Defining Your Own Translations
Translating the user experience of S-Docs is simple. Currently, only Spanish and German translations are available to download; this process is explained in the next section. If you want to define your own translations, you can do so on the S-Docs translation page. If you are using S-Docs 4.381+, navigate to this page by clicking the App Launcher, typing in "S-Docs Setup," and clicking S-Docs Setup in the dropdown menu. From there, scroll down to the Translate UI section and click Go To S-Docs UI Translation Page.
![]()
If you are using a version of S-Docs below 4.381, the S-Docs Translation page can be accessed by adding the following URL after "salesforce.com" in your browser:
[code lang="html"]/apex/SDOC__SDConfig?translateSDocs=true[/code]
The S-Docs translation page appears as follows:
![]()
If you've defined translations for a language on this page before, you'll be able to [1] choose a language and [2] edit the translations for that language. If you haven't accessed this page before, you'll need to [3] enter the name of a language and then [4] click Define new translations for this language to bring up a list of available S-Docs fields that you can translate.
![]()
Translation options are [1] broken up into different sections. The following S-Docs pages can be translated on this page:
- The Generate Documents page (where templates are selected and generated)
- The Edit Document page (where generated documents can be edited using the Live Edit feature)
- The Send Email page
- The Contact Lookup window (this appears when users click inside of the Contact/User Lookup field on the Send Email page)
- The Attach Files window (this appears when users click Attach or Remove Files on the Send Email page)
- The Upload Files tab within the Attach Files window
[2] The English version of each field that can be translated appears on the left. You can translate the text in the text box on the right. Make sure to [3] click Save when you are done entering your translations.
Using S-Docs Translation Templates
1. Import The Template
To use the translations we provide, begin by importing either the Spanish or German translation template. To do this, create a new template. You can set whatever values you want for "Related to Type" and "Template Format," as these will be overwritten when you import the translation template.
![]()
Navigate to the template editor and paste in the code from one of the links below, then click Save & Close.
Spanish: S-Docs Translation Spanish v2.955
German: S-Docs Translation German v2.955
![]()
![]()
Once you click Save & Close, the template record should look like this.
![]()
Notice that Available for Use and Initially Visible have been unchecked, since this isn't a template that can be used for document generation; it's simply providing the translation for the S-Docs user experience.
2. Add The Translation Parameter To Your S-Docs Button
Next, you need to add the following parameter to the S-Docs button for each object you're using S-Docs with (replace Spanish for German if using the German translation):
[code lang="html"]UILanguage='Spanish'[/code]
In this example, we'll add it to the S-Docs button for the Contact object. Navigate to Setup by clicking the cog in the upper right corner of your screen, then go to the Object Manager tab. Click your object.
![]()
Then, navigate to the Buttons, Links, and Actions tab. Find your S-Docs button and click Edit.
![]()
Add the parameter to your button.
[code lang="html"]{!URLFOR('/apex/SDOC__SDCreate1', null,[id=Contact.Id, Object='Contact',
UILanguage='Spanish'])}[/code]
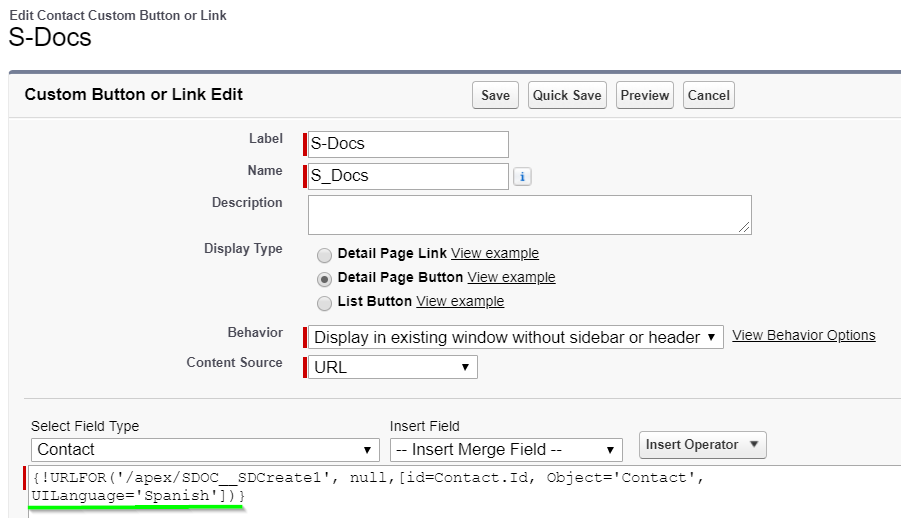 Click Save and you're all set! The S-Docs user experience will now be translated.