Navigate to the S-Sign Configuration Page
The S-Sign Configuration page provides you with a number of administrative configuration options for S-Sign, including licensing information and Salesforce site configuration. This article will go over each setting on this page. For more information on S-Sign template-level configurations, please view the S-Sign Template Settings.
If you are using S-Docs 4.381+, the S-Sign Configuration page can be accessed through the S-Docs Setup page (App Launcher > S-Docs Setup > Go to S-Sign Setup Page).
If you are using a version of S-Docs below 4.381, the S-Sign Configuration page can be accessed through one of the following links:
[Production]: https://login.salesforce.com/apex/SSIGN__SSConfig">https://login.salesforce.com/apex/SSIGN__SSConfig
[Sandbox]: https://test.salesforce.com/apex/SSIGN__SSConfig">https://test.salesforce.com/apex/SSIGN__SSConfig
The S-Sign Configuration page appears as follows:
S-Sign Licensing Page
The first section of the S-Sign Configuration page is where your S-Sign license key data is housed, as well as where you assign/remove licenses from your users. Click Go To S-Sign License Page to be routed to the S-Sign license page, which is shown below.
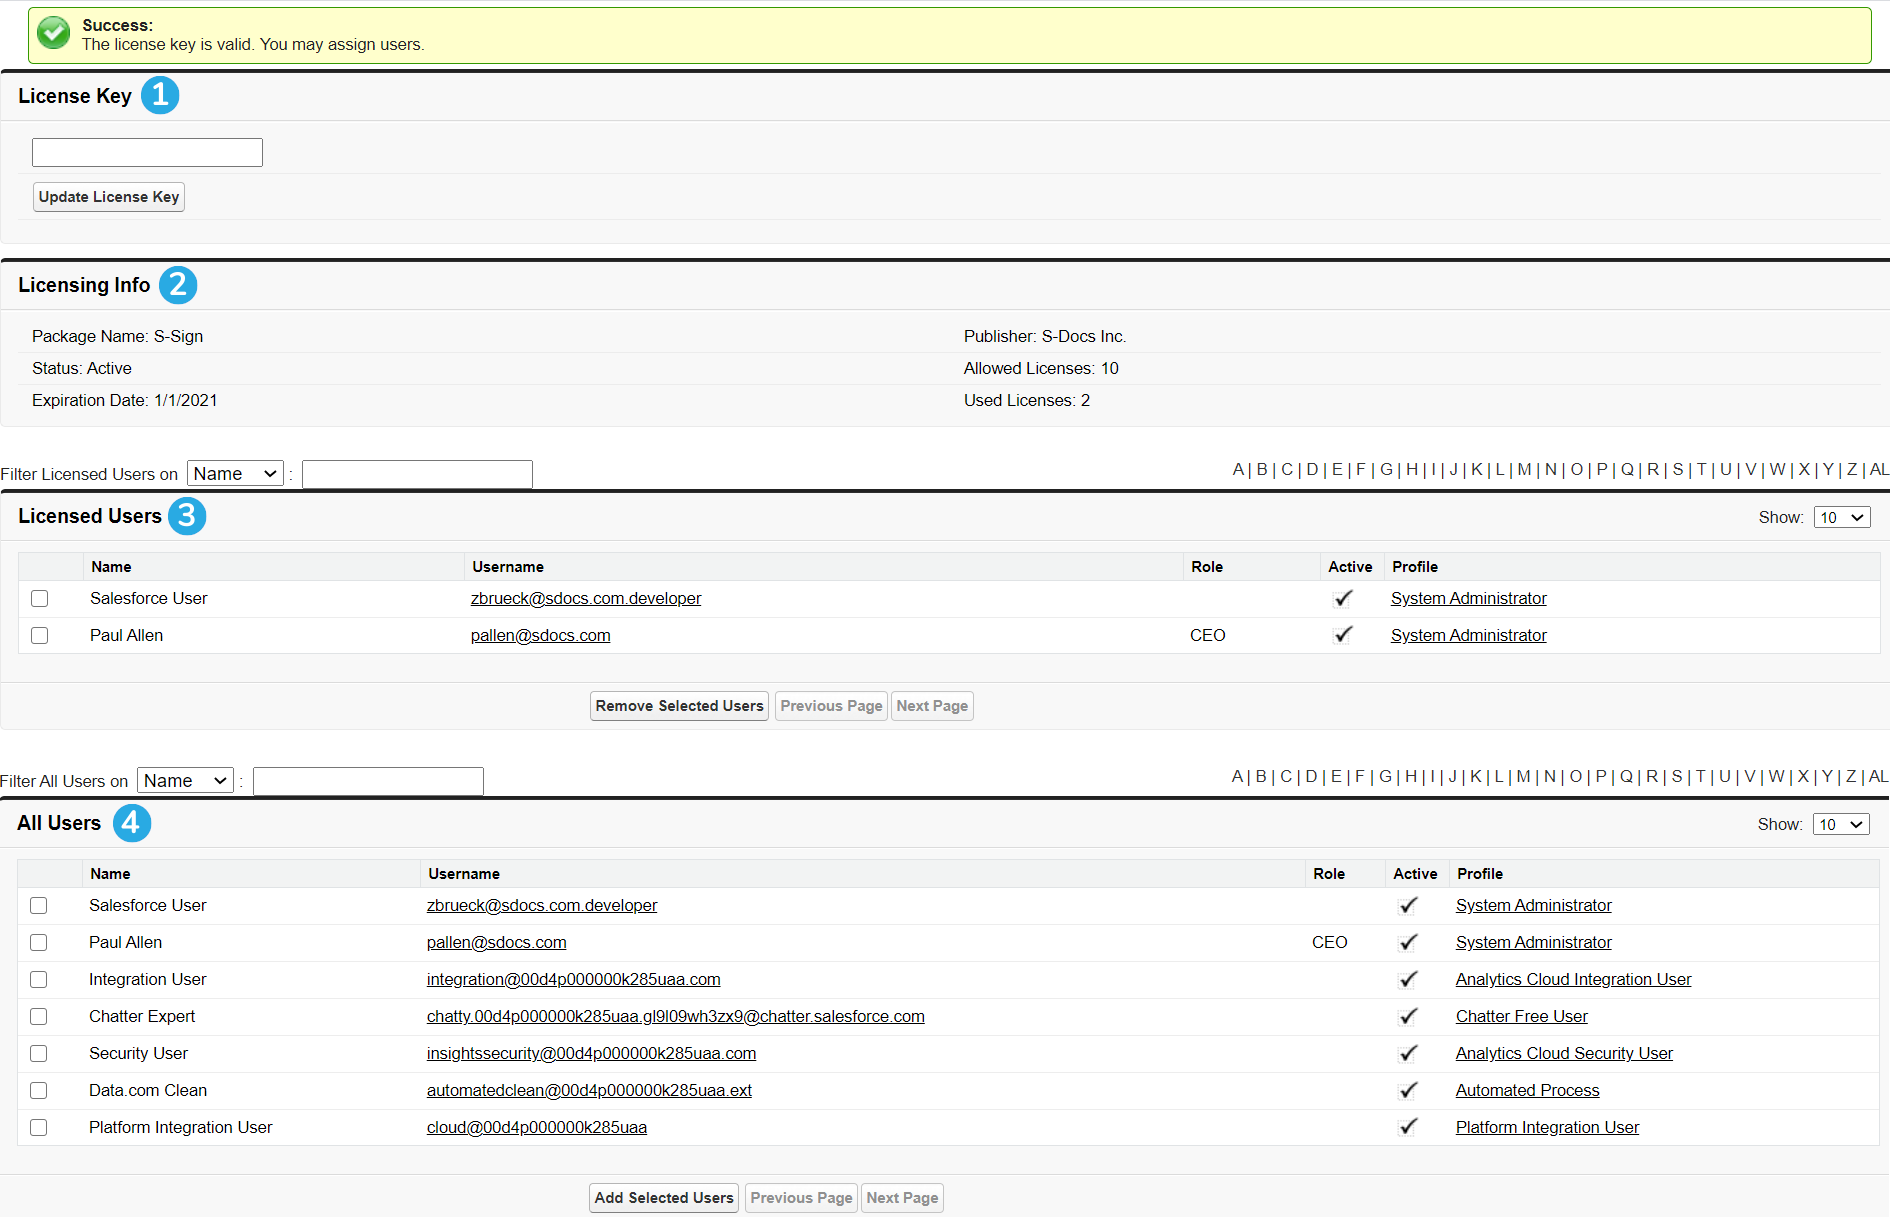
The S-Sign license page allows you to:
[1] Enter your license key for the first time, or update your license key
[2] View your org's license information, including the expiration date, total license count, and how many licenses have been used
[3] View which users have been assigned licenses, as well as remove them
[4] Assign licenses to additional users in your org
For more information about assigning S-Sign licenses, click here.
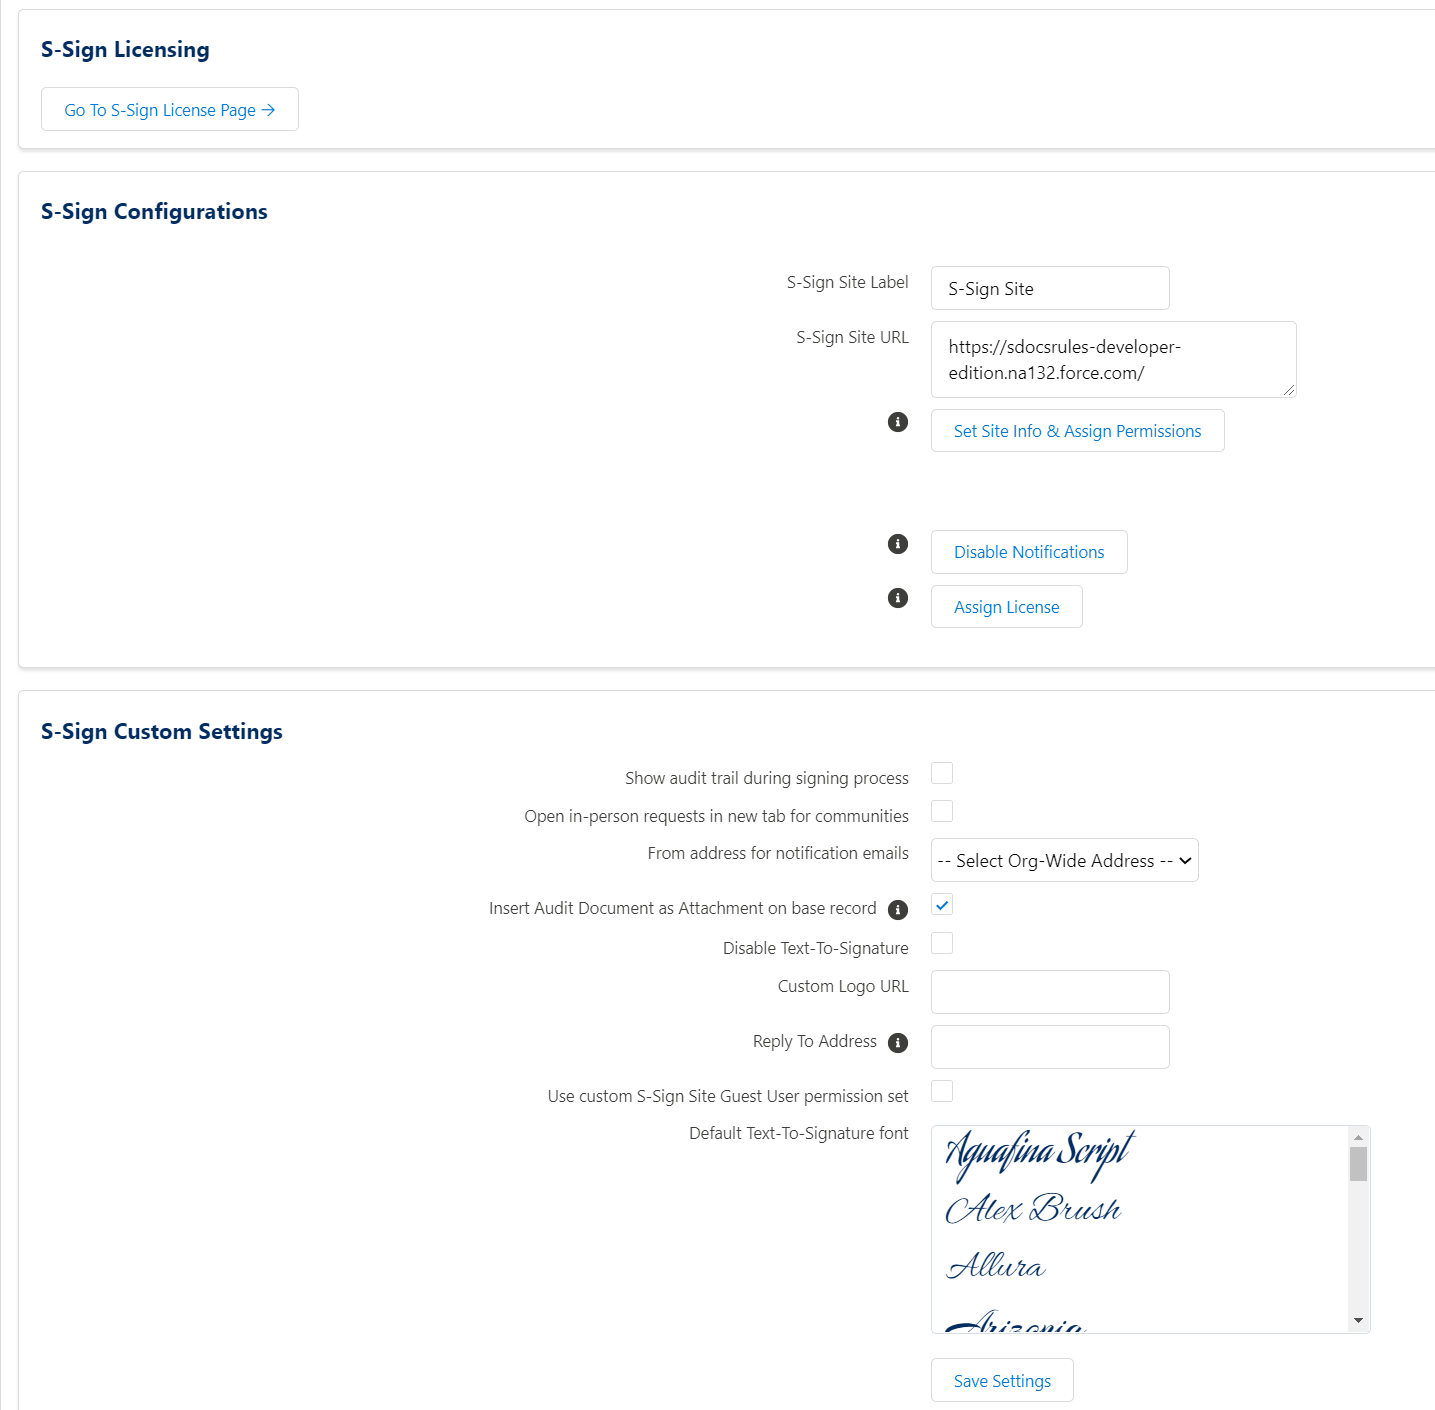
S-Sign Configurations
The S-Sign Configurations section appears as follows:
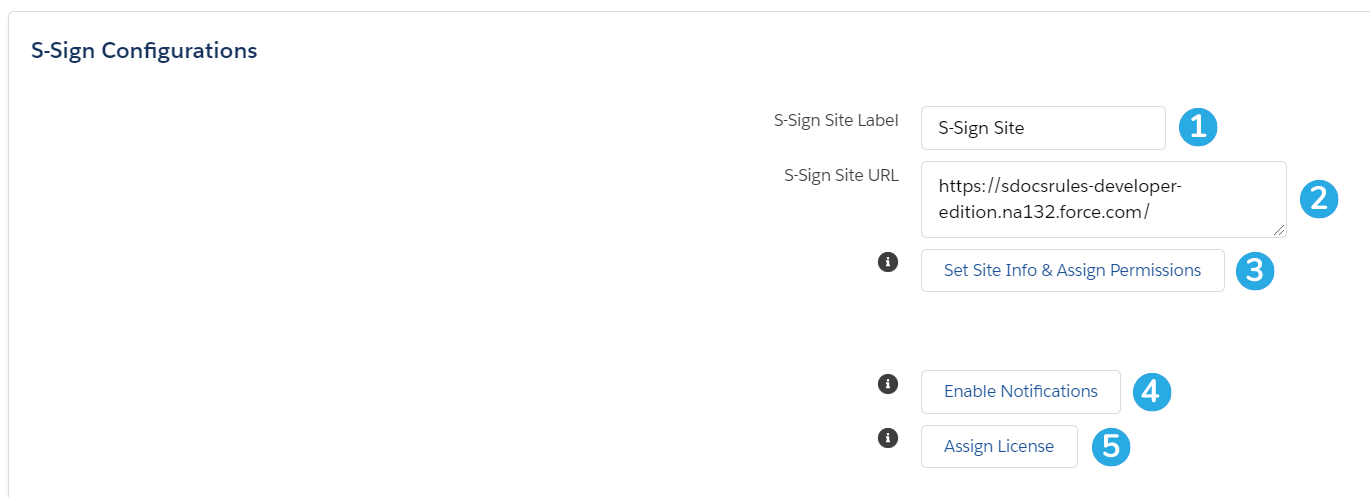
This section allows you to:
[1 & 2] Provide S-Sign with the Site Label and Site URL of the Salesforce site that you created during the initial configuration of S-Sign. These fields are automatically populated with this information when you create your S-Sign site, but you should still copy and paste your Site Label and Site URL here to ensure that they match. Click here for more information about ensuring that these values are correct.
[3] Confirm your Salesforce Site information and assign the S-Sign Guest User permission set. This is all completed in the background when you click the button.
[4] Enable reminder and expiration emails for your e-signature requests (these are disabled by default). You can configure expiration and reminder settings at the template level within the S-Sign template settings menu.
[5] Assign an S-Sign license to your S-Sign Internal User, if one has not already been assigned. Learn more about the S-Sign Internal User here.
S-Sign Custom Settings
The S-Sign Custom Settings section appears as follows:
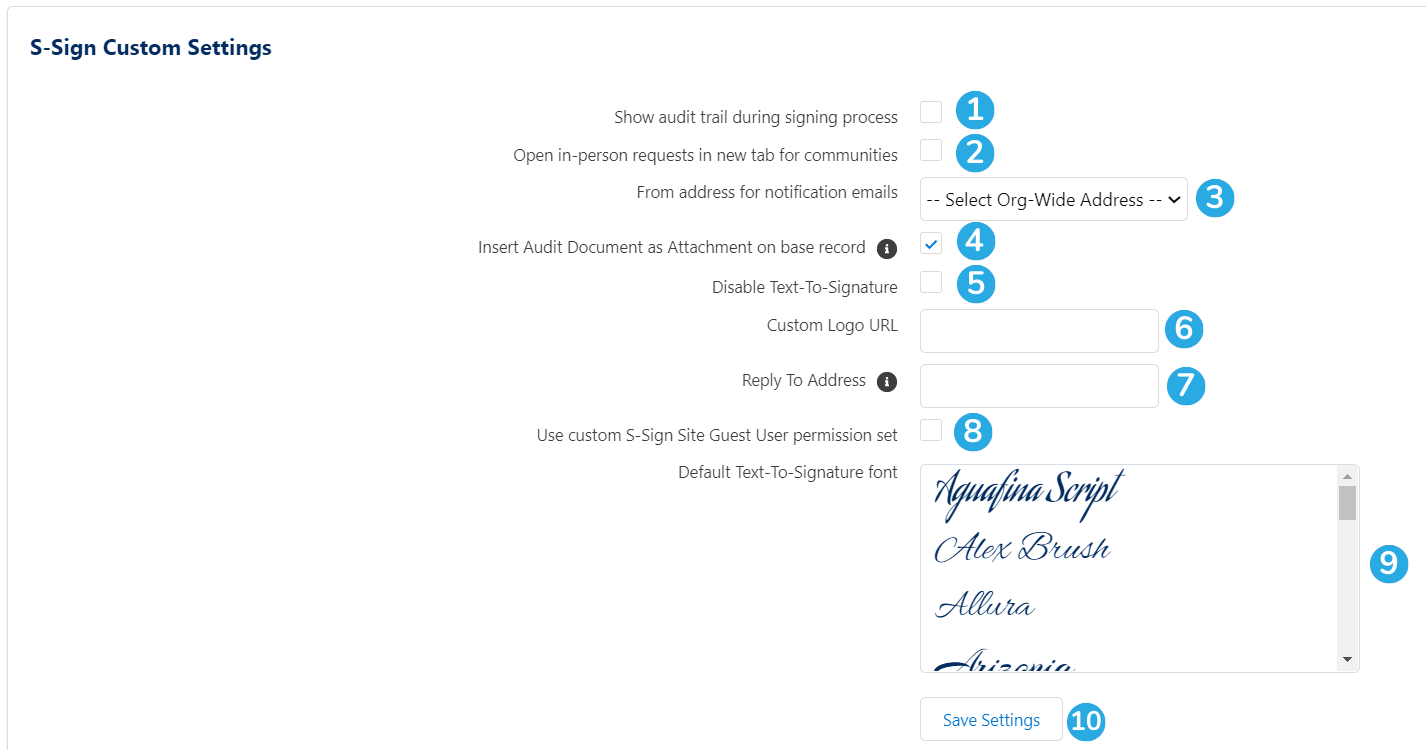
This section allows you to:
[1] Display the S-Sign Audit Trail to each person who signs a document. By default, the audit trail is appended to the signed document after all signers have signed. Checking this box will display the audit trail throughout the signing process. For example, signer 2 will receive the document with an audit trail that includes details from signer 1, signer 3 will receive the document with an audit trail that includes details from signers 1 and 2, and so on.
[2] When using S-Sign with Salesforce Communities, open all Sign In Person requests in a new tab
[3] Select an org-wide email address as your email alias for all S-Sign notification emails.
[4] Insert the signed document with the audit trail as an attachment on your base record. By default, the signed document with the audit trail is saved as a Salesforce file on the S-Sign Envelope Document record, and then linked to the base record using ContentDocumentLink. This option will save the document as an attachment on the S-Sign Envelope Document record, and then save a cloned version of the attachment to the base record.
[5] Prevent signers from using the text-to-signature feature. This will require them to draw their signature.
[6] Replace the S-Sign logo with your organization's logo throughout the signing process (including the security verification splash screen and the S-Sign toolbar that appears at the bottom of the screen when users are signing a document).
[7] Specify the reply-to email address for all S-Sign emails. This field accepts any valid email address. If left blank, the reply-to email address for all S-Sign emails will be automatically set to the email of the user sending the request.
[8] Use a custom permission set for the S-Sign Site Guest User, in place of the permission set that is automatically assigned when you click Set Site Info & Assign Permissions in the S-Sign Configurations section of this page.
[9] Select a default font to use for for the text-to-signature feature.
[10] Save your settings.
For more information about configuring and customizing S-Sign, please visit our S-Sign General Configuration page.