Available in: S-Docs 4.381+
In This Article:
Introduction
The S-Docs Setup page provides quick access to a number of different S-Docs administrative settings. This article will describe the functionality of each section on this page.
Locate S-Docs Setup
To navigate to the S-Docs Setup page, click the App Launcher in the upper left corner, type "S-Docs" into the search field, then click S-Docs Setup.
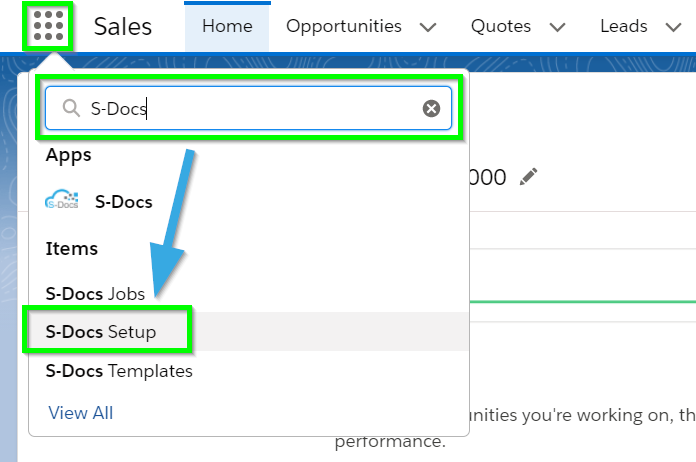
S-Docs Setup Sections
This article will now go over each section of the S-Docs setup page in detail.
S-Sign Setup
The S-Sign Setup section appears as follows.
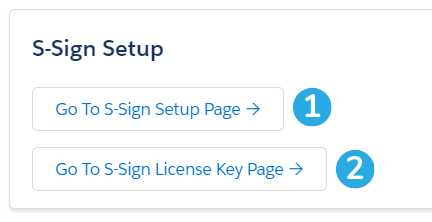
[1] Go To S-Sign Setup Page: This button routes to the S-Sign Configuration Page, which contains a number of administrative configuration options for S-Sign including Salesforce Site information, email notification options, Guest User licensing, and more. Click here to learn more about the S-Sign Configuration Page.
[2] Go To S-Sign License Key Page: This button routes to the S-Sign License Key Page, where you can input and update your S-Sign license key and assign/remove user licenses. Click here to learn more about the S-Sign License Key Page.
S-Docs License Key
The S-Docs License Key section appears as follows.
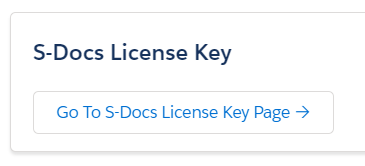
Go To S-Docs License Key Page: This buttons routes to the S-Docs License Key Page, where you can input and update your S-Docs license key. Click here to learn more about installing S-Docs license keys and assigning licenses.
Migrate S-Docs & S-Sign Templates
The Migrate S-Docs & S-Sign Templates section appears as follows.
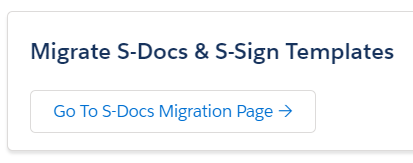
Go To S-Docs Migration Page: This button routes to the S-Docs Template Migrator, which allows you to import or export S-Docs templates between different Salesforce orgs. Click here to learn more about the S-Docs Template Migrator.
Translate UI
The Translate UI section appears as follows.
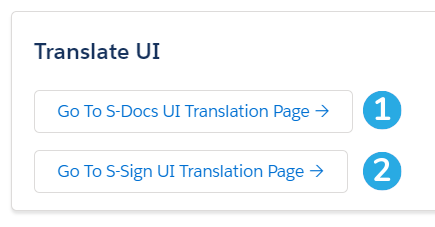
[1] Go To S-Docs UI Translation Page: This button routes to the S-Docs UI Translation Page, which allows you to create your own translations for the S-Docs end-user experience. Click here to learn more about the S-Docs UI Translation Page.
[2] Go To S-Sign UI Translation Page: This button routes to the S-Sign UI Translation Page, which allows you to translate the S-Sign end-user experience. Click here to learn more about the S-Sign UI Translation Page.
Other Pages
The Other Pages section appears as follows.
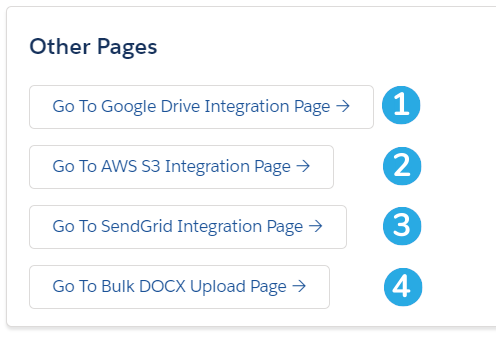
[1] Go To Google Drive Integration Page: This button routes to the Google Drive Authentication Page. For full instructions on configuring the S-Docs & Google Drive integration, click here.
[2] Go To AWS S3 Integration Page: This button routes to the Amazon S3 Configuration Page. For full instructions on configuring the S-Docs & AWS integration, click here.
[3] Go To SendGrid Integration Page: This button routes to the SendGrid Configuration Page. This page allows you to enter your SendGrid API key for secure emailing.
[4] Go To Bulk DOCX Upload Page: This button routes to the Bulk DOCX Upload Page, which allows you to bulk-upload DOCX files and create an S-Docs template for each file. To learn more about the Bulk DOCX Upload page, click here.
Other Settings
The Other Settings section appears as follows.
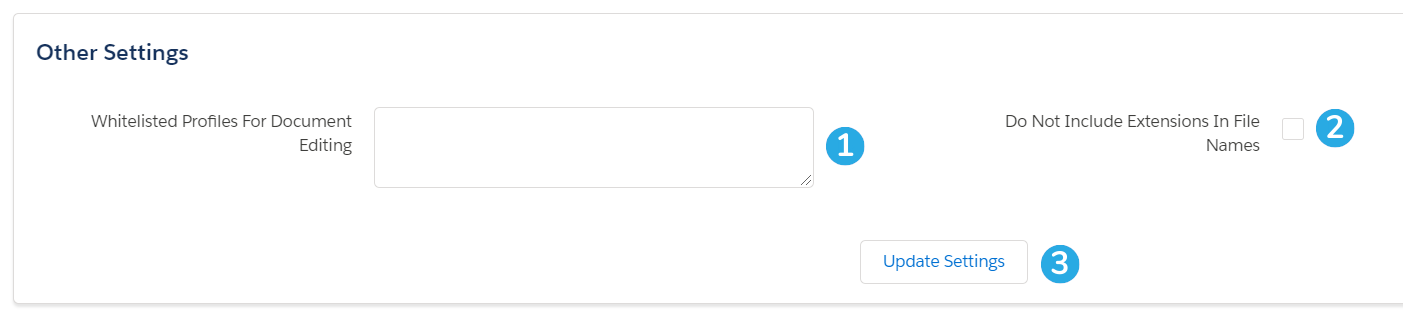
[1] Whitelisted Profiles for Document Editing: This field allows you to list user profiles that should have access to the Live Edit feature (enabled for all users by default). Click here to learn more about this field.
[2] Do Not Include Extensions in File Names: When you check this box, S-Docs saved as Salesforce Files will not include the file extension name in the File's Title field.
[3] Update Settings: Click this button to update the settings in this section.