Check The "Allow Edit" Checkbox
If you find yourself in need of editing a document after it’s been generated, no worries! The S-Docs Live Edit feature enables end-users to open and edit generated documents wherever they're linked in Salesforce.
Note: This feature is only available for PDF, PDF-Upload, HTML, and DOC templates.
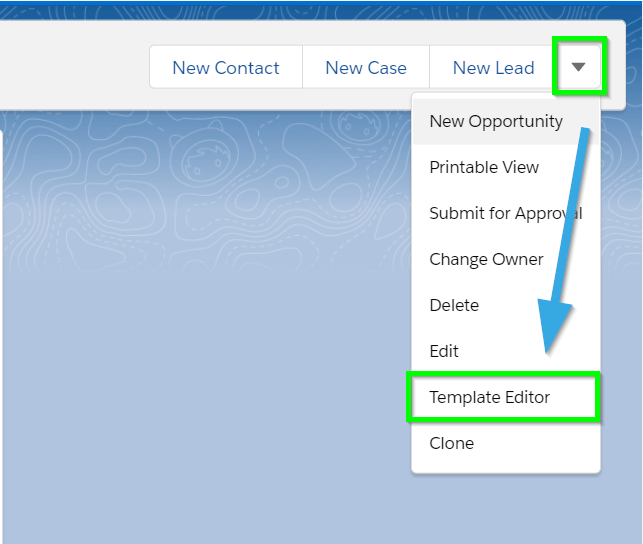
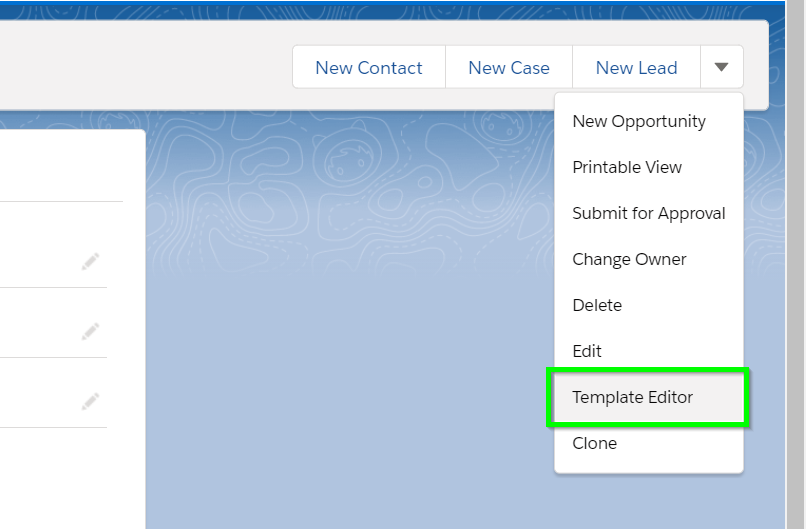
To enable this feature, navigate to the template record detail page for the template that should be editable after generation. Click the dropdown arrow on the right, and then click Template Editor to open up the S-Docs template editor.
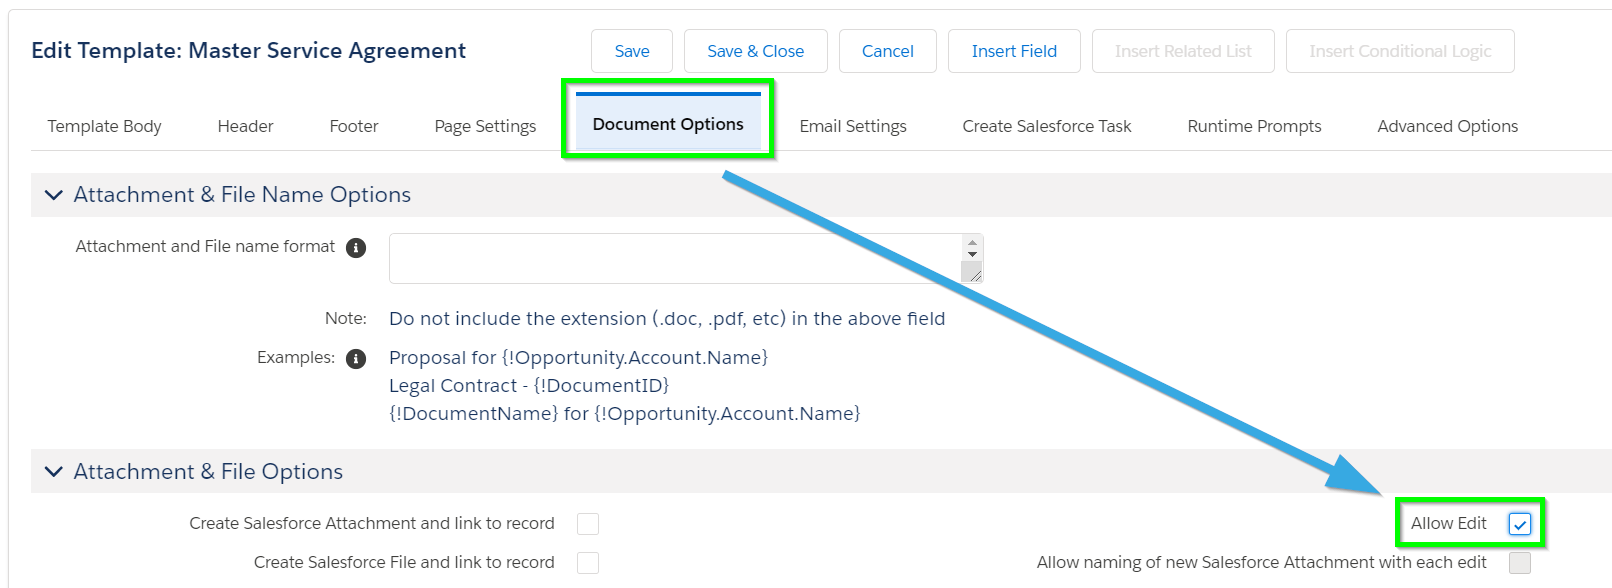
Navigate to the Document Options tab, then check the Allow Edit checkbox, which can be found under the Attachment & File Options section.
After you save your template, an edit link (a pencil icon) will appear next to the document each time it is generated.
Note: If you are using S-Docs version 4.325 or below, the Allow Edit checkbox will not be available within the template editor. It will instead be available as a field on the template creation page & template detail page.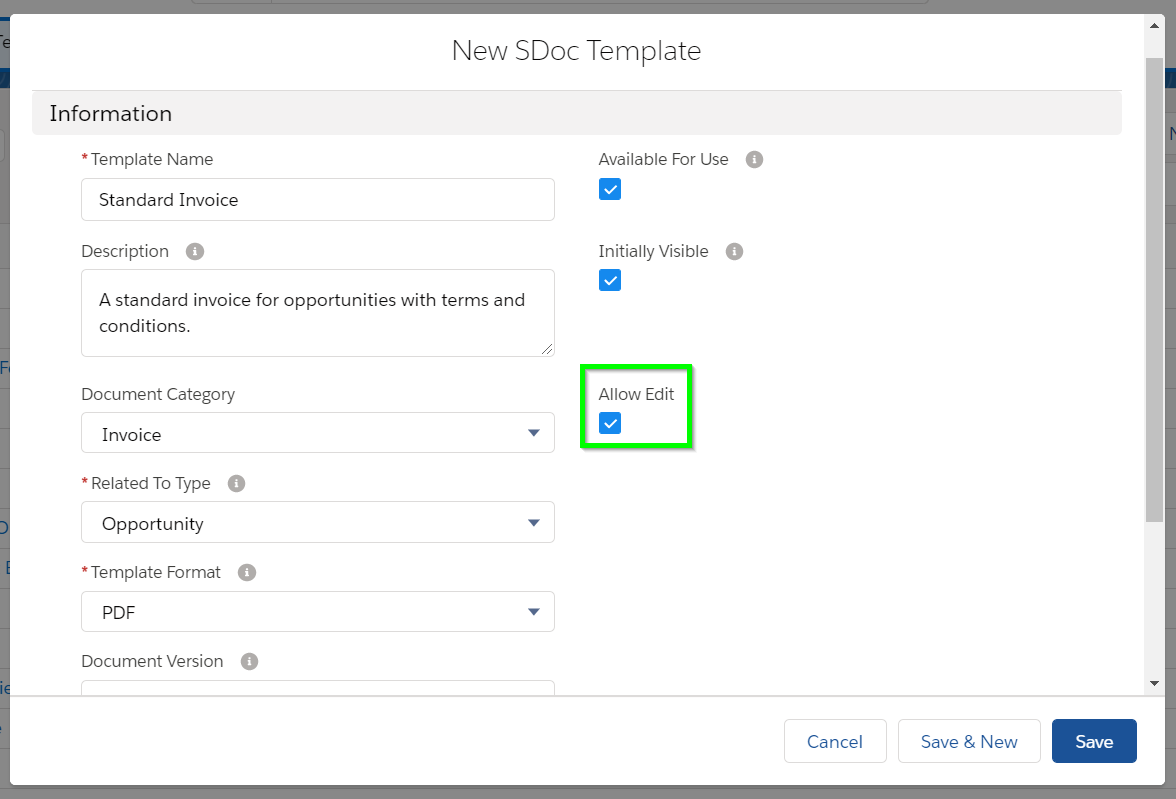
Generate and Edit A Document
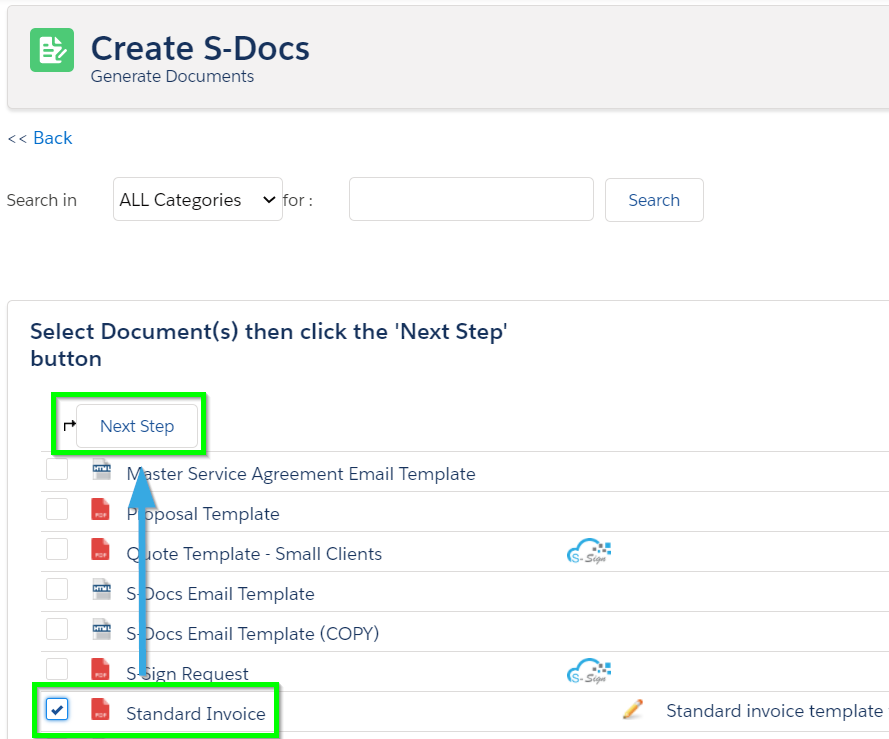
In this example, we’re going to generate an invoice from an Opportunity. The process is the same as any other document generation. We’re going to select the “Standard Invoice” document and then click Next Step.
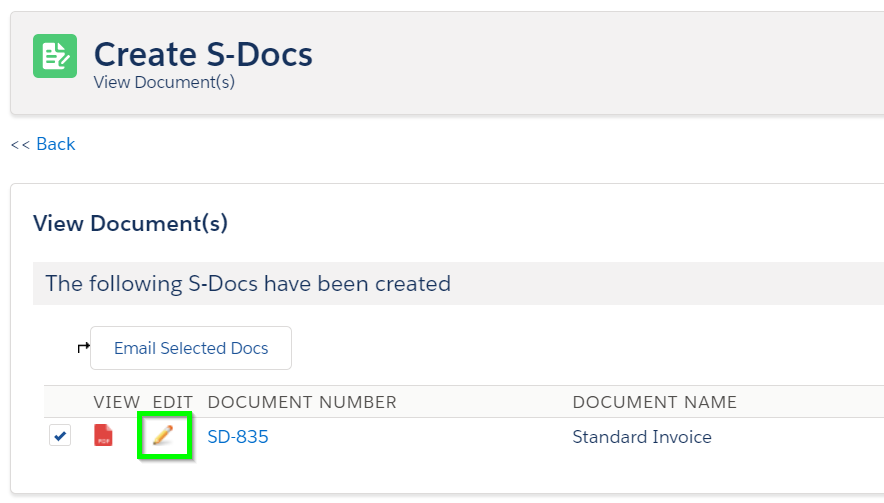
Once your document is generated, you can edit it by clicking the pencil icon. You can also click Emailed Selected Docs to proceed to the email page and make your edits from there, or find the document in the S-Docs related list on the record that you generated the document from. The pencil icon will appear wherever this document is stored in Salesforce, allowing you maximum editing flexibility. We'll click the pencil icon now.
The live edit screen will appear as follows in a new tab:
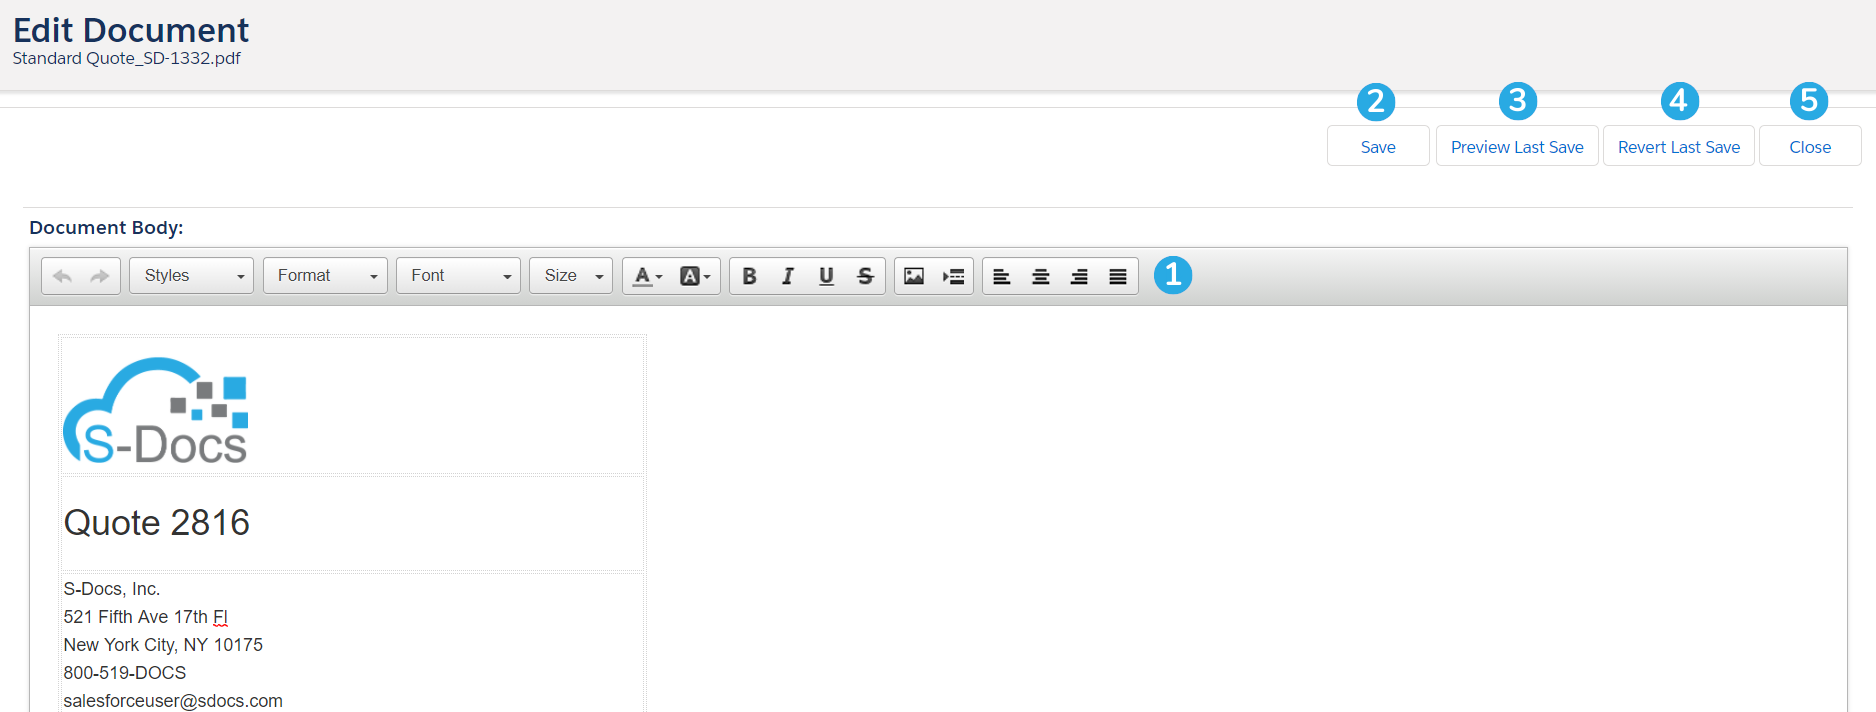
You can [1] make edits to your document and use the toolbar to apply styling. [2] Click Save to save your changes, and then [3] click Preview Last Save to preview how your changes will appear in the final document.
Note: If you click the Preview Last Save button before saving, it will display your document without your edits.
If you're not happy with your edits, [4] click Revert Last Save to undo your changes. [5] Click Close to close the edit window and return to the page you started from (in this case, the generated documents page).
That's all there is to it!
Whitelist Profiles for Live Edit
By default, all users with S-Docs licenses enabled are able to edit documents that have the live edit feature enabled. However, you can also disable live editing for all users by default and allow only specific profiles to use the feature.
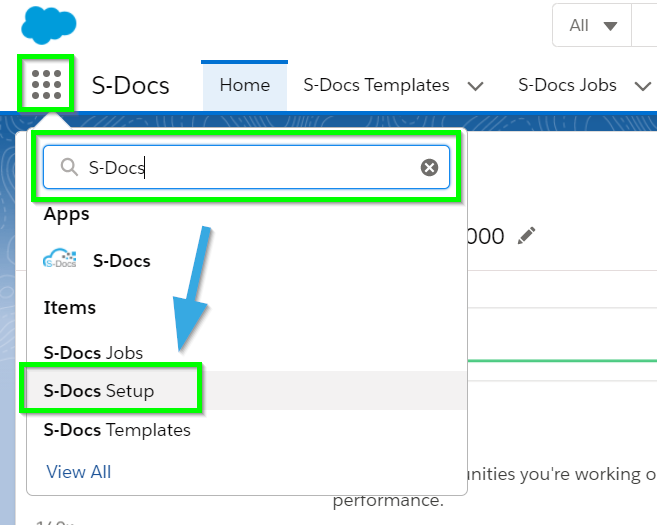
To do so, navigate to the S-Docs Setup tab by clicking the App Launcher, typing in "S-Docs," and clicking S-Docs Setup in the dropdown menu.
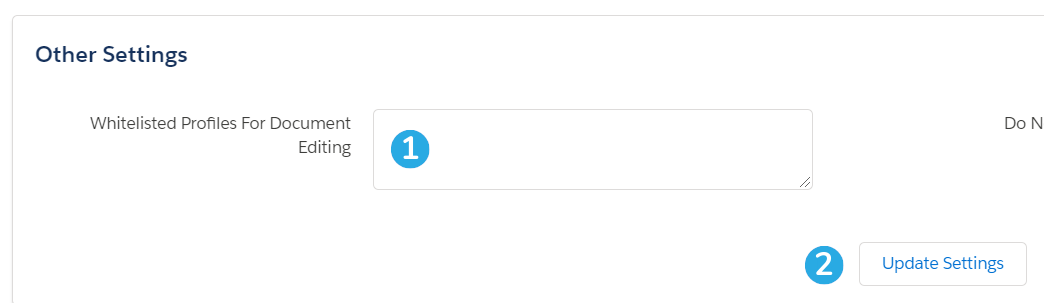
Scroll down to the Other Settings section. From there, you can [1] enter a new-line delimited list of profile names that should have access to live editing. Then, [2] click Update Settings. Only users with profiles in the list will be able to live edit documents.
Limitations
While the Live Edit feature is convenient way to modify documents after they have been generated, it does come with a few limitations.
- PDF, PDF-Upload, HTML, and DOC are the only file output types supported.
- Editing cannot be restricted to certain sections of the document; the Live Edit feature gives users access to edit the entire document (except for PDF-Upload templates. With this format, only merged field data can be edited).
Introduction
This document will teach you how to create your first S-Docs template and navigate to the template editor. Since S-Docs is 100% native to Salesforce, creating your first template is a simple process. Any records you create using S-Docs will be stored within the Salesforce cloud. To learn more about the S-Docs template editor, click here. To view the S-Docs template library, which contains free and easy-to-customize downloadable templates, click here.
You can also watch the following video for a more comprehensive tutorial that goes over the different elements of the template editor and how to design a simple quote template.
Video Tutorial
Written Instructions
Create A New Template
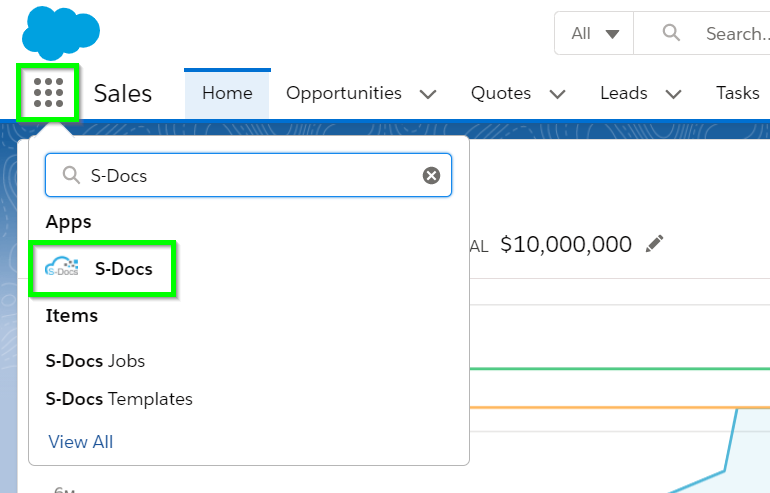
To begin, navigate to the S-Docs app by clicking the App Launcher in the upper left corner, and then selecting S-Docs.

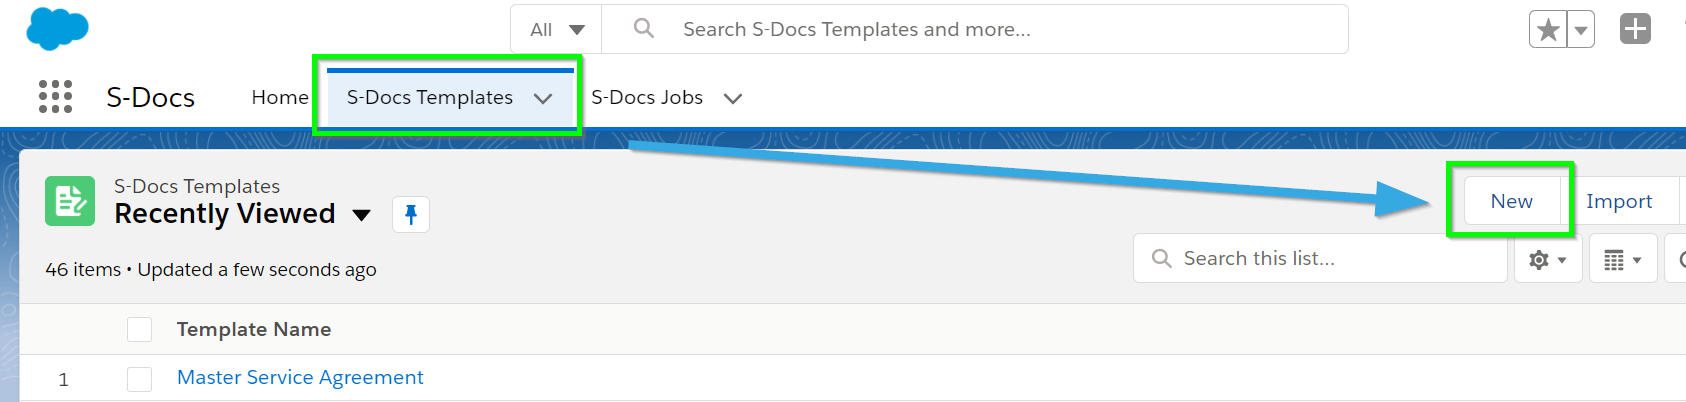
Click over to the S-Docs Templates tab. This page will display all of the templates you create. To create a new one, click New.

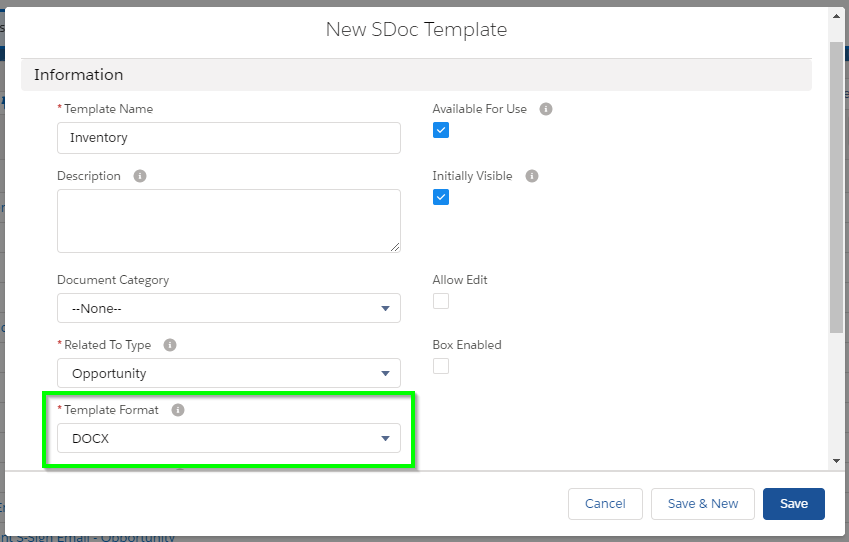
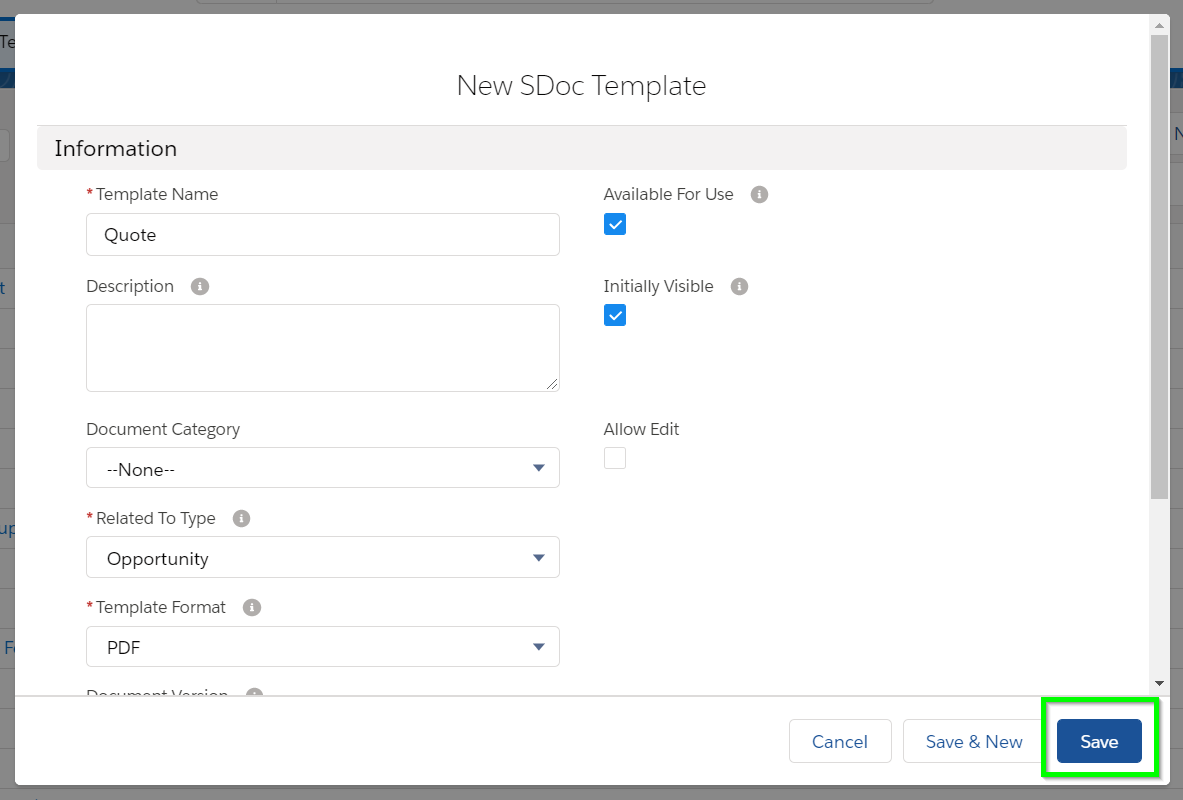
This will bring up the initial template creation page (not the template editor). To get started quickly, you only need to complete the fields indicated with a red asterisk, and then click the Save button. In this example we will create an opportunity summary sheet from the "Opportunity" object, but you can enter any values you want. All of the fields are explained below.
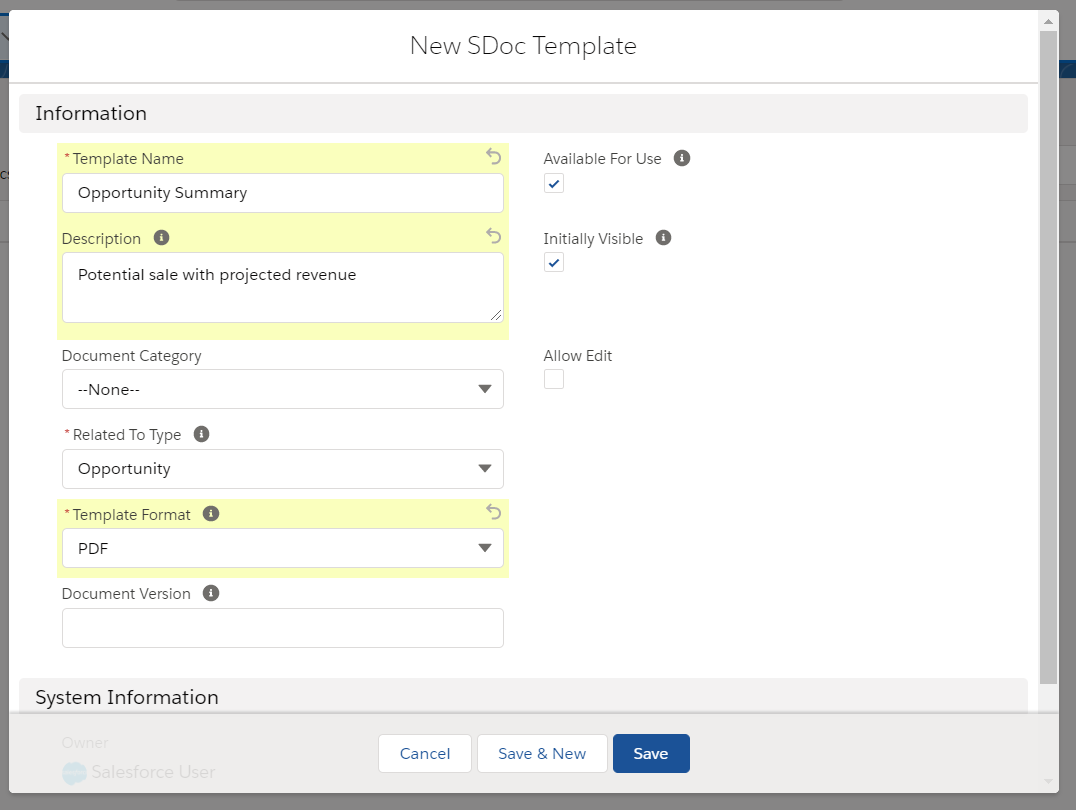
Template Name: Enter a template Name. This field is required.
Description: Optionally add a description. You should include any keywords that will be useful when searching for this template, because this field and the name field are searched during the document selection step. End users will see this field in the template listings.
Document Category: Optionally chose a category from the picklist. Templates can be grouped together so that a user can browse templates by using a category picklist. If needed, you can later customize this picklist.
Related to Type: Pick an object from the picklist. This is the base or primary object this template will use. If needed, you can customize this list with your custom objects. This field is required.
Template Format: Pick an output format. To support the same document in multiple formats, simply clone the template with a different "Format" field value. This field is required.
Document Version: Use this field to track any internally used version number (or date) for this template. It is only used for reference purposes.
Available for Use: Keep this box checked (it is checked by default). This ensures that the template is visible for new document creation.
Initially Visible: Keeping this box checked (it is checked by default) will make this template visible on initial load of the document creation page based on the object type. Typically, you want to set this checkbox for the 10 most used templates for each object type.
Allow Edit: If you want users to be able to edit this document after it has been generated, check this box. Read more about this feature.
Once you've filled in all of the values to your specifications, click Save. You will be redirected to the template detail record.
Use The Template Editor
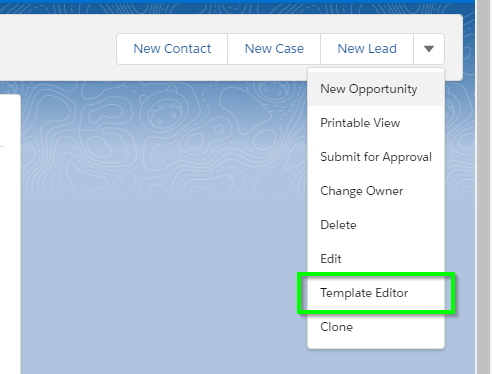
From the template detail record, click the dropdown arrow in the top right, then select Template Editor to design your template.
This is a very basic overview of the template editor. For a more in-depth explanation, click here.
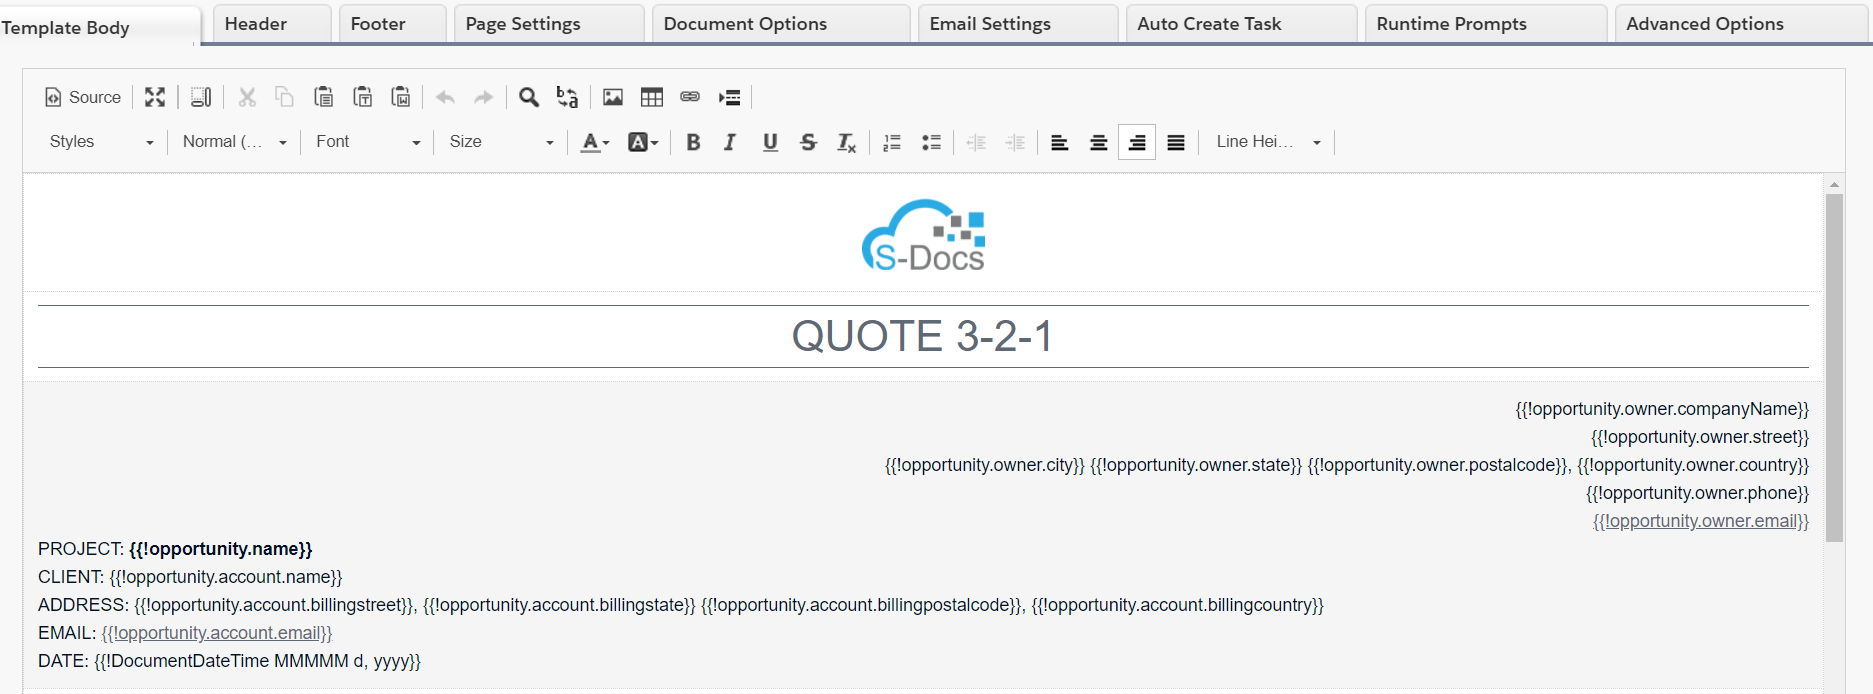
This is the WYSIWYG template editor (What You See Is What You Get). Add some text, place the cursor where you want your Salesforce record data to be merged into the template, and then click on the Insert field button.
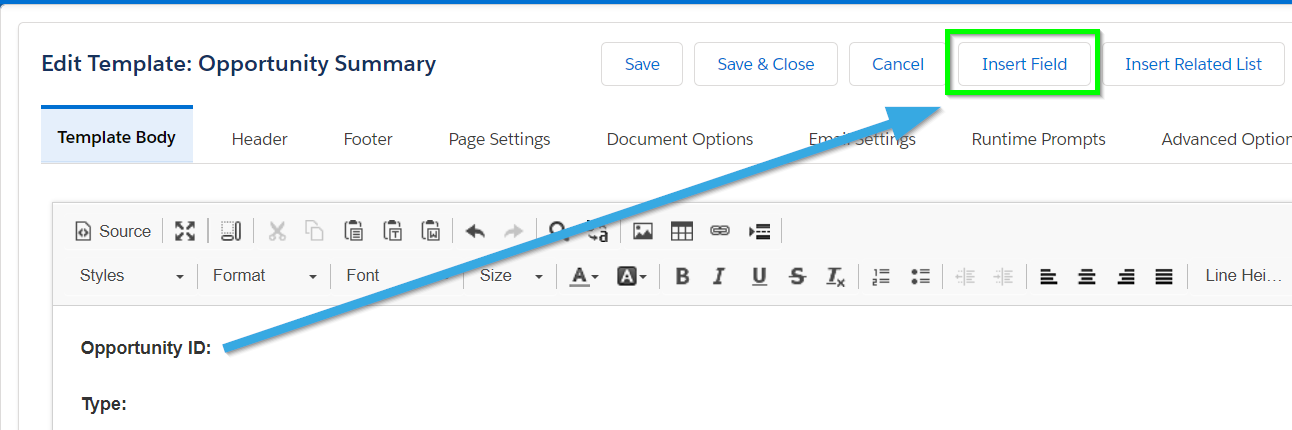
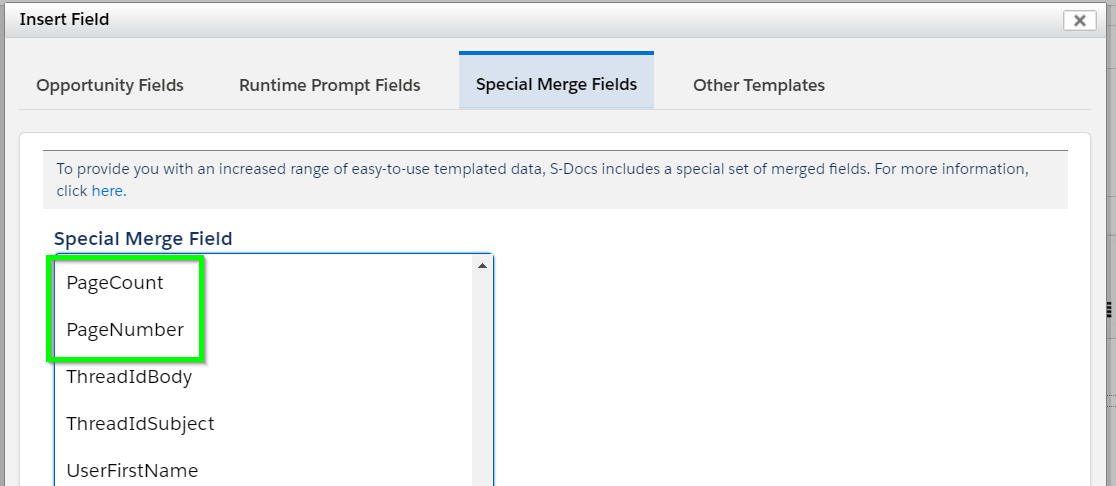
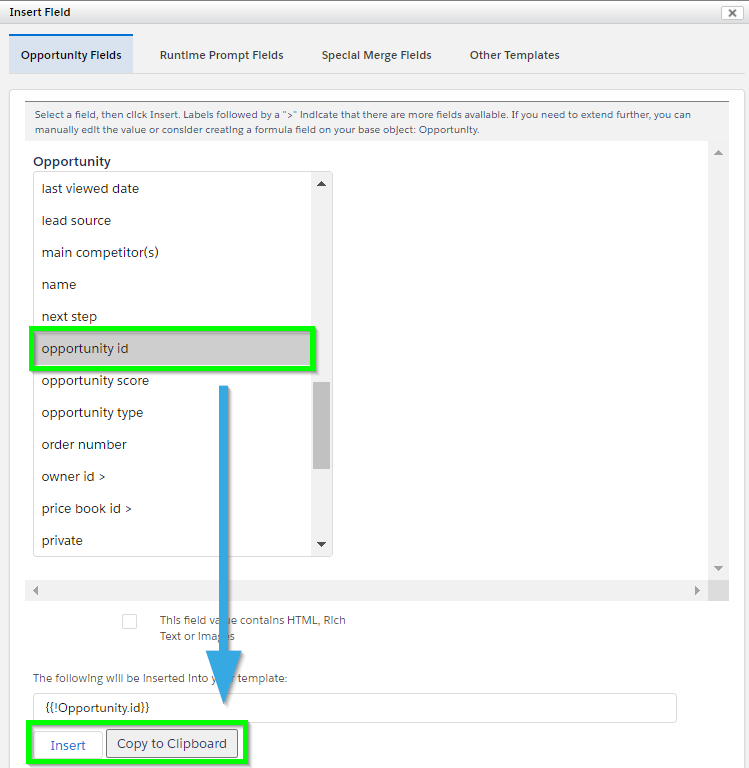
Select the field you want to insert and click Insert. The editor will add the merge field in the correct syntax into the template editor.
Repeat the above step for other fields. You can also use the editor tools to modify the document. Or, click Source to view the HTML and add your own styles. The customization options are endless. Click Save when done.

You have now created your first template.
Note: You can also insert images, span related objects and create child object line items and add CSS stylesheets. The possibilities are endless!
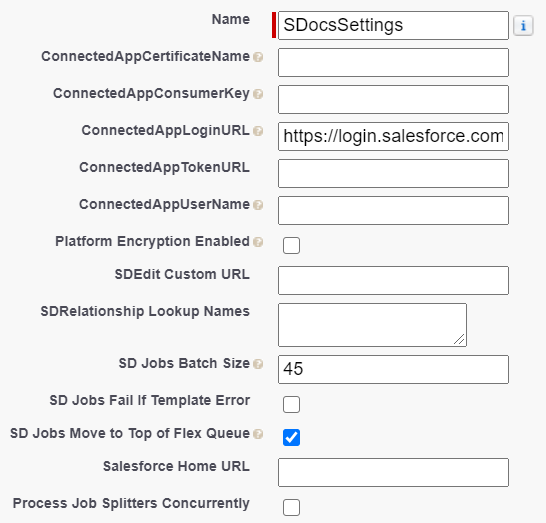
Winter '20 Release Note: If you are using S-Docs below version 4.53, you may experience an "Attempt to de-reference a null object" error when interacting with various forms of automation in S-Docs. In order to fix this bug, you can create a new SDocs Settings custom settings set. To do this, type "Custom Settings" into the Quick Find / Search bar in the Setup menu, and click Custom Settings. Click SDocsSettings, then click Manage at the top of the page. From there, click New. Fill out the following information:
Name: SDocsSettings
ConnectedAppLoginURL:
Production: login.salesforce.com
Sandbox: test.salesforce.com
SD Jobs Batch Size: 45
SD Jobs Move to Top of Flex Queue: ☑
Additionally, ensure that you have a Remote Site Setting for either login.salesforce.com (production), or test.salesforce.com (sandbox).
Generating automated emails with S-Docs Jobs is simple, and using the Process Builder is the quickest approach. For information on automation and batch processing, click here.
Video Tutorial
The following video will go over 2 examples:
- Auto-sending a welcome email to new clients
- Auto-sending an invoice for won opportunities.
You can also refer to the written instructions below the video for a similar example.
Auto-Generating A Welcome Email For New Contacts
In this example, we will generate an email welcome letter whenever a contact is created by using an S-Docs Job in a Salesforce Process. We'll use 2 templates for this process: an HTML template to fill out the body of the email, and a PDF template for the welcome letter that will be attached to the email. Make sure you specify an email address in the Email Settings tab of the HTML template; typically, you'd want to put {!contact.email} in the recipient field so that when this process is invoked, the email address is automatically specified for each unique contact created. Click here to learn more about creating email templates.
Before you begin, note the names of your templates, as you will need them later.
Note: You can also use a template's ID in place of a template's name for the "doclist" parameter. However, template IDs will change from sandbox to production orgs, so we recommend using the template names if possible. Keep in mind that if there are multiple templates in your org with the same name, all of them will generate if one of them is referenced by your process.
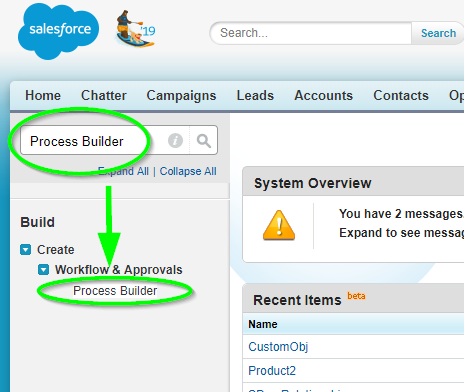
Create A New Process In Process Builder
Navigate to Setup > Build > Create > Workflow & Approvals > Process Builder and create a new Process by clicking New.
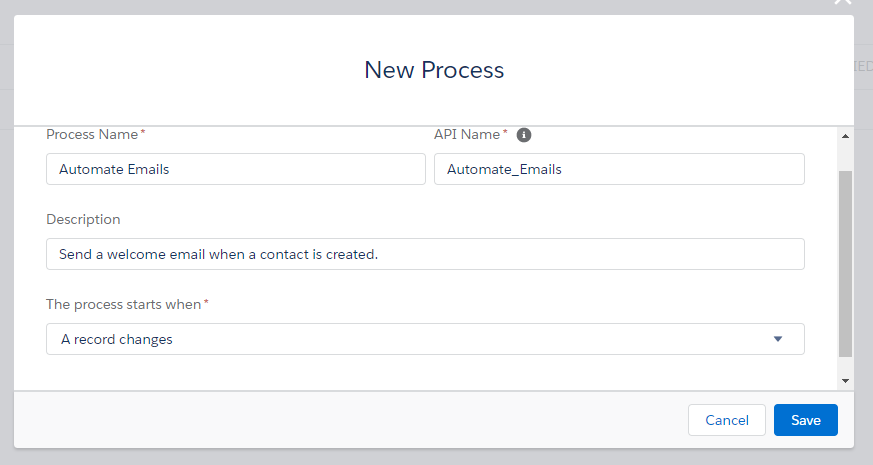
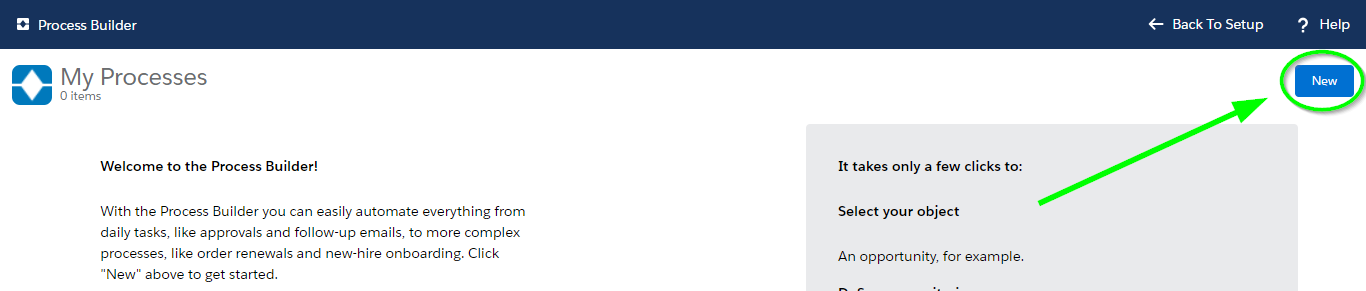 Fill in a name and optionally a description for your process. Choose to start the process when "A record changes." Click Save.
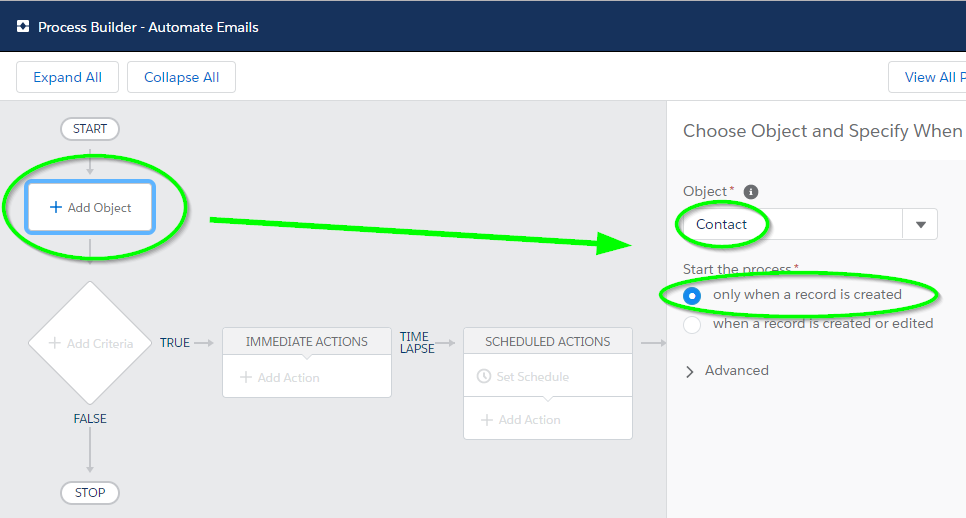
Add Your Object
Click Add Object, choose Contact, and start the process only when a record is created.
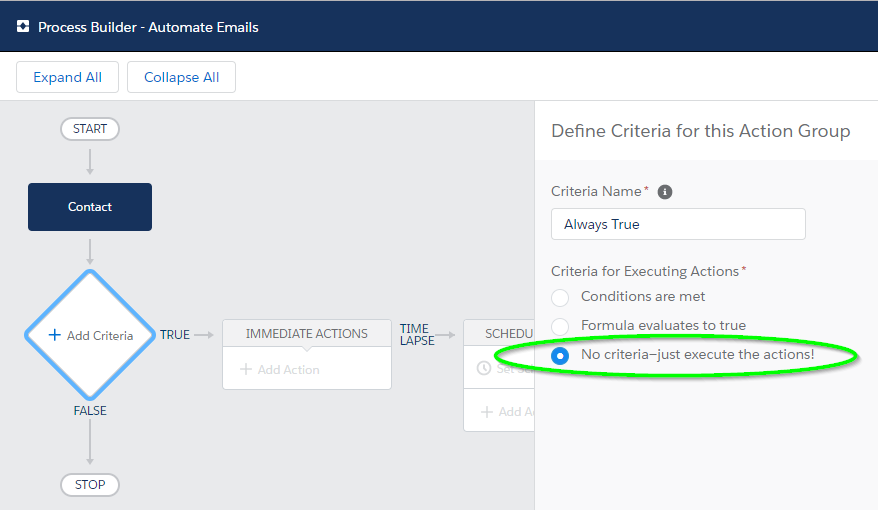
Add "No Criteria"
Then, we click Add Criteria and set it to No Criteria, since we want our Job to execute every time a new contact record is created.
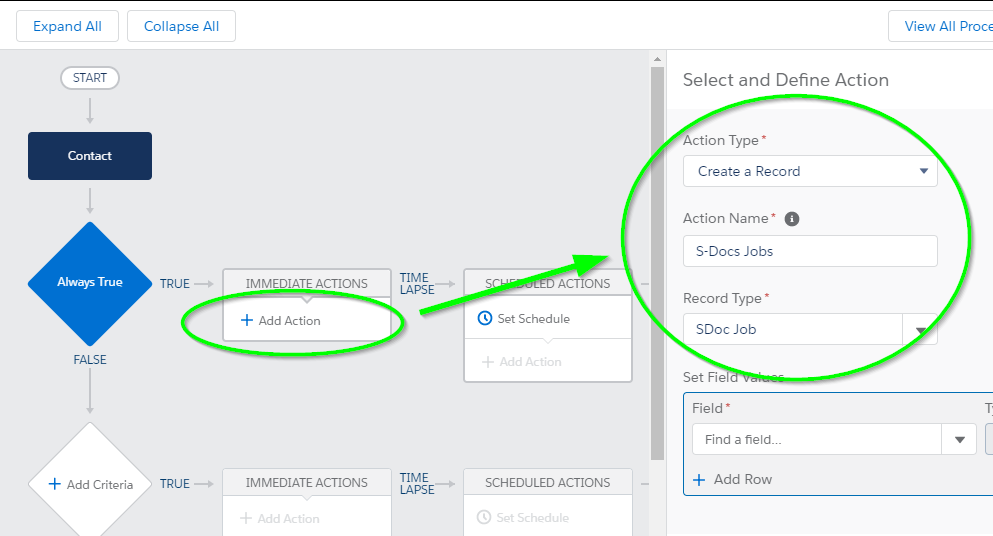
Add The "Create A Record" Action
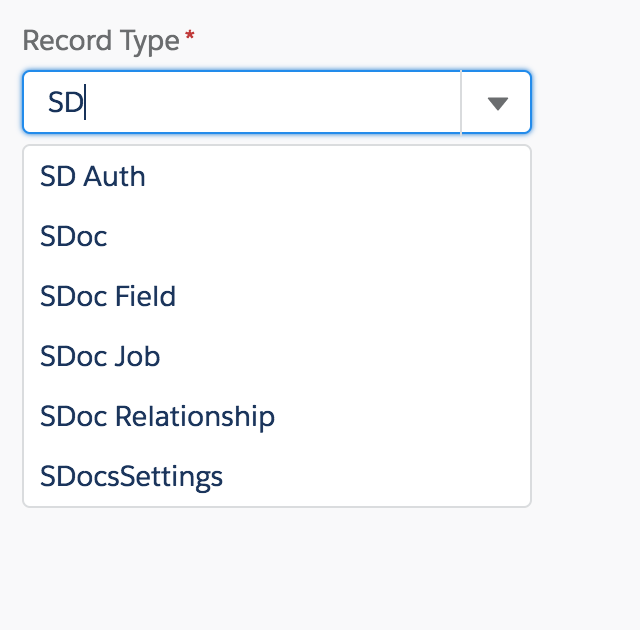
Next, click Add Action and choose Create a Record for our action type. Select SDoc Job for our record type.
If you are having trouble finding SDoc Job in the picklist, type in "SD" and SDoc Job will appear.
Add S-Doc Job Field Values
Next, we will add the following 5 field values:
Start Job: The type will be a Boolean set to ‘true’ so that the specified documents will automatically generate (and in this case, automatically email, as we have specified to do so using the Job’s email fields) upon the creation of this particular S-Doc Job record.
Send Email: The type will be a String with a value of ‘1,’ so that an S-Doc Job record will email the document it generated. If we set this to ‘0,’ an email will not be sent, thus, we will be setting this to ‘1.’
Object ID: The type is a Reference because we are referring to the ID of the record we are creating objects for, and we look up the value "Contact ID." This gives this field the value [Contact].Id, so when this S-Doc Job runs for a newly created contact, it will know that contact's ID.
Object API Name: The type is a String and it is the API name of our objects. In our example, we’re creating this trigger for new contacts, so we store Contact in this field.
Doclist: The type is a String. The value is the comma-delimited list of S-Docs template names that we will be using to generate our documents. Make sure there aren’t any spaces in your comma-delimited list. In our example, Welcome Letter is the name of our S-Doc template for a welcome letter PDF, and Email Template is the name of our S-Doc template for an HTML email.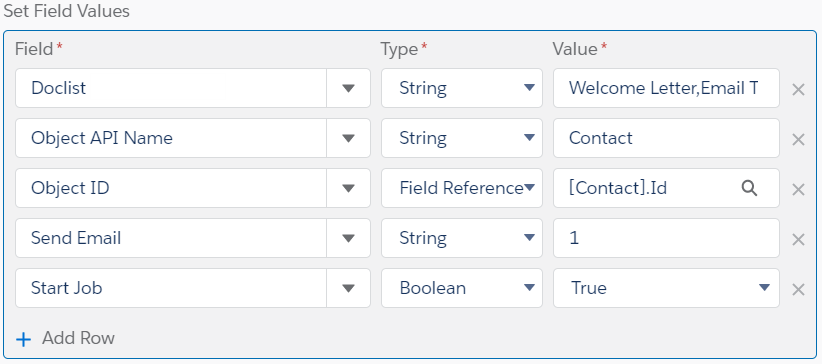
Additionally, if we wanted this S-Doc Job to be run as a different user, we would click Add Row and add the "Run as User" field. For "Value," we would enter the username of the user we want this Job to be run under.
Then, we click Save and click Activate at the top right of the screen.
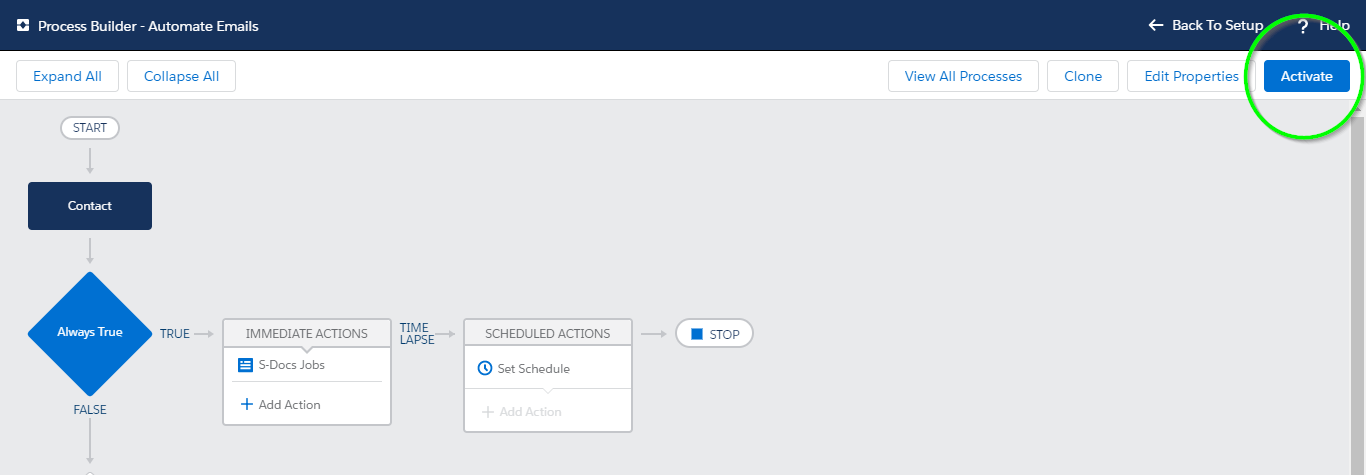
All done! S-Docs will now automatically generate and email a welcome letter whenever a contact is created.
Additional Fields
While we only used 5 fields in the process above, S-Docs Jobs also support a number of other fields that you can use to further customize your process.
Email From

Email From allows you to set an org-wide email address as the From address when your S-Docs Job process includes emailing a document.
Email Params

Email Params allows you to add advanced email parameters to your process that are not available to access through standard fields on the S-Docs Job object, such as useExistingNoContactRecord=true.
Incl. Attachments with Email

Incl. Attachments with Email allows you to specify a comma-delimited list of Salesforce Attachment IDs to be included in the email sent out by the S-Docs Job.
Incl. Documents with Email

Incl. Documents with Email allows you to specify a comma-delimited list of Salesforce Document IDs to be included in the email sent out by the S-Docs Job.
Incl. Files with Email

Incl. Files with Email allows you to specify a comma-delimited list of Salesforce File IDs to be included in the email sent out by the S-Docs Job.
In This Article:
As you build an S-Docs template, you'll likely want to generate a document using that template several times in order to see how each change you make appears in an actual generated document. You can streamline this process by using the Template Preview feature.
Enabling Template Previews
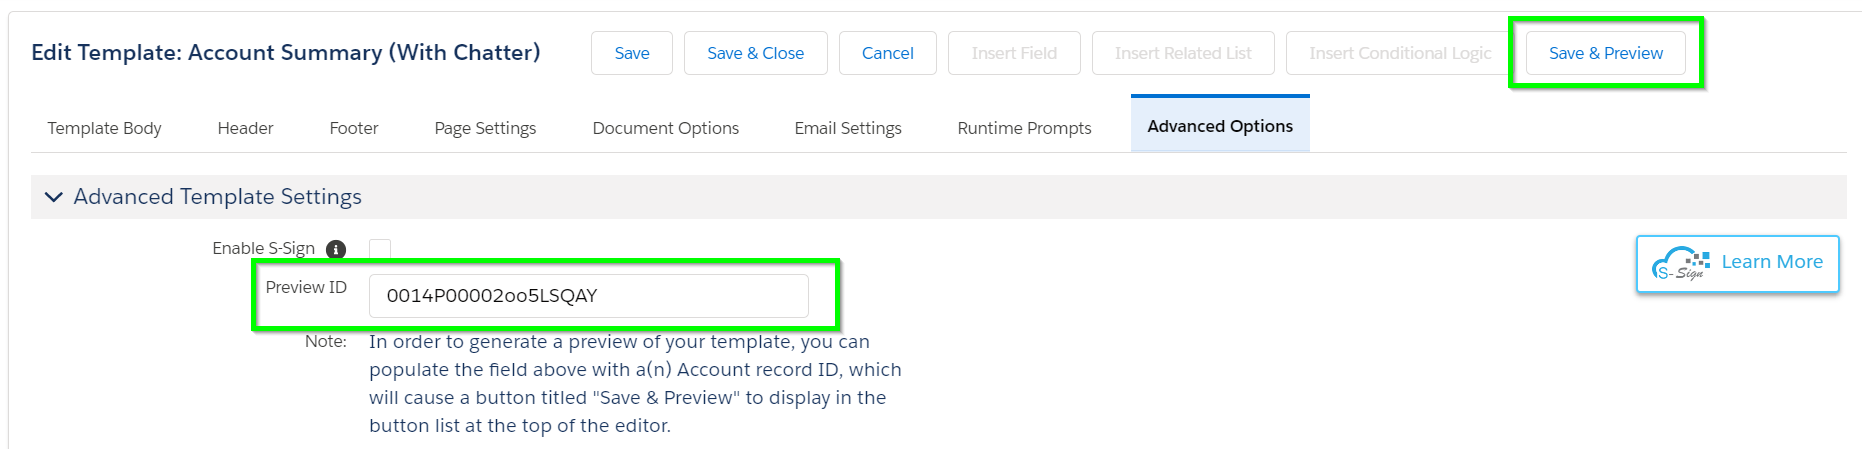
To use this feature, navigate to the Advanced Options tab of the template editor and find the Preview Settings section. This section has a single field titled Preview ID. When you fill in the Preview ID field with the ID of a test record, a button titled Save & Preview will appear at the top of this page.
Record IDs can be found in the URL when you're viewing the record.
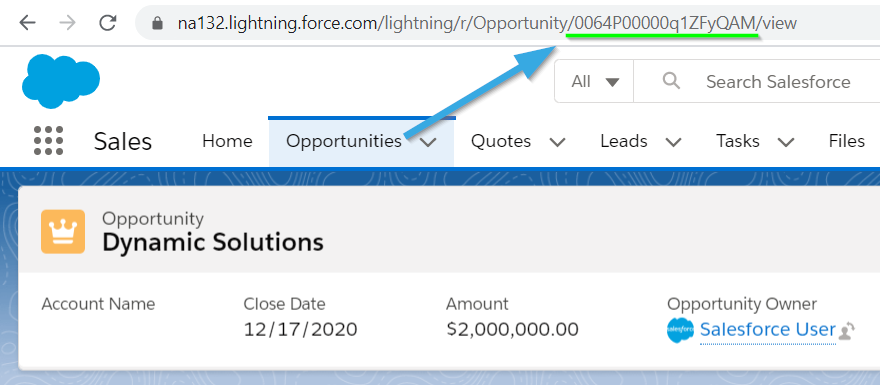
You can click the Save & Preview button in the template editor to generate and view a test document for the Account record with the ID you provided.
When you click "Save & Preview", a new tab will open in which a document is generated and automatically opened for previewing. This saves you even more time throughout your template development process.
In This Article:
S-Docs supports integration with Adobe eSign. Here are the steps needed to integrate S-Docs with Adobe eSign:
1) Create your Template.
2) Insert the appropriate Adobe Sign Text Tags in your template at the appropriate places, for example:
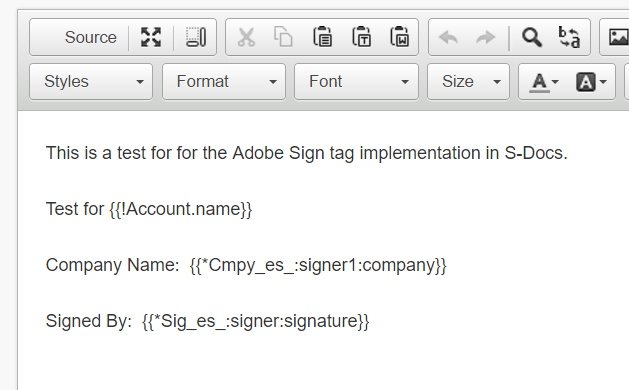
Please visit this page for specific tag format and description.
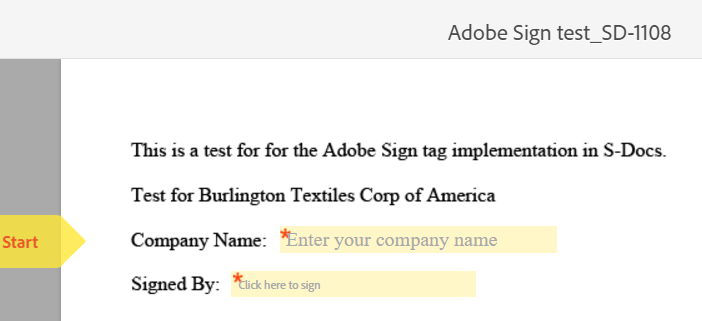
3) Email the document generated in S-Docs to your Adobe Sign recipient.
4) Your recipient then opens your email, downloads the attached document, and then opens that document in Adobe Sign in order to fill and sign. Your recipient should see something similar to the following when they open the document in Adobe Sign:
In This Article:
S-Docs supports a variety of integrations with DocuSign. Since integrations may vary from org to org depending on the use case, this document aims to provide the base knowledge and resources required to develop your own custom integration.
Use Anchor Tags In Your S-Docs Template
To use DocuSign with S-Docs, you can use anchor tags in your S-Docs template (see: https://help.salesforce.com/s/articleView?id=sf.cpq_docusign_anchors_concept.htm&type=5), generate the document, and then manually send it through DocuSign as you would any other documents.
Use DocuSign API
Alternative to manually sending the document, you can develop an integration to send the document automatically. Setting up automated integrations require using DocuSign's API, which you can learn about more at: https://developers.docusign.com/docs/
Example
Here is a brief overview of how you might integrate S-Docs with DocuSign:
1) Create a process in Process Builder to generate the document, and then set a flag.
2) Create an Apex trigger, based on the flag, to grab the generated doc attachment and send the attachment to the Docusign API: https://www.docusign.com/developer-center/api-overview
3) Use the DocuSign API to send the document to be signed.
Introduction
S-Docs provides users the opportunity to efficiently upload .docx files through the DOCX feature. This feature allows you to:
- Easily import pre-existing Microsoft Word templates that you don't want to rebuild from scratch in the Template Editor
- Leverage Microsoft Word features like Restricted Editing, Table of Contents, and Redlining
- Create complex and beautiful templates without any knowledge of HTML
You can watch the following tutorial video to learn how to upload DOCX templates into S-Docs, use DOCX templates as S-Docs components, and use bulk upload with DOCX. You can also refer to the written instructions below for a general guide to uploading DOCX templates and using the correct merge field syntax.
Tutorial Video
Generating DOCX Documents via S-Docs
Using .docx files with Microsoft Word is incredibly advantageous if you’re trying to increase your documentation generation. Let’s start by creating a new S-Docs template. Click on the Template Format drop-down menu and choose DOCX. Click Save.
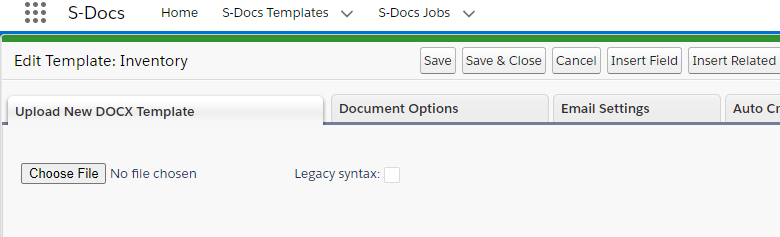
Next, head to the template editor like you would with other templates. Normally, you would be able to make changes to the source code here, but with the DOCX upload feature, all you have to do is upload the .docx template file that you’ve already created!
Let's start by putting a merge field into our template. From the template detail page, click the Template Editor button.
Then, click Insert Field and select a merge field.
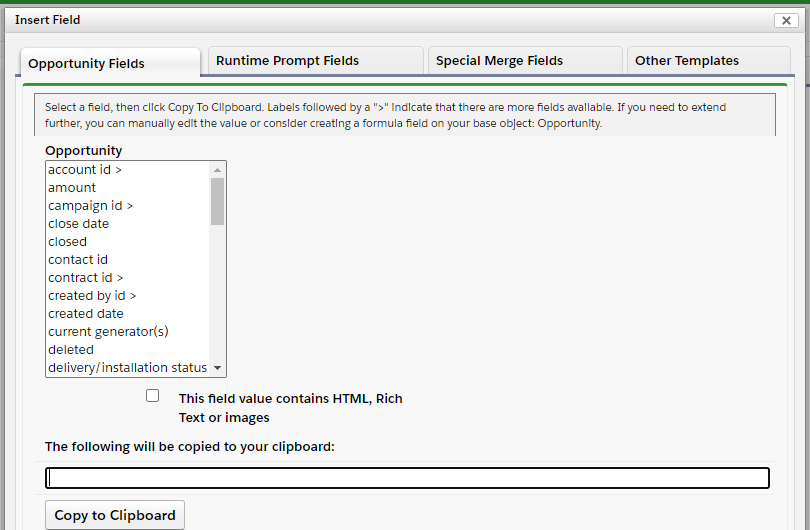
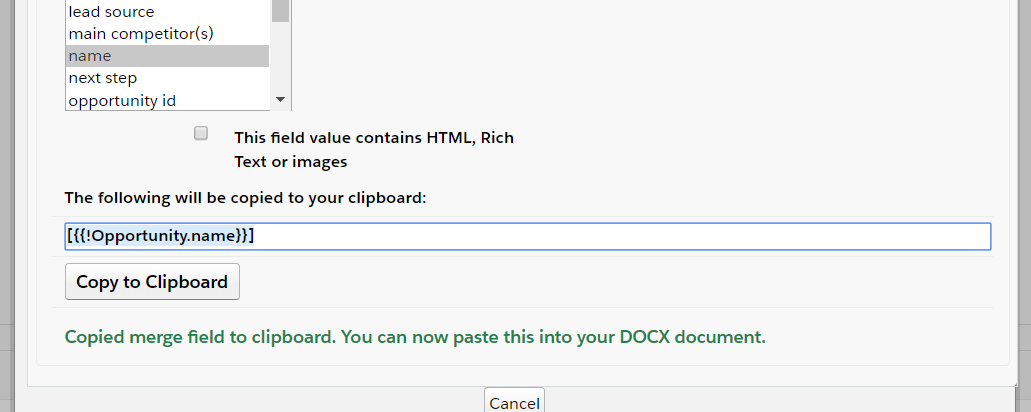
Rather than inserting the field into the typical source code editor, you will click the Copy to Clipboard button and paste it into your Word document where desired.
Once you’ve pasted the merge field in your Word document, return to the template editor. The screen should look like this:
Select "Choose File" and upload the Word document you have been working with. After selecting the file, you will see a message indicating that your file is uploading. In a matter of seconds, your template will successfully upload.
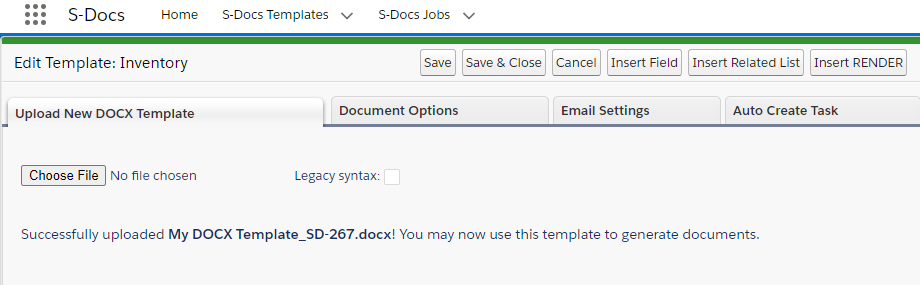
Congratulations! You can now generate your DOCX documents using your created S-Docs template.
Note: The best workflow to build DOCX documents is to have your browser and Word open side-by-side. In addition to using copy and paste, you can also drag-and-drop merge fields into your DOCX document without having to switch between windows.

Uploading Bulk DOCX Templates
You can create a large number of DOCX templates at one time using the Bulk DOCX Upload feature. The Bulk DOCX Upload page can be accessed through the S-Docs Setup page.
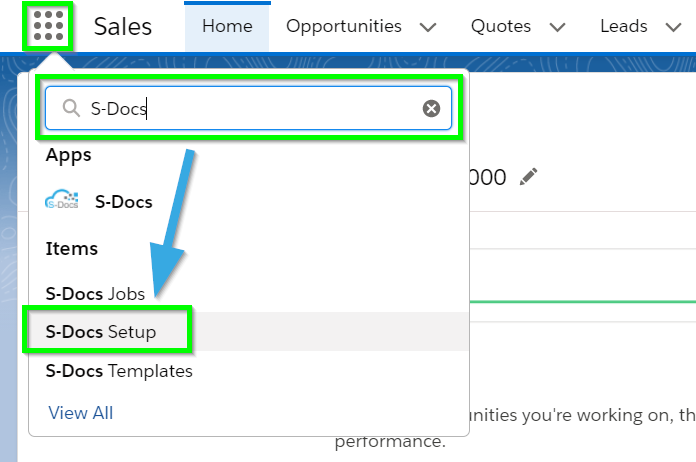
To navigate to the S-Docs Setup page, click the App Launcher in the upper left corner, type "S-Docs" into the search field, then click S-Docs Setup.
Scroll down to the Other Pages section and click Go to Bulk DOCX Upload Page.
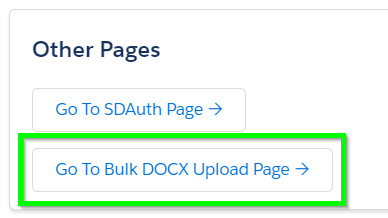
The Bulk DOCX Upload page appears as follows:
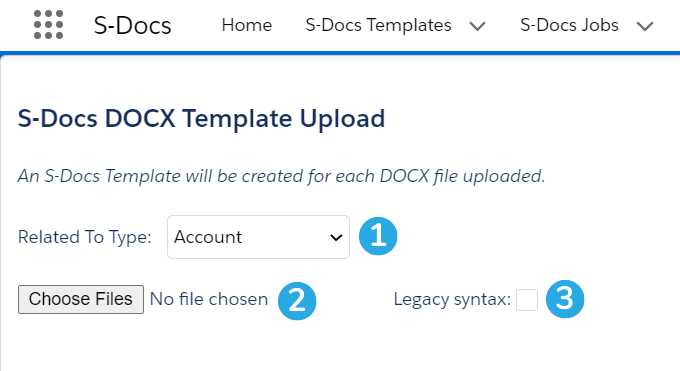
[1] To begin, choose the object that your templates will be related to.
[2] Next, click Choose Files to select as many DOCX templates as you'd like. Each file chosen will create an S-Docs template.
[3] Check the Legacy syntax checkbox if you're using the older DOCX syntax, which is no longer supported.
Syntax
Since first launching our DOCX feature, we have updated the syntax. The old syntax is still available when the “Legacy Upload” checkbox is checked on the DOCX file upload page, but no longer supported.
General DOCX Syntax
Note: DOCX syntax also applies to PPTX and XLSX documents.
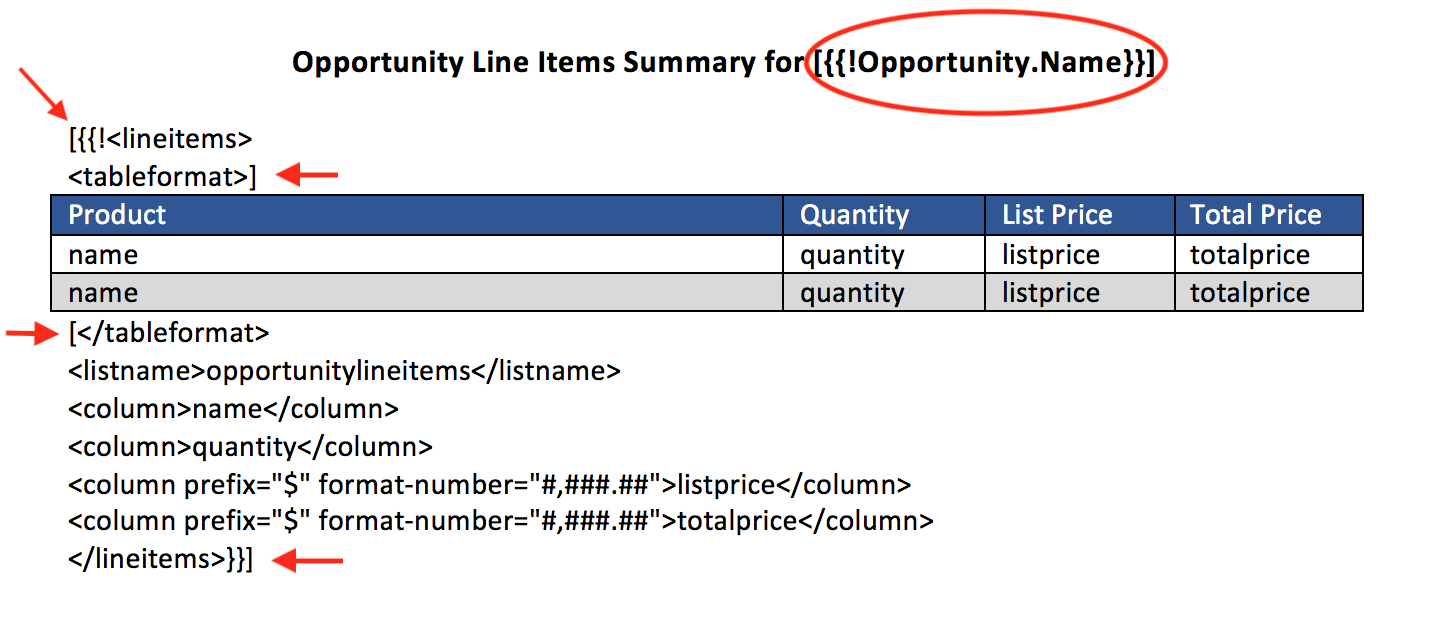
As part of the update, brackets are now required around all S-Docs syntax in DOCX templates, which results in a better output of your template.
[code lang="html"][{{!<lineitems>
<tableformat>]
//Your Table Here
[</tableformat>
<listname>opportunitylineitems</listname>
<column>name</column>
<column>quantity></column>
<column prefix="$" format-number="#,###.##">listprice</column>
<column prefix="$" format-number="#,###.##">totalprice</column>
</lineitems>}}][/code]
Render Statements
If you’re importing a DOCX template that uses render statements, you will need to use brackets there too.
[code lang="html"][<!--RENDER={{!Contact.Phone}}=="123-456-7890"-->]
[{{!Contact.Name}}] can be reached at [{{!Contact.Phone}}]. This is never true.
[<!--ENDRENDER-->]
[<!--RENDER={{!Contact.Name}}=="Tim Barr"-->]
[{{!Contact.Name}}] can be reached at [{{!Contact.Phone}}]. This may or may not be true.
[<!--ENDRENDER-->]
[<!--RENDER=1!=2-->]
This is always true.
[<!--ENDRENDER-->]
[<!--RENDER=1==2-->]
This is never true.
[<!--ENDRENDER-->][/code]

Note: You cannot have RENDERS on the same line as the LINEITEMS block.
Named Queries
If you're using named queries in your DOCX template, you'll need to convert them to the DOCX format. If your named query looked like this:
[code lang="html"]<!--{{!<LineItemsSOQL>
...
</LineItemsSOQL>}}-->
{{!myQuery1.fieldname}}[/code]
You'd need to update it to this syntax:
[code lang="html"][{{!<LineItemsSOQL>
...
</LineItemsSOQL>}}]
[{{!myQuery1.fieldname}}][/code]
Note: DOCX templates support the named query filter and offset features. Please visit the named query article linked above for more information about these features.
Rich Text Images
You can display images stored in rich text fields by surrounding the merge field in three curly braces instead of two, as shown below.
[code lang="html"][{{{!Object.FieldName}}}][/code]
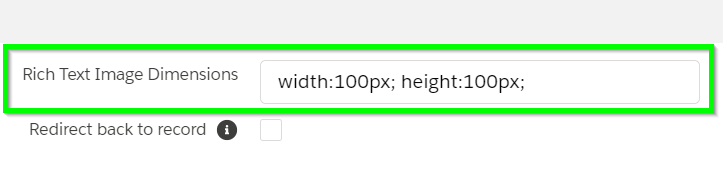
To adjust the image dimensions, navigate to the Document Options tab of the template editor, scroll down to the Other Options section, and input your desired dimensions into the Rich Text Image Dimensions field, as shown below.
Note: This field governs the size of all images merged into your DOCX template from rich text fields.
Rich Text Font
Fonts and font sizes are not pulled from Salesforce rich text fields into your DOCX document - they will simply match Microsoft Word's "Normal" style. If you want your document to display the font from your rich text field, you can either change Microsoft Word's "Normal" style to match the desired font/font size, or use the font-family and font-size merge field attributes. For example, if your rich text field is written in Arial font at size 12, your merge field might look like this:
[code lang="html"][{{!Object.FieldName font-family="Arial" font-size="12"}}][/code]
To stay aligned with Salesforce's move away from Attachments and towards Files, S-Docs allows you to automatically create a File for a given template and link it to a record whenever you generate an S-Doc for that template. You still have the ability to use Attachments, but we recommend making the move to Files now.
1) Add the Files related list to the applicable page layouts.
2) Enable Files permission on regular and community profiles, as applicable, so that users can see the files.
3) Edit the Object Permissions on the applicable User and Community User Profiles
a) On the S-Docs object Edit, verify/check both boxes for the File ID field, and Save.
b) On the S-Docs Templates object Edit, verify/check both boxes for the Auto Create File field, and Save.
4) Edit all applicable templates:
a) uncheck Auto-create Attachment on the Template Detail
b) Select Template Editor, go to the Document Options tab -
i) uncheck the "Auto Create Salesforce Attachment" checkbox
ii) check "Auto-Create File"
Note. On newer versions of S-Docs, the "Auto-create Attachment" checkbox can be found in the "Document Options" tab of the template editor. On older versions, this checkbox will appear on the S-Docs Template record detail page.
In This Article:
Note: If you're a newer user, you'll need to configure S-Docs for use in your org in order to generate documents with any templates that you've created. For detailed instructions on setting up S-Docs, please click here.
Create A New S-Docs Template
Importing a template into S-Docs is quick and easy. Once you have downloaded a PDF template from the S-Docs template library or exported one of your own templates (see "Export Template" in the "Advanced Options" tab of the template editor), you can follow steps below to import it into your org:
1) First, navigate to the S-Docs app by clicking on the App Launcher in the upper left corner and typing "S-Docs" into the search field.
Navigate to the S-Docs Templates tab and click New to create a new template.
3) Name the template whatever you'd like and click Save (the fields specified here don't matter as they will be overwritten upon import).
Import Your Template
4) Now that you've created a new template, navigate to the template detail page and open the S-Docs template editor by clicking the Template Editor button (under the dropdown arrow on the right side of the page).

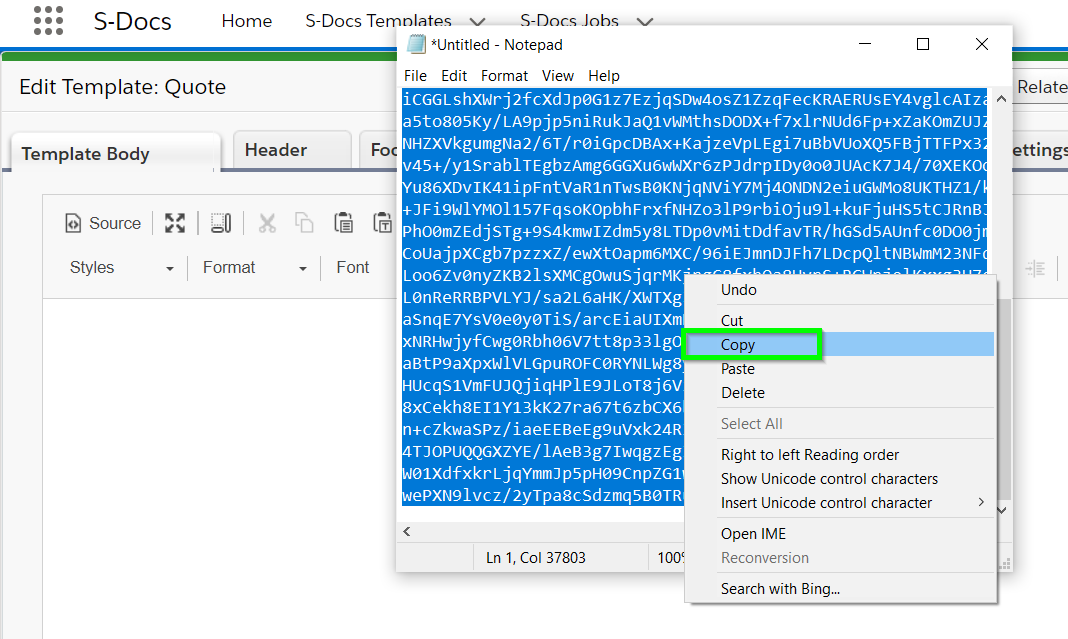
5) Copy and paste the contents of your recently downloaded template data into "Template Body" tab of the S-Docs Template Editor.
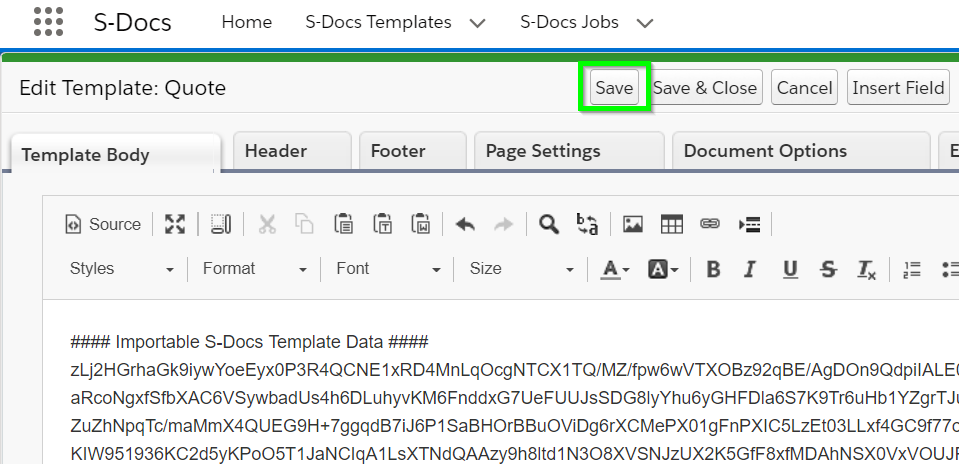
6) Once you have pasted your recently downloaded template source into the S-Docs template editor, click Save and S-Docs will decode the data and populate your template fields.
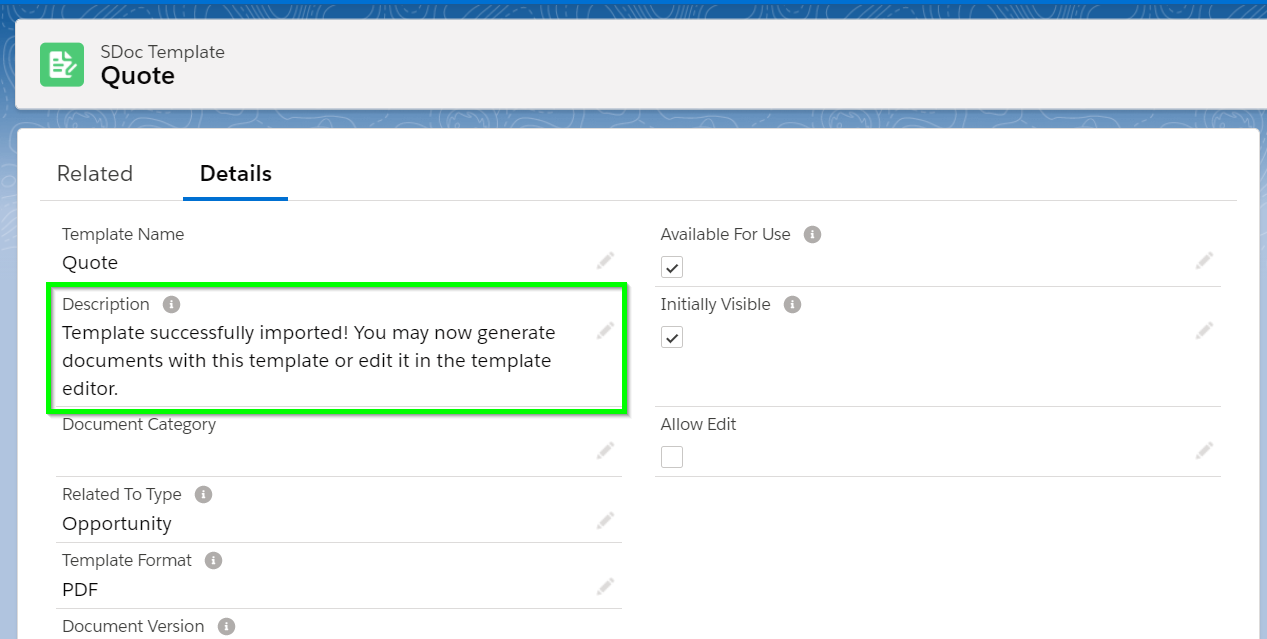
That's it! Your template has been successfully imported into S-Docs. When you click Save, you will be redirected to the S-Docs Template record detail page. All of the original fields will be overridden, and the description will say "Template successfully imported! You may now generate documents with this template or edit it in the template editor." Let's click the Template Editor button to see how our imported template turned out.
Beautiful, isn't it?