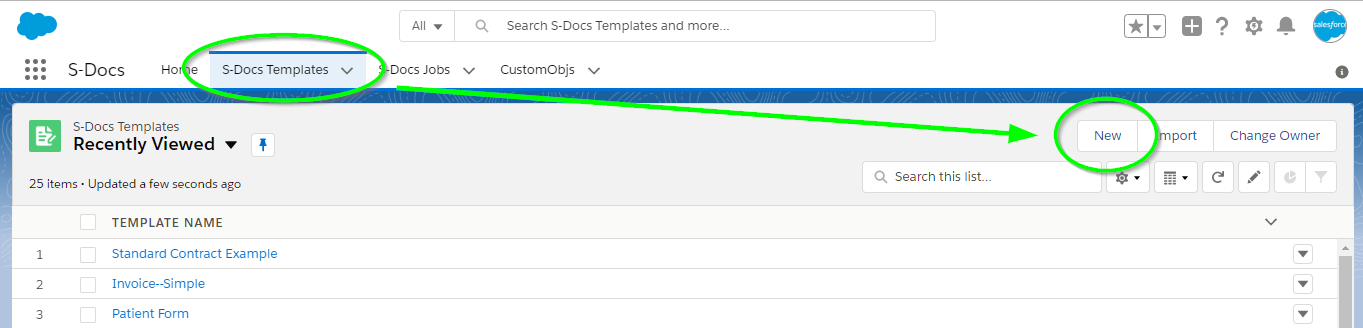
Category

Documentation

Text to Signature

By Documentation, S-Sign No Comments

Introduction

If you're not using a tablet or smartphone, it can be difficult and clumsy to draw a signature with a mouse or trackpad. Fortunately, S-Sign provides the option forgo any drawing at all with the Text to Signature feature. This feature allows you to sign a document by typing your name and replacing it with a cursive font.

Text to Signature works on S-Sign version 1.973 and above, so make sure you have the latest version installed before testing it out. You can check the version number by navigating to the Setup menu, typing "Installed" into the Quick Find / Search bar, and clicking Installed Packages.

If you don't have the latest version, reach out to a member of our sales team at sales@sdocs.com to obtain an installation link.

Use The Text-To-Signature Feature

Text to Signature is easy to use and requires no configuration on your part. When a user receives an S-Sign request and clicks Click Here to Sign, the signature capture window will open with a Text to Signature checkbox right below the area where they'd normally draw their signature.


When the user clicks Add Signature, their typed signature will be merged into the document.

They can then fill in any other necessary fields and submit the document.

That's all there is to it! Text to Signature is an easy-to-use alternative to drawing a signature designed to save your users time and provide more value to you.

Set A Default Font

You can set a default font for text-to-signature in the Custom Settings section of the S-Sign Configuration Page.

S-Docs Runtime Prompts: Merge User Input with Documents at Runtime

By Documentation, S-Docs Runtime Prompts Feature No Comments

Video Tutorial

Introduction to Runtime Prompts

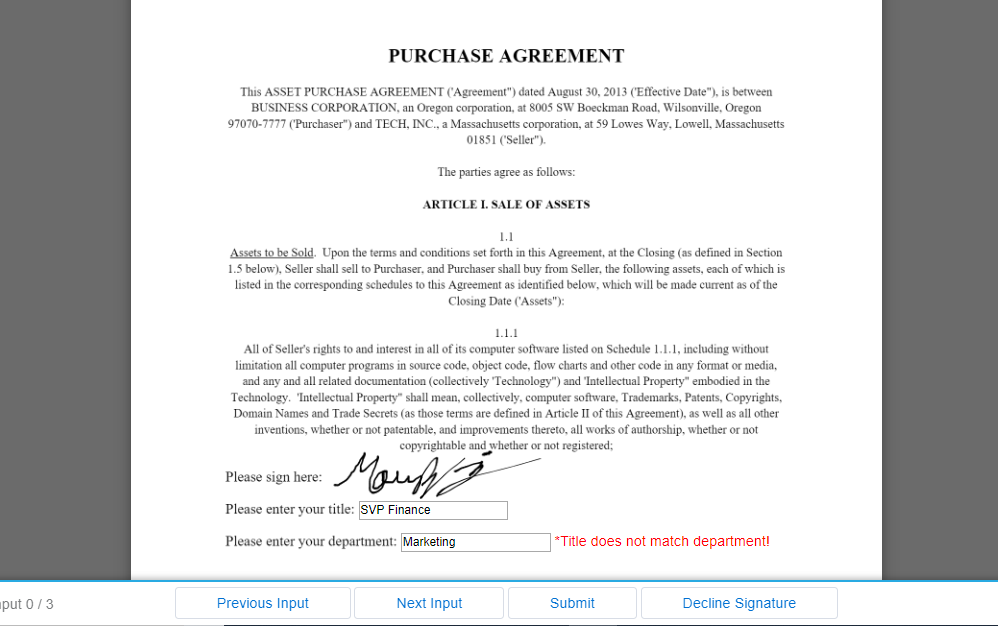
The S-Docs Runtime Prompts feature allows you to set up forms with questions for users to respond to during the document generation process. This form input can then be merged into the document and/or conditionally render certain sections of the document. 

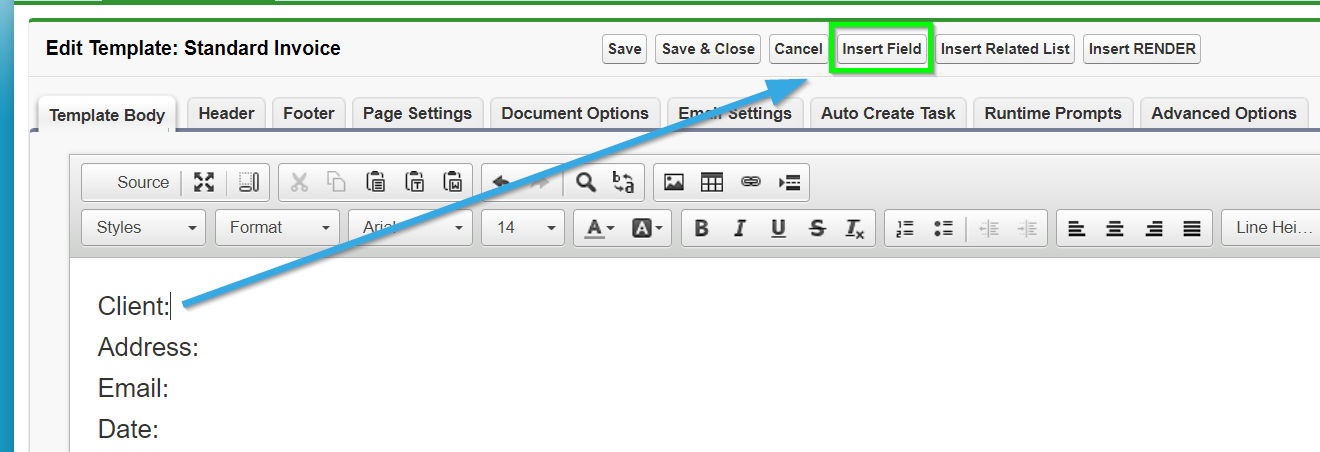
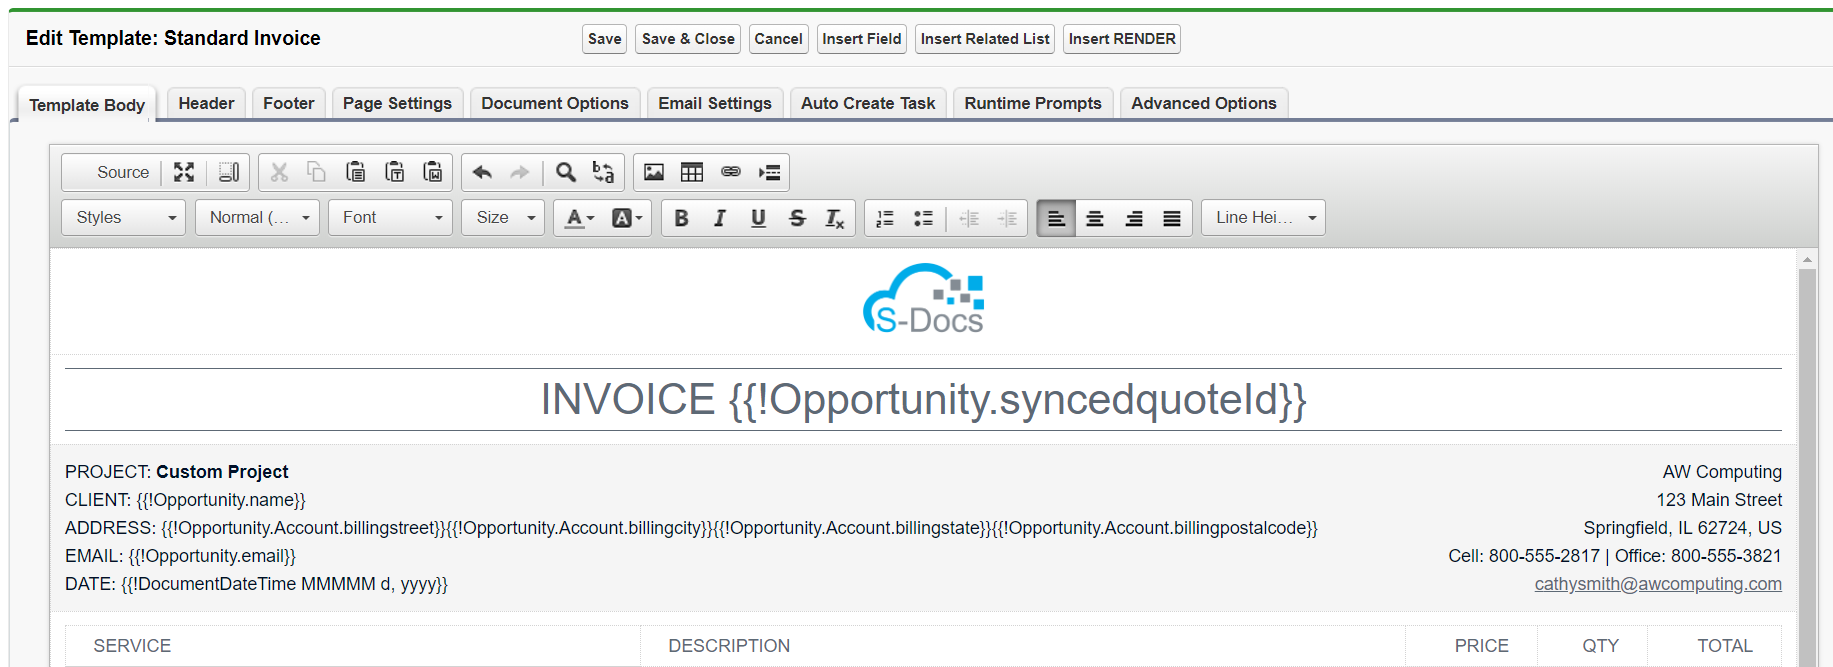
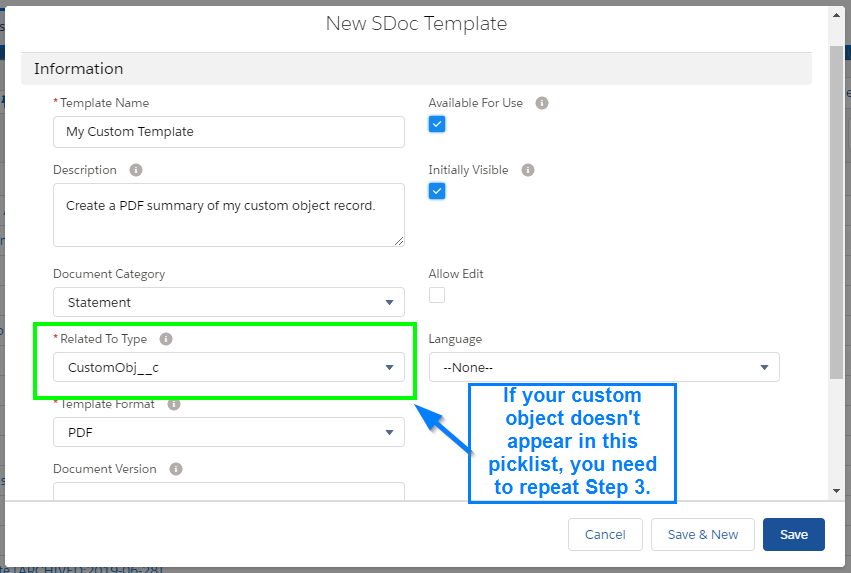
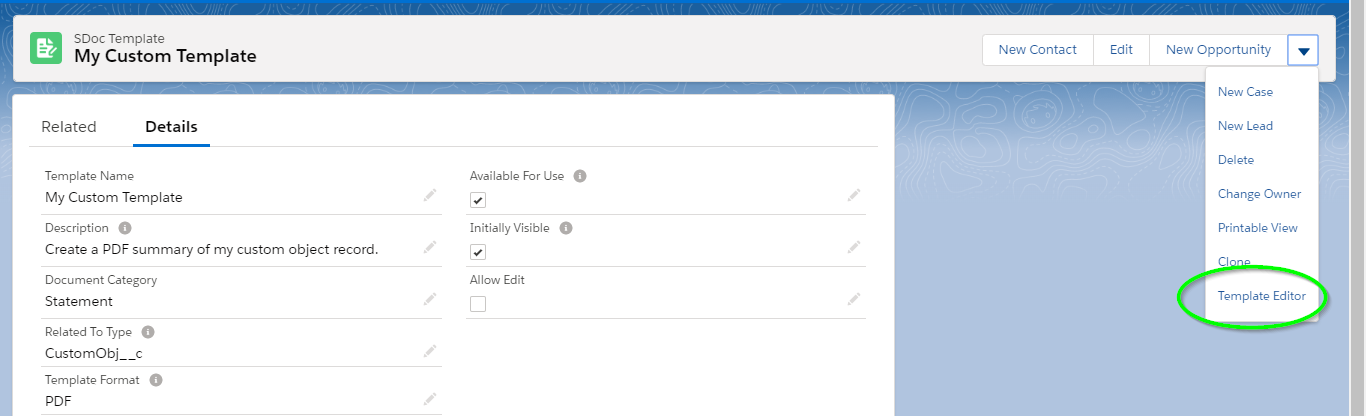
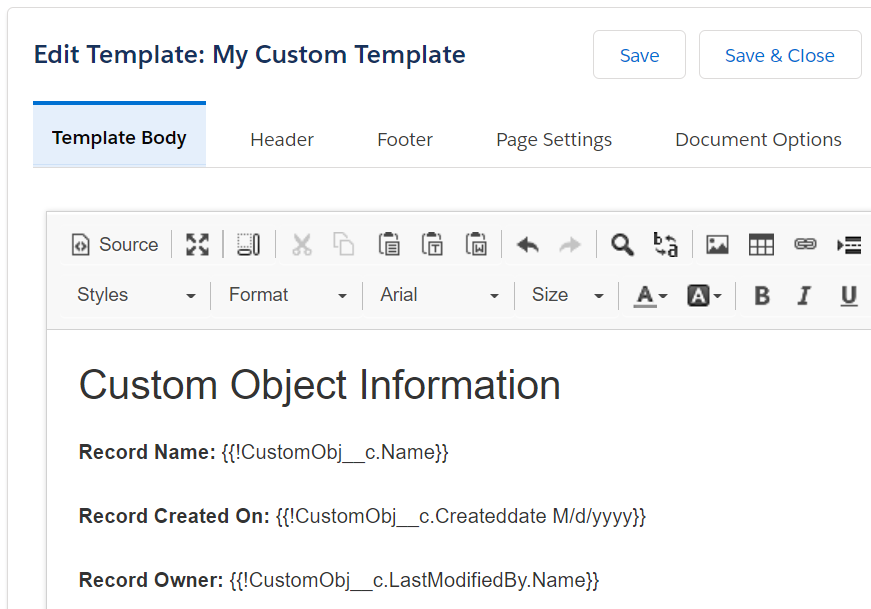
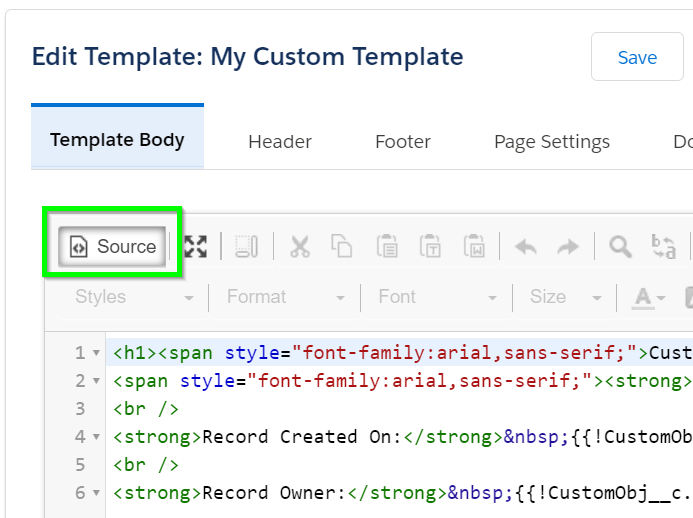
Setting up a template with Runtime Prompts is fairly simple: open your template in the Template Editor and head over to the Runtime Prompts tab.

Overview of the Runtime Prompts menu

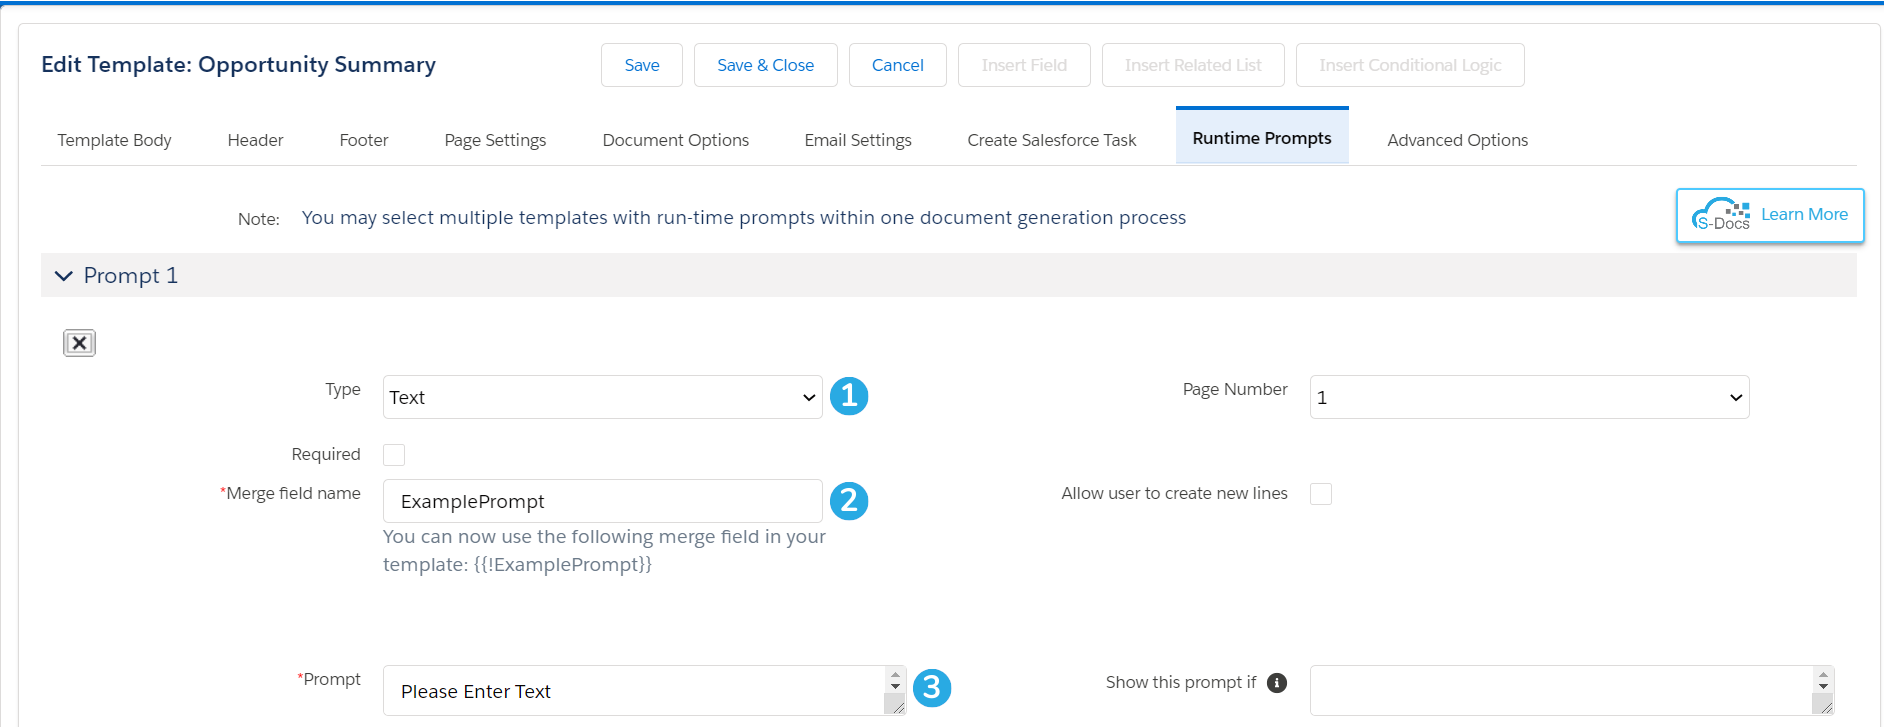
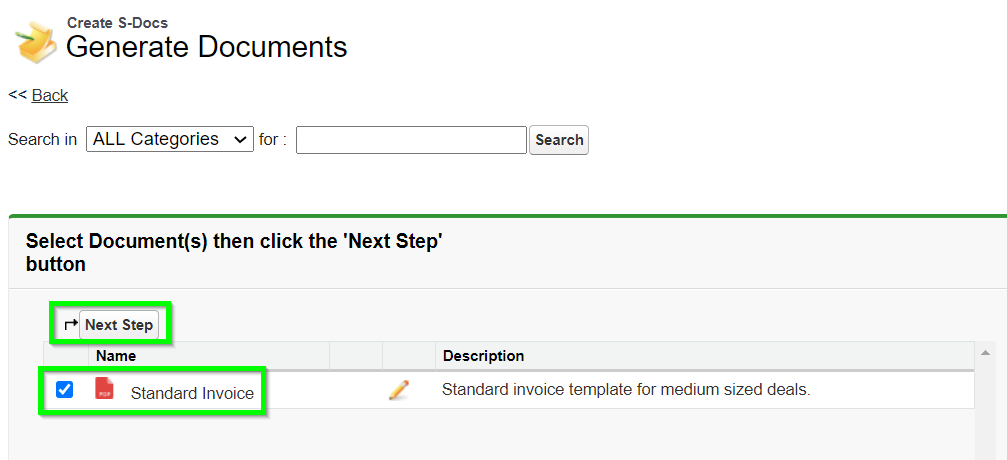
Although different options will appear for each type of prompt, this is the basic layout of the Runtime Prompts menu. Each piece of input you'd like to collect from your users is called a "Prompt." You can create as many as you like. To create a basic prompt:

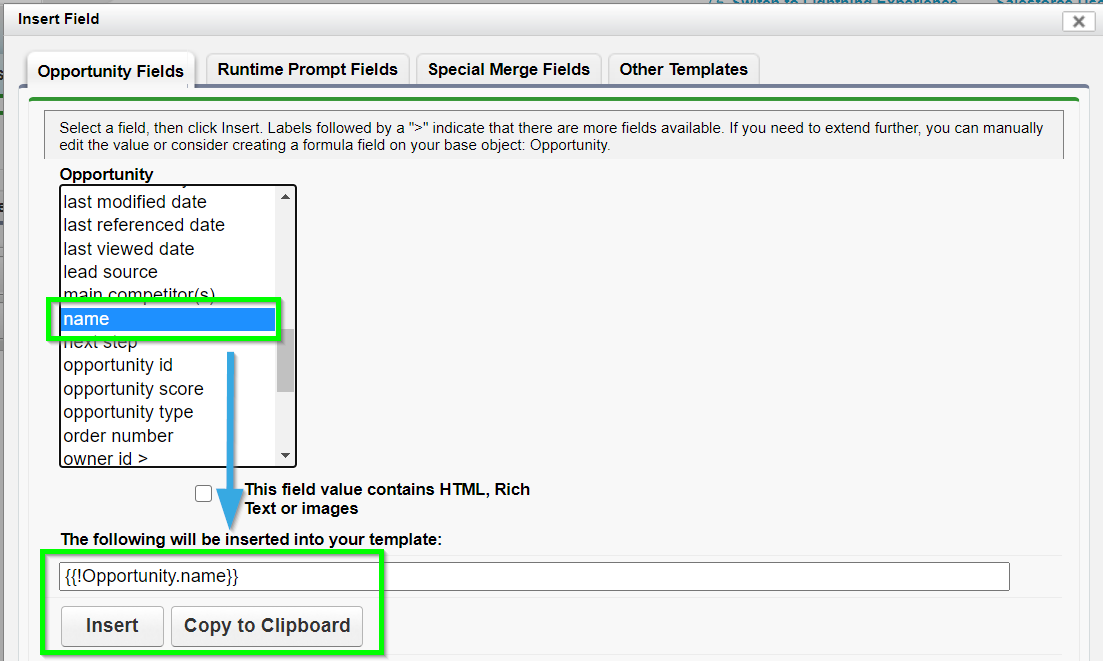
[1] Select the type of prompt you would like users to answer: Text, Date, Checkbox, or Related List.

[2] Name the merge field for this prompt and place it within the template body. The user's response to the prompt will appear where the merge field is placed.

[3] Write the prompt itself. This is the question the user sees and responds to during the document generation process.

We will now go over the options for each individual prompt type.

The Four Types of Prompts

As we stated before, you can choose from Text, Date, Checkbox, and Related List Prompts.

Text Prompts

Text prompts are simple free-form text fields that the user can type whatever they want into. This is the text prompt menu:

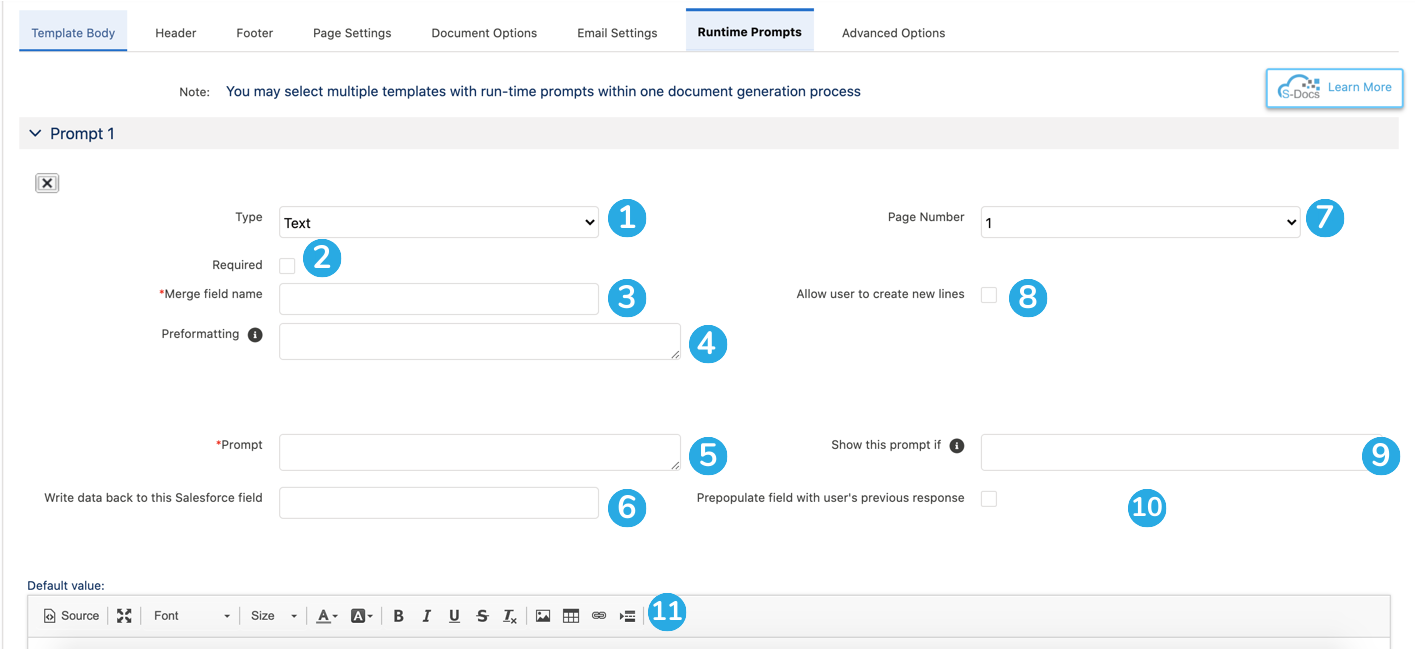
[1] Set the prompt type to Text to create a text prompt.
[2] Make this prompt required or optional. The user will not be able to finish generating this document without responding to this prompt if it is required.
[3] Name the merge field for this prompt and place it within the template body. The user's response to this prompt will appear where the merge field is placed. This merge field can also be used within conditional statements.
[4] Preformatting tool to assign a specific number of characters that can be entered. Use an X to indicate any single-character input, or use a # to indicate a digit. For example, for U.S. phone numbers, do '(###) ###-####'.
[5] Write the text prompt itself. This is the question the user sees above the text box during document generation.
[6] Choose a Salesforce text field to write this data back to.

Note: Omit curly braces for Writeback merge fields used within Runtime Prompts. For example, instead of {{!Opportunity.Description}}, write Opportunity.Description.

[7] Choose which page this text prompt should appear on. You can create up to 10 different pages for your Runtime Prompts.
[8] Allow the end-user to expand the text box and create new lines of text. By default, users can only enter one line of text.
[9] Specify conditions for this prompt to be shown. This field accepts conditional statements, and can be used with regular merge fields and Runtime Prompt merge fields (see the Runtime Prompt Decision Trees section of this article for more information).
[10] Choose to prepopulate this prompt with the user's previous response. This means that if they typed "Example Response" into the text box the last time they generated this document, the default value for this field will be "Example Response" the next time they generate it.
[11] Specify a default value for this prompt. This will be used if the user leaves the prompt blank.

Note: You can only specify a default value if the prompt is not required.

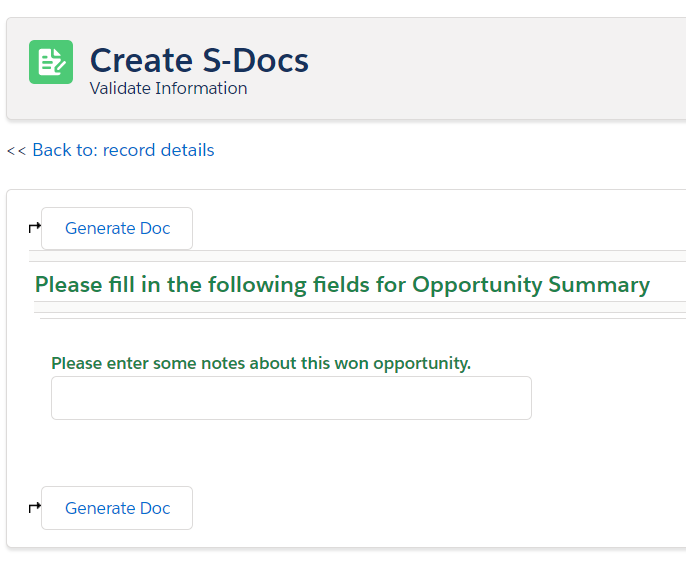
Text prompts look like this at runtime:
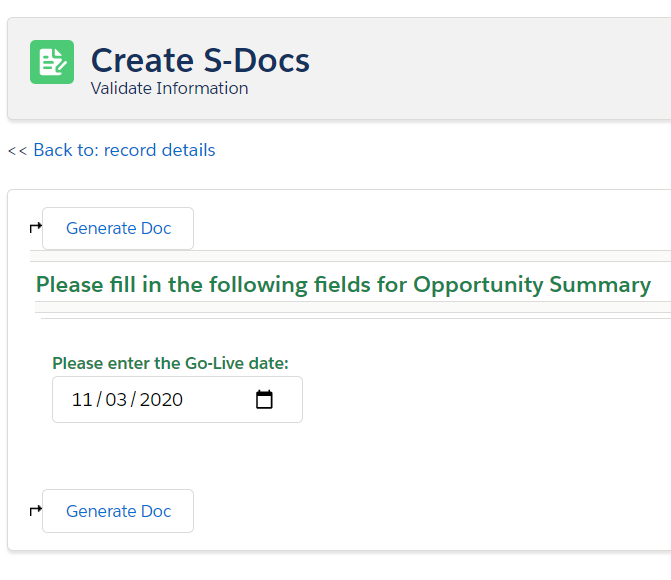
Date Prompts

Date prompts provide a date picker that the user can choose a date from. This is the date prompt menu:

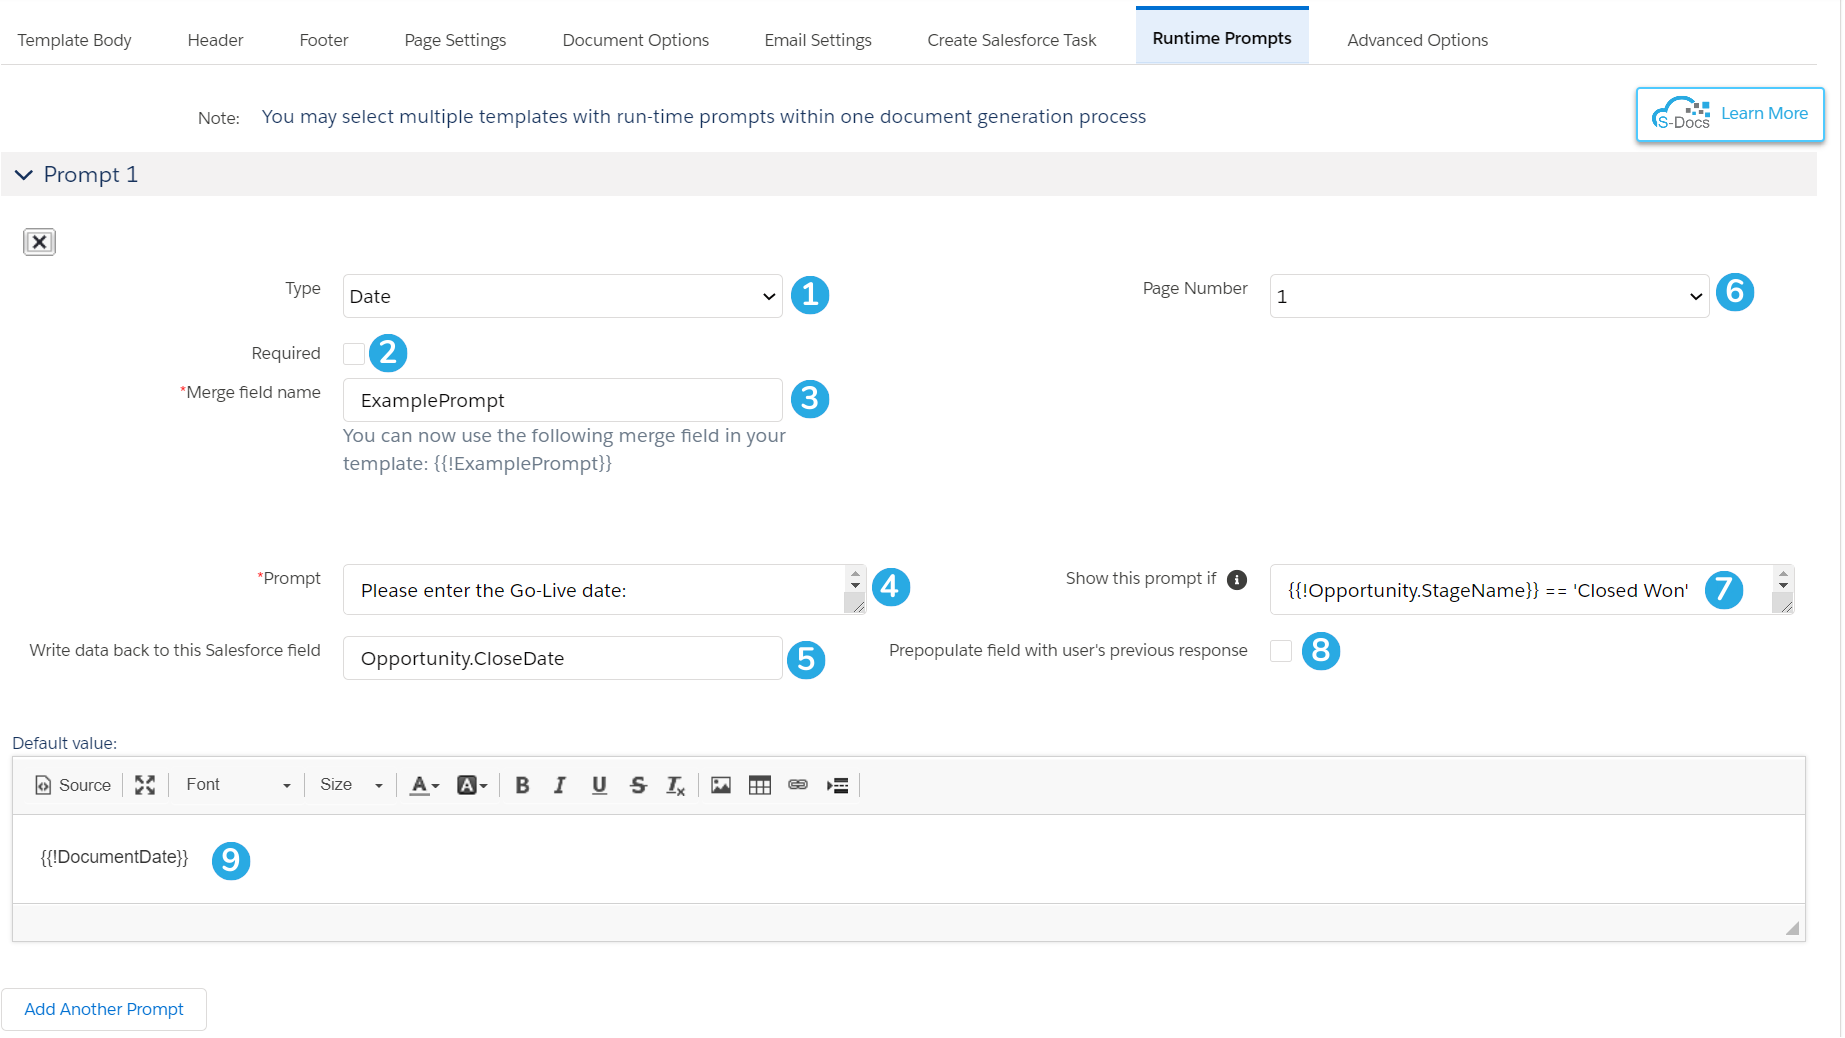
[1] Set the prompt type to Date to create a date prompt.
[2] Make this prompt required or optional. The user will not be able to finish generating this document without responding to this prompt if it is required.
[3] Name the merge field for this prompt and place it within the template body. The user's response to this prompt will appear where the merge field is placed. This merge field can also be used within conditional statements.

Note: This date field can be formatted with format-date(e.g. {{!ExamplePrompt MM/dd/yyyy}}), or it can be used to filter a WHERE clause in your related list (e.g. WHERE CreatedDate > {{!ExamplePrompt}}), or it can do pretty much anything else an ordinary date merge field can do.

[4] Write the date prompt itself. This is the question the user sees above the date picker during document generation.
[5] Choose a Salesforce date field to write this data back to.

Note: Omit curly braces for Writeback merge fields used within Runtime Prompts. For example, instead of {{!Opportunity.Description}}, write Opportunity.Description.

[6] Choose which page this date prompt should appear on. You can create up to 10 different pages for your Runtime Prompts.
[7] Specify conditions for this prompt to be shown. This field accepts conditional statements, and can be used with regular merge fields and Runtime Prompt merge fields (see the Runtime Prompt Decision Trees section of this article for more information).
[8] Choose to prepopulate this prompt with the user's previous response. This means that if they chose "8/11/2021" the last time they generated this document, the default value for this field will be "8/11/2021" the next time they generate it.
[9] Specify a default value for this prompt. This will be used if the user leaves the prompt blank. You can use merge fields and static text.

Date Prompts look like this at runtime:

Checkbox Prompts

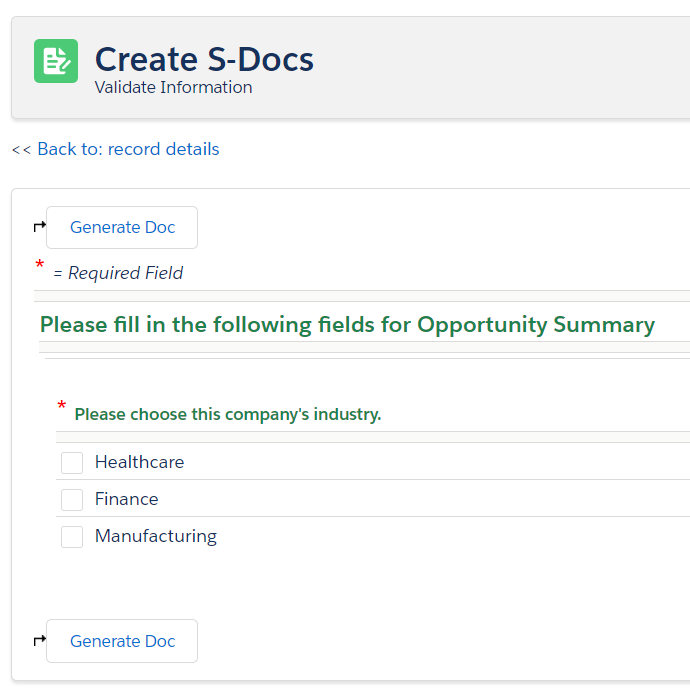
Checkbox Prompts provide users with a variety of options to choose from. This is the checkbox prompt menu:

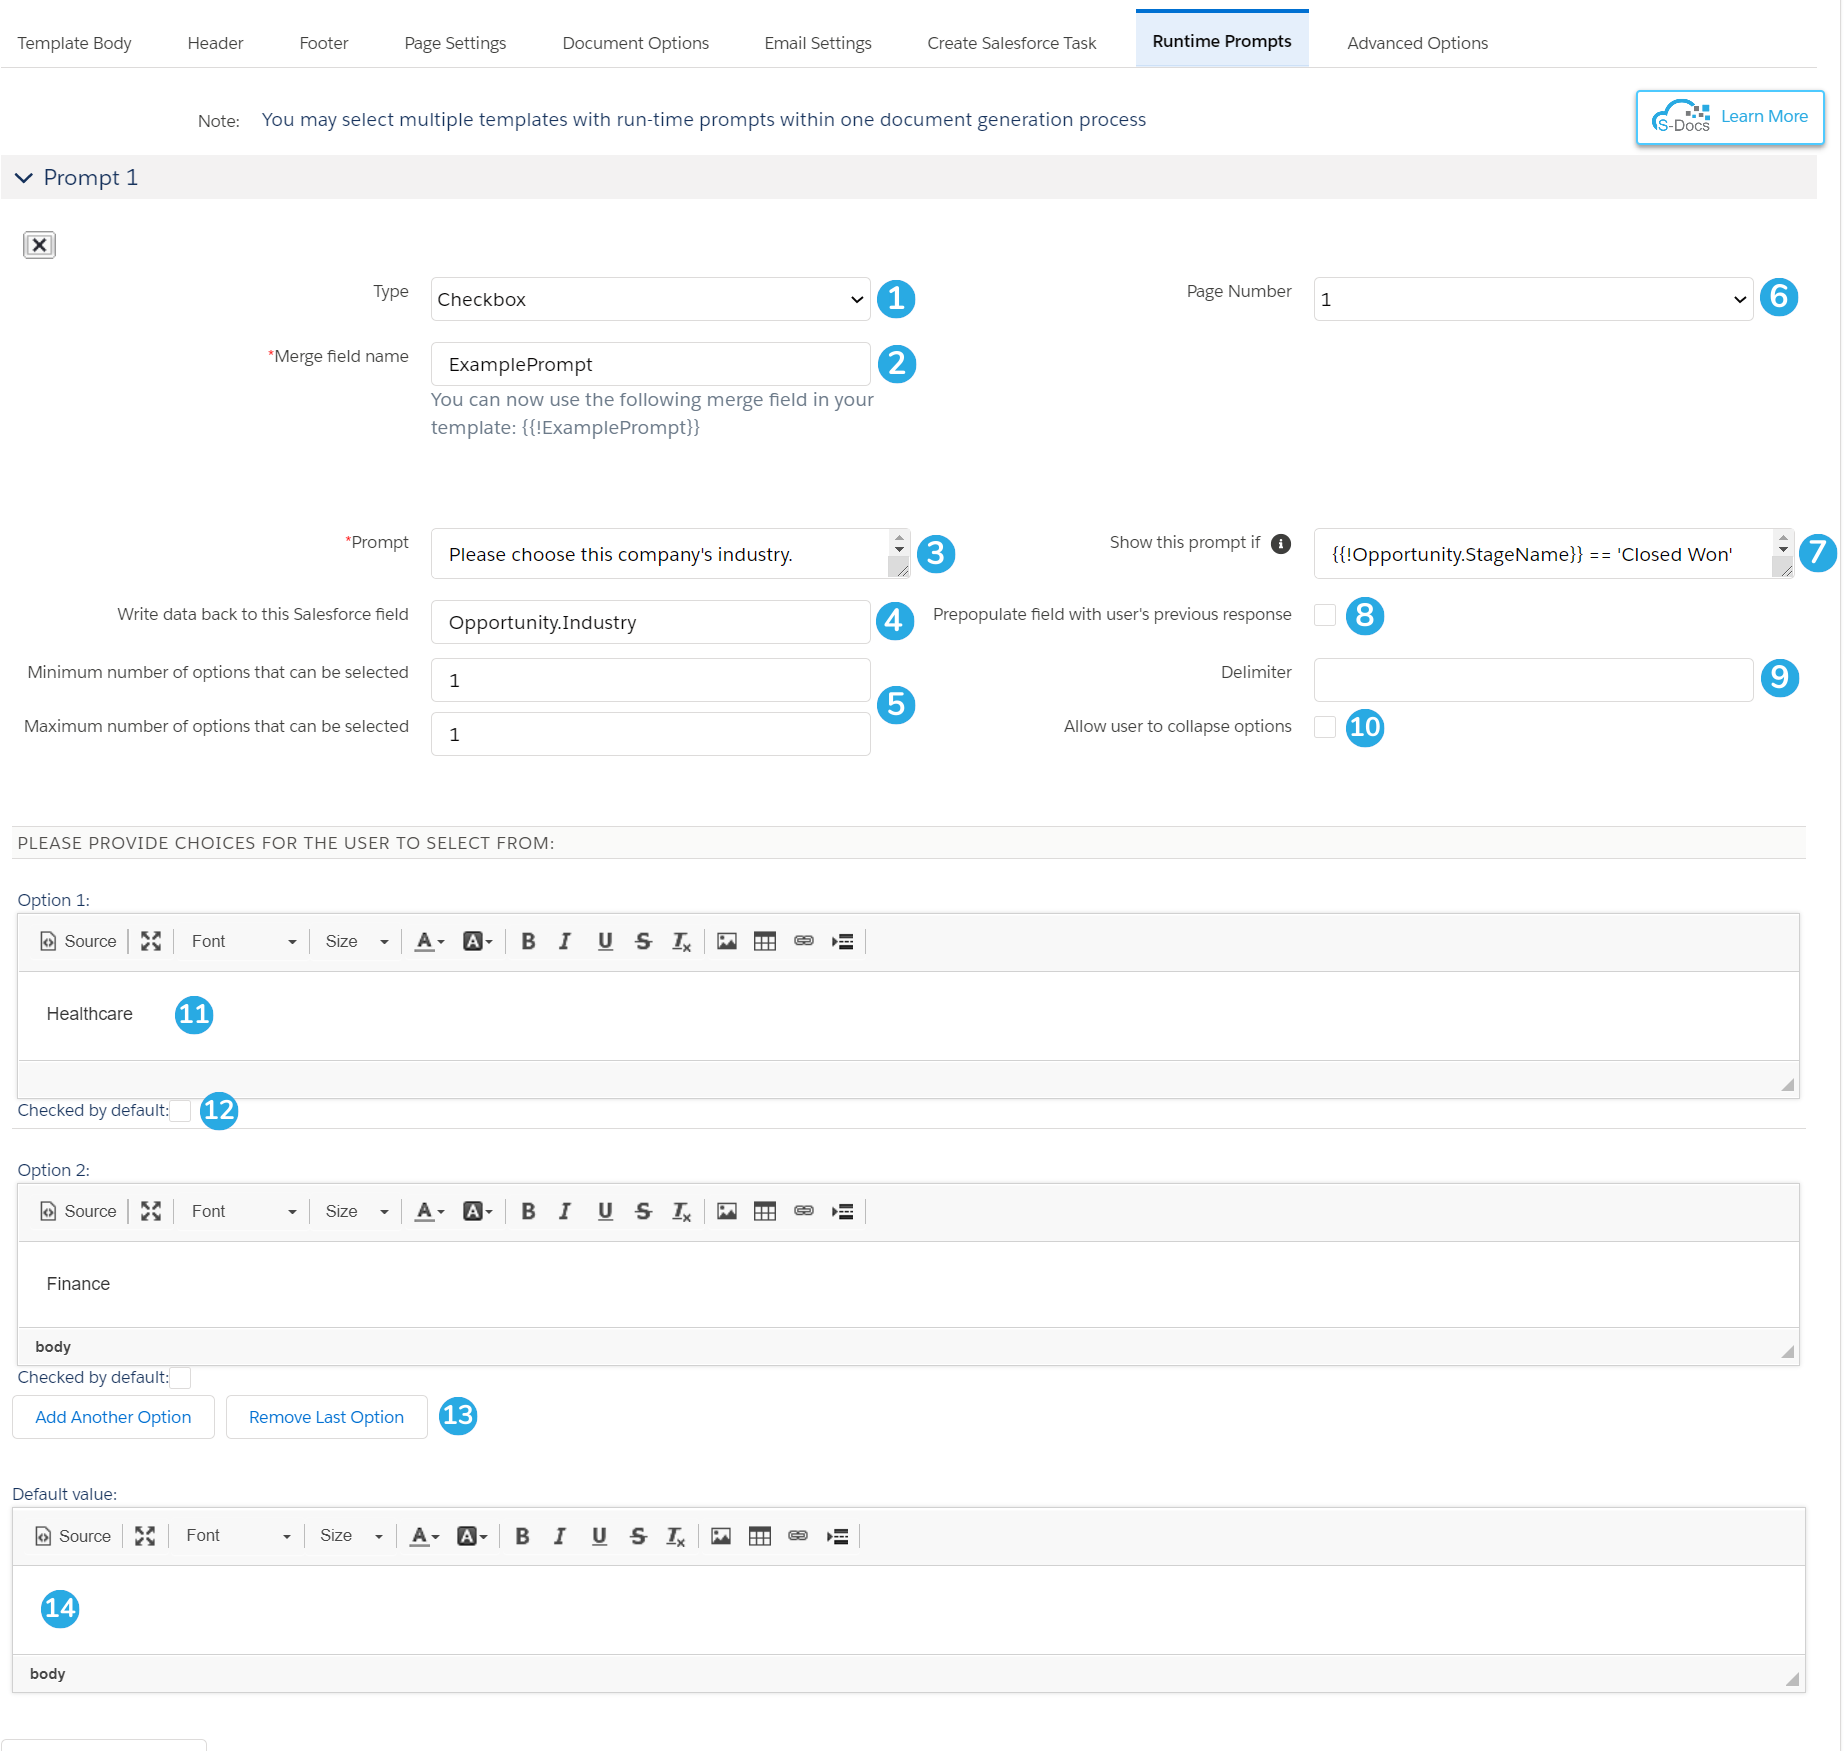
[1] Set the prompt type to Checkbox to create a checkbox prompt.
[2] Name the merge field for this prompt and place it within the template body. The user's response to this prompt will appear where the merge field is placed. This merge field can also be used within conditional statements.
[3] Write the checkbox prompt itself. This is the question the user sees above the list of checkbox options during document generation.
[4] Choose a Salesforce text field to write this data back to.

Note: Omit curly braces for Writeback merge fields used within Runtime Prompts. For example, instead of {{!Opportunity.Description}}, write Opportunity.Industry.

[5] Specify the minimum and maximum number of options that can be selected by the user. If you leave these fields blank, users will be able to select all options.
[6] Choose which page this checkbox prompt should appear on. You can create up to 10 different pages for your Runtime Prompts.
[7] Specify conditions for this prompt to be shown. This field accepts conditional statements, and can be used with regular merge fields and Runtime Prompt merge fields (see the Runtime Prompt Decision Trees section of this article for more information).
[8] Choose to prepopulate this prompt with the user's previous response. This means that if they chose "Option A" the last time they generated this document, the default value for this field will be "Option A" the next time they generate it.
[9] Specify a delimiter to separate multiple values by in the document. For example, say your Options are Okay, Good, Better, & Best, your merge field is {{!ExamplePrompt}}, and your delimiter is "AND." If the user selects Good, Better, and Best at runtime, then {{!ExamplePrompt}} will be replaced with "Okay AND Good AND Best" in the final document.
[10] Allow the user to collapse the checkbox options and only show the prompt on screen.
[11] Create the checkbox Options for users to choose from. An Option can be just one word, or it can consist of heavily formatted rich text paragraphs; you can even use merge fields in an Option. You can define as many Options as you'd like.
[12] Choose to have options appear checked or unchecked by default.
[13] Add or remove as many options as you'd like.
[14] Specify a default value for this prompt. This will be used if the user leaves the prompt blank. You can use merge fields and static text.

Now, what about picklists? Where are the Picklist Prompts!? Trick question - they're here! Runtime Prompts plays off of simplicity and flexibility to allow you to get a lot of power out of these three little Prompt types.

So, how can we get a picklist? Well, let's start with what a picklist functionally is: a collection of options that allows for the selection of exactly one of those options. In other words, a list of options from which you can select a minimum of 1 option and maximum of 1 option, meaning you can simply create a Checkbox Prompt with "1" as the value for both "Minimum number of options that can be selected" and "Maximum number of options that can be selected."

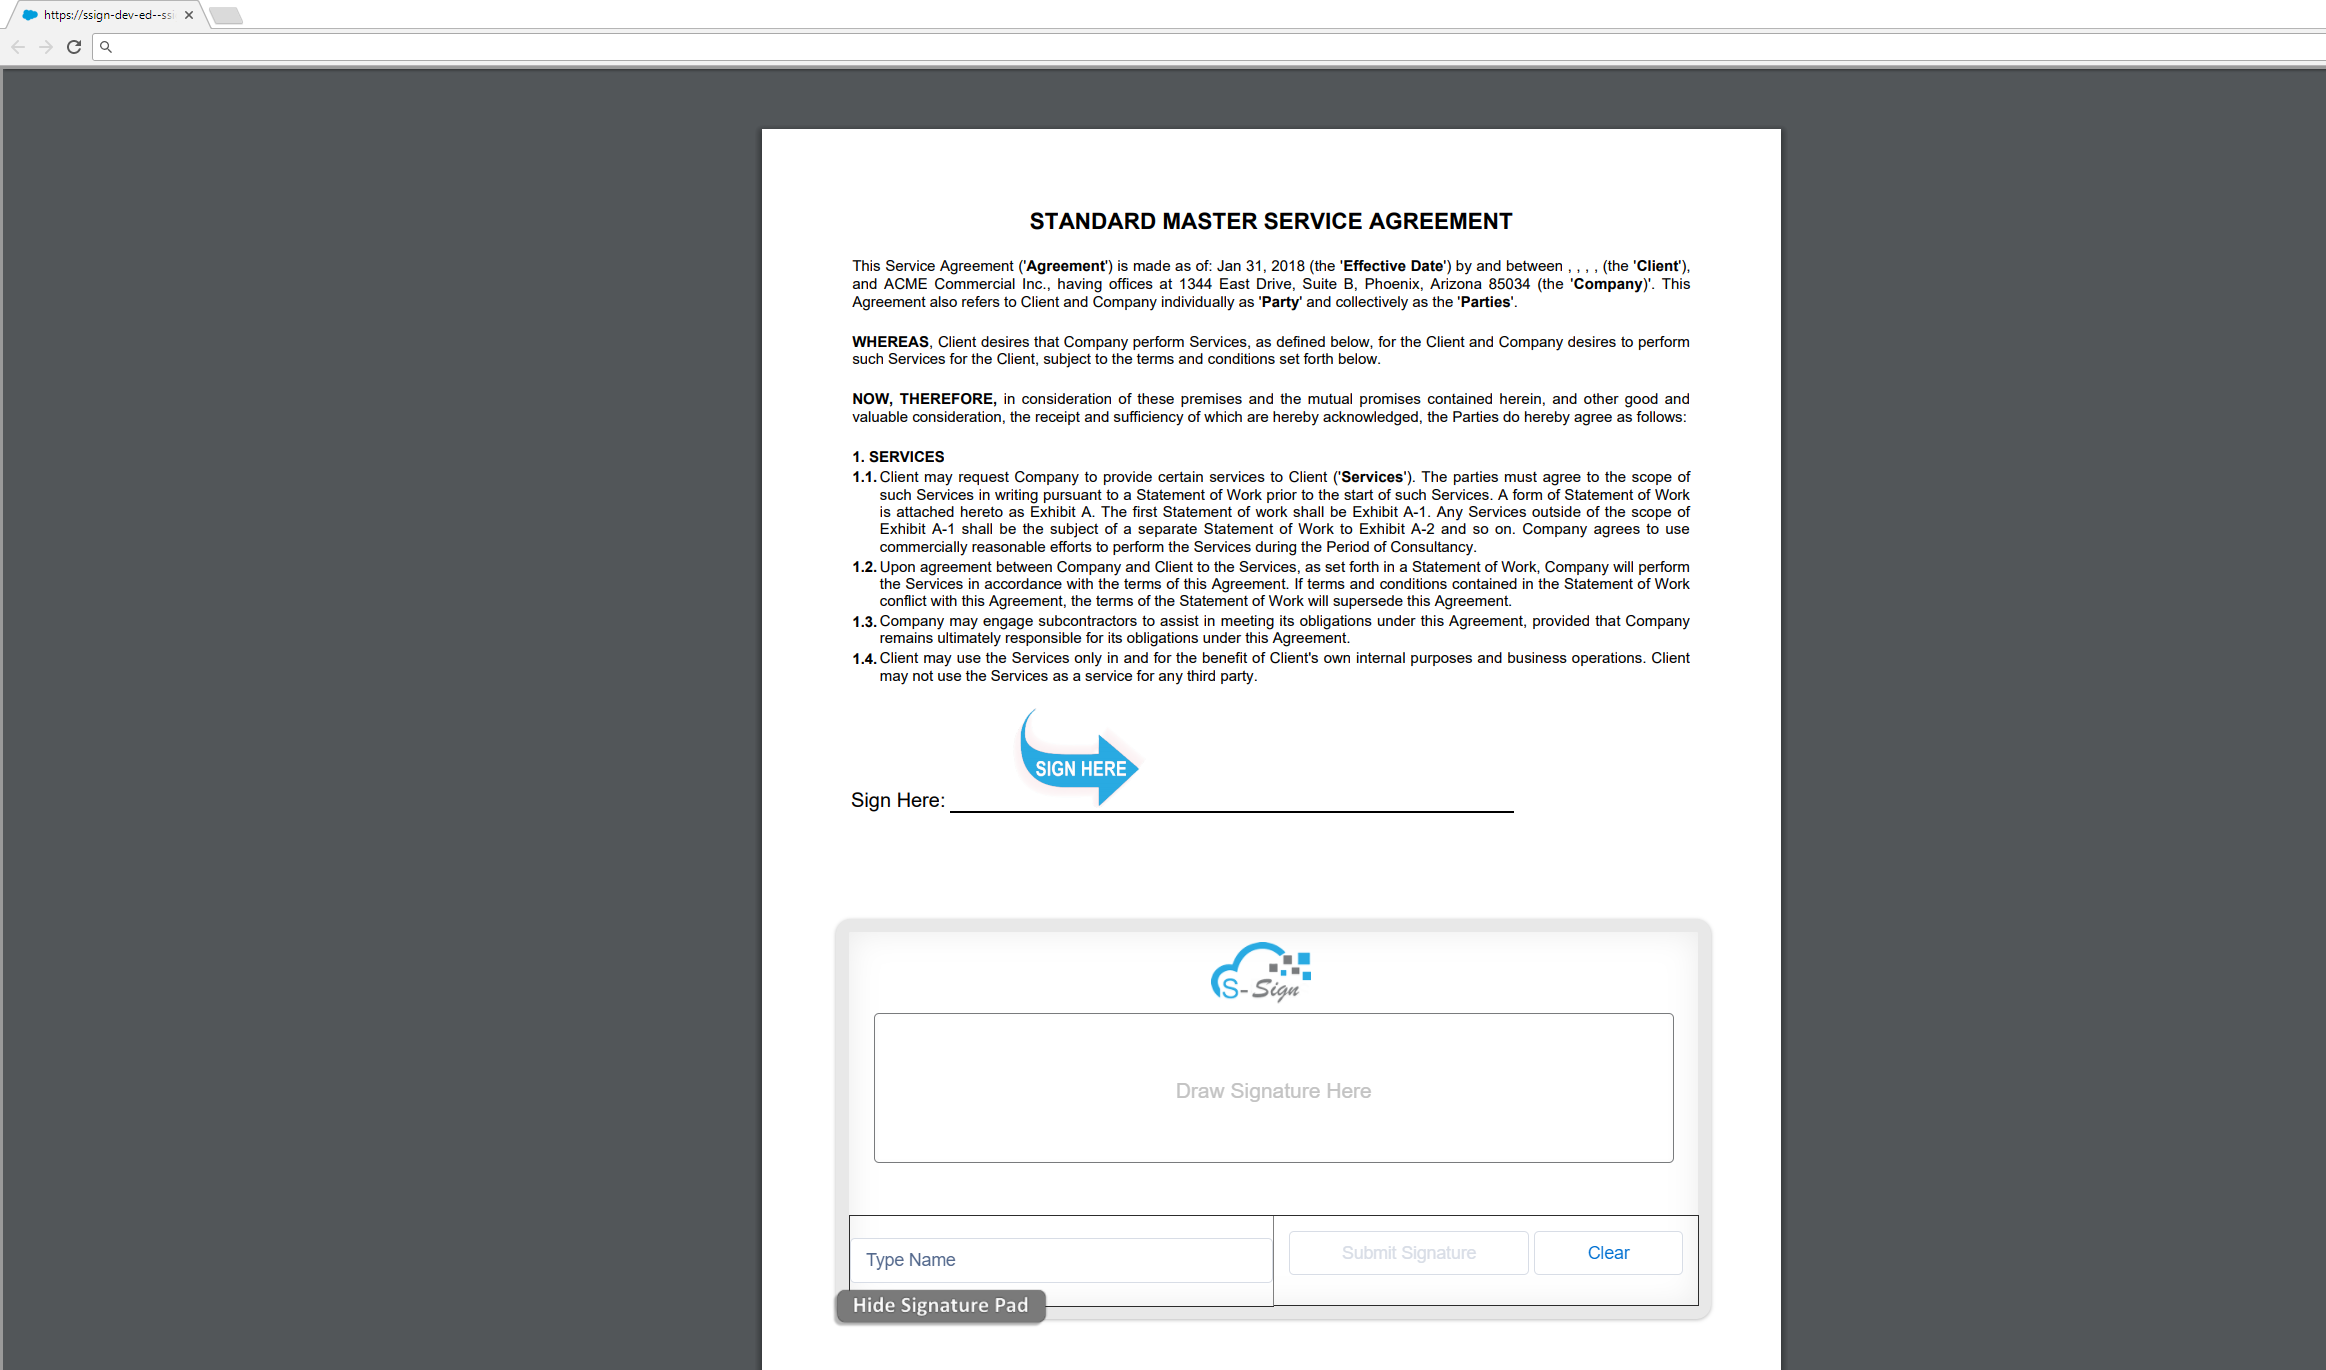
Checkbox prompts look like this at runtime:

Related List Prompts

Related List Prompts display records from a related list and allow the user to select which records to include in the document. They can be used with LineItemsSOQL queries. This is the related list prompt menu:

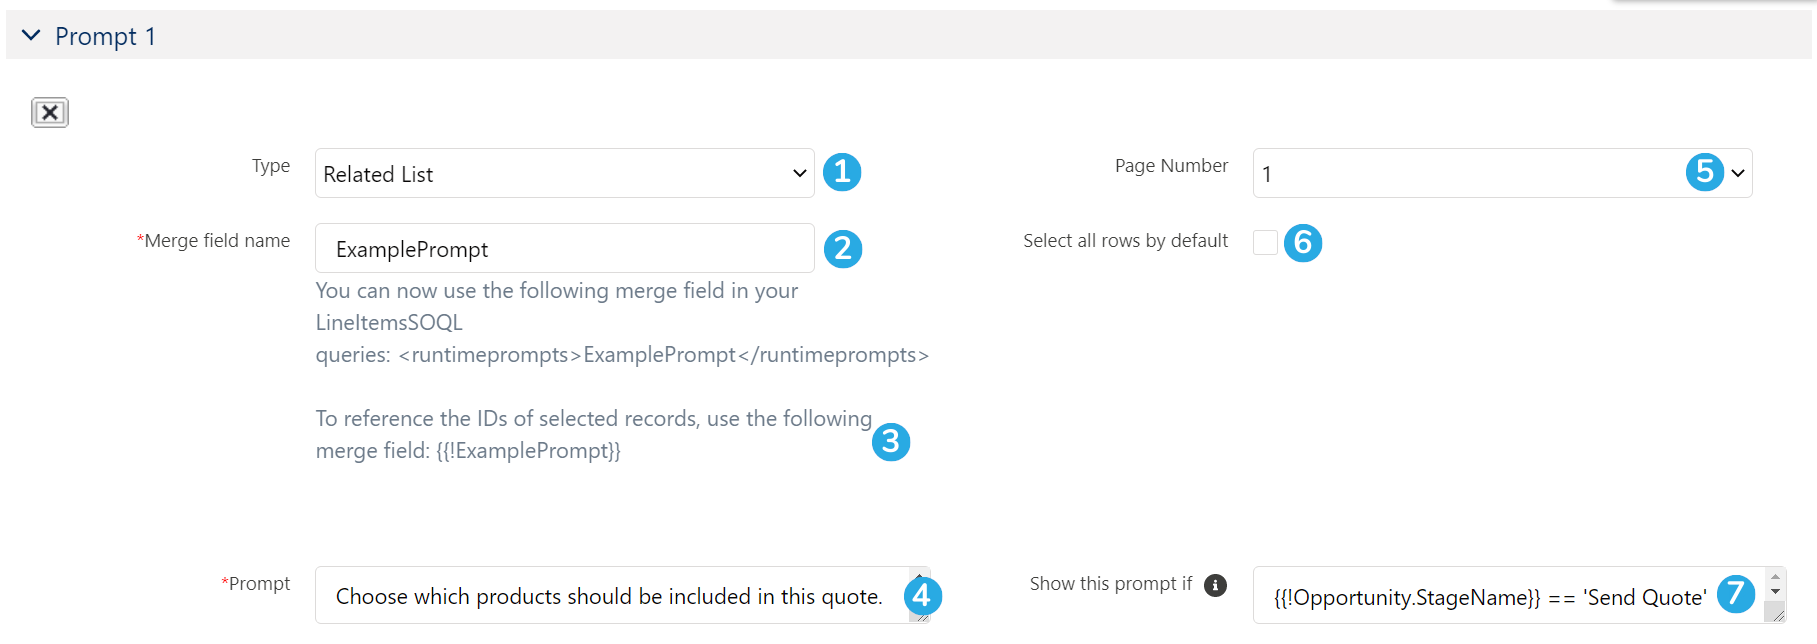
[1] Set the prompt type to Related List to create a related list prompt.
[2] Enter a name to be included within <runtimeprompts> tags within your LineItemsSOQL statement. Let's say we wanted users to be able to select which opportunitylineitems to include in a table on a quote. The LineItemsSOQL statement would look similar to the following:

[code lang="html" highlight="18,19"]<img src="data:image/gif;base64,R0lGODlhAQABAIAAAAAAAP///yH5BAEAAAAALAAAAAABAAEAAAIBRAA7" data-wp-preserve="%3Cstyle%20type%3D%22text%2Fcss%22%3Etable%20%7B%20border%3A%20collapse%3B%20%7D%0A%20%20table%2C%20tr%2C%20td%2C%20th%20%7B%20border%3A%201px%20solid%20black%3B%20%7D%0A%20%20th%20%7B%20font-weight%3A%20bold%3B%20%7D%0A%3C%2Fstyle%3E" data-mce-resize="false" data-mce-placeholder="1" class="mce-object" width="20" height="20" alt="&lt;style&gt;" title="&lt;style&gt;" />
<strong>Products</strong>
<table cellpadding="4" cellspacing="0">
<thead>
<tr>
<th>name</th>
<th>quantity</th>
<th>listprice</th>
<th>totalprice</th>
<th>productcode</th>
</tr>
</thead>
<tbody><!--{{!
<LineItemsSOQL>
<runtimeprompts>ExamplePrompt</runtimeprompts>
<uniqueid>123</uniqueid>
<class>table151</class>
<soql>
SELECT name, quantity, listprice, totalprice, productcode
FROM opportunitylineitem
WHERE opportunityid='{{!Opportunity.id}}'
</soql>
<column>name</column>
<column>quantity</column>
<column>listprice</column>
<column>totalprice</column>
<column>productcode</column>
</LineItemsSOQL>
}}-->
</tbody>
</table>[/code]

Note that the "Merge Field Name" goes inside <runtimeprompts> tags. You must also enter a unique ID (any unique string of numbers) and enter it within <uniqueid> tags, as shown above.
Upon generating the document, users would be presented with a list of related opportunitylineitems that displays the name, quantity, list price, total price, and product code of each product. They could then select which products to include in the document's related list table.

[3] Use this merge field in your document to reference the record IDs that the user selects from the Runtime Prompt related list. For example, you could write a new SOQL query in your document that only displays the records chosen, similar to the following:

[code lang="html"]SELECT ... FROM .... WHERE id IN {{!ExamplePrompt}}[/code]

You can also use this merge field in additional related list runtime prompts, so that only the records chosen in one prompt will display in another prompt. If you opt to do this, each prompt must be on its own Runtime Prompt page.

[4] Write the related list prompt itself. This is the question the user sees above the list of related list records during document generation.
[5] Choose which page this related list prompt should appear on. You can create up to 10 different pages for your Runtime Prompts.
[6] Choose to automatically select each record in the related list by default (the user could then uncheck items that shouldn't be included).
[7] Specify conditions for this prompt to be shown. This field accepts conditional statements, and can be used with regular merge fields and Runtime Prompt merge fields (see the Runtime Prompt Decision Trees section of this article for more information).

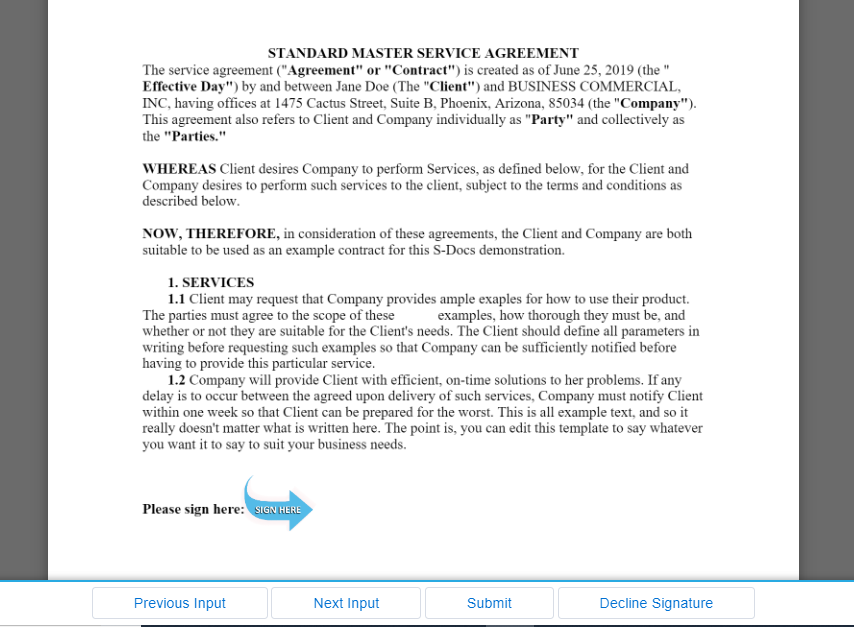
Related list prompts look like this at runtime:

Runtime Prompt Decision Trees

You can conditionally show certain prompts based on responses given for previous prompts, meaning that you can create complex decision trees for your documents. We'll demonstrate this with the following example.
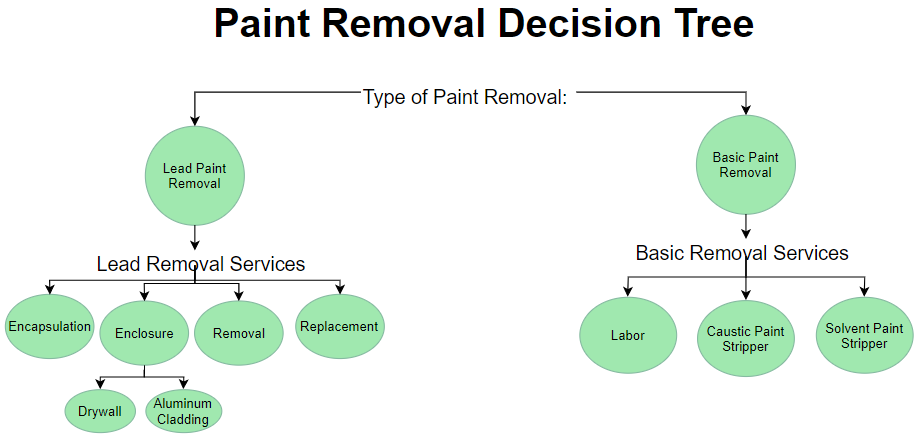
Example Use Case

Alex owns a professional paint removal service. His representatives conduct preliminary evaluations at their clients' homes, then send follow-up letters afterward. Alex wants his representatives to be able to generate these letters from a pre-made template - the only problem is, there are different types of paint removal and methods of getting it done. Alex doesn't want his employees to have to choose from a list of 20 different templates each time they want to send a follow-up letter!

Luckily, Runtime Prompts can help him out. Let's take a look at the possible choices that Alex's representatives have for their letters:

Setting Up The Prompts

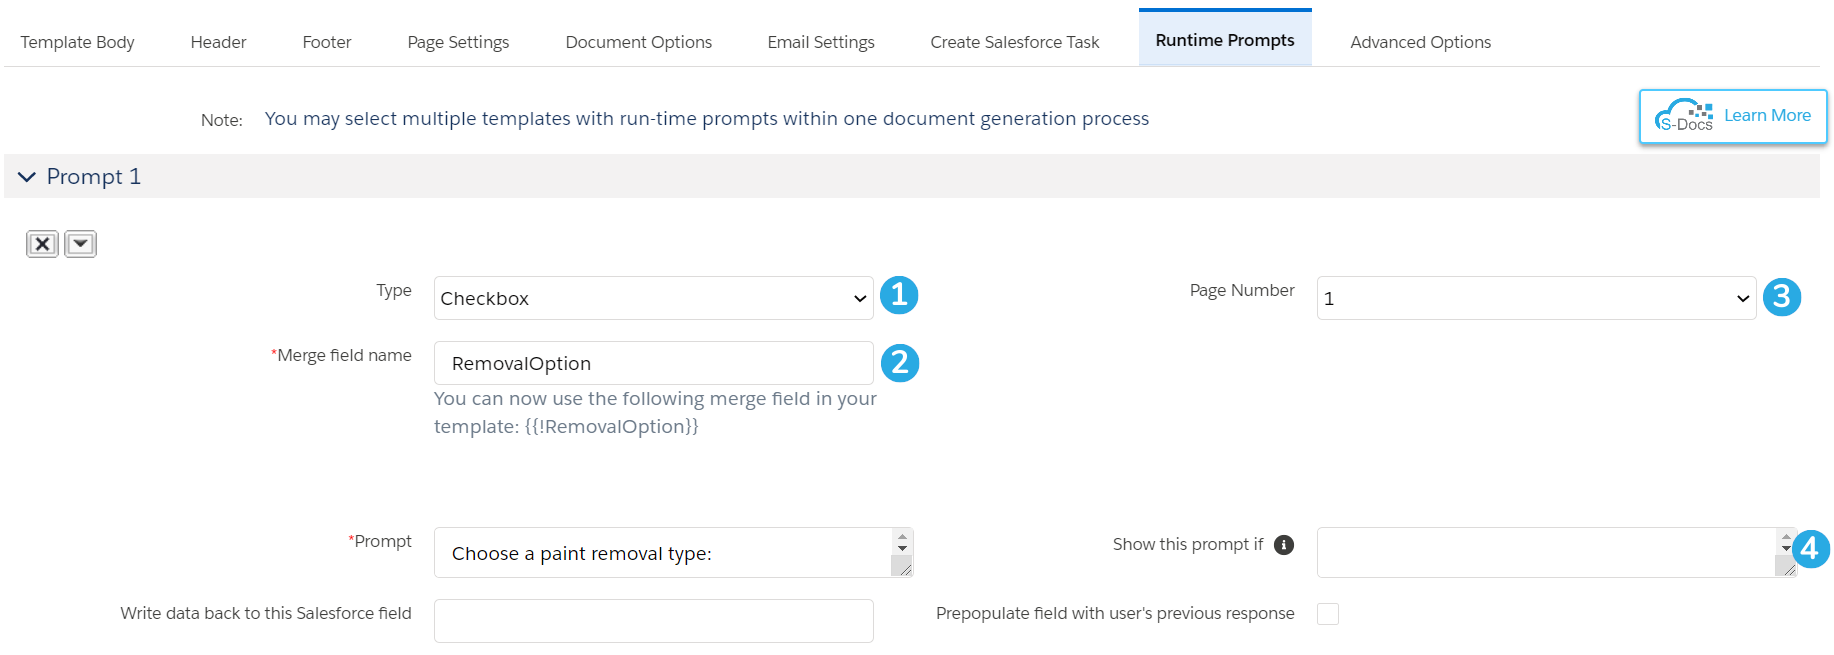
The two initial options are lead paint removal and basic paint removal. For these, Alex [1] creates a simple checkbox prompt. [2] He names the merge field "RemovalOption," and [3] chooses to have it appear on page 1 of the Prompts, since it is the first question that needs to be asked. He [4] leaves the Show this prompt if field blank, since his representatives should always see this question when they generate follow-up letters.

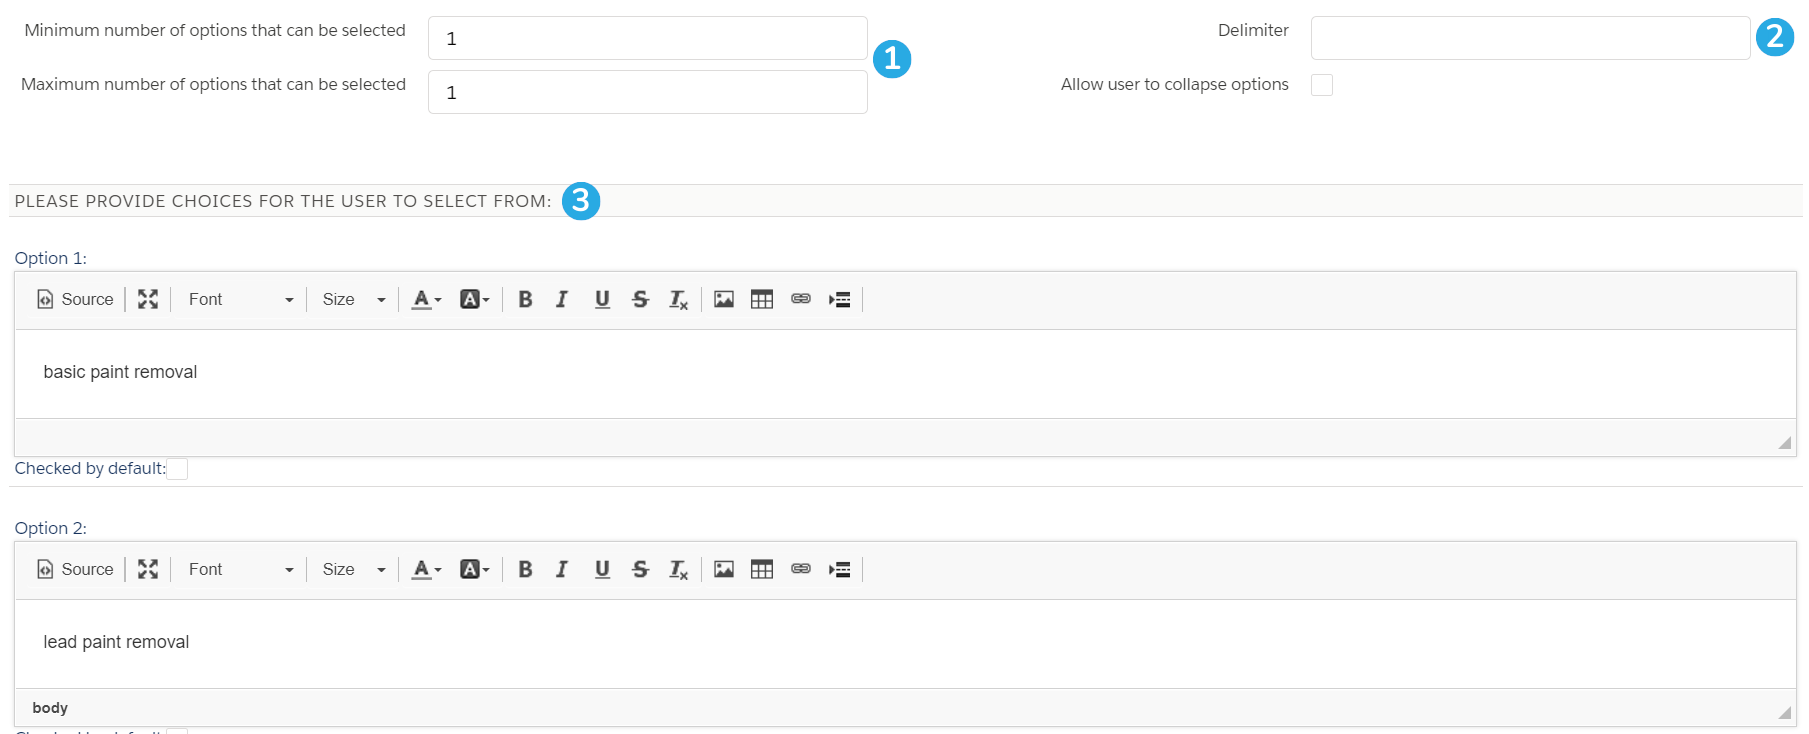
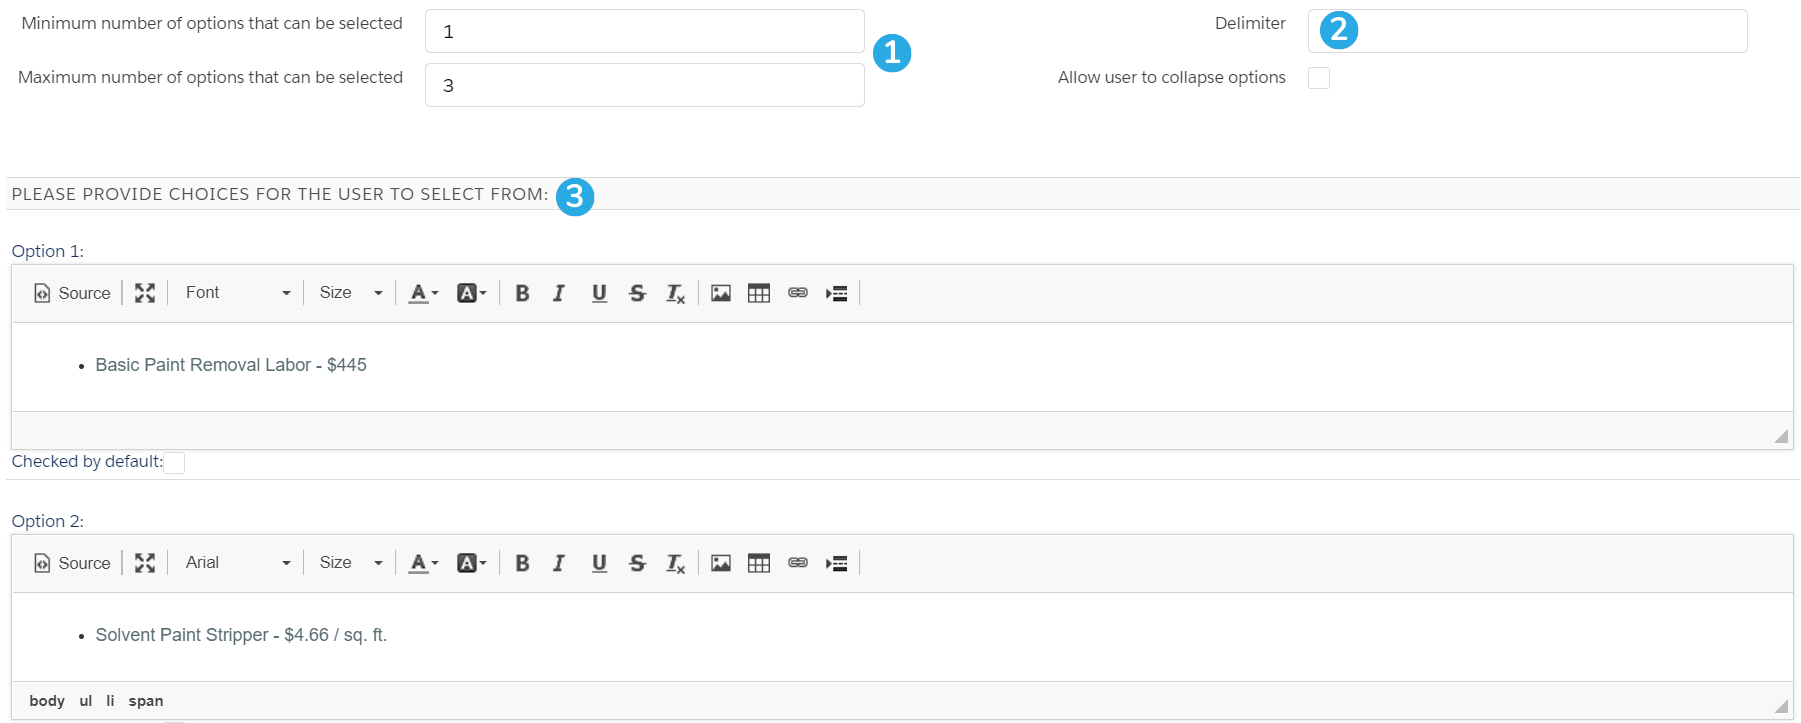
Since only 1 option is allowed to be checked, Alex [1] inputs "1" for both the minimum and maximum number of options that can be selected, and [2] leaves the delimiter field blank. He then [3] adds the two choices in as Options.

He now needs to provide his representatives with a list of basic and lead paint removal services to choose from. He only wants his representatives seeing basic removal options if they chose basic paint removal, and lead removal options if they chose lead paint removal.

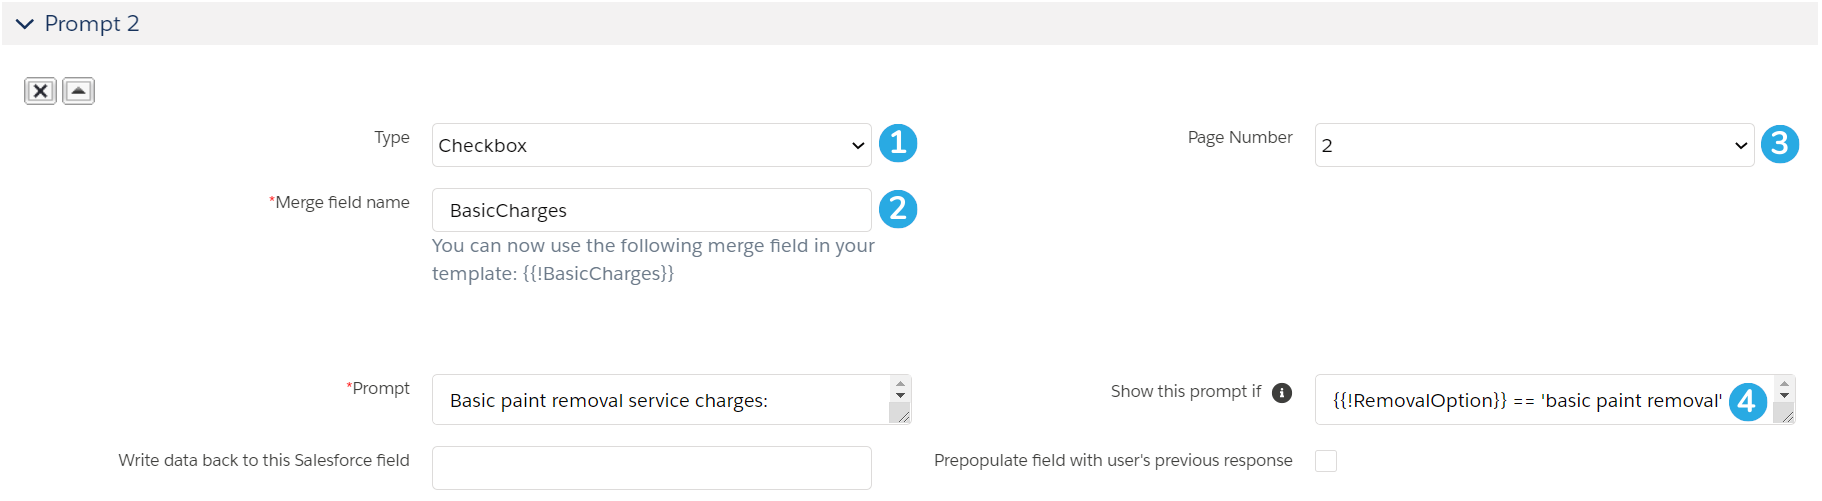
He starts with the prompt for basic paint removal. He [1] chooses a Checkbox prompt, [2] names the merge field "BasicCharges," and [3] opts to have it appear on page 2, since it's a conditional prompt. In the Show this prompt if field, he [4] denotes that the Prompt should only appear if the representative chose "basic paint removal," using the syntax {{!removaloption}} == 'basic paint removal.'

He then adds the basic removal options. Alex [1] requires at least one option to be chosen, but accepts a maximum of three choices, since a few different service charges might apply for this option. He [2] doesn't specify a delimiter because he has edited the source of his Options so they appear as bullets. He then [3] adds the three basic paint removal service charges.

He repeats this process for the lead removal options and the other conditional prompts he requires. This is the gist of Runtime Prompt Trees: they can be as basic or complex as you want!

Adding The Prompt Merge Fields Into The Document

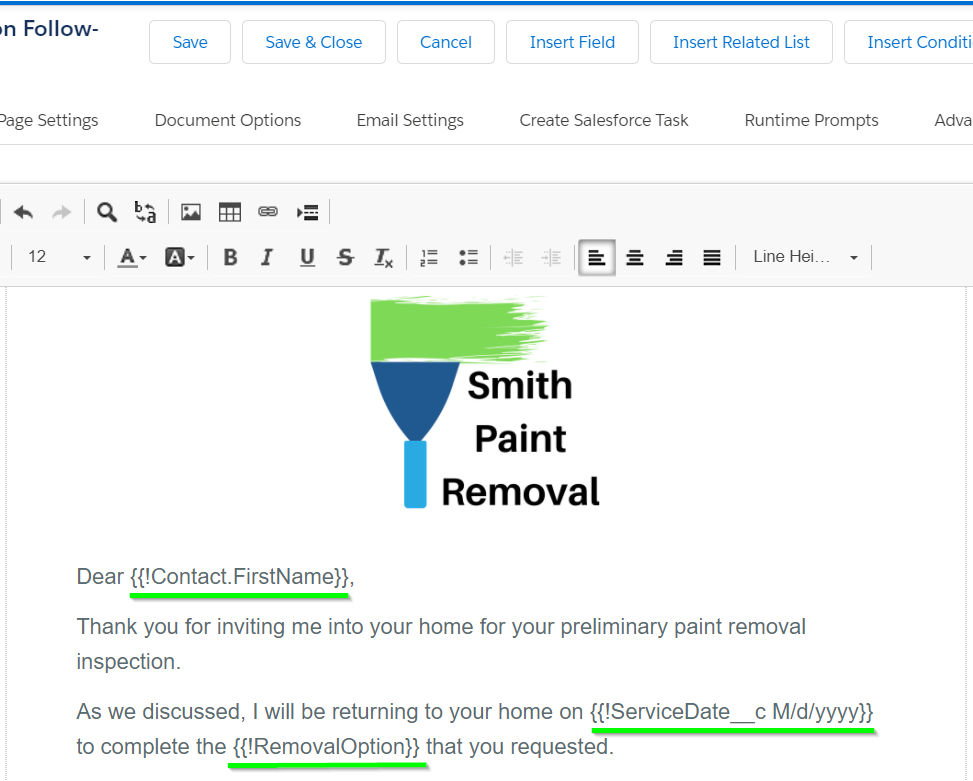
Once Alex finishes creating his Runtime Prompts, he needs to add his custom merge fields to the followup letter template. He begins by adding in the merge fields that will always appear in the document: the client's name, the date of the representative's return, and the paint removal type.


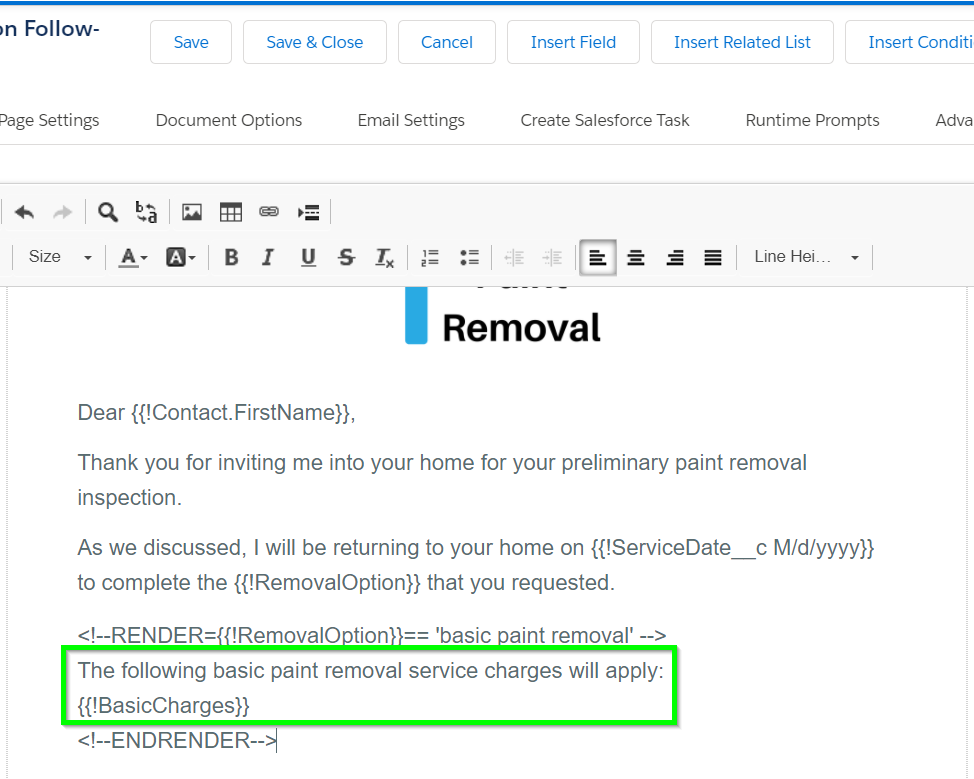
After this introduction, he wants certain sections of the document to conditionally appear/disappear based on responses to his Runtime Prompts, so he opts to use the Conditional Logic feature. He first inserts a conditional statement for basic paint removal. The portion outlined in green is what will appear in the document if "basic paint removal" is chosen by his representatives.

He uses a nested conditional statement for lead removal options, since one of the options (enclosure) has further options to choose from, and he only wants these further options shown if both "lead paint removal" is chosen and "enclosure" is picked as the type. The portions outlined in green are what will appear if "lead paint removal" is chosen by his representatives, and the portion outlined in orange is what will appear if "enclosure" is chosen as the removal type.

What The End User Sees

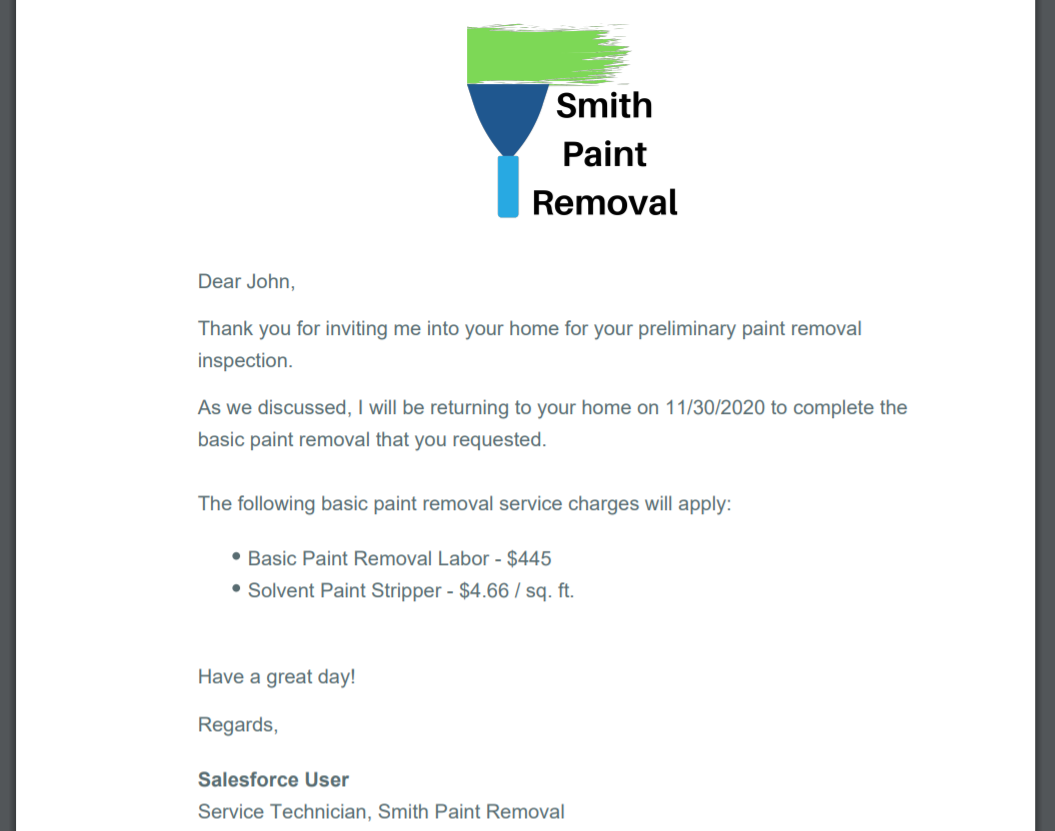
Now that Alex has added in all of his merge fields, let's see what his representatives will see each time they generate the follow-up letter. On the first page, they will simply be prompted to enter the date of their return and the type of paint removal that the client needs.

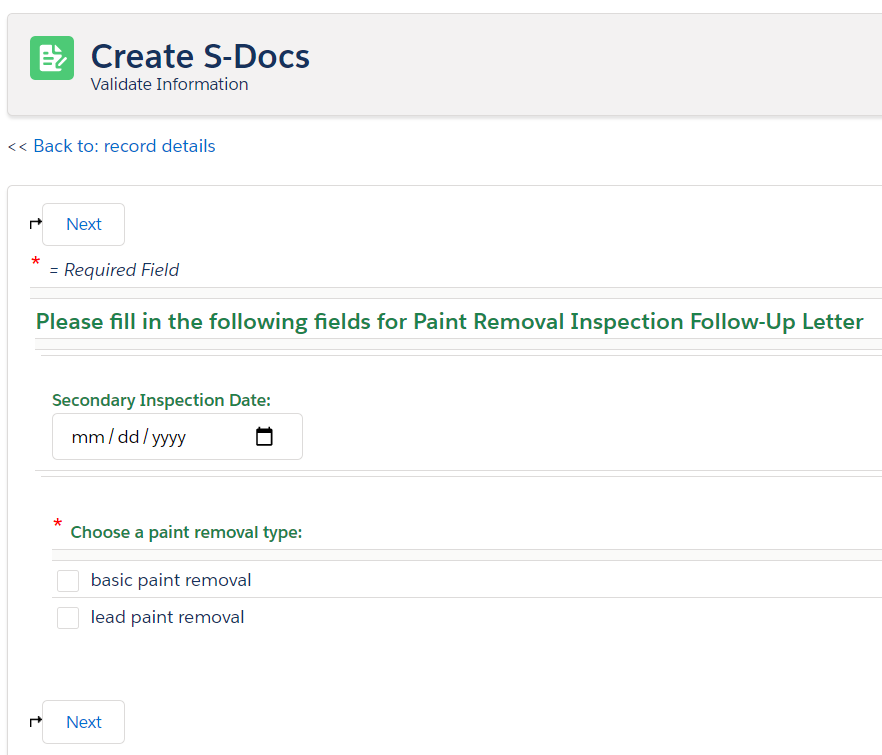
If they choose "basic paint removal," they will be prompted with the appropriate options.

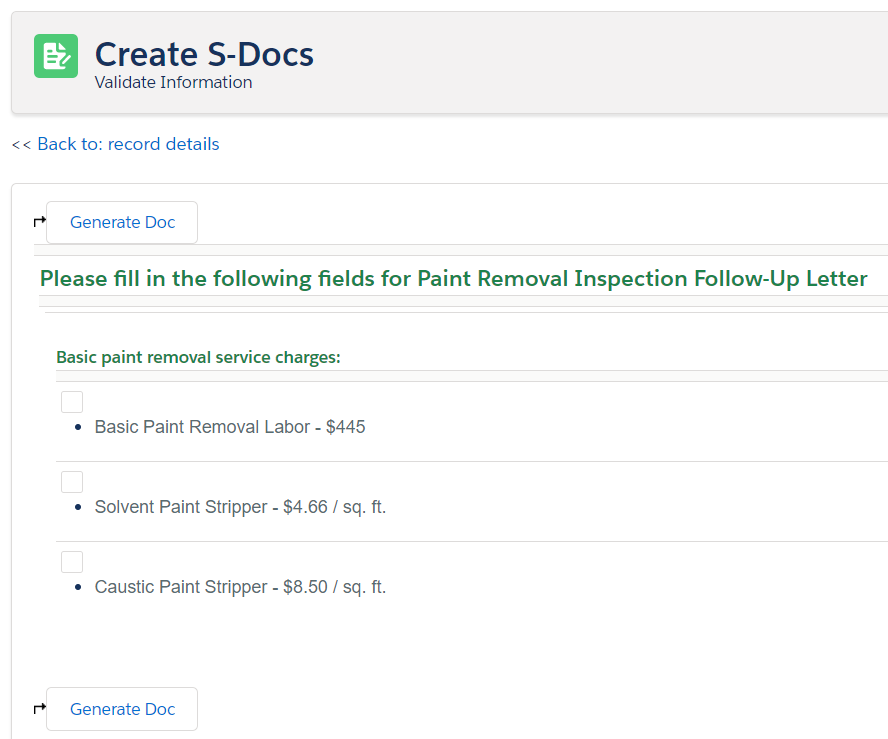
Since there are no more options that go with basic paint removal, the representative can click Generate Doc to generate the follow-up letter with their choices incorporated.

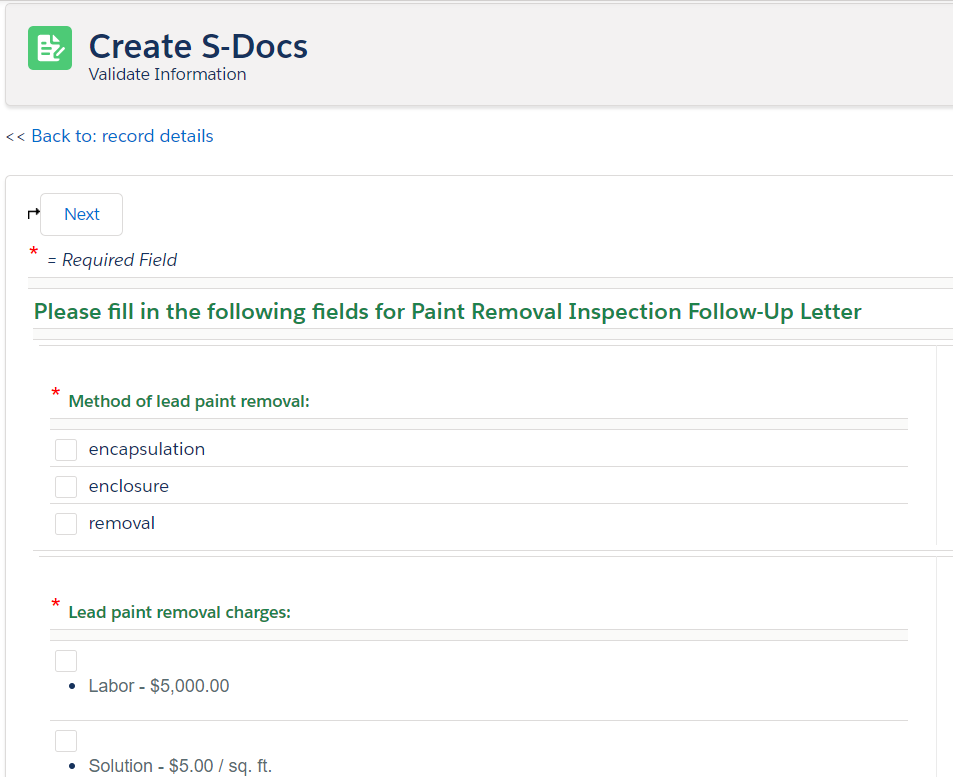
Let's go back to before the document was generated. If Alex's representatives choose lead paint removal instead, they will be prompted with the lead options.

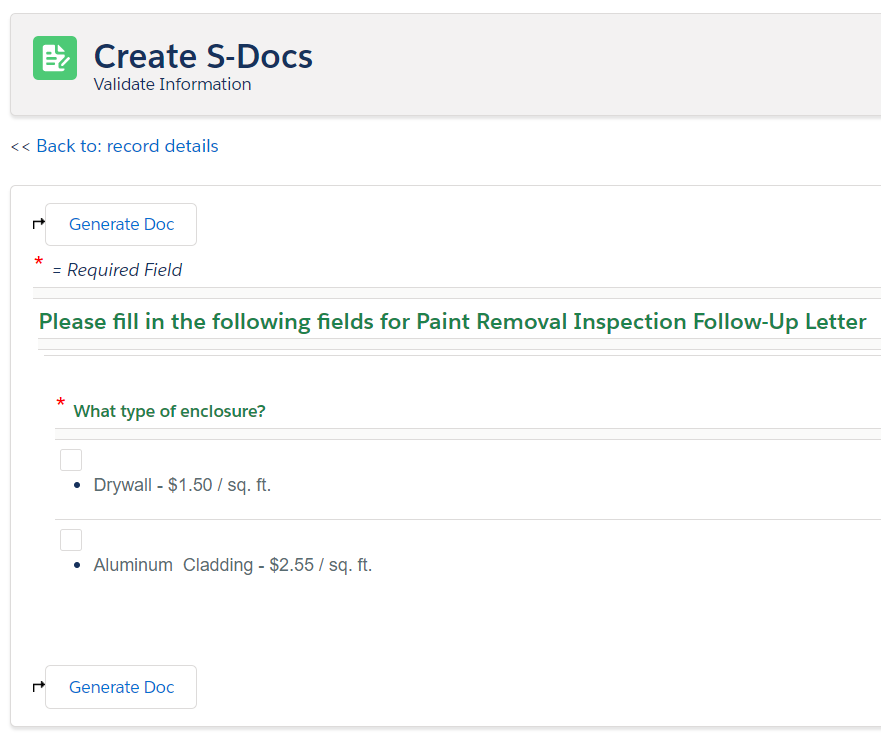
Finally, if they choose enclosure as the method of lead paint removal, they will be prompted with the further options that are available, on a separate page.

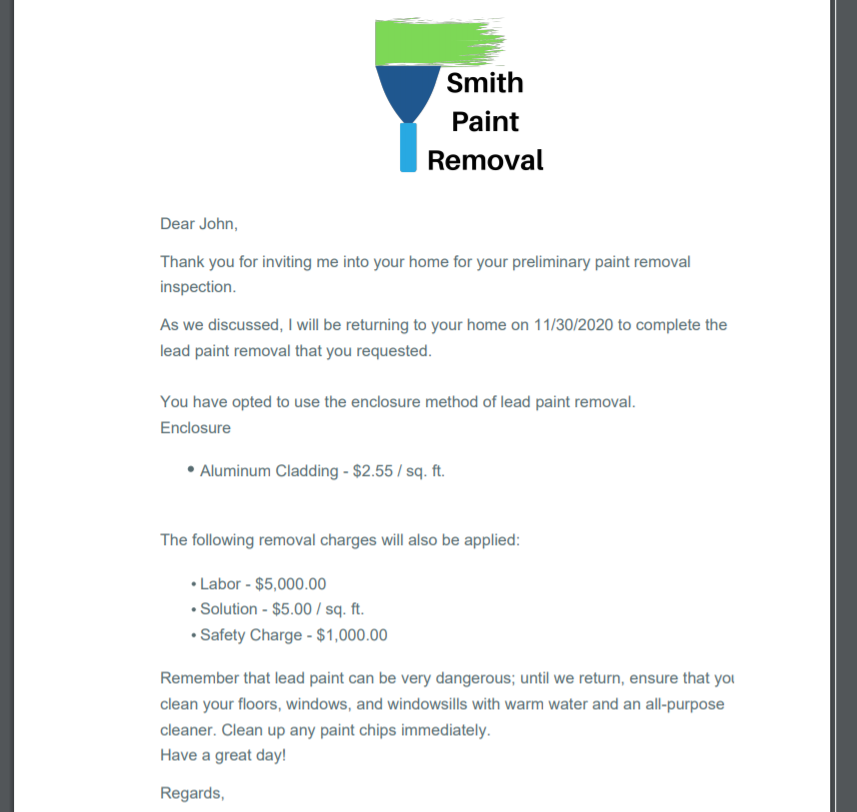
The final document will render only the lead paint removal sections.

That's it! We designed Runtime Prompts to be as simple as possible while providing enough flexibility so that you can integrate them with other features in order to achieve pretty much any result imaginable when form input is required prior to document generation. If you want to download and play around with a template already set up with Runtime Prompts, you can get this Boiler Inspection Follow-Up Letter from our Template Library. This is one of many examples of how we can use form data to build a living, breathing document.

Translate The S-Docs UI

By Documentation, General Solutions, S-Docs Cookbook No Comments

Defining Your Own Translations

Translating the user experience of S-Docs is simple. Currently, only Spanish and German translations are available to download; this process is explained in the next section. If you want to define your own translations, you can do so on the S-Docs translation page. If you are using S-Docs 4.381+, navigate to this page by clicking the App Launcher, typing in "S-Docs Setup," and clicking S-Docs Setup in the dropdown menu. From there, scroll down to the Translate UI section and click Go To S-Docs UI Translation Page.

If you are using a version of S-Docs below 4.381, the S-Docs Translation page can be accessed by adding the following URL after "salesforce.com" in your browser:

[code lang="html"]/apex/SDOC__SDConfig?translateSDocs=true[/code]

The S-Docs translation page appears as follows:

If you've defined translations for a language on this page before, you'll be able to [1] choose a language and [2] edit the translations for that language. If you haven't accessed this page before, you'll need to [3] enter the name of a language and then [4] click Define new translations for this language to bring up a list of available S-Docs fields that you can translate.

Translation options are [1] broken up into different sections. The following S-Docs pages can be translated on this page:

  • The Generate Documents page (where templates are selected and generated)
  • The Edit Document page (where generated documents can be edited using the Live Edit feature)
  • The Send Email page
  • The Contact Lookup window (this appears when users click inside of the Contact/User Lookup field on the Send Email page)
  • The Attach Files window (this appears when users click Attach or Remove Files on the Send Email page)
  • The Upload Files tab within the Attach Files window

[2] The English version of each field that can be translated appears on the left. You can translate the text in the text box on the right. Make sure to [3] click Save when you are done entering your translations.

Using S-Docs Translation Templates

1. Import The Template

To use the translations we provide, begin by importing either the Spanish or German translation template. To do this, create a new template. You can set whatever values you want for "Related to Type" and "Template Format," as these will be overwritten when you import the translation template.

Navigate to the template editor and paste in the code from one of the links below, then click Save & Close.

Spanish: S-Docs Translation Spanish v2.955
German: S-Docs Translation German v2.955

Once you click Save & Close, the template record should look like this.

Notice that Available for Use and Initially Visible have been unchecked, since this isn't a template that can be used for document generation; it's simply providing the translation for the S-Docs user experience.

2. Add The Translation Parameter To Your S-Docs Button

Note: The S-Docs button comes prepackaged for the following standard objects: Contract, Opportunity, Account, Contact, Lead, Task, and Event. Because of this, the button will be managed and therefore unable to be edited for these objects. You will need to create a new S-Docs button (and replace the old button on the object's page layout) to make edits.

Next, you need to add the following parameter to the S-Docs button for each object you're using S-Docs with (replace Spanish for German if using the German translation):

[code lang="html"]UILanguage='Spanish'[/code]

In this example, we'll add it to the S-Docs button for the Contact object. Navigate to Setup by clicking the cog in the upper right corner of your screen, then go to the Object Manager tab. Click your object.

Then, navigate to the Buttons, Links, and Actions tab. Find your S-Docs button and click Edit.

Add the parameter to your button.

[code lang="html"]{!URLFOR('/apex/SDOC__SDCreate1', null,[id=Contact.Id, Object='Contact',
UILanguage='Spanish'])}[/code]


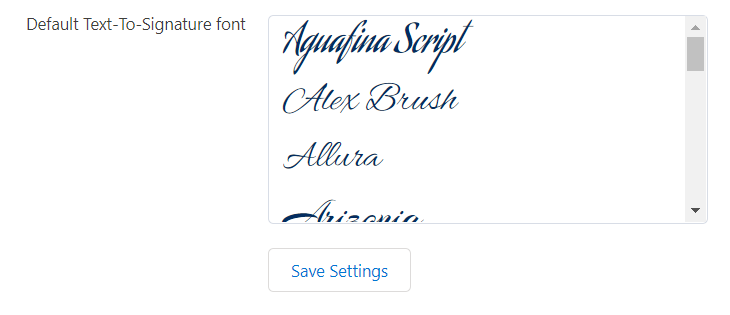
Click Save and you're all set! The S-Docs user experience will now be translated.

Translate The S-Sign UI

By Documentation, S-Sign No Comments

Defining Your Own Translations

Translating the user experience of S-Sign is simple. Currently, only Spanish and German translations are available to download; this process is explained in the section below. If you want to define your own translations, you can do so on the S-Sign translation page. If you are using S-Docs 4.381+, navigate to this page by clicking the App Launcher, typing in "S-Docs Setup," and clicking S-Docs Setup in the dropdown menu. From there, scroll down to the Translate UI section and click Go To S-Sign UI Translation Page.

If you are using a version of S-Docs below 4.381, the S-Sign Translation page can be accessed by adding the following URL after "salesforce.com" in your browser:

[code lang="html"]/apex/SDOC__SDConfig?translateSSign=true[/code]

The S-Sign Translation page appears as follows:

If you've defined translations for a language on this page before, you'll be able to [1] choose a language and [2] edit the translations for that language. If you haven't accessed this page before, you'll need to [3] enter the name of a language and then [4] click Define new translations for this language to bring up a list of available S-Sign fields that you can translate.

[1] The English version of each S-Sign field that can be translated appears on the left. You can translate the text in the text box on the right. Make sure to [2] click Save when you are done entering your translations.

Using S-Docs Translation Templates

1. Import The Template

To use the translations we provide, begin by importing either the Spanish or German translation template. To do this, create a new template. You can set whatever values you want for "Related to Type" and "Template Format," as these will be overwritten when you import the translation template.
Next, navigate to the template editor and paste in the code from one of the links below, then click Save & Close.

Spanish: S-Sign Translation Spanish v1.960
German: S-Sign Translation German v1.960

Once you click Save & Close, the template record should look like this.

Notice that Available for Use and Initially Visible have been unchecked, since this isn't a template that can be used for document generation; it's simply providing the translation for the S-Sign user experience.

2. Add The Translate Parameter to Your S-Docs Button

Note: The S-Docs button comes prepackaged for the following standard objects: Contract, Opportunity, Account, Contact, Lead, Task, and Event. Because of this, the button will be managed and therefore unable to be edited for these objects. You will need to create a new S-Docs button (and replace the old button on the object's page layout) to make edits.

Next, you need to add the following parameter to the S-Docs button you will be using with S-Sign (replace Spanish for German if using the German translation):

[code lang="html"]ssignParams='language:Spanish'[/code]

In this example, we'll add it to the S-Docs button for the Contact object. Navigate to Setup by clicking the cog in the upper right of your screen, then go to the Object Manager tab. Click your object.

Then, navigate to the Buttons, Links, and Actions tab. Find your S-Docs button and click Edit.

Add the parameter to your button.

[code lang="html"]{!URLFOR('/apex/SDOC__SDCreate1', null,[id=Contact.Id, Object='Contact',
ssignParams='language:Spanish'])}[/code]

Click Save, and you're all set! The S-Sign user experience will now be translated.

Setting Language on a Per-Document-Envelope Basis

You can also set the S-Sign language for individual document envelopes through the SSIGN__Language__c field. When building automation using the S-Docs Job object in conjunction with Salesforce Process Builder or Apex, set the S-Doc Job field SSign Language to your chosen language. This will cause the S-Doc Job record to set the S-Sign Envelope Document field SSIGN__Language__c to that language.

Using S-Sign in Person

By Documentation, S-Sign No Comments

Introduction

If you need your clients to sign documents in person, S-Sign has you covered. 

Before you begin, make sure you've configured S-Sign and created your S-Sign enabled template. If your documents aren't going to be signed in person, click here to learn how to use S-Sign with email.

Generate An In-Person S-Sign Request

Start by navigating to your object record and clicking the S-Docs button.

Select the document you wish to be signed and click Next Step.

Note: Since the document will be signed in person, you do not need to use an HTML template along with the PDF template.

Since you only selected a PDF template, an E-Sign Documents In Person button will appear in place of the email button. Click this button to proceed.

What The Signer Sees

After clicking "E-Sign Documents In Person," you will be redirected to the email verification page. The signer of the document will be required to enter a verification code before proceeding. This 6-digit code will be sent to them once they enter their email address.

After clicking Continue, the document will be displayed. The signer can then fill in all of the inputs required by clicking on the text boxes/check boxes or clicking Next Input and Previous Input to move between them.

The signature pad will open for the signature input. The signer can then draw their signature and type their name, then click Add Signature.

The signer can then review the document once more and click Submit when they are finished. The following screen will appear. The signer can click anywhere to view the signed document.

The final document will be displayed will all of the inputs filled in, the signer's signature merged into the signature area, and a date/time stamp.

The signer can also scroll down to view the document's audit trail.

In addition, the signer will receive a confirmation email with the signed document attached for their records.

That's all there is to it!

S-Docs Quick Install & Configuration Guide

By Documentation, S-Docs Install Config and Upgrade No Comments

Step 1: Install S-Docs

This quick installation & basic configuration guide will teach you how to install S-Docs and create & email a custom document in Salesforce Classic. To view this article for Salesforce Lightning Experience, click here.

Note: You should download and install the S-Docs package into a SANDBOX or DEVELOPER organization. We strongly advise against installing it into any production org without proper testing.

You can watch the video above or follow the instructions below to install S-Docs.

1. Navigate to our Salesforce AppExchange listing and click Get it Now.

2. You will be prompted to log into your Salesforce org.

3. Once you are logged in, you'll be given the option to install S-Docs in your production org or a sandbox instance. We highly recommend testing in a sandbox instance before installing in your production org.

4. Confirm your profile details, agree to the terms and conditions, and click Confirm and Install.

5. You'll then see the following screen. Make sure to select Install for All Users and then click Install.

Congratulations! S-Docs is now installed in your org.

We recommend assigning the S-Docs User or Administrator permission sets to yourself and users who will be interacting with S-Docs. Learn more about S-Docs permission sets here.

Step 2: Create the S-Docs Button and Add it to Your Object’s Page Layout

This section details setting up your S-Docs button for a standard object in Salesforce Classic. This button will initiate the template selection and document generation processes. Although the setups are fairly similar, please reference this documentation for information regarding S-Docs in Salesforce Lightning, and please refer to this documentation for information on setting up S-Docs with a custom object.

The S-Docs button comes pre-created for the following standard objects: Contract, Opportunity, Account, Contact, Lead, Task, and Event. If you're setting up S-Docs for these objects, you only need to add the button to your page layout. However, if you plan to customize the functionality of your button with apex parameters, you should create a new button so that you can edit it in the future. For other standard objects, you will need to create a new custom button.

In this example, we will be creating the S-Docs button for the Opportunity object.

Navigate to Setup > Build > Customize > Opportunities > Buttons, Links, and Actions.

Click New Button or Link to add a new button.

Fill in the following information for your button.

Button Label & Name: Choose a name. We'll name our button "S-Docs."
Description: Optionally enter a description, such as "Create documents for this object."
Display Type: Detail Page Button
Behavior: Display in existing window without sidebar or header
Content Source: URL
Button URL:

{!URLFOR('/apex/SDOC__SDCreate1', null,[id=Opportunity.Id, Object='Opportunity'])}

Note: Be sure to replace both instances of "Opportunity" with the API name of your object in this URL.

To read about how you can customize this button to allow for one or zero click automation, click here.

Add Your S-Docs Button To Your Page Layout

Once you save this button, you'll need to add it to the detail page layout for your object. Navigate to an object record and click Edit Layout.

Click Buttons in the top menu. The S-Docs button that you just created will appear in this menu. Click and drag it into the Custom Buttons area in the Opportunity Detail section. Click Save when done.

Add The S-Docs Related List To Your Page Layout

Additionally, you should add an S-Docs Related List to your page by clicking Related Lists and dragging the S-Docs box down into the Related Lists section.

The S-Docs Related List on a given record should display all of the S-Docs ever generated for that record, as well as options to download and email those documents again. In order to display this, we need to add these columns to our Related List. Click the wrench icon on the S-Docs related list.

We recommend adding the following columns: View, Edit, Email, Doc Number, Name, Status, Doc Created On. These will display as columns from left to right on your related list (where top=left and bottom=right). To add a column, click on the column you want to add and then click the triangle button below "Add."

Additionally, we recommend sorting by Doc Created On descending.

Click OK once you’ve added all of your fields. The related list will appear as follows on a particular record’s page.

Note: Each time you edit an S-Doc template record with Auto Create Salesforce Attachment and link to record unchecked, the documents on the related list will change to reflect those edits. The related list will not store documents generated from previous versions of your templates, but rather generate a new document reflecting the most recent version of your template each time you view or email a document in this list.

Step 3:  Configure Your First Template

In order to start using S-Docs, you need to configure and activate at least one template. Start by navigating to the S-Docs templates page by clicking All Tabs ("+" sign), scrolling down, and clicking S-Docs Templates.

This page is where all of your templates will appear. To create a new template, click New.

This is the template creation page. In this example, we will create an invoice template for the Opportunity object. Each field is explained below the screenshot.

Template Name: Enter a template name. This field is required.
Description: Optionally add a description. You should include any keywords that will be useful when searching for this template, because this field and the name field are searched during the template selection step. End users will see this when they are selecting templates.
Document Category: Optionally chose a category from the picklist. Templates can be grouped together so that a user can browse templates using a category picklist. If needed, you can later customize this picklist.
Related to Type: Pick an object from the picklist. This is the base or primary object this template will use. If needed, you can customize this list with your custom objectsThis field is required.
Template Format: Pick an output format. To support the same document in multiple formats, simply clone the template with a different "Format" field value. This field is required.
Document Version: Optionally use this field to track any internally used version number (or date) for this template. This is only for reference purposes.
Available for Use: Keep this box checked (it is checked by default). This ensures that the template is visible for document creation.
Initially Visible: Keeping this box checked (it is checked by default) will make this template visible on initial load of the document creation page based on the object type. Typically, you want to set this checkbox for the 10 most used templates for each object type.
Allow Edit: If you want users to be able to edit this document after it has been generated, check this box. Learn more about this feature.

Once you've filled in all of the values to your specifications, click Save. The template is now ready to be edited.

Utilize the Template Editor

Once you've filled in all of the values to your specifications, click Save. The template is now ready to be edited. Click the Template Editor button to design your template.

Note: This is a very basic overview of the template editor. For a more in-depth explanation,
click here.

This is the WYSIWYG template editor (What You See Is What You Get). Add some text, place the cursor where you want your Salesforce record data to be merged into the template, and then click on the Insert field button.

Select the field from the object you want to insert and click Insert.  The editor will add the merge field in the correct syntax into the template editor.

Repeat the above step for other fields.  In addition, you can add related lists and insert conditional logic. You can also use the editor tools to modify the document formatting. Or, click Source to view the HTML and add your own styles; the customization options are endless! Click Save when done.

You have now created your first template!

Note: You can also insert images, span related objects and create child object line items and add CSS stylesheets. Click here for an in-depth explanation of the template editor, or click here to read about advanced template editor features.

Step 4: Generate And Email Your First Document

Open any record for your object and click the S-Docs button you just created.

The template you created earlier will appear. (If it doesn't, make sure you’ve checked the Available for Use and the Initially Visible checkboxes when you created your template. Additionally, make sure you set "Related to Type" to the object you're using.) Select the template and click Next Step.

The document will generate in seconds. You can click on the "View" icon or the document number to view or download your document, or click the pencil icon to edit your document (this option is only available if Allow Edit has been checked on the template record). Click Email Selected Docs to bring up the email page for emailing the document.

You can edit all of the normal email fields on the email page, as well as the body of the email itself. The document you just generated is automatically added as an attachment to the email. To learn more about how to create custom email templates that automatically fill these fields in for you, click here.

Click Send when done. You have now created and emailed your first document with S-Docs!

Email Failure Troubleshooting

By default, S-Docs links outbound emails to the contact record with a matching email address; Salesforce requires this linkage. If you try to send an email to an email address that is not listed under any Contact record in your org, S-Docs will attempt to link it to a single dummy contact record called "No Contact Record." This contact record is created automatically by the S-Docs package to handle this linkage, and is immediately deleted once the email is sent.

If your org has implemented validation rules that require additional contact fields to be completed, then the S-Docs package will not be able to create this contact record. In this case, there are two main options.

Option 1 (Recommended)

Create a before insert, before update Apex trigger on the Contact object that automatically changes the fields on the No Contact Record that S-Docs creates so that your validation rules are not triggered. For example, the trigger might look like this if your validation rules prevent the contact field "This_Cannot_Be_Null__c" from being null:

trigger ContactFirstName on Contact (before insert, before update) {
    for (Contact c : trigger.new) {
        if (c.LastName == 'No Contact Record') {
            c.This_Cannot_Be_Null__c = 'some non-null value';
        }
    }
}

With this option, S-Docs will be able to create and delete the No Contact Record, and the email will be sent and logged in Activity History on the base object record.

If you require test coverage for your No Contact trigger, you can use the following test class:

Class Name: NoContactTestClass

@isTest
private class NoContactTestClass {    @isTest
    public static void noContactTest() {
    	Test.startTest();
        Contact testContact = new Contact();
        testContact.LastName = 'No Contact Record';
        insert testContact;
        Test.stopTest();
    }}

Option 2

Create the S-Docs No Contact Record manually with all of the fields filled in that are required by your validation rules. The fields that S-Docs requires should be filled in as follows:
First Name: Not Required. We recommend writing S-Docs to avoid confusion.
Last Name: No Contact Record
Email Address: this.email@is.invalid
You then need to add the following parameter to the end of your S-Docs button: &useExistingNoContactRecord=true
Note: This option is not recommended, as the email will not be logged in Activity History on the base object record.

Sandbox Deliverability

If you are testing S-Docs in a sandbox org and emails are not being delivered, you should check Setup > Email Administration > Deliverability, and check that "Access to Send Email" is set to "All email." By default, Salesforce turns off outbound email access when a sandbox is created to reduce the risk of inadvertently sending emails to contacts during development and testing. Be aware that this change effects the entire sandbox and not just S-Docs.

Configuring S-Docs with Custom Objects – Salesforce Lightning

By Documentation No Comments

Introduction

S-Docs works great with the custom objects and even the Force.com platform edition, which is entirely comprised of custom objects. Your documents can span many relationships to include data from formula fields, rich text, parent records, child, grandchild and related objects--all within the same document.

Since every organization creates different custom objects to meet their unique requirements, you need to configure S-Docs to recognize which custom objects you want to leverage with S-Docs.

To learn how to configure S-Docs with custom objects in Salesforce Lightning Experience, you can watch the following tutorial video, which will walk you through the process. You can also refer to the written instructions below the video, which provide a detailed, step-by-step guide to configuring S-Docs with custom objects. To view the same guide for Salesforce Classic, click here.

For the purposes of this guide, we assume your custom object is named CustomObj and has an API name of CustomObj__c. (Note: the API name has two underscores.) Whenever you see "CustomObj" in this document, you can replace it with the name of your custom object. S-Docs can also integrate with other AppExchange apps. (Note: there are a few setup differences.) This document will walk you through the step-by-step configuration process in Salesforce Lightning. It is intended for Salesforce.com administrators who are familiar with standard configuration tasks.

Sample templates can be found here.

Tutorial Video

Step 1: Add a lookup field to allow relationship linking [00:54]

This step allows you to associate the S-Doc with the Custom object, so that users can see a related list of all S-Docs created on your Custom Object's page layout.

  1. In the Setup menu (the gear in the upper right corner), navigate to the object manager and select SDoc Relationship.
  2. Click Fields & Relationships in the sidebar, then click New.
  3. Follow the New Custom Field steps:

Step 1 of 6 - Pick Lookup Relationship. Click Next.
Step 2 of 6 - Select your Custom Object (e.g. CustomObj__c) from picklist values, then click Next.
Step 3 of 6* - Field label and field name should be your custom object name without the “__c.”  In our example it would be "CustomObj." Click Next.

*Note: If you are using S-Docs with another AppExchange managed package, your field name in step 3 above will need to accommodate for the double underscore in the field name, which is not allowed by Salesforce. Since your API name includes the domain name of the package followed by two underscores and then the object name (e.g. package__CustomObj__c), you will need to replace the first double underscore with “_u_” and remove the remaining “__c.” In our example, your field name should be set to: package_u_CustomObj.

Step 4 of 6 - Checkbox should be visible for all users. Click Next.
Step 5 of 6 - Checkbox should add the field for the layout.
Step 6 of 6 - Accept default. Click Save.

Step 2: Create a button to place it on your Custom Object page Layout [02:06]

Just like using S-Docs with other objects, you need to place an S-Docs button on the record detail page layout. Users will click the button to initiate creating a document from the record detail page.

Create the S-Docs button.

  1. Navigate back to the Object Manager in the Setup menu and click on the name of your custom object.
  2. Click Buttons, Links, and Actions in the sidebar and click New Button or Link.
  3. Button Label: Choose a label (e.g. "S-Docs")
  4. Display Type: Detail Page Button
  5. Behavior: Display in existing window without sidebar or header
  6. Content Source: URL
  7. Use the following URL (note that double underscores are used in three places):
    {!URLFOR('/apex/SDOC__SDCreate1', null,[id=CustomObj__c.Id, Object='CustomObj__c'])}
     

    Note: If you are using S-Docs with an object within another AppExchange managed package, your button syntax should include the entire object API name that includes the domain (e.g. package__CustomObj__c). Note that double underscores are used throughout. Your button syntax should therefore look similar to the following:
    {!URLFOR('/apex/SDOC__SDCreate1', null,[id=Package__CustomObj__c.Id, Object='Package__CustomObj__c'])}

  8. *Optional* You can have users save clicks by enabling the “One-Click” feature. Enabling this will bypass the document creation wizard. An administrator simply needs to change the button definition to include a list of pre-selected S-Docs template names that will be automatically generated. Placing this button will let users create all the documents encoded in the button without any additional interaction. The button syntax uses a parameter called “doclist,” which is followed by one or more template names to be auto-generated. Here is an example of the button syntax (replace the highlighted values with your own template names):
    {!URLFOR('/apex/SDOC__SDCreate1', null,[id=CustomObj__c.Id, Object='CustomObj__c', doclist='Template1,Template2'])}
  9. Click Save

Step 2b: Place button on your page layout [02:52]

  1. Navigate back to the Object Manager in the Setup menu and click the name of your custom object.
  2. Click on Page Layouts in the sidebar, then click the Edit link (you will repeat this for each page layout that you want the S-Docs button to appear in).                                         
  3. In the layout editor, scroll down to the “Salesforce Mobile and Lightning Experience Actions” section and click override the predefined actions.
  4. Then, click Mobile & Lightning Actions in the top menu. Find the S-Docs button you just created, and drag it down into the “Salesforce Mobile and Lightning Experience Actions” section.
  5. Be sure to click Save to apply the changes to the page layout and repeat steps 3-6 for any other layouts where you would like to add the button.

To use this new S-Docs button, you first need to add your custom object as an available picklist value in the "Related to Type" field on the S-Docs template detail page, and then create at least one template to use with your custom object. The next two steps describe this process.

Step 3: Add Your Custom Object API Name  to the "Related to type" field on the "SDoc Template" object [03:25]

  1. Navigate back to the Object Manager, then click on the S-Doc Template link.
  2. Click on Fields & Relationships in the sidebar, then click on the Related to Type link.
  3. Scroll down to the "Values" section and click on the New button.
  4. Add your custom object’s API name (e.g. CustomObj__c)  as a picklist value, then click Save.
Note: if you are using S-Docs with another AppExchange managed package, then your custom object API name should include the domain name of the package followed by two underscores and then the object name (e.g. package__CustomObj__c). You should use the entire API name for the S-Docs picklist value.

As a reminder, you should substitute your object’s API name (not use the example CustomObj__c shown above).

Step 4: Create your Custom Object Template [04:09]

  1. Go to the S-Docs template home page by clicking on the App Launcher in the upper left corner and selecting S-Docs.
  2. Navigate to the S-Docs Templates tab and click New.
  3. Create your Custom Object template record. Be sure to select your Custom Object name from the “related to type” picklist values. Before you can first use this template, you should confirm you have also checked the Available for Use and Initially Visible checkboxes.
  4. Click Save, then click the Template Editor button.
  5. Once in the editor mode, you can design your template using the WYSIWYG editor. The editor allows you to add text, format styles, insert tables, insert images and merge Salesforce data by using the Insert Field and Insert Related List buttons.
  6. You can also edit the template HTML directly by clicking on the Source button. You can additionally paste pre-made template code here. Sample templates are available here.
  7. Once your template is saved, you can test it by opening a sample custom object record, clicking on the S-Docs button, selecting your new template, then clicking on Next Step.
  8. Click on the View PDF icon or the document number to view or download the document.
  9. The document will open in another tab with all of the fields filled in.

Creating S-Sign-Enabled Templates for S-Docs

By Documentation, S-Sign No Comments

In This Article:

  1. Introduction
  2. Configuring the HTML Template
  3. Configuring the PDF Template
  4. Legacy Instructions [For versions of S-Sign before 1.900]

Introduction

Creating S-Sign-enabled S-Docs templates can be done in almost no time. If you've just installed S-Sign into an org that's had S-Docs for a while, you can quickly enable S-Sign in any pre-existing S-Docs template. To learn how to create S-Docs templates, click here.

Sign requests consist of two types of S-Docs templates: PDF and HTML. The HTML template will be used as the body of the sign request email. The PDF template will be used to generate the documents that you would like to be signed.

Note: If you're using S-Sign in person, you don't need to include an HTML email template. Learn about using S-Sign in person.

Configuring the HTML Template

The HTML template is like any other S-Docs HTML email template, with two extra steps.

First, you need to enable S-Sign on the HTML template. To do this, navigate to the template editor for your HTML template. Navigate to the Advanced Options tab and check the Enable S-Sign checkbox. After that, your HTML template is S-Sign enabled.

Next, you need to place a link in the "Source" page of the Template Editor that looks like the following:

[code lang="html"]<a href="[[[SIGNLINK]]]" target="_blank">Click Here to Sign</a>[/code]

[[[SIGNLINK]]] is an S-Sign merge field that will be replaced with a link in the email that takes the recipient to a page where they can sign the document. You can also use the S-Sign merge field [[[DOCUMENTNAME]]] to display the name of the PDF document in the outbound email. Once out of the "Source" page of the template editor, it should look like this:


However, you can edit the source of this template to appear any way you want it to.

Configuring the PDF Template

Similar to the HTML template, the PDF template is like any other S-Docs PDF template with the exception that you need to enable S-Sign. Just as you did with the HTML template, go into the template editor, navigate to the Advanced Options tab and check the Enable S-Sign checkbox. Since it's a PDF template, the S-Sign panel will appear on the left of the template editor.

From there, you can select your S-Sign field type from the dropdown menu (signature, initials, text, checkbox, date, or picklist), and then paste the field tag into your template where you want the field to appear in the finished document. For example, if you want the signature box to appear after the words "Please Sign Here," you would paste the field tag like this:

That's it! Once you have modified the HTML template to include the [[[SIGNLINK]]] code and enabled S-Sign on both templates, you are ready to send out an E-Signature request using these two documents.

Legacy Instructions

Just like the current version, legacy S-Sign requests consist of two types of S-Docs templates: PDF and HTML. The HTML template will be used as the body of the sign request email. The PDF template will be used to generate the documents that you would like to be signed.

To enable the HTML template for E-Signature, you'll need to go to the "Advanced Options" tab of the Template Editor and select "SSIGN" for the "E-Sign Vendor" dropdown (just like with the current version). However, you do not need to do this for the PDF template.

Once you've made this change, you need to place a link in the "Source" page of the template editor that looks like the following:

[code lang="html"]<a href="[[[SIGNLINK]]]" target="_blank">Click Here to Sign</a>[/code]

[[[SIGNLINK]]] is an S-Sign merge field that will be replaced with a link that takes the recipient to a page where they can sign the document. You can also use the S-Sign merge field [[[DOCUMENTNAME]]] to display the name of the PDF document in the outbound email.

Similarly, the PDF template is like any other S-Docs PDF template, with the exception that you need to place the S-Sign merge field [[[SIGNATURE]]] wherever you'd like the recipient's signature to be placed. When you generate a document using this PDF template, [[[SIGNATURE]]] is replaced with a large image that says "Sign Here" until the recipient signs the document. Once the recipient signs the document, all instances of [[[SIGNATURE]]] will be replaced with the recipient's signature image. Hence, [[[SIGNATURE]]] can be placed in multiple locations of the document, but the recipient only signs once, and all instances of [[[SIGNATURE]]] will be replaced by the same image.

That's it! Once you have set the HTML template's "E-Sign Vendor" value to "SSIGN," modifed the HTML template to include [[[SIGNLINK]]], and modified the PDF template to include [[[SIGNATURE]]], you are ready to send out an E-Signature request using these two documents.

S-Sign Features: Validation Rules & Write Data Back to Salesforce

By Documentation, S-Sign No Comments

Introduction

S-Sign excels when it comes to sending and receiving e-signature requests, but it can do much more than just accept signatures. By utilizing the template editor, you can add a variety of different text fields and checkboxes to your S-Sign documents to capture user input like title, department, phone number, or any number of things that fit your organization's needs. Once the user fills these fields in, the data will be automatically written back to Salesforce, and the appropriate fields on the base record will be updated.

Additionally, S-Sign will automatically run your Salesforce validation rules and display your error messages directly on the document(s) users are signing. This is useful when there are certain field values that you want to restrict users from inputting.

Creating a Sample Validation Rule

To showcase these features, we will start by creating a validation rule that prevents individuals from entering a title of "Finance" and a department of "Marketing," but S-Sign will run any validation rules you have in place. You'll see this in action later. There is no configuration necessary for S-Sign to run your validation rules; this happens automatically.

Writing User Input Back to Salesforce - Configuration

Now that we have written our validation rule, we will showcase how S-Sign writes data back to Salesforce fields based on what users input into your e-signature documents.

In this example, we will send a purchase agreement to a contact in Salesforce. Note that the contact’s title is “Financial Manager” and their department is “Financial Services” in the Salesforce contact record. These are the fields that will be updated when the contact signs the document and enters their information. To begin, there are a few configuration steps we need to take.

Step 1: Edit Your S-Sign Site's Public Access Settings

First, you will need to edit the Public Access Settings of your S-Sign Site (The site you set up when you first installed and configured S-Sign). To do this, click Setup in the upper right corner, then type "Sites" into the "Quick Find/Search" bar. Click Sites (under Build > Develop) from the list that drops down.

From there, click S-Sign Site under "Site Label."

Click Public Access Settings.

Click Edit at the top of the page.

Scroll down to "Standard Object Permissions" and check the Read and Create boxes for the base object of your S-Sign template(s) (in this case, we're using the Contact object).

Click Save. You will be taken back to the Public Access Settings page. Scroll down to "Field Level Security" and click the View link next to the base object of your S-Sign template(s) (Contact in this case).

On the next page, click Edit and check the boxes for Read Access and Edit Access for all of the fields that you want S-Sign to write data back to.

Click Save. This concludes part 1.

Part 2: Associate S-Sign Fields to Salesforce Fields

Now that you've given S-Sign permission to write user input back to your Salesforce records, you must now associate S-Sign input fields to the Salesforce fields that they will write data back to. This is done in the S-Docs template editor. To begin, navigate to the template editor by clicking on All tabs (“+” symbol). Click on S-Docs Templates, choose your template, then click Template Editor. To learn how to create S-Sign-enabled templates, click here.

In our purchase agreement, we’re going to include three fields: a signature field where the user can sign their name, and two text fields where the user can enter their title and department. We do this by adding three S-Sign fields into the document. We set the type of field 1 to Signature, and the types of fields 2 and 3 to Text.

Since field 1 is just a signature, it is ready to go: we simply copy the S-Sign Field tag and paste it into our template wherever we want the recipient to sign.

We will now associate text fields 2 and 3 to specific Salesforce fields; this will enable S-Sign to write the data back to Salesforce and update the contact record when the user fills in their information. To do this, we click Insert Field at the top of the template. This will bring up a list of numerous fields to choose from. Select the field you want, then click Copy to Clipboard.

Next, we paste this merge field into the Write signer input to the following field in Salesforce field in the S-Sign menu. From there, we can copy the S-Sign Field tag and insert it wherever we want. It will now write user-inputted data back to the appropriate Salesforce field.

This step is repeated for however many fields are desired. After we save this template, it is now ready to be sent to our contact to be signed. To learn how to send e-signature requests with S-Sign, click here.

Let's See it in Action

Once the recipient receives your S-Sign request and opens the document, they can enter their information and sign. Here’s where the validation rule comes into play. If they enter values not allowed by your validation rule, they will see the error message you wrote.

However, if the recipient enters their information correctly, they will be able to submit the signed document.

Notice that this user input “SVP Finance” into the Title field and “Finance” into the Department field. These values differ from what was previously written in the Salesforce contact record for this person (“Financial Manager” for title and “Financial Services” for department). As you can see, S-Sign automatically updated these fields in Salesforce when the user signed the document. No manual updates needed!

S-Sign User Guide – Salesforce Classic

By Documentation, S-Sign No Comments

This article provides a comprehensive overview of creating and sending an e-signature request with S-Sign in Salesforce Classic, as well as explains what happens behind the scenes. To view this article for Salesforce Lightning Experience, click here.

Sending the E-Signature Request

Sending an E-Signature request with S-Sign is as simple as generating a document and sending an email. Once you have created an HTML E-Signature request template and a signable PDF template, navigate to a Salesforce record and click the S-Docs button. If you don't see the S-Docs button, you either need to add it to your page layout (if you're viewing select standard objects) or you need to create the button and add it to your page layout (if you're viewing a custom object).

Next, select your HTML E-Signature request template and your signable PDF template. You can tell which templates are S-Sign enabled by the S-Sign logo that appears next to their names. Click Next Step to generate documents with these templates.

S-Docs will then recognize that you have generated an E-Signature document and offer a Send Documents for Electronic Signature button. Click this button to email the E-Signature document. Click here to learn about using S-Sign in person.

If you didn't specify the email of the signer in the template editor, you will be prompted to enter their email now. If you have specified multiple signer fields in your template, you will be able to enter the email address of each signer here.

Upon clicking Next Step, you will be brought to the the email page. Here, you have the option to edit the usual email fields (To, CC, BCC, Subject) and edit the body of the outbound email. Note that the PDF we generated is not included on this email as an attachment; this is because the email contains a link to an interactive webpage where the user can view and sign that PDF (this is the code you inserted into your HTML template when you created it). Click Send to send the document for E-Signature.

Note: Additional attachments (non-S-Sign documents or pre-generated documents) are not supported with S-Sign emails at this time.

What the Signer Will See

The recipient then receives the email that you created with your HTML template:

When the recipient clicks View and Sign, they will be prompted to verify their identity by entering a code and consenting to do business electronically.

They will then be taken to the signable document.

From here, the recipient can decline to sign, or they can sign the document by clicking Sign Here, which will bring up the signature pad.

The recipient can then type their name, draw a signature, and submit their information.

Once the recipient clicks Submit Signature, their signature is merged into the document, and both you and the recipient receive a confirmation email containing the signed document. The recipient is then  redirected to view the signed version of the document. The signed version of the document includes the signer’s name, their signature image, and the date and time at which they signed the document. Additionally, the audit trail for the document appears as a new page at the end.

Note: To learn how to customize aspects of an S-Sign request, such as the size of the signature image and who receives the audit record, please visit the S-Sign Templates Settings documentation.

Note: You can send multiple documents in a single e-signature request. Click here to learn how to do this.

Behind the Scenes - Before Signature

What happened in Salesforce while all of this was going on? Let’s take a step back in time to way before our recipient has signed the document. Immediately after you clicked Send Documents for Electronic Signature, an S-Sign Envelope record was created, which can be viewed on the object record that you created the e-signature request for.

Let’s view this S-Sign Envelope record, where you can view and track the request. The record has a related list of S-Sign Envelope Document records, one for each signable PDF that was included in our E-Signature request (in this case, only 1). It has a sign status of “Created,” meaning it hasn’t been signed yet. Additionally, the S-Sign Envelope itself has a status of “Created." When the signer opens the document, this status will change to "Viewed," and when they sign it, it will change to "Signed."

Now let’s view the S-Sign Envelope Document. To do this, click on the Envelope Doc Number.

Since the document contained by this S-Sign Envelope Document hasn’t been signed yet, we only see links for the signature request and for viewing the original document. Additionally, the Notes & Attachments related list only contains the original document.

Behind the Scenes - After Signature

Now let’s take a step forward in time to when our recipient has signed the document. Again, head to the object record you generated the e-signature request from, and click on the S-Sign Request link under S-Sign Envelopes.

At this point:

  1. The S-Sign Envelope's status has been updated to “Completed”
  2. The “View Signed Document” link appears
  3. The S-Sign Envelope Document status has been updated to "Signed"
  4. You can click on the Envelope Doc Number to view more information

Upon clicking on the Envelope Doc Number, the Notes & Attachments related list now contains information like the document's audit trail, the signed document, and the raw signature image itself.

That's all there is to it!

tracking

Top