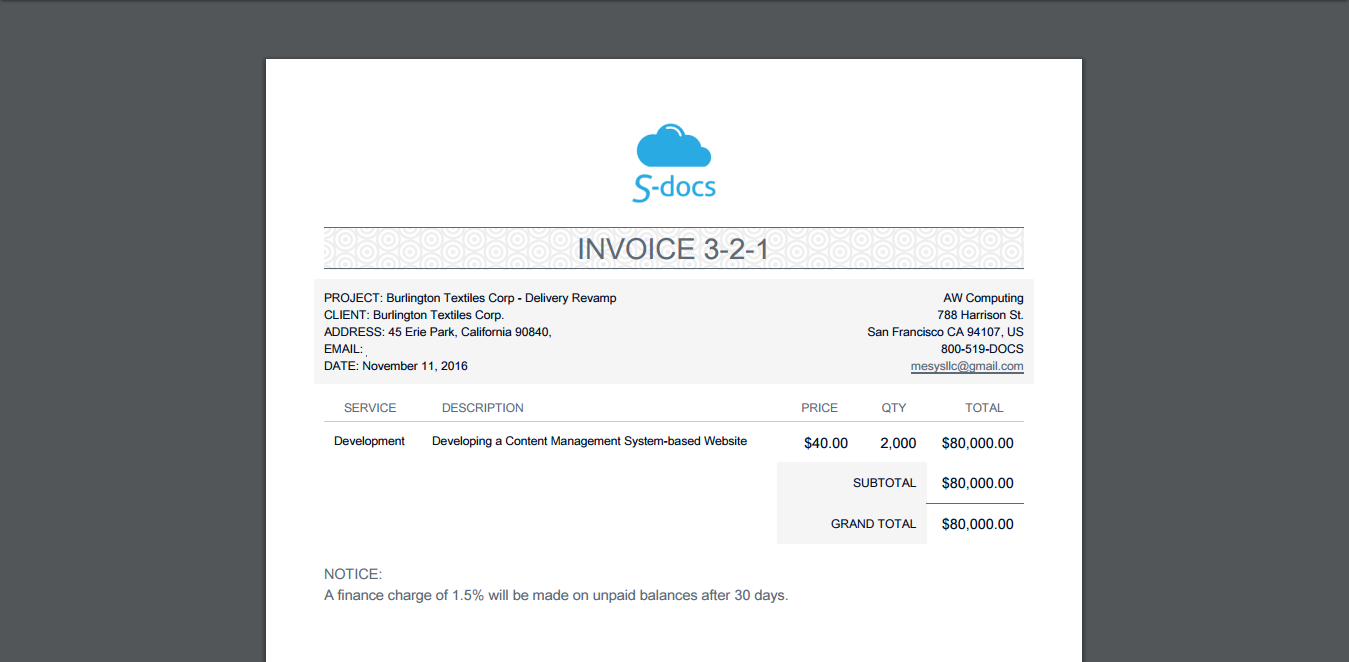
To create a quote similar to the following sample – copy and paste the provided template into your quote template source.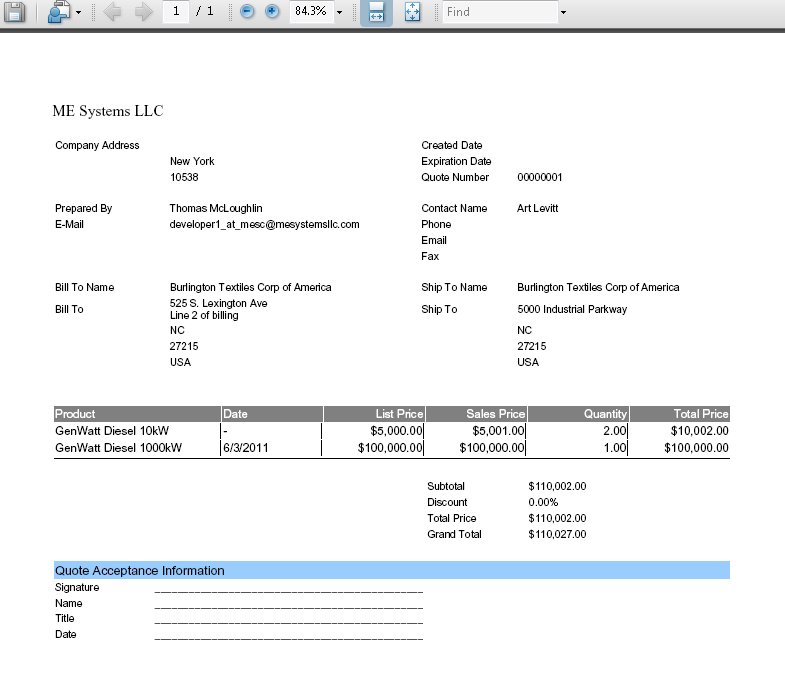
Sample Quote Template Source:
To create a quote similar to the following sample – copy and paste the provided template into your quote template source.
Sample Quote Template Source:
This is a quick overview of using S-Docs with the Salesforce Quote object. For step-by-step instructions on configuring S-Docs with the Quote object, click here.
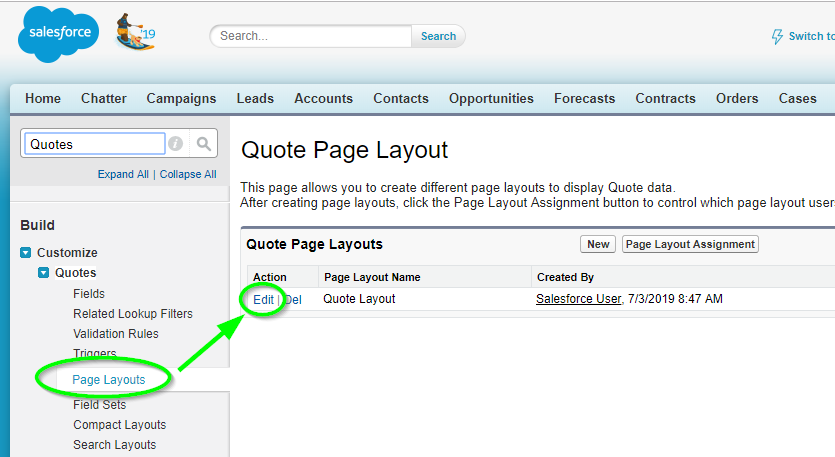
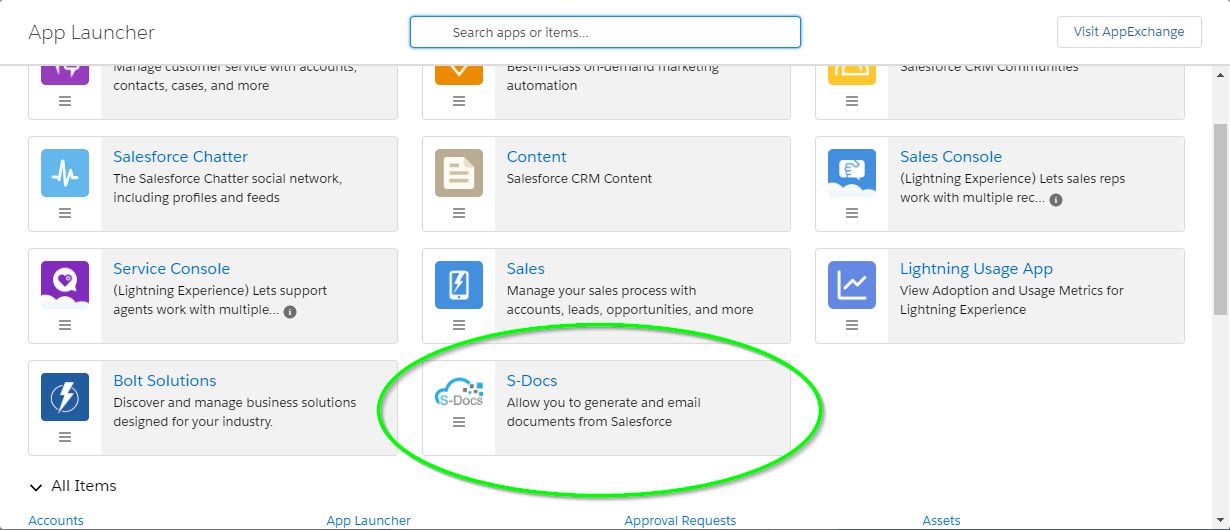
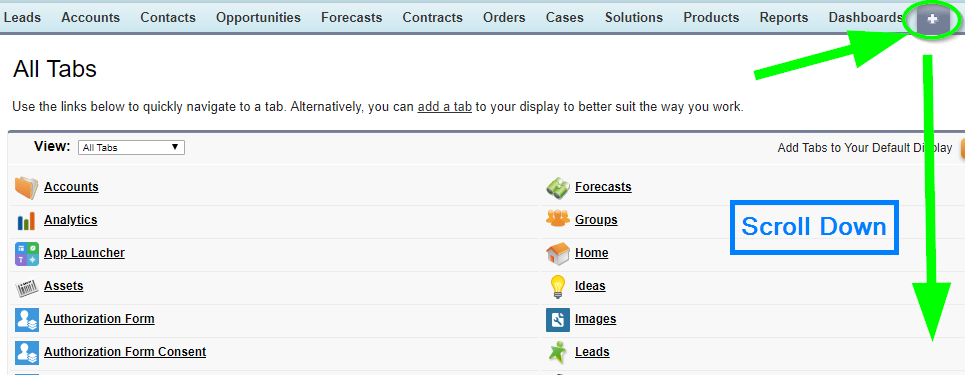
1. Navigate to the S-Docs app by clicking the App Launcher in the upper left corner and selecting S-Docs.

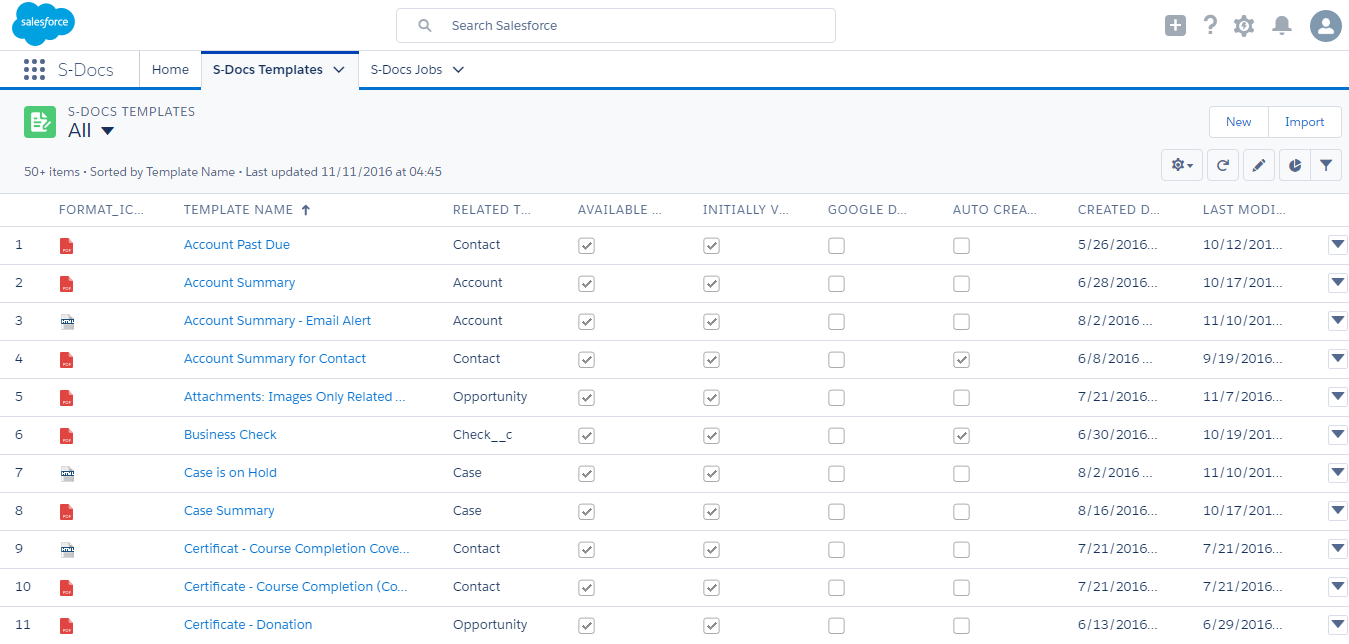
2. Click over to the S-Docs Templates tab, then click New to create a new template.

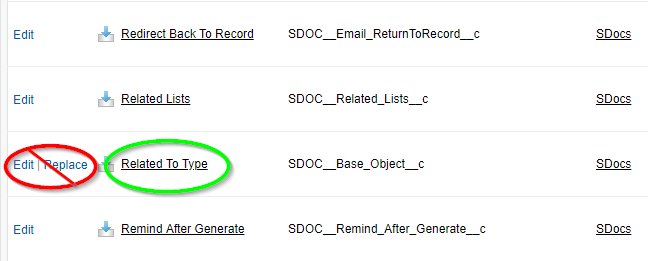
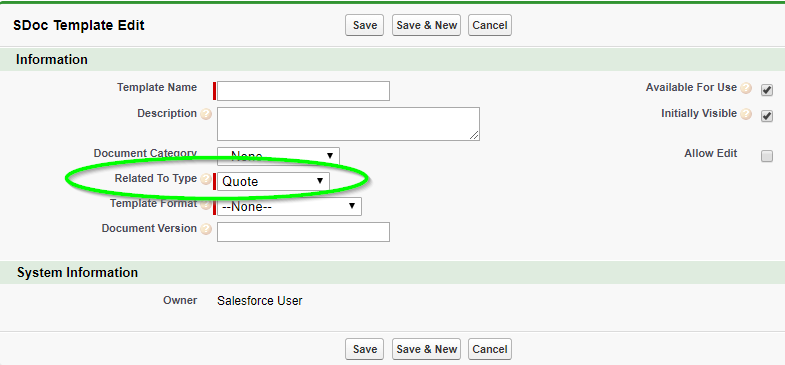
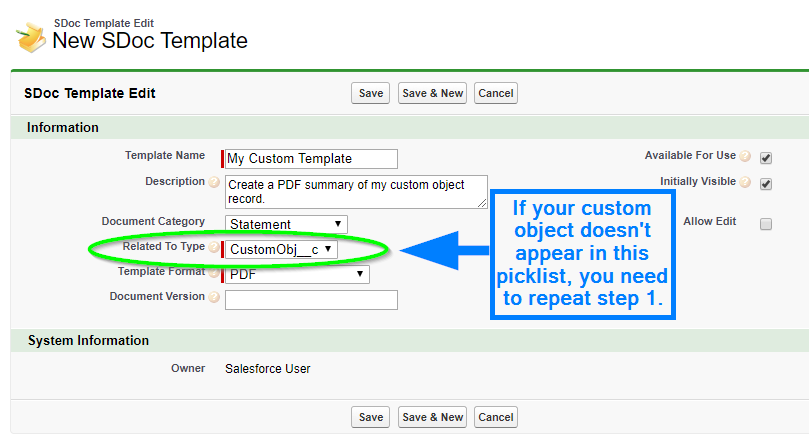
3. Create your Quote template record. Be sure to select Quote from the “related to type” picklist values. If it doesn't appear there, review the steps for configuring quotes with S-Docs. Confirm you have also checked the Available for Use and Initially Visible checkboxes.
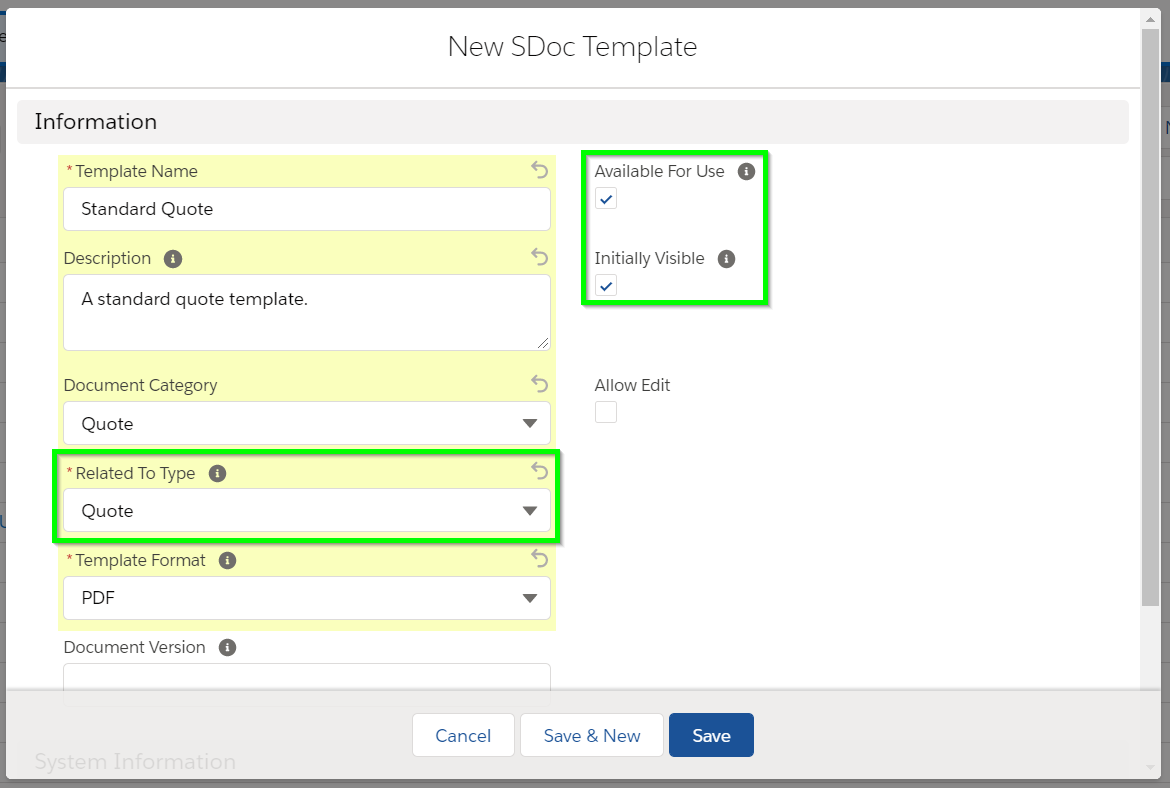
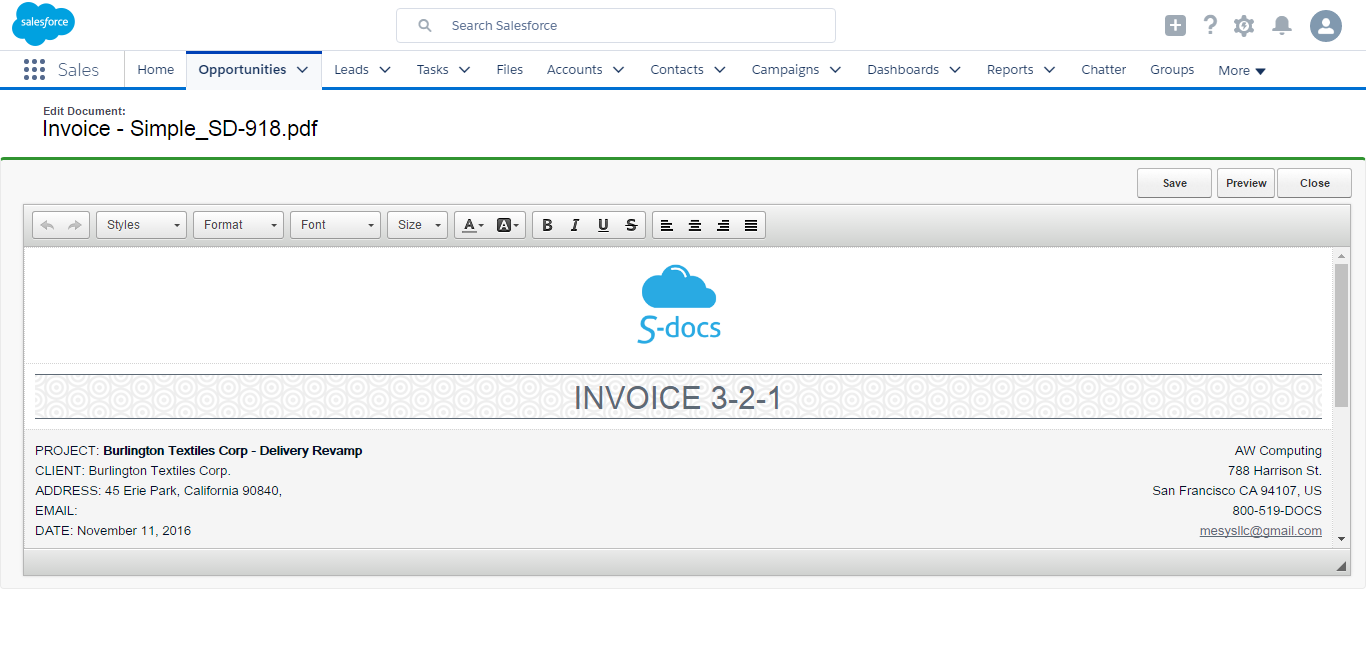
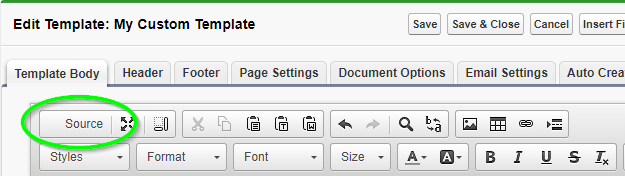
4. Click Save. You will be redirected to the template detail page. To begin editing your quote template, navigate to the template editor by clicking the dropdown arrow in the upper right, and then clicking Template Editor.

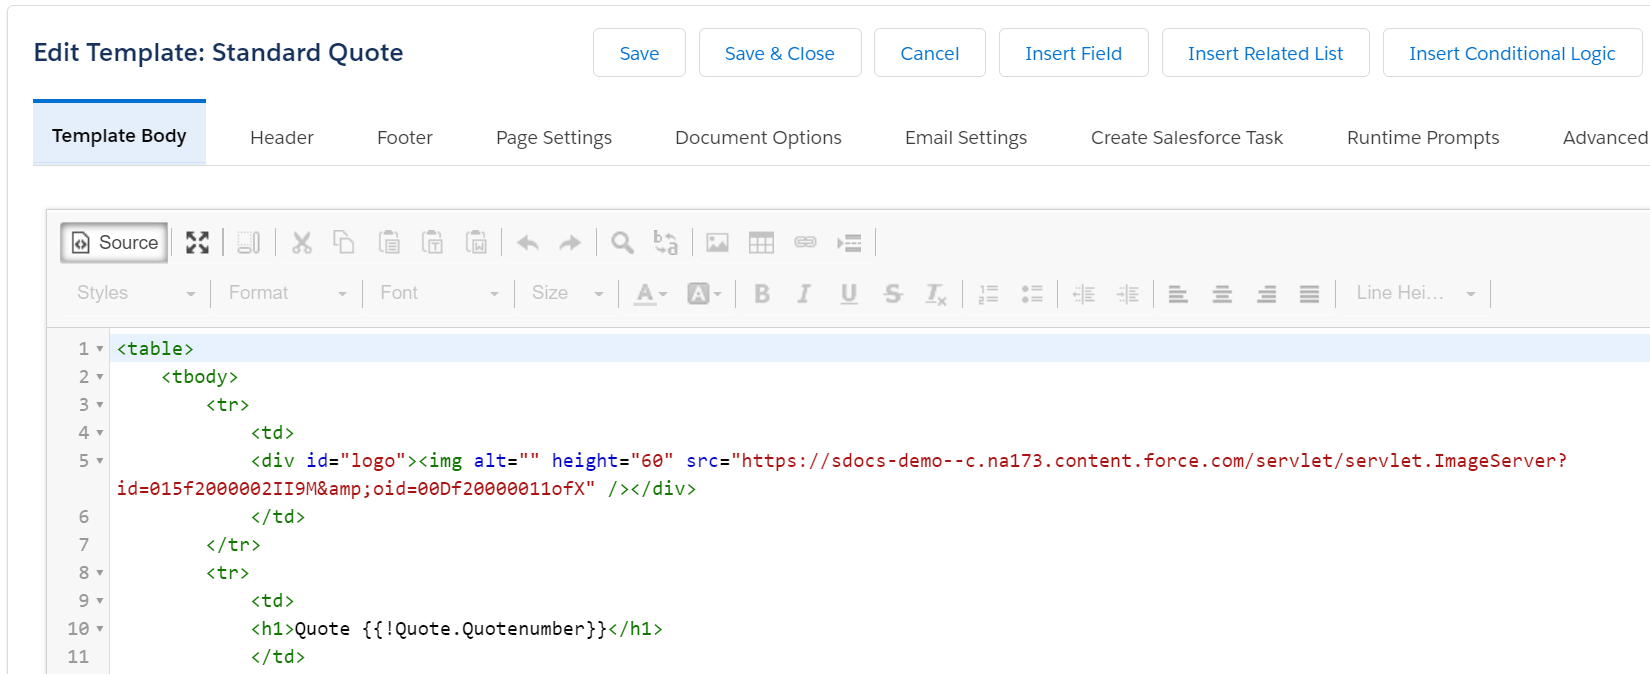
5. Once in the editor mode, you can design your quote template. There are several pre-made quote templates available in our Template Library that you can download and modify to meet your specifications.
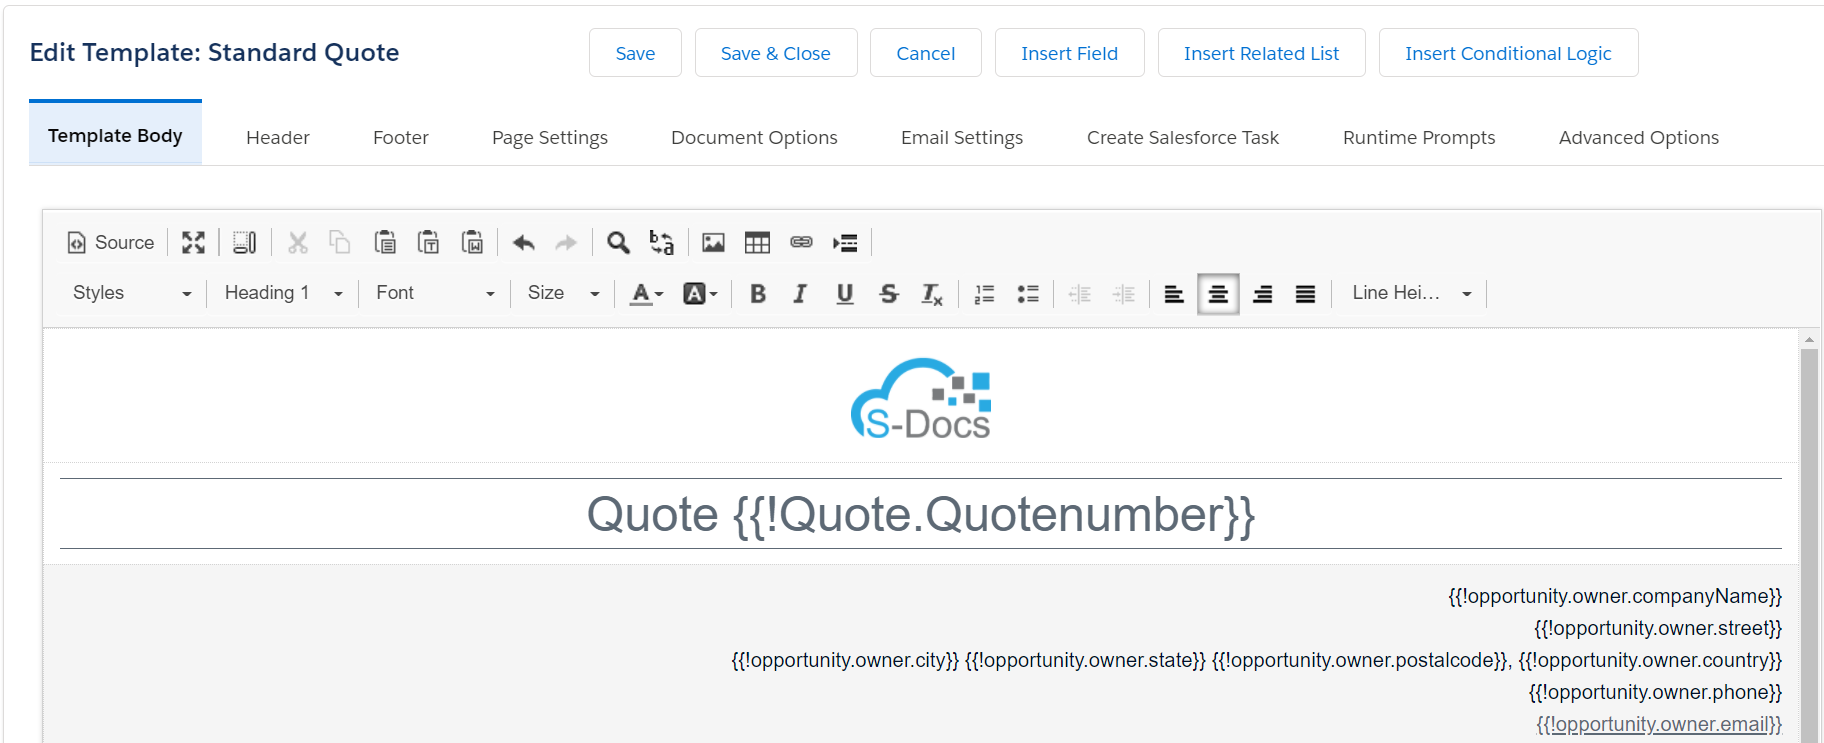
You can also use and modify the template source of your quote template for even further customization options.
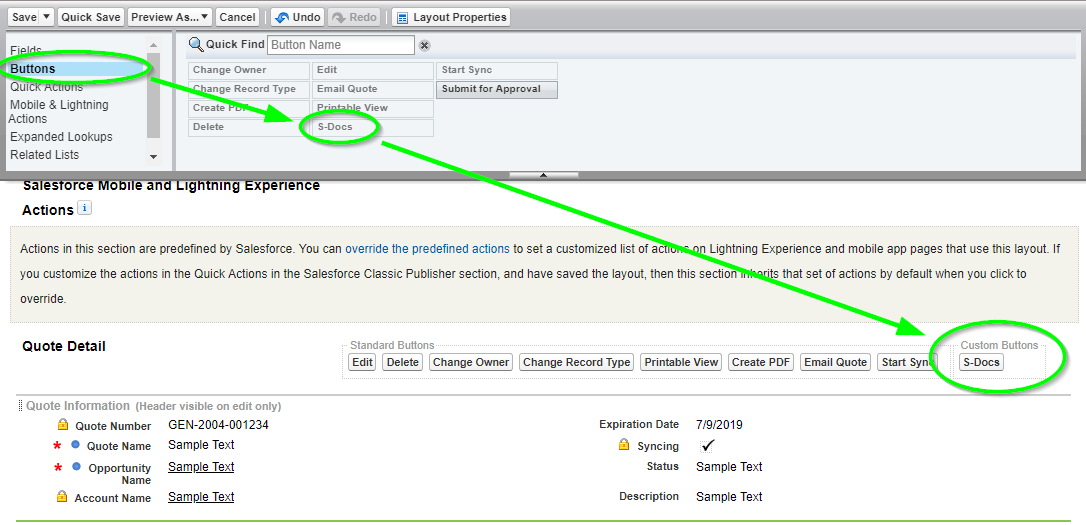
1. Once your template is saved, you can click on the S-Docs button you created and placed on your quote page layout when you configured S-Docs with the Quote object.

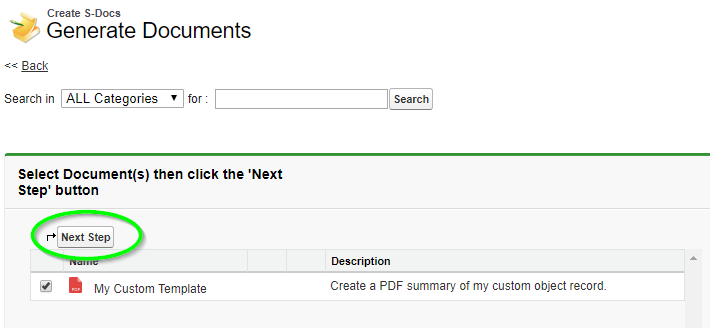
2. Select your template and click Next Step.
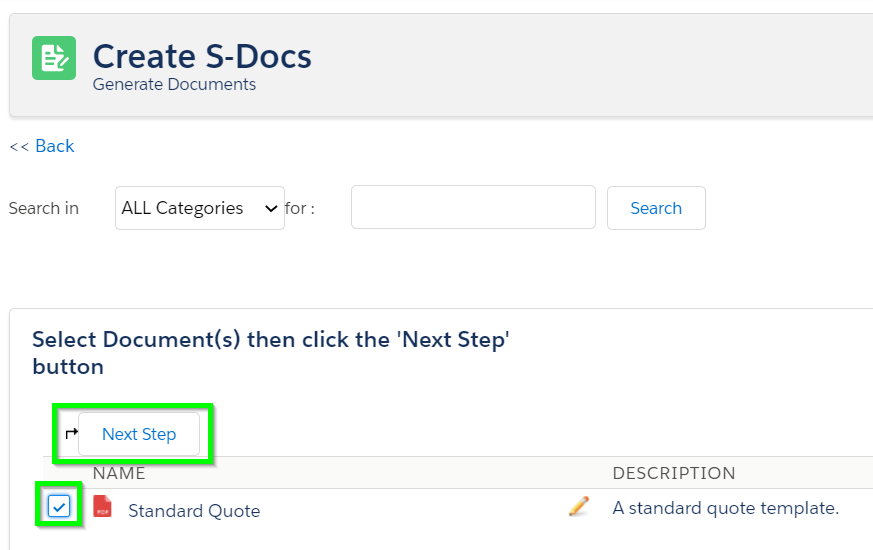
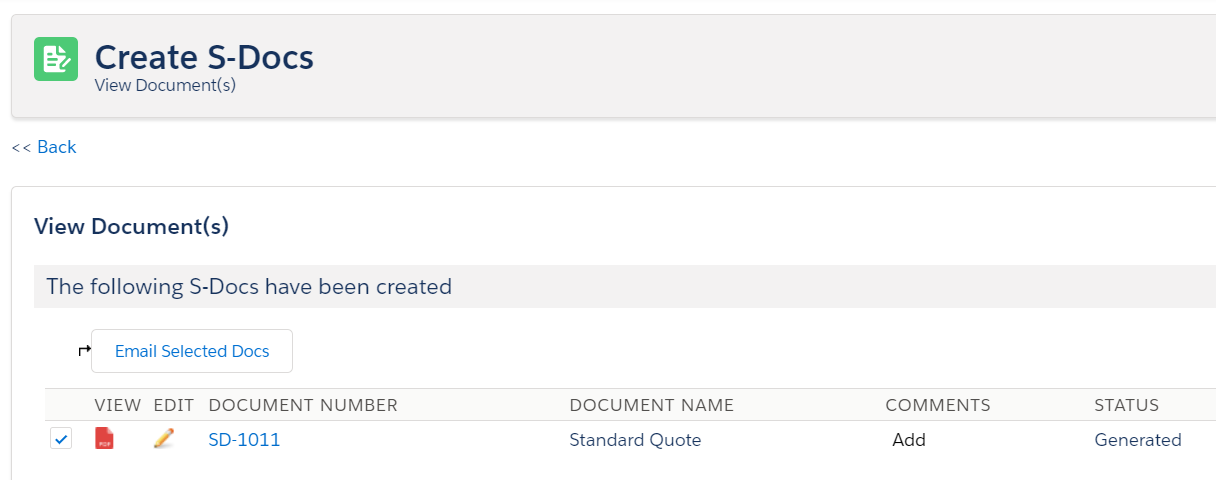
3. Once the document is generated, you can click on the PDF icon or the document number the view it, or Email Selected Docs to email your quote. That's it!
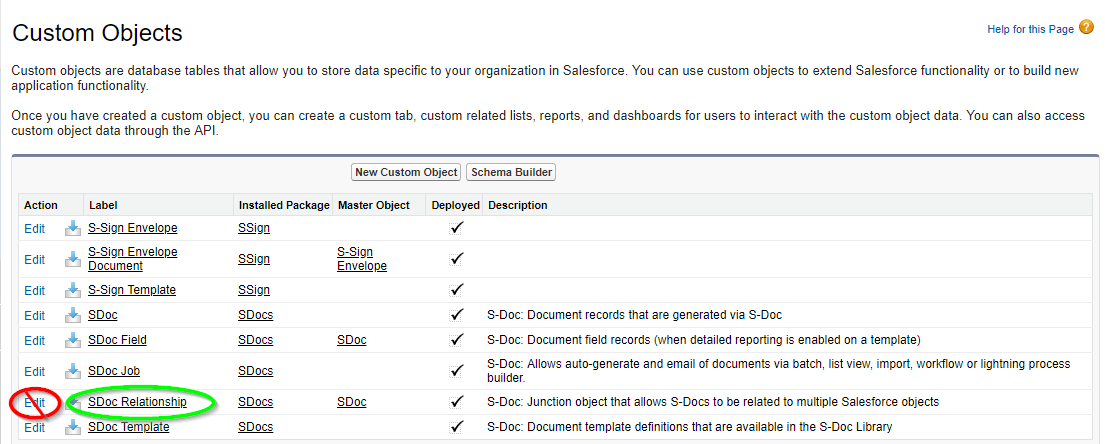
S-Docs works great with quotes, orders, and other standard objects. Not all organizations have these Salesforce features enabled, however, so they are not configured with S-Docs out-of-the-box. This document will show you how to configure S-Docs with standard objects that aren't included in the S-Docs package, using the Quote object as an example. You can follow this process with any standard objects that are not included in the S-Docs package. For a complete guide to configuring S-Docs with custom objects, visit our custom object configuration guide.
With S-Docs for Salesforce, you have much more power in generating quotes and documents that look exactly as you want them to. You can include many more related objects, filter and group your line items, format tables, include multiple logos, insert product images, insert a terms and conditions section, and then email your generated quote as a number of different file output types, including PDF and Microsoft Word.
Once you have completed these steps, you can create your quote template. We’ve provided a sample template at the bottom of this document that you can copy/paste into your template source.

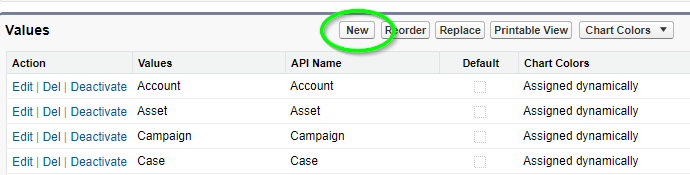
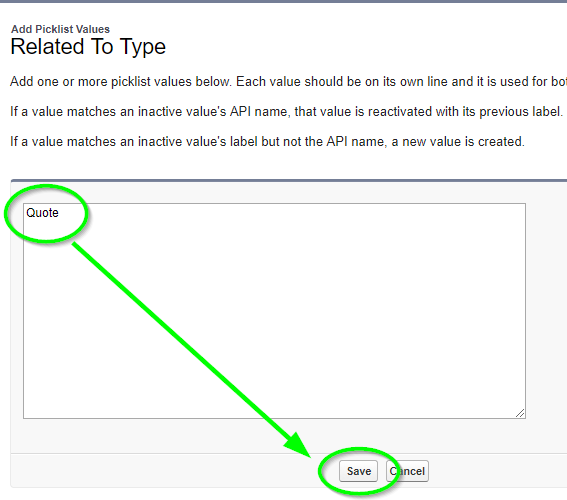
You should now be able to create a template and choose "Quote" from the picklist in the "Related to type" field when creating a template.
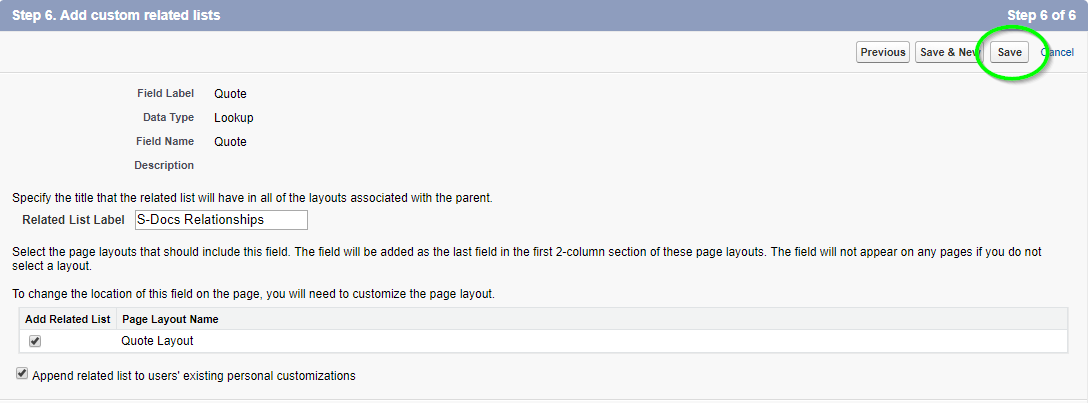
This step allows you to associate the S-Doc with the Quote object, so that users can see a related list of all S-Docs created related to a quote.
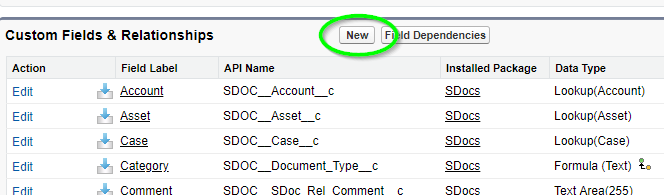
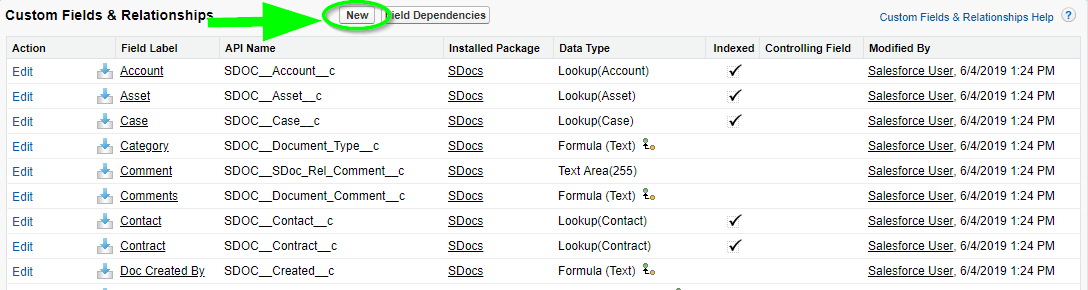
Follow the Custom Field creation steps:
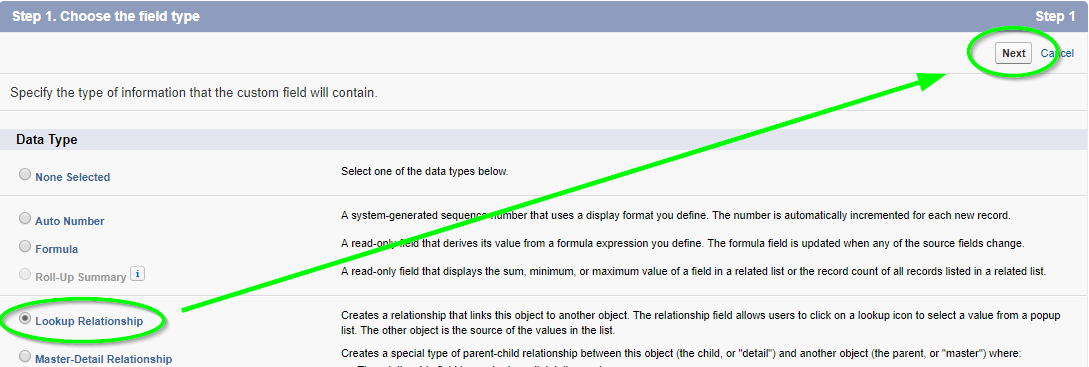
Step 1 of 6 - Pick "Lookup Relationship," then click Next.
Step 2 of 6 - Select "Quote" from picklist values, then click Next.

Step 3 of 6 - Field label and field name should be "Quote," then click Next.

Step 4 of 6 - Checkbox should be visible for all users.

Step 5 of 6 - Checkbox should add the field for the layout.
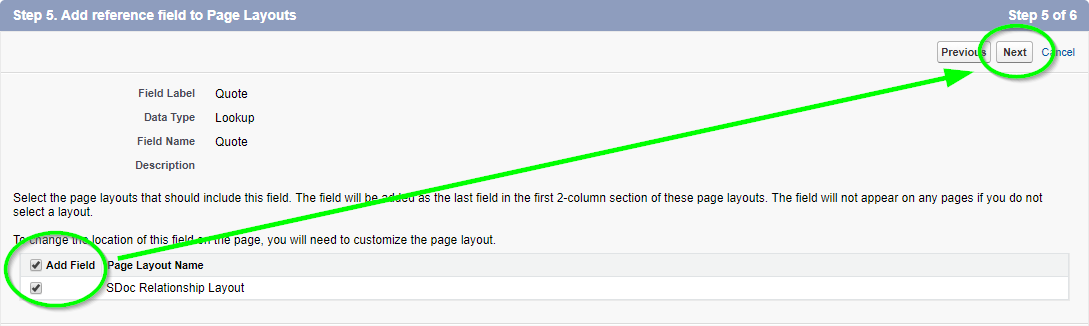
Step 6 of 6 - Accept default, then click Save.
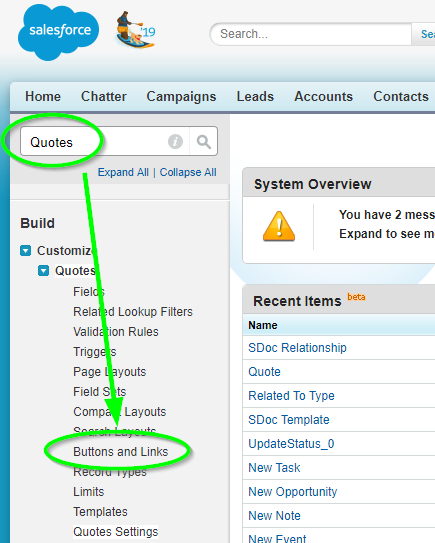
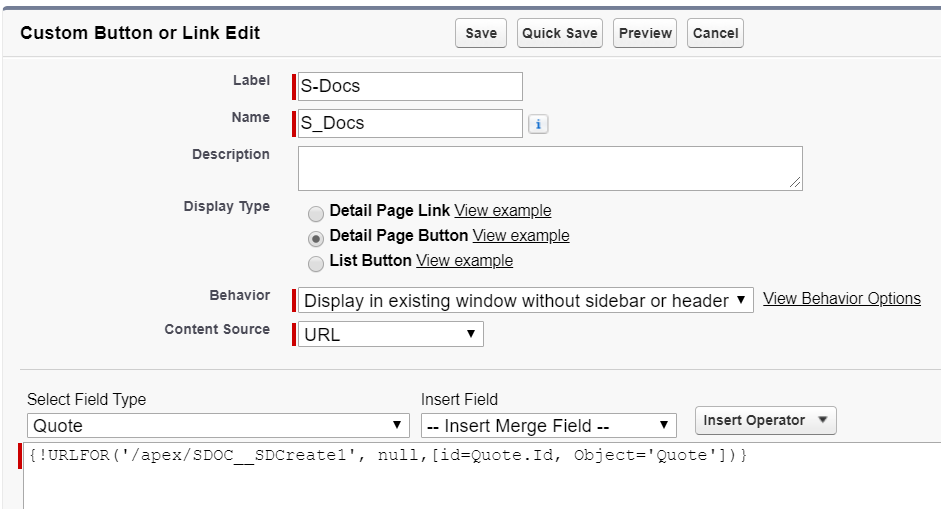
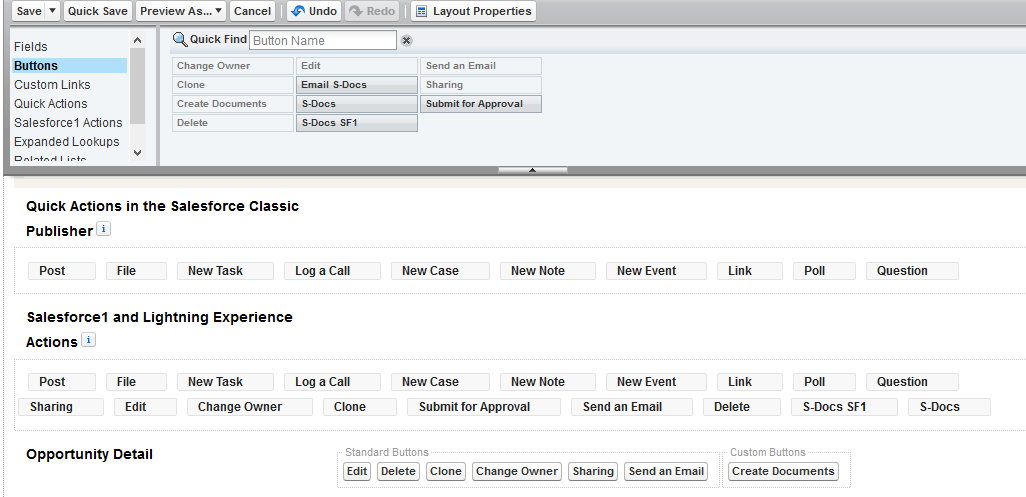
Just like using S-Docs with other objects, you need to create the S-Docs button and place it on the detail record layout in order for the user to initiate creating a document.

Optional: You can have users save clicks by enabling the “One-Click” feature. Enabling this will bypass the document creation wizard. An administrator simply needs to change the button definition to include a list of pre-selected S-Docs template names that will be automatically generated. Placing this button will let users create all the documents encoded in the button without any additional interaction. The button syntax uses a parameter called “doclist,” which is followed by one or more template names to be auto-generated. Here is an example of the button syntax (replace the highlighted values with your own template names):
[code lang="html"]{!URLFOR('/apex/SDOC__SDCreate1', null,[id=Quote.Id, Object='Quote',
doclist='Template_1,Template_2'])}[/code]
For more information on the one-click and zero-click features, click here.
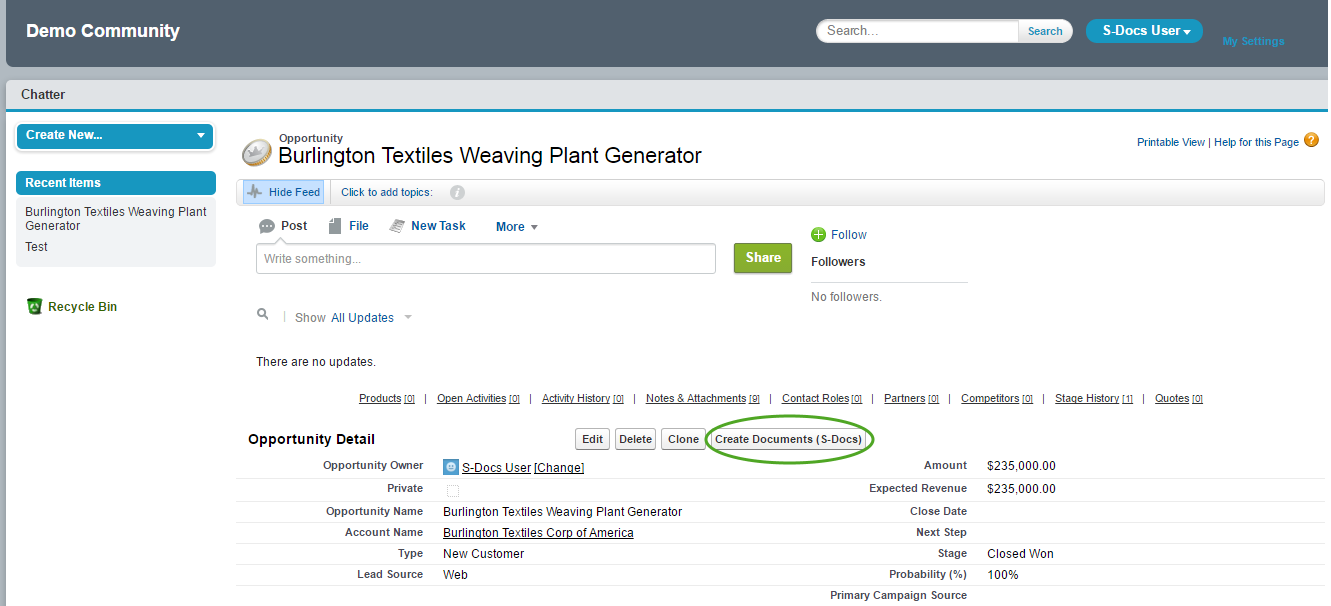
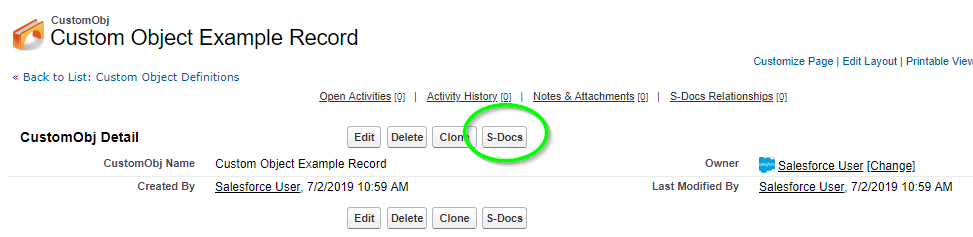
If you already have a quote template created, you can now open a quote record, click on the S-Docs button and create your S-Docs quote, which will be automatically be associated to the quote record.
Click Here to download our sample quote template, which is also available on our Template Library.
For instructions on how to import your quote template, click here.
This document will teach you how to configure S-Docs and generate your first documents with the Salesforce mobile app. Once you set up S-Docs for the Salesforce mobile app, you will be able to access the full features & functionality of S-Docs just as you can on a desktop. However, it may be beneficial for mobile clients to streamline document generation on the go. If your users typically create a few documents in the field, such as quotes or service orders, you may want to consider using the S-Docs automation features to simplify the process. This would remove the need to place an S-Docs button on the Salesforce mobile app and reduce the number of taps and potential errors or omissions.
For example, you can add a picklist on your mobile page layout with the following values: Email Quote, Email Service Order. When the user selects that value and saves the Salesforce record, an S-Doc is automatically generated and emailed from the Salesforce cloud. The user does not need to do anything else. This process can be configured without writing any code by using the Salesforce Process Builder. See the documentation here.
If you would like to leverage the full features and functionality of S-Docs on the Salesforce mobile app, it is described in this document.
Note: As of Spring '17, only S-Docs Templates with Auto-create File checked (found in the "Document Options" tab of the Template Editor) can be reliably viewed across all devices.* In the Salesforce mobile app, S-Docs Templates with Auto-create File unchecked can still be generated, emailed, etc. as usual, but cannot be reliably viewed across all mobile devices in mobile browsers or the Salesforce mobile app.
*This is because, as of Spring '17, only Salesforce Files can be reliably viewed on all devices in the Salesforce mobile app - the same may not hold true for Salesforce Attachments or other document rendering methods in Salesforce. Checking "Auto-create File" on your template will create a Salesforce File when you generate an S-Doc, so this will ensure that your document can be reliably viewed across all mobile devices in the Salesforce mobile app.
Before we see to configure S-Docs for use with the Salesforce mobile app, we will first see the feature in action.
1. Select the object you created the button for.

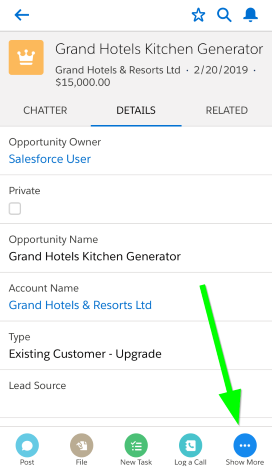
2. Select any record from this object. At the bottom of that record’s page, tap Show More.
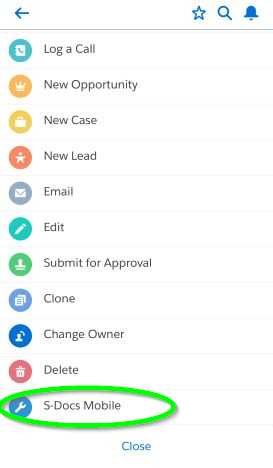
3. Scroll down and tap S-Docs Mobile.
4. Use S-Docs to generate documents just as you would on a desktop. It’s that simple!
We will now discuss how to set up S-Docs for use with a particular object in the Salesforce mobile app.
1. Create a new S-Docs Mobile button for a particular object. For standard objects, please follow the instructions in part (a). For custom objects, please follow the instructions in part (b).
If you are creating this button for a standard object, navigate to the Setup menu, type the name of the object into the Quick Find / Search bar, and click Buttons, Links, and Actions from the options that drop down under your object name.
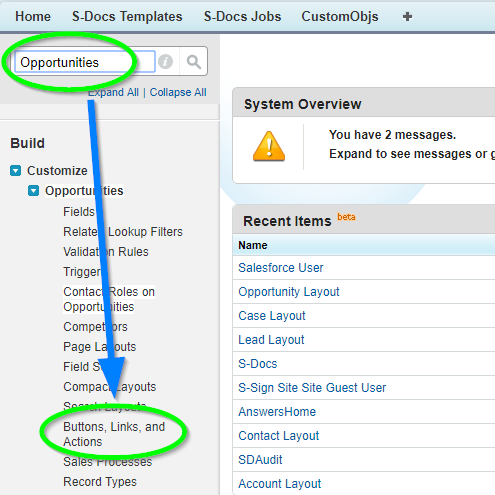
Then, click New Button or Link.
This concludes part (a).
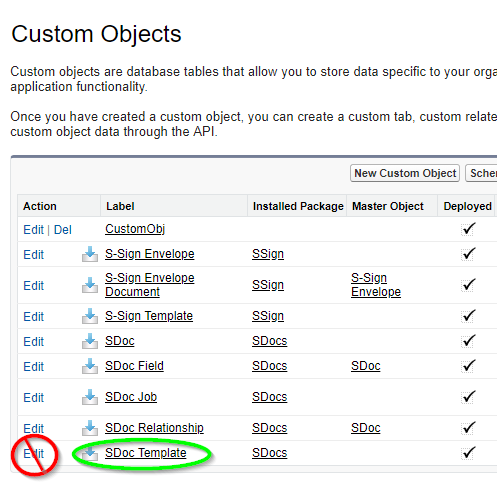
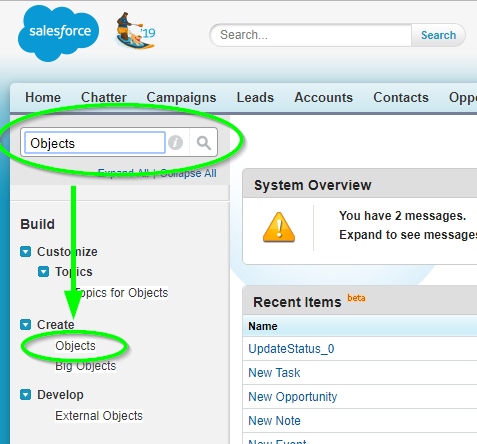
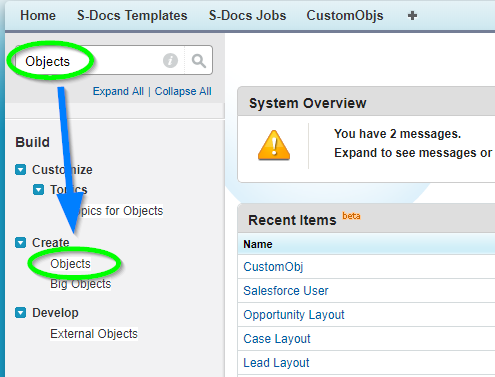
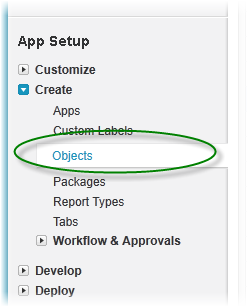
If you are creating this button for a custom object, navigate to the Setup menu, type "Objects" into the Quick Find / Search bar, then click Objects from the options that drop down under Create.
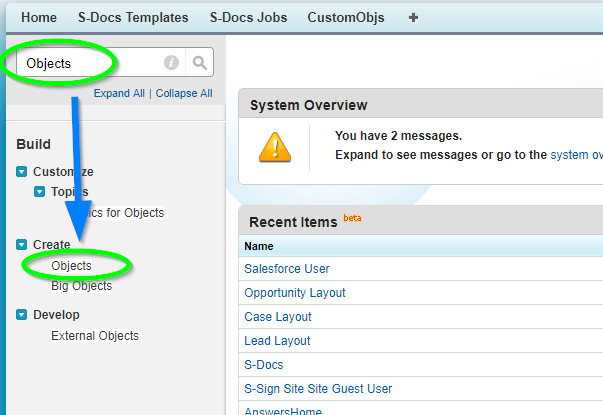
Then, click the name of your object (not the Edit button).
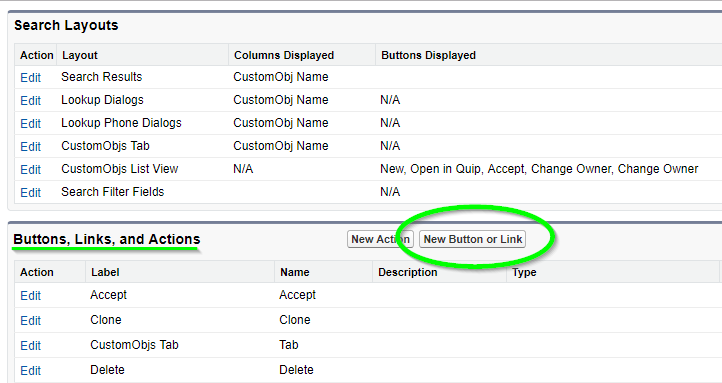
After you click the name of your custom object, scroll down to “Buttons, Links, and Actions” and click New Button or Link.
This concludes part (b).
2. On the “New Button or Link” page, fill in the fields as follows:
Label: S-Docs Mobile
Name: S_Docs_Mobile
Display Type: Detail Page Button
Behavior: Display in existing window without sidebar or header
Content Source: URL
Leave “Select Field Type” as the name of your object, and paste the following in the Custom Button or Link Editor:
[code lang="html"]{!URLFOR(
'/apex/SDOC__SDCreate1?id='
+ ChangeToYourObjApiName.Id
+ '&Object=ChangeToYourObjApiName'
+ '&lightningNav=true'
)}[/code]

If you are making the button for a standard object, the API Name is the same as the object name for all objects (e.g. the API name for an opportunity is Opportunity) except for products; for products, the API name is Product2.
If you are making the button for a custom object, you can find the API name on the same page you found the “Buttons, Links, and Actions” table on in 1b.
Once you finish pasting and editing the above code, click Save.
1. Navigate to the Page Layouts for your object. For standard objects, please follow the instructions in part (a). For custom objects, please follow the instructions in part (b).
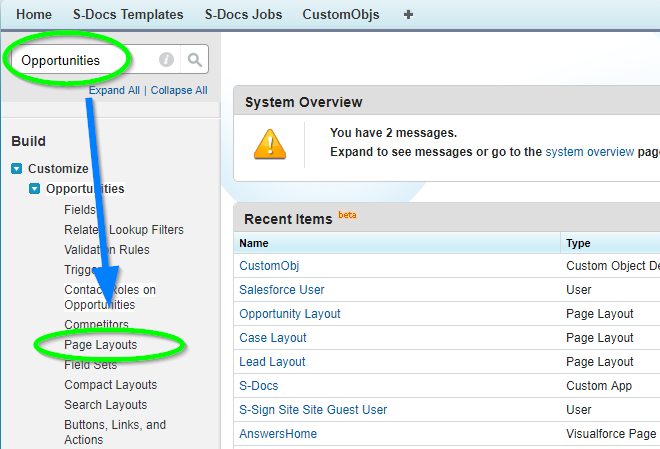
If you are adding the button to the Page Layout for a standard object, navigate to the Setup menu, type the name of your object into the Quick Find / Search bar, then click Page Layouts from the options that drop down under your object.
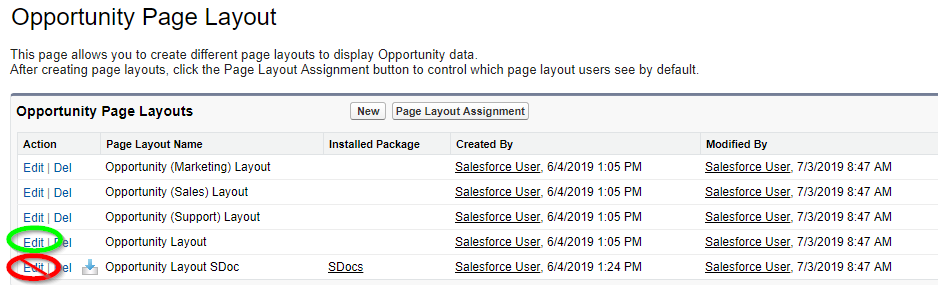
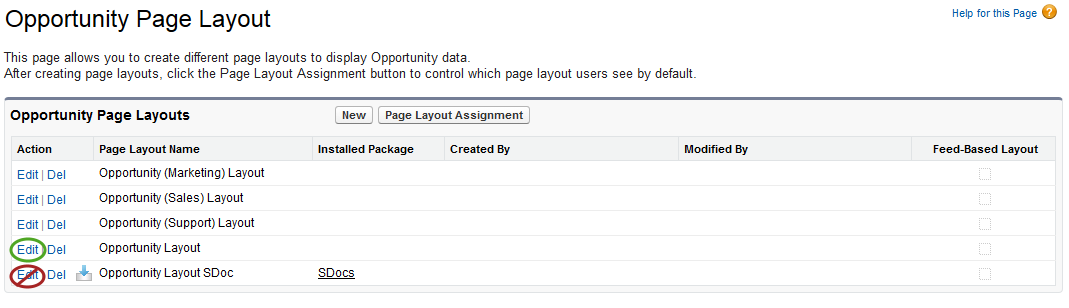
Click Edit next to “YourObjectName Layout.” For Accounts and Opportunities, there is a layout called “ObjectName Layout SDoc.” Do not edit this layout; rather, edit the layout called “ObjectName Layout.” In our Opportunity example, we are editing “Opportunity Layout.”
This concludes part (a).
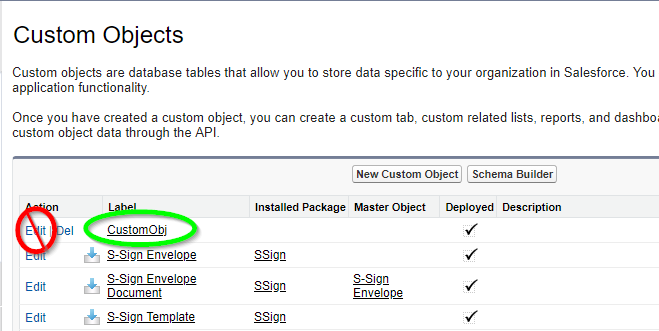
If you are adding the button to the Page Layout for a custom object, navigate again to the Setup menu, type "Objects" into the Quick Find / Search bar, then click Objects.
Then, click the name of your object (not the Edit button).
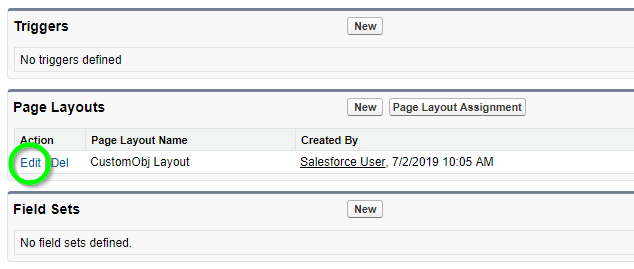
After you click the name of your custom object, scroll down to “Page Layouts” and click Edit next to “YourObjectName Layout.”
This concludes part (b).
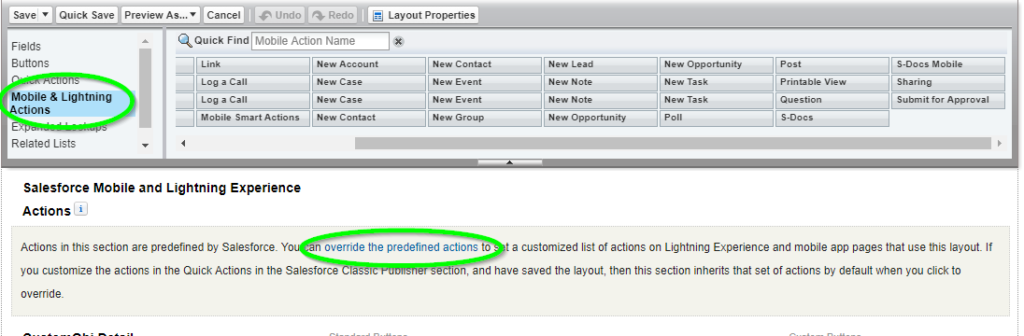
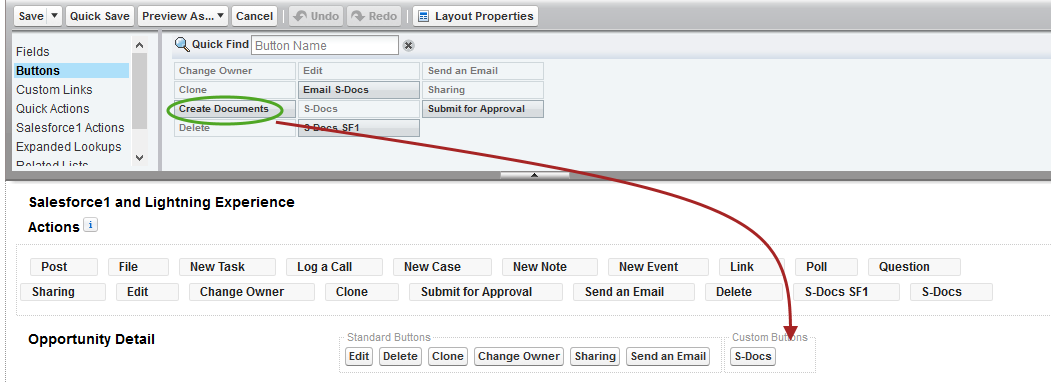
2. Scroll down to Salesforce Mobile & Lightning Experience Actions and click override the predefined actions. Then, click Mobile & Lightning Actions in the toolbar at the top of your screen.
Now, get rid of the standard S-Docs button by clicking it and dragging it anywhere within the toolbar.
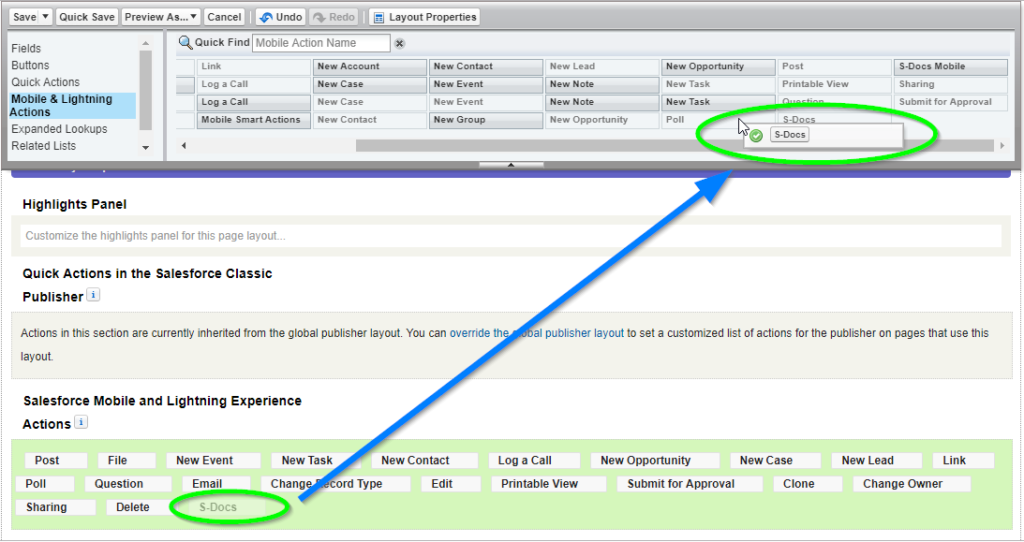
After removing the standard S-Docs button, click and drag the S-Docs Mobile button into the "Salesforce Mobile and Lightning Experience Actions" group.
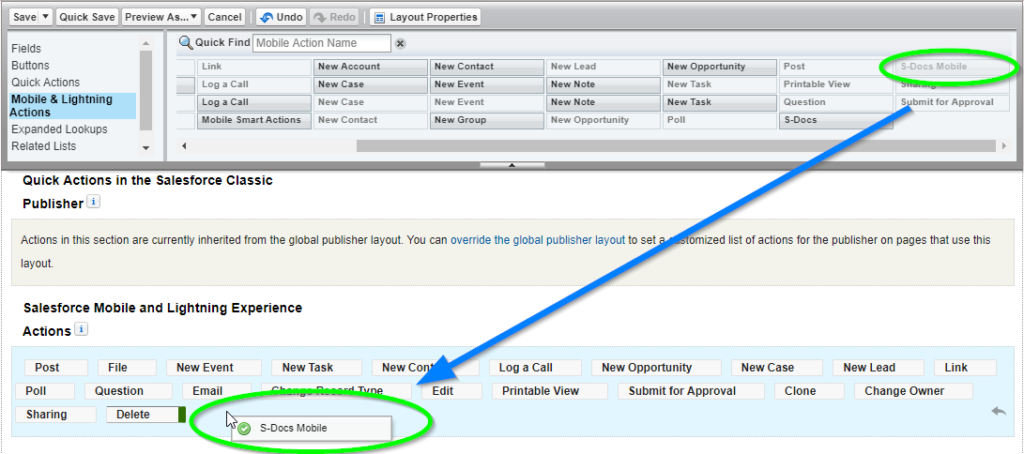
The resulting page should appear as follows:
Click Save to finalize your changes. S-Docs is now enabled for use with this object in the Salesforce mobile app!
This guide discusses how to configure and use S-Docs in Salesforce Lightning Experience and how to edit a template in Lightning. You can also view the S-Docs Quick Install and Configuration Guide for Salesforce Lightning Experience for a comprehensive overview of installing and configuring S-Docs in Salesforce Lightning Experience.
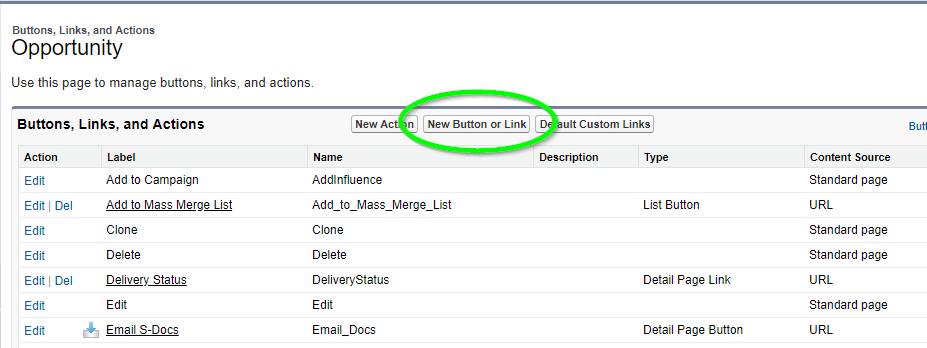
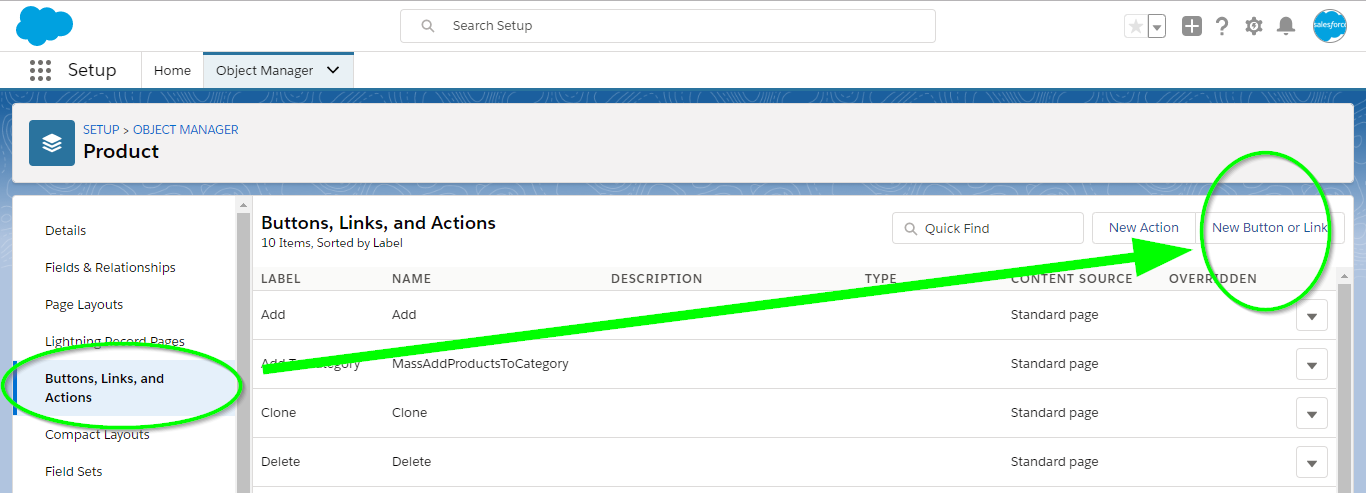
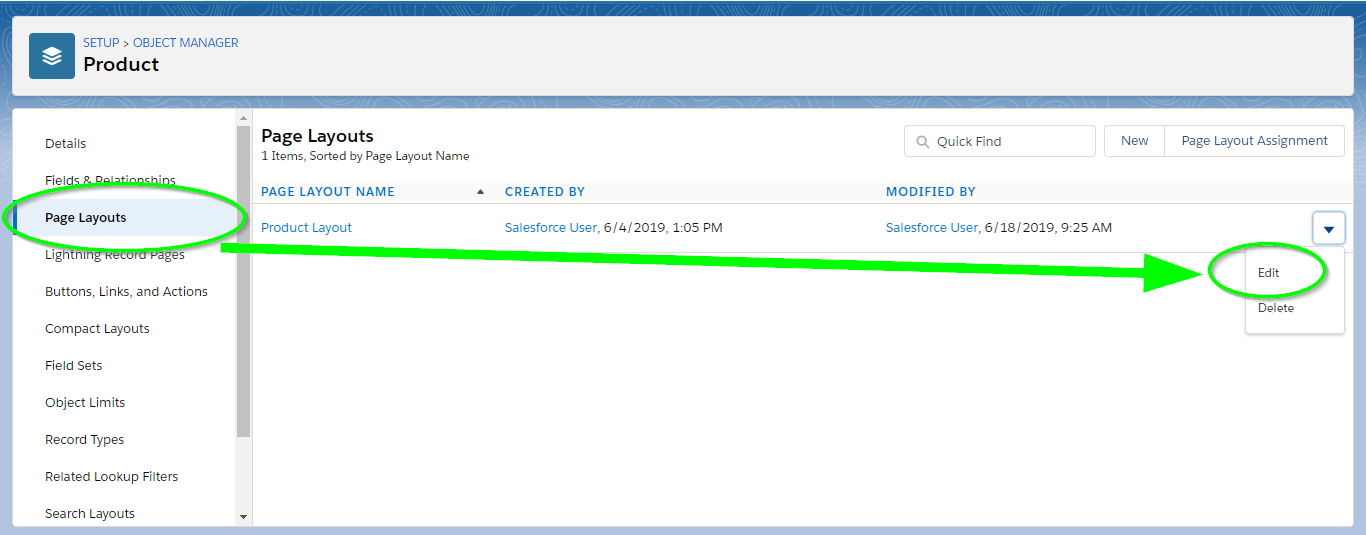
If you have not already created an S-Docs button and added it to your page layout, you will need to add a custom button (Note that the S-Docs button comes prepackaged for many standard objects, such as Opportunities, Contacts, and Accounts; however, you still need to add the button to your page layout for these standard objects). To create a new button, you'll need to go to Setup > Object Manager > ObjectNameHere > Buttons, Links & Actions.

 Click on New Button or Link and fill in the fields as in the following screenshot. You'll need to modify the button link per your object's API name. In this case, our object is a Product (API name Product2), so we used:
| {!URLFOR('/apex/SDOC__SDCreate1', null,[id=Product2.Id, Object='Product2'])} |
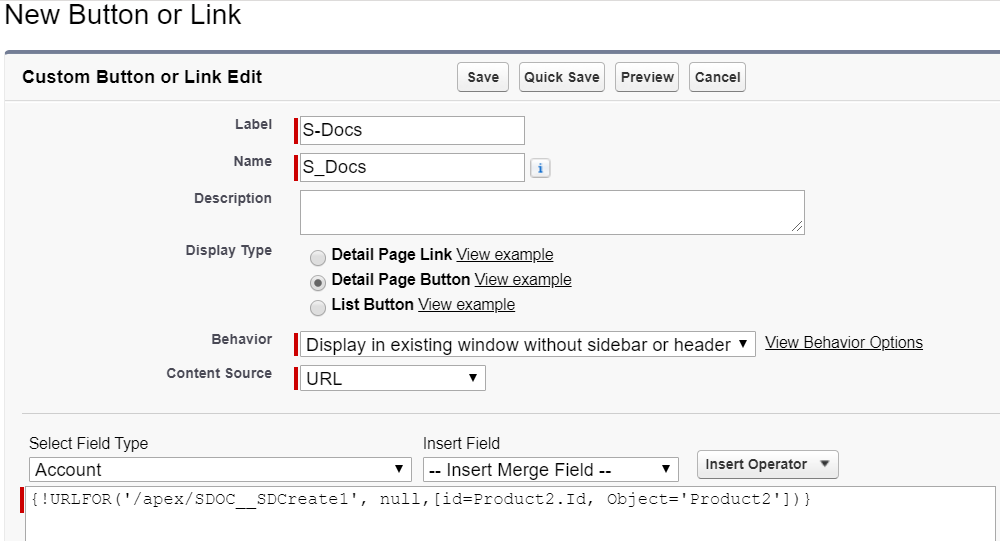
Note: If you encounter problems with your S-Docs button in lightning, add the lightningnav='true' parameter to your button URL. This step usually isn't necessary, but it can fix problems in lightning should they arise.
| {!URLFOR('/apex/SDOC__SDCreate1', null,[id=Product2.Id, Object='Product2', lightningnav='true'])} |
Then, you'll have to add your new button to your page layout. Staying within the Object Manager for your object, click Page Layouts on the sidebar, and then click Edit.
 Select the button from the Mobile & Lightning Actions box in the toolbar and add it to the Salesforce Mobile and Lightning Experience Actions box in the page layout.

Click Save and you're all set! You can now generate S-Docs in Lightning.
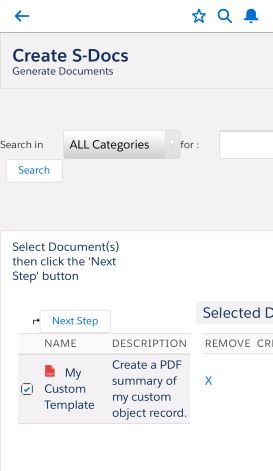
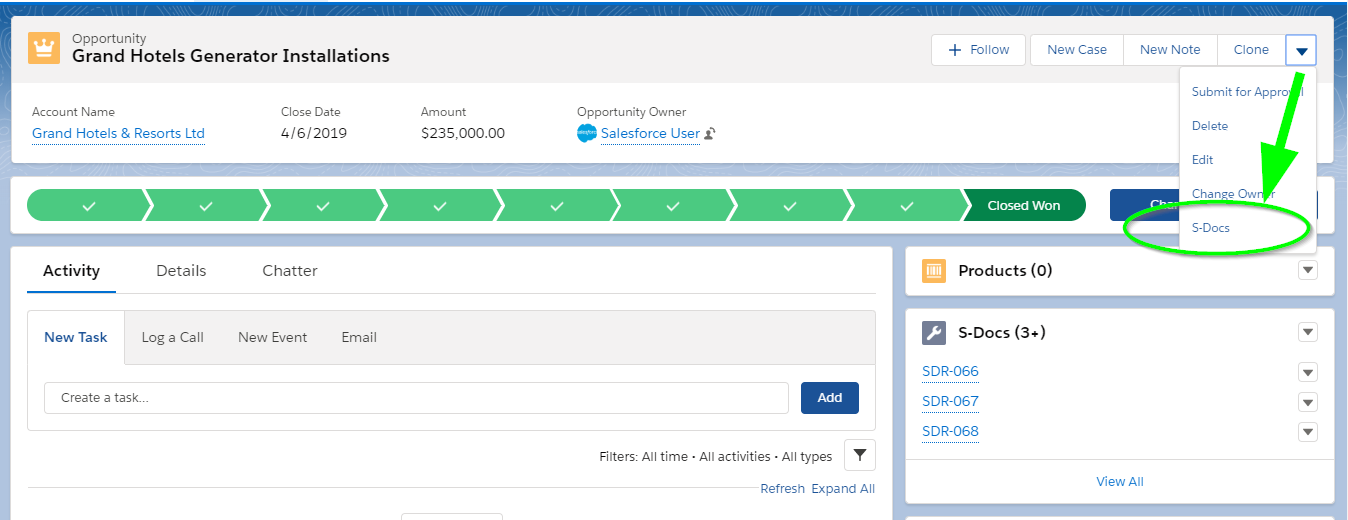
To generate an S-Doc for a record, go to that record’s page and click the S-Docs button:
Then, select the templates you would like to use. Click Next Step to generate documents derived from the templates you selected: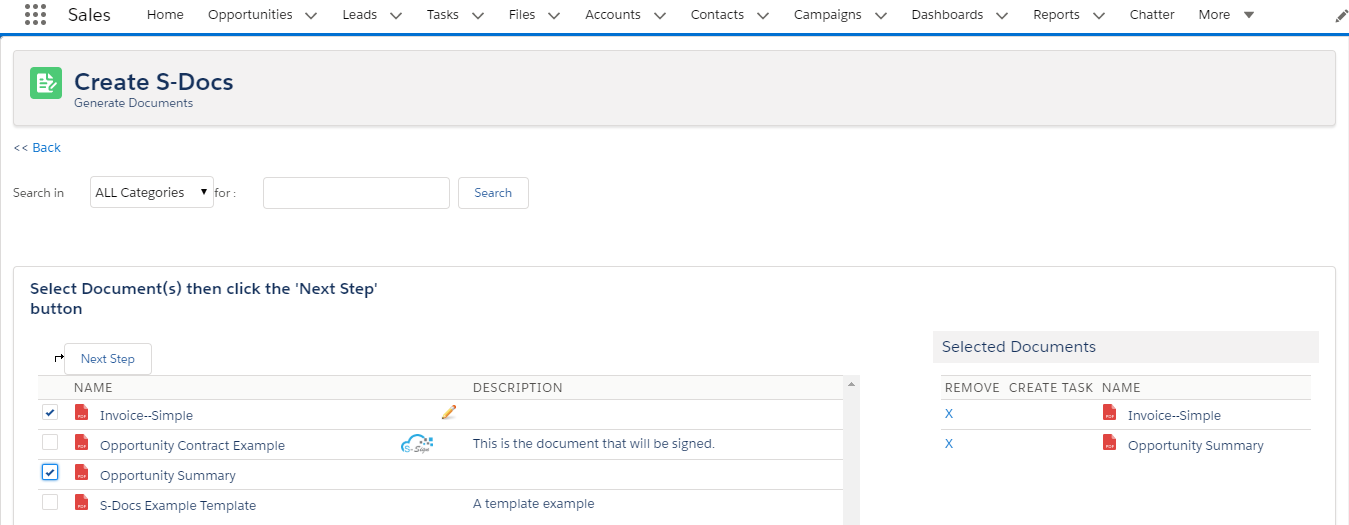
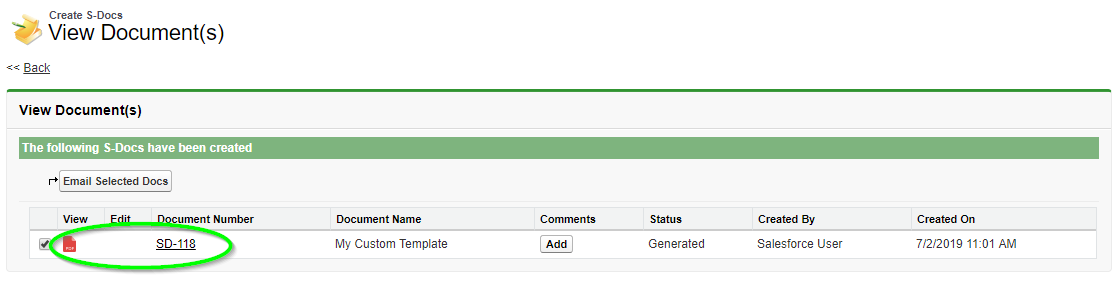
Once you have generated your documents, you will see the “View Document(s)” page.
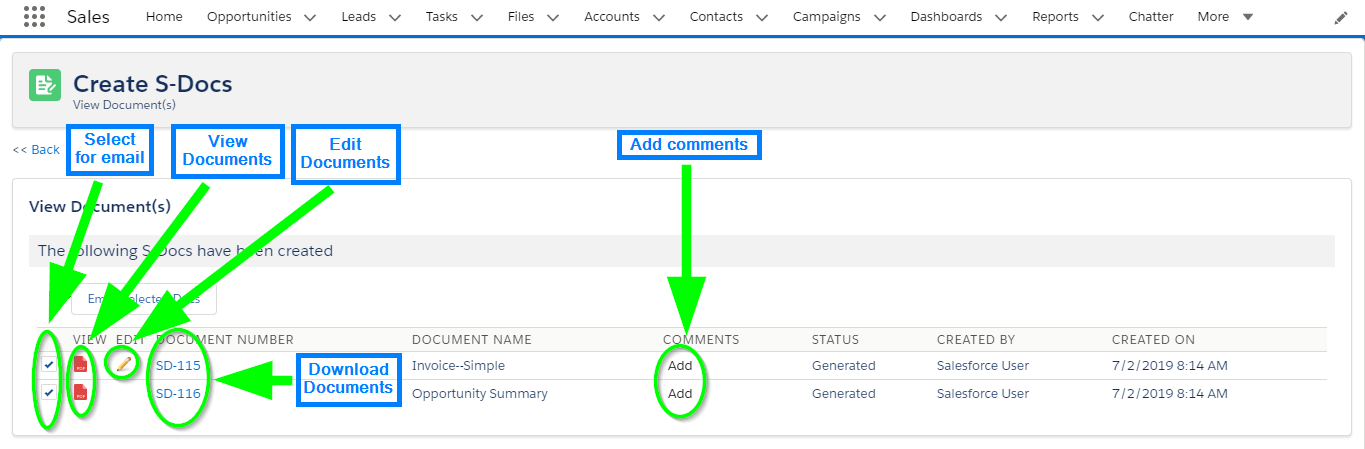 Clicking the "View" icons will bring up your documents in a separate tab:
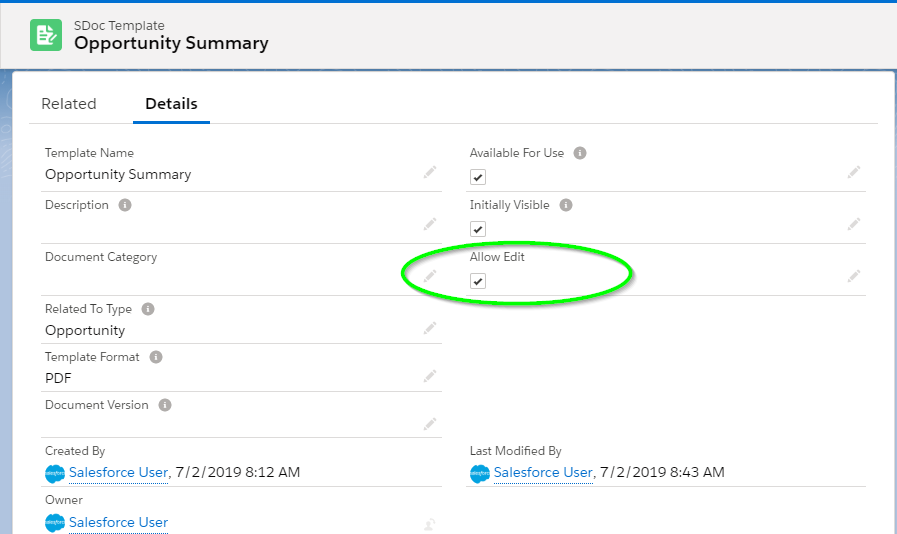
Let’s return to the “View Document(s)” page. If “Allow Edit” is enabled for a particular template, you can click the pencil icon corresponding to that document to edit it after it’s been generated:
After you make your edits, you can click Preview to preview the final document, Save to save and return to the “View Document(s)” page, and Close to discard your changes and return to the “View Document(s)” page.
On the “View Document(s)” page, you can click Email Selected Docs to email your documents. Your documents will be included as attachments on an email. Here, you can edit the email fields as desired, scroll down to edit the body of the email, and click Send to send your email or Cancel to return to your record’s page.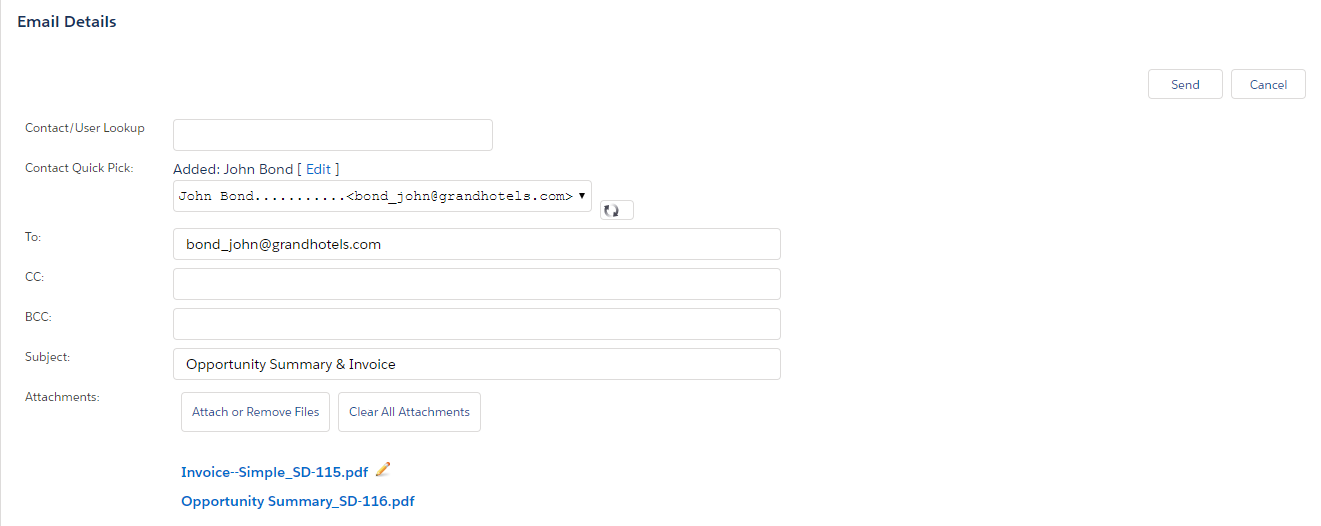
Once you return to your record’s page, you will notice that the S-Docs you generated now appear in the S-Docs related list. You can click View All for a more in-depth look at your S-Docs’ details.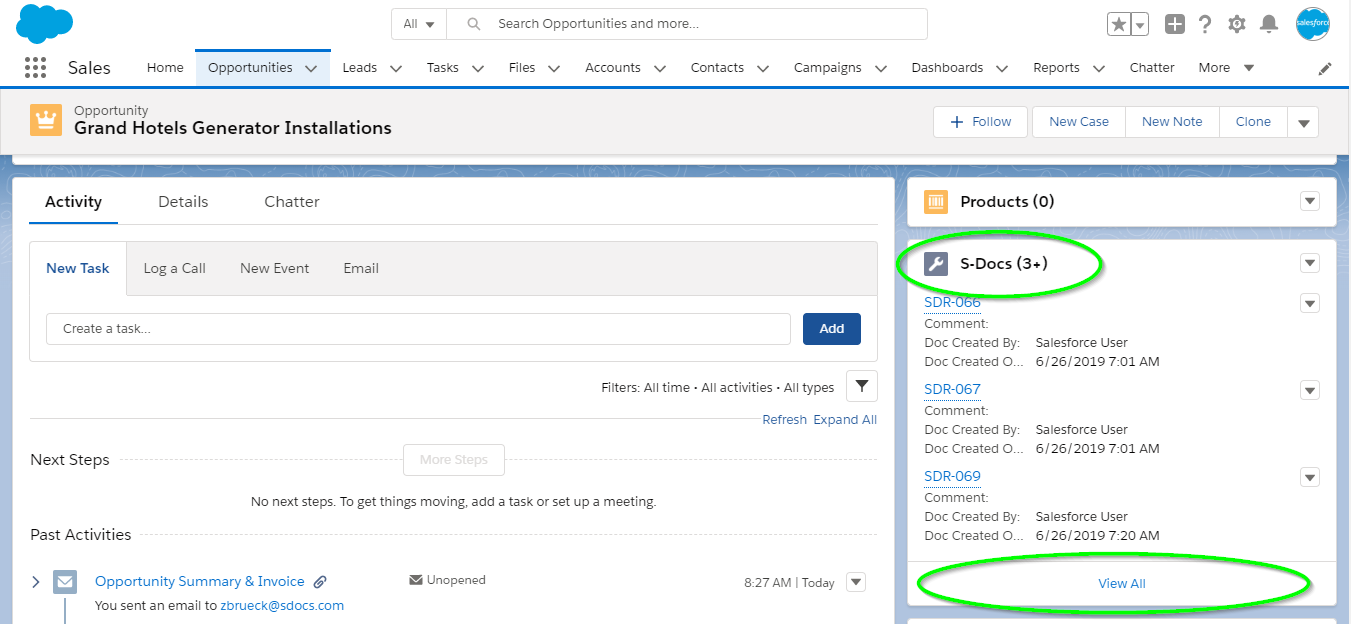
On the following page, you can click the document icon in the “View” column, the mail icon in the “Email” column, or the pencil icon in the “Edit” column to respectively view, email, or edit the corresponding document.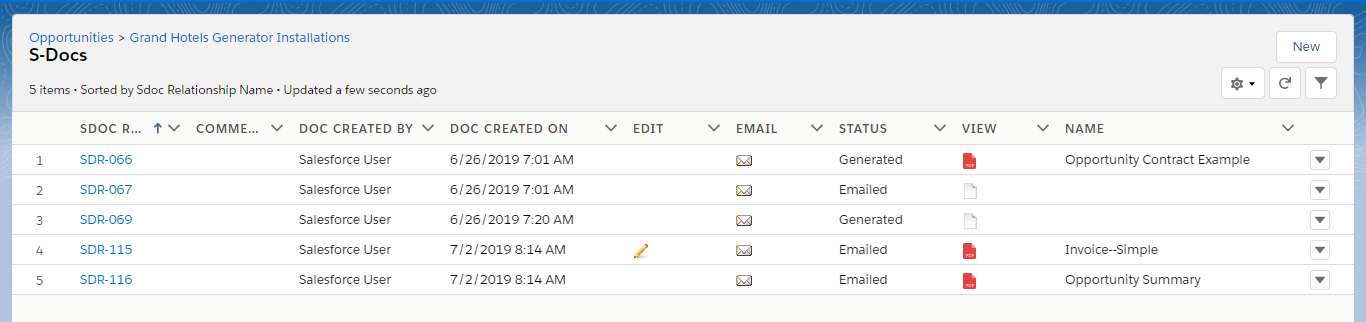
Now, going back to the record we generated S-Docs for, if we scroll down to the bottom of the page, we will see that the email we sent was recorded in the “Past Activity” section. Additionally, the Invoice template was saved in the Notes & Attachments section, but not the Opportunity Summary. This is because “Auto-Create Attachment” is enabled for the Invoice template but not the Opportunity Summary.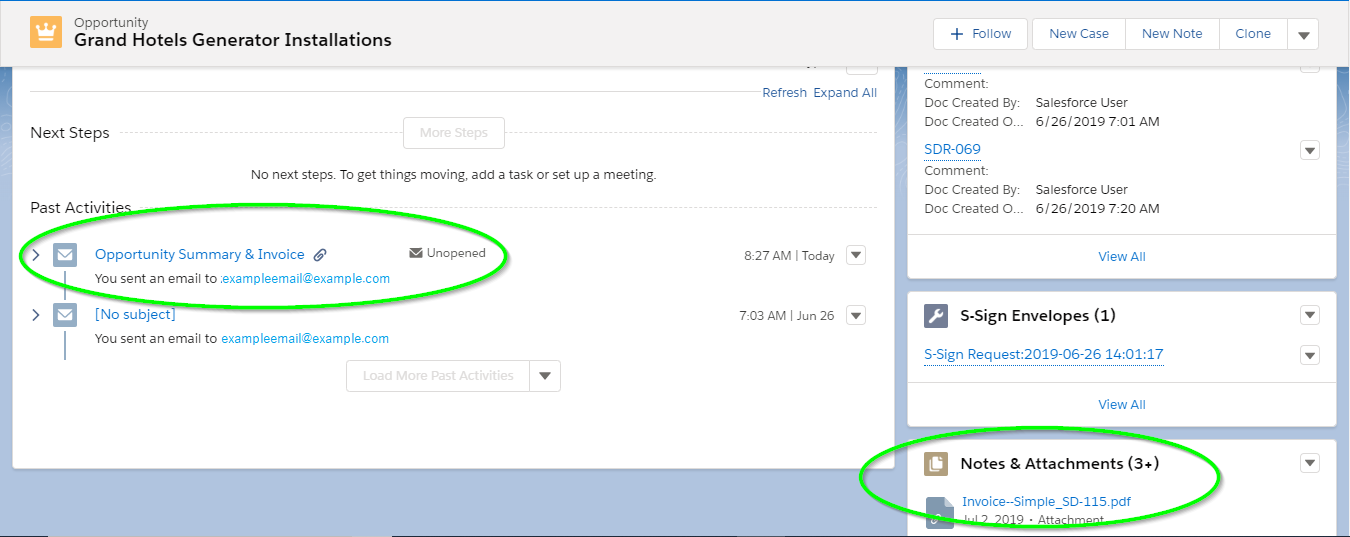
(If you’re an end-user of S-Docs who is just generating documents and not editing templates, you can ignore the following note).
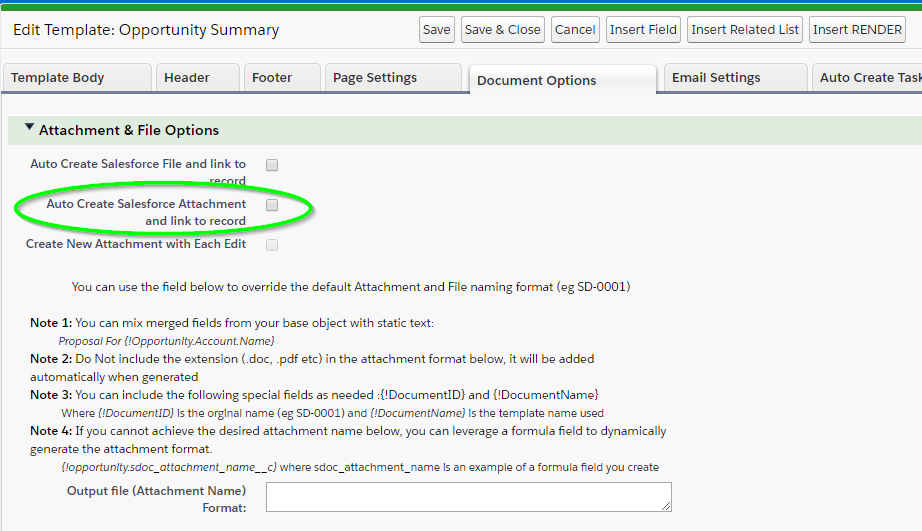
Additionally, note that if the Auto-Create Salesforce Attachment and link to record box (found under the "Document Options" tab of the template editor) is not checked on a template, the documents created with that template in the S-Docs related list will be regenerated each time they are viewed, emailed, or edited. For example, if this box was not checked for an account summary template, and you opened an account summary document from 6 months ago, the document would be regenerated and the current account info would be displayed, rather than the account info from 6 months ago.
Editing templates in Lightning works just the same as in Classic. The only difference is getting there! To get there, select the S-Docs app from the app launcher.
 Then, click the “S-Docs Templates” tab. From here, you can select any template you’d like to edit by clicking on its name.
Once you select a template, you can edit its fields or head over to the template editor to edit the contents of the template itself.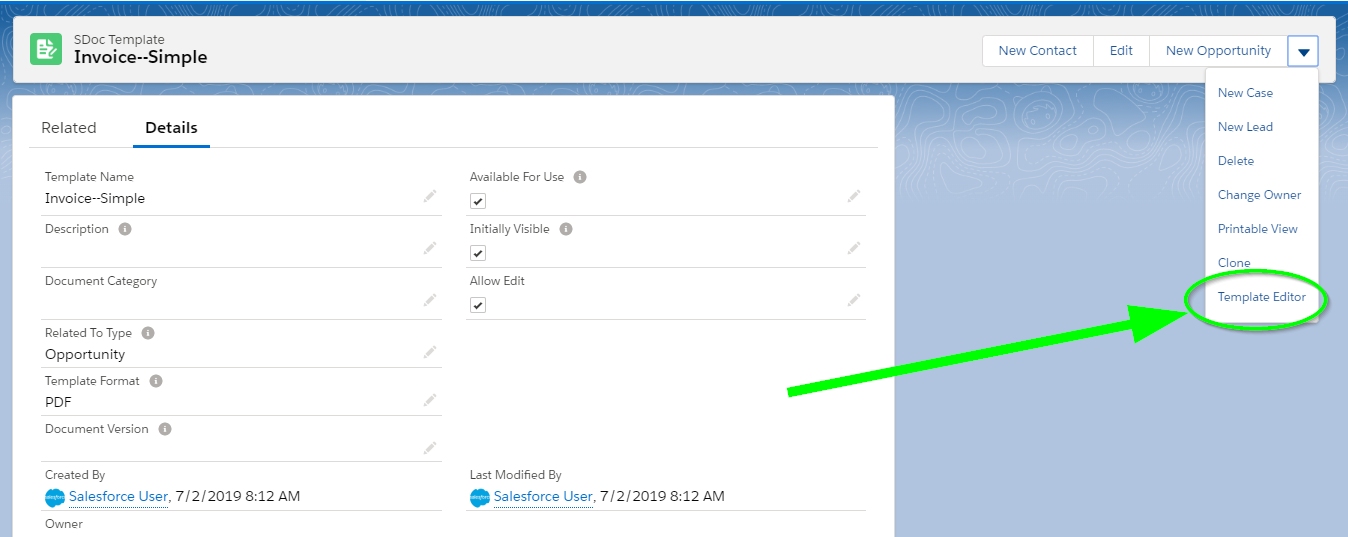
And there it is! Editing your template in Lightning works exactly the same as editing your template in Classic. If you wish to learn more about editing S-Docs templates, please see our overview of the template editor.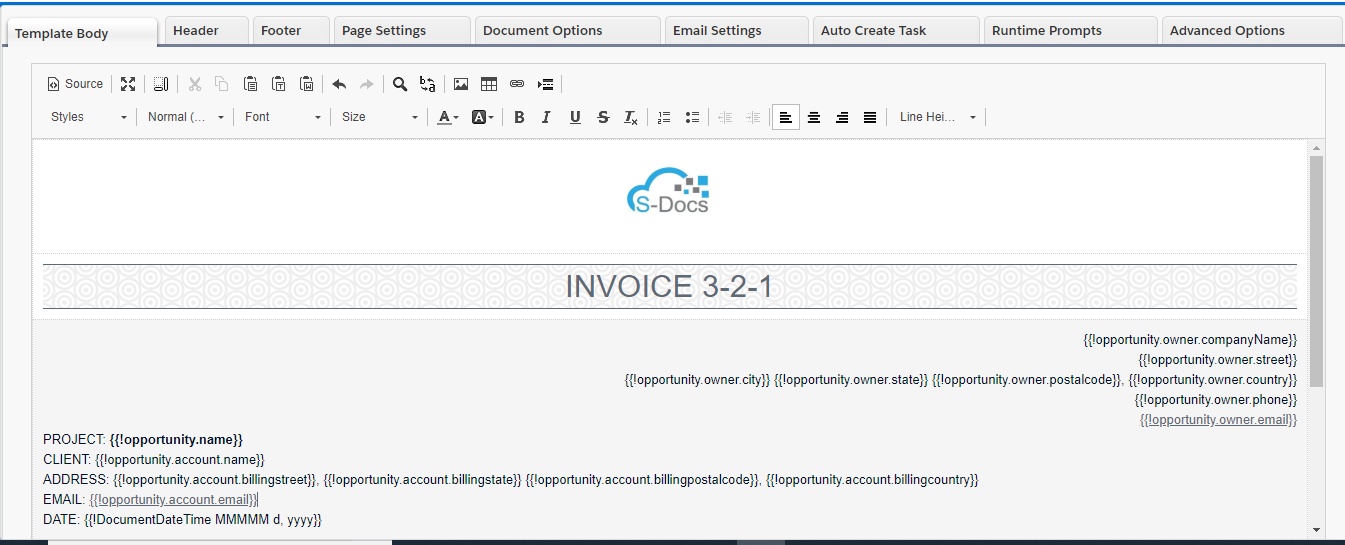
S-Docs can be used in Salesforce communities too! In this guide, we will be setting up this functionality for a particular Salesforce object (you will need to follow the steps in this guide for each object you are enabling S-Docs with communities for). To do so, all we have to do is create a button that will show up for your community users and add it to an object’s page layout.
This button is not unique to communities; it will also exist in our production org and operate exactly the same as an ordinary S-Docs button. This means if we already have an S-Docs button, we will be replacing it with a new button that can be used by community users as well as users in our production org.

In this step, we will be creating a button that will enable the use of S-Docs with Salesforce communities for a particular object. In this example, we will be creating the button for an opportunity.
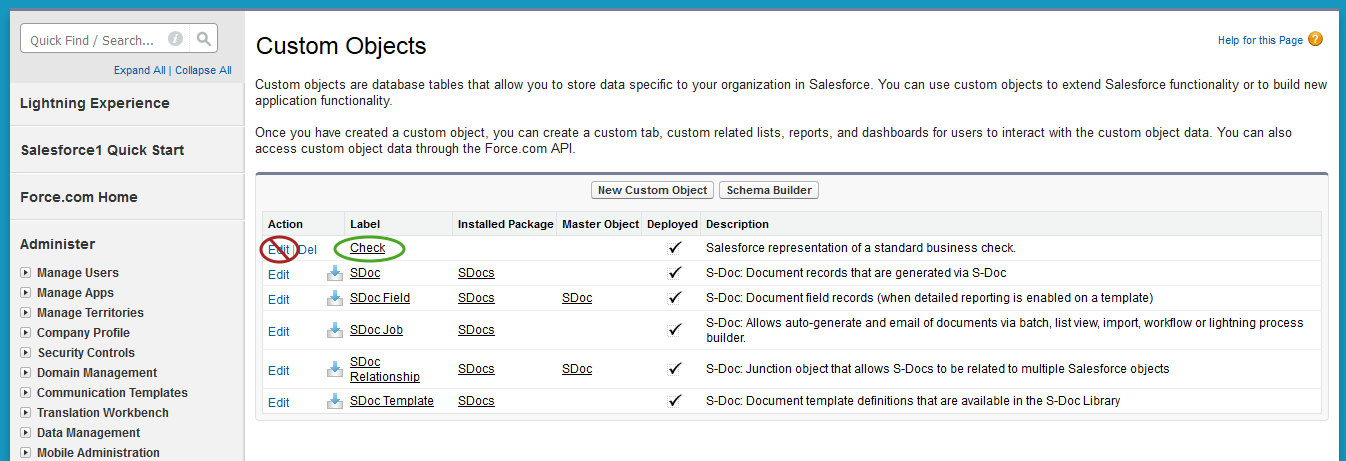
Navigate to Setup > Build > Create > Objects.
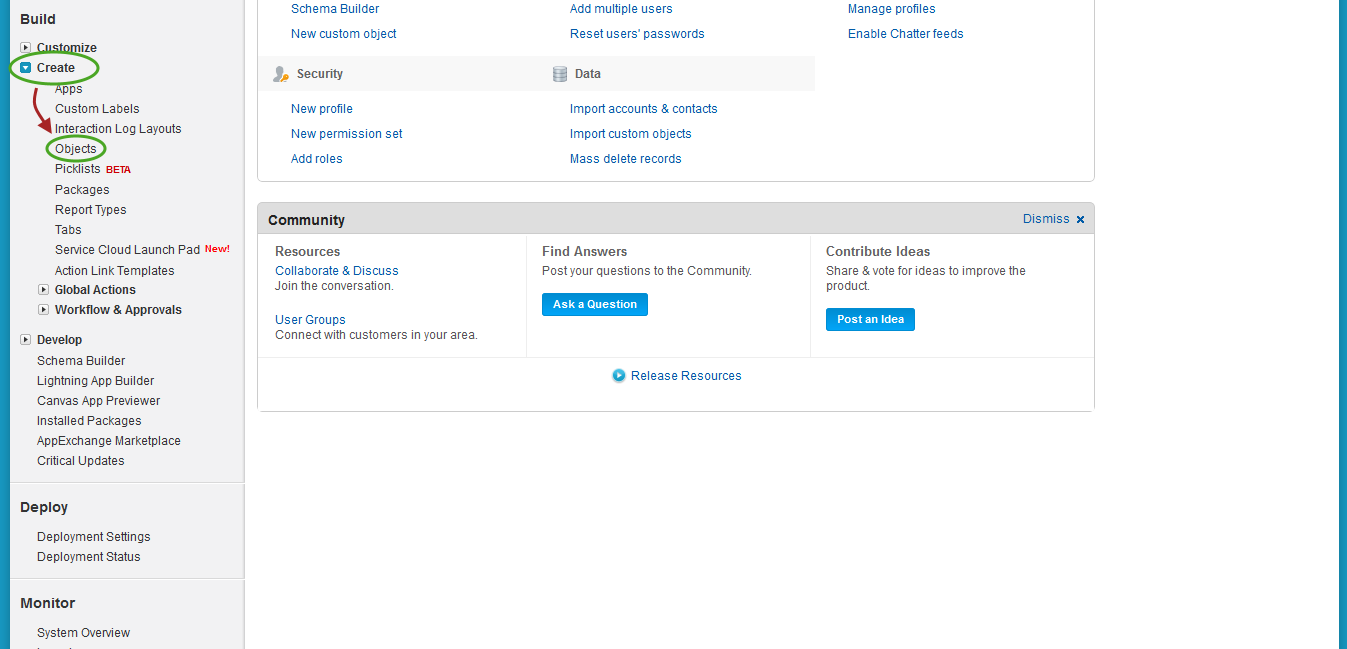
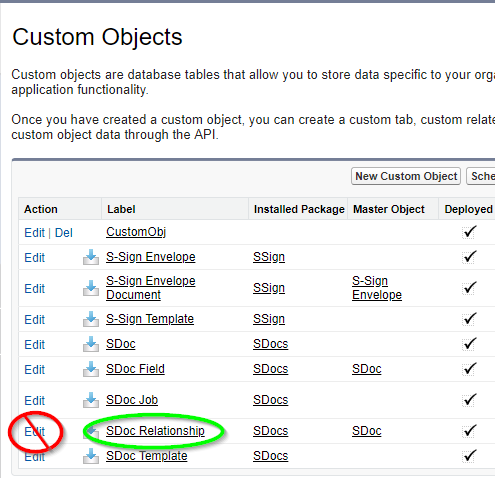
Find the name of the custom object you would like to create the button for and click the name of this object (do not click the Edit button). In this example, we will be creating the button for the Check object, a custom object representing the data for a standard business check.

Next, a page will display for your custom object.
The API Name is often just the “Object Name” appended with __c (note the two underscores), but sometimes this is not the case, so please take note of that here. In the case of our custom Check object, we will note that our API Name is Check__c.

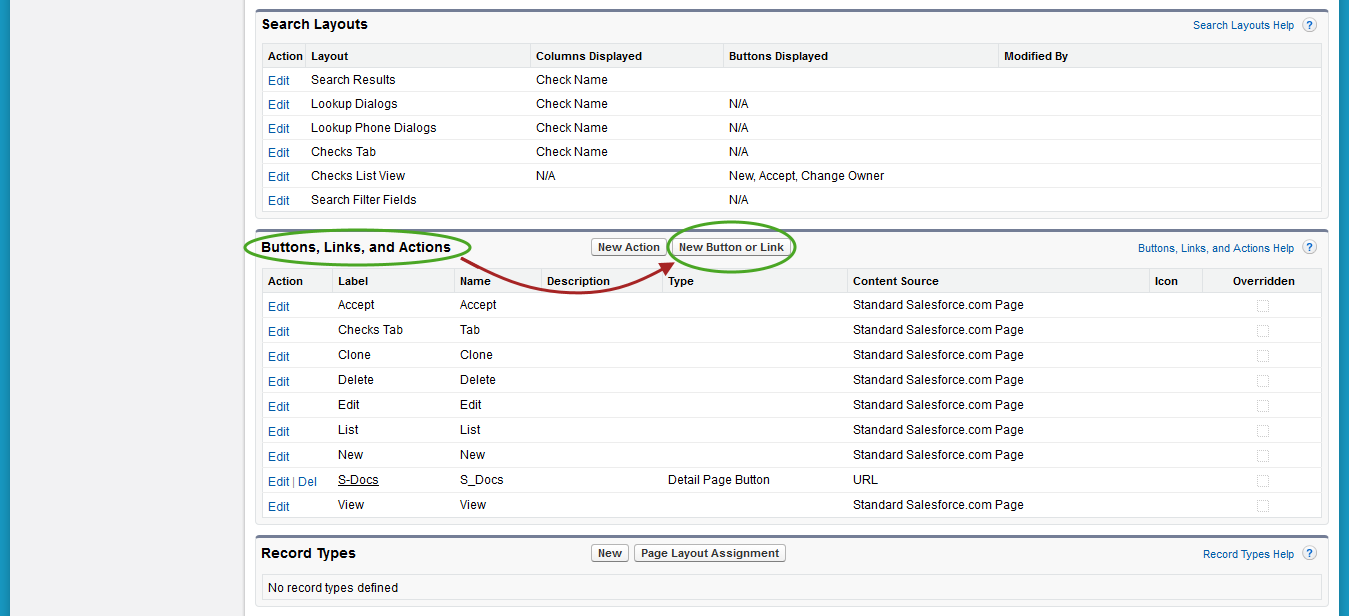
On the page for your custom object, scroll down to “Buttons, Links, and Actions” and click New Button or Link.
This concludes part (a).
Navigate to Setup > Build > Customize > YourObjectNameHere > Buttons, Links and Actions. In this example, we will be finding the “Buttons, Links, and Actions” page for an Opportunity.
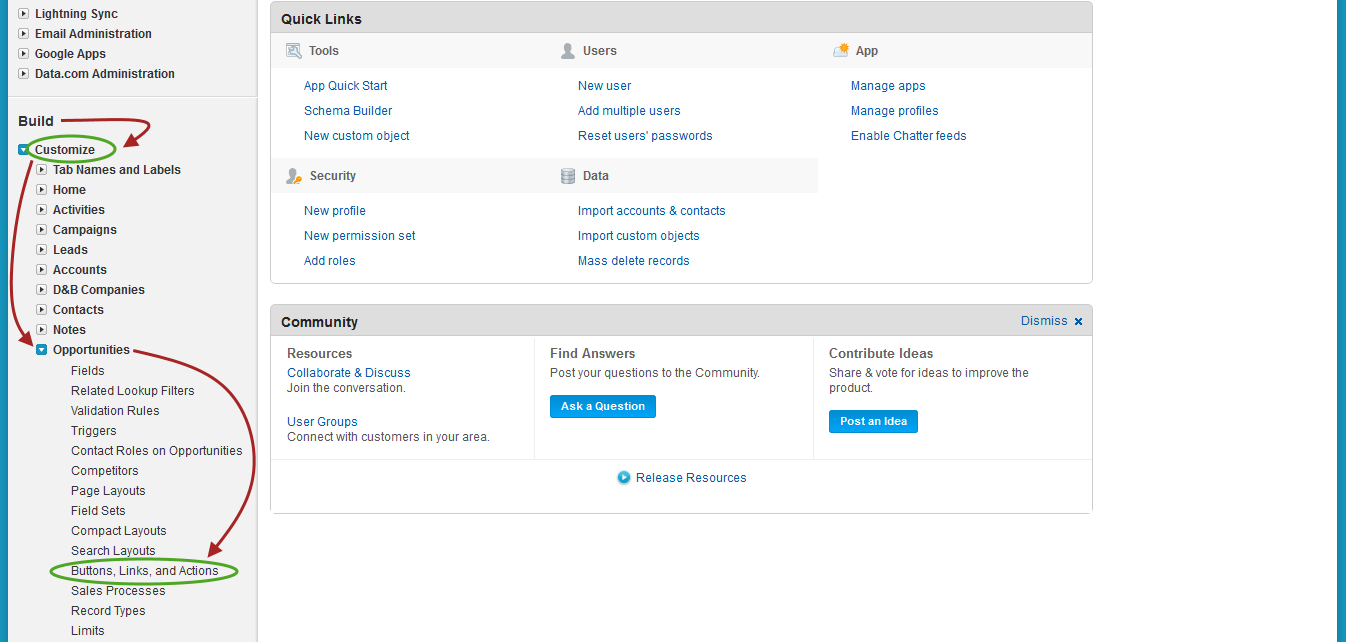
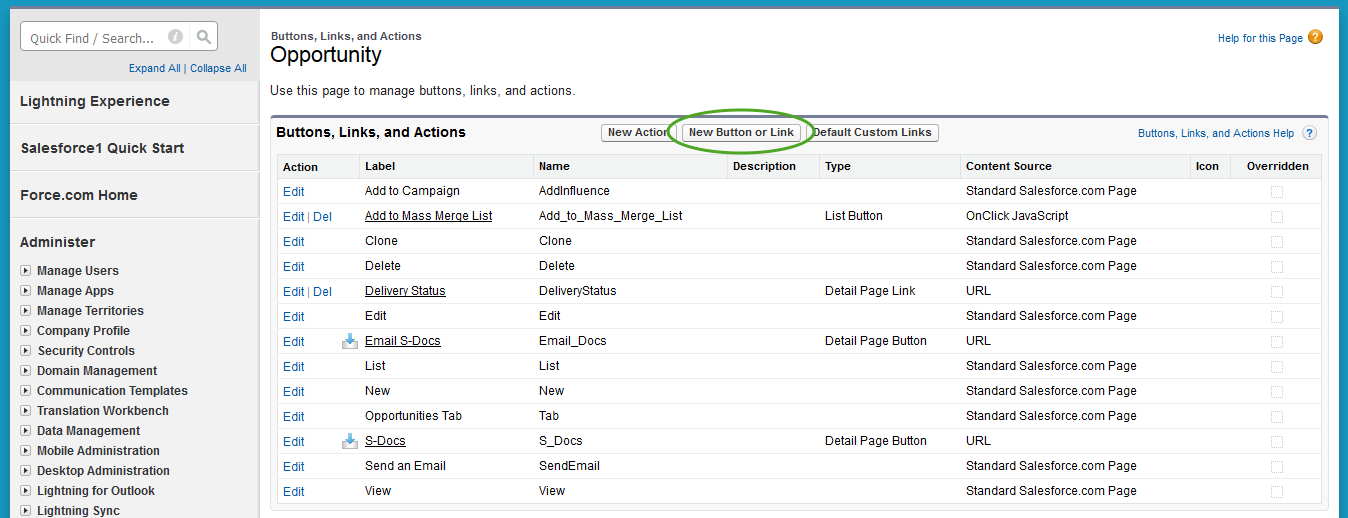
Once you’re on the “Buttons, Links, and Actions” page for your standard object, click New Button or Link.
This concludes part (b).
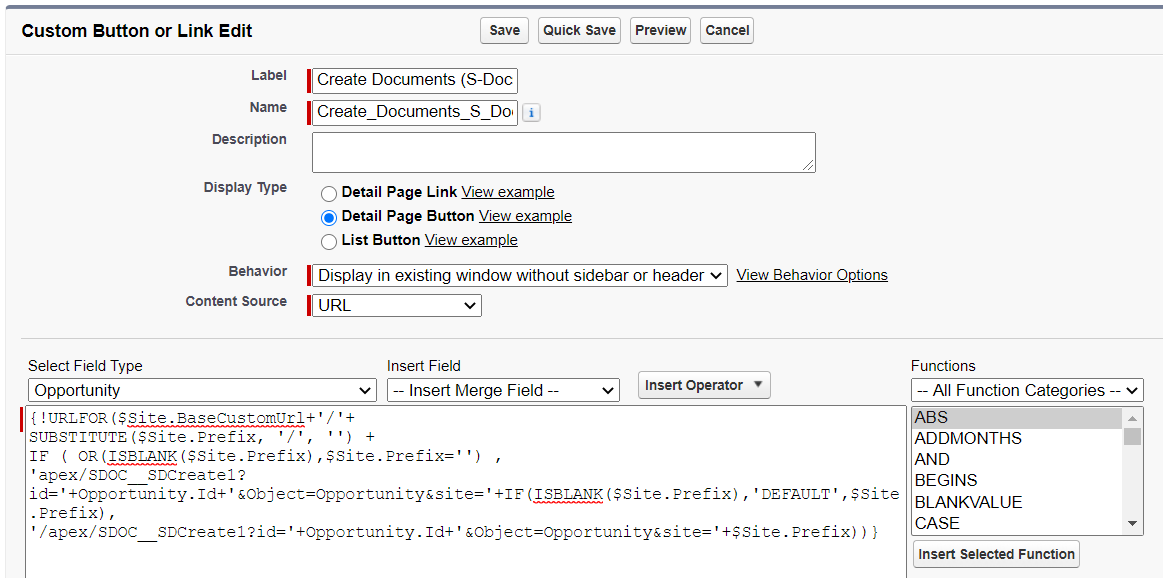
Here’s what to fill in:
Label: Create Documents (S-Docs)
Name: Create_Documents_S_Docs
Display Type: Detail Page Button
Behavior: Display in existing window without sidebar or header
Content Source: URL
Finally, paste the following code into the “Custom button or link editor.”
[code lang="html"]{!URLFOR($Site.BaseCustomUrl+'/'+
SUBSTITUTE($Site.Prefix, '/', '') +
IF ( OR(ISBLANK($Site.Prefix),$Site.Prefix='') ,
'apex/SDOC__SDCreate1?id='+ChangeToYourObjAPIName.Id+'&Object=ChangeToYourObjAPIName&site='+IF(ISBLANK($Site.Prefix),'DEFAULT',$Site.Prefix),
'/apex/SDOC__SDCreate1?id='+ChangeToYourObjAPIName.Id+'&Object=ChangeToYourObjAPIName&site='+$Site.Prefix))}[/code]
Again, please make sure that both appearances of “ChangeToYourObjAPIName” have been changed to your object’s API name. Click Save to finish the button.
Now, all we have to do is add the button we just created to our object’s page layout.
Navigate to Setup > Build > Create > Objects.

Find the name of your custom object and click the name of this object (do not click the Edit button). In this example, we will be adding the button to a Check’s page layout.
On the page for your custom object, scroll down to “Page Layouts” and click Edit next to “YourObjectName Layout.”
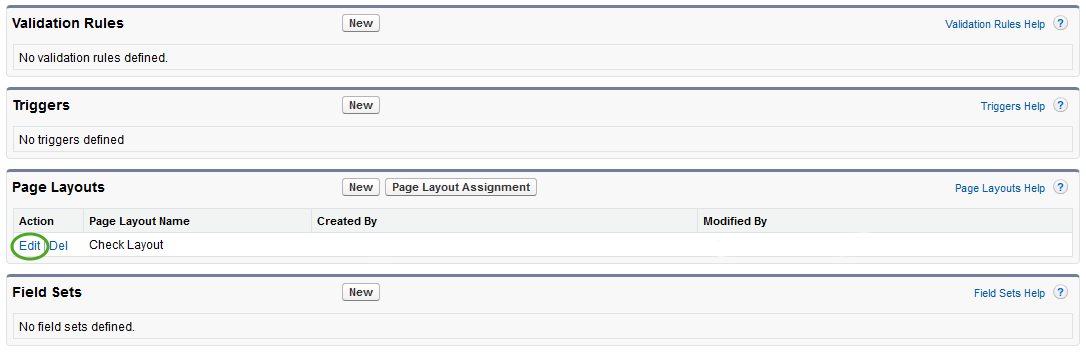
This concludes part (a).
Navigate to Setup > Build > Customize > YourObjectNameHere > Page Layouts. In this example, we will be finding the “Page Layouts” page for an Opportunity.
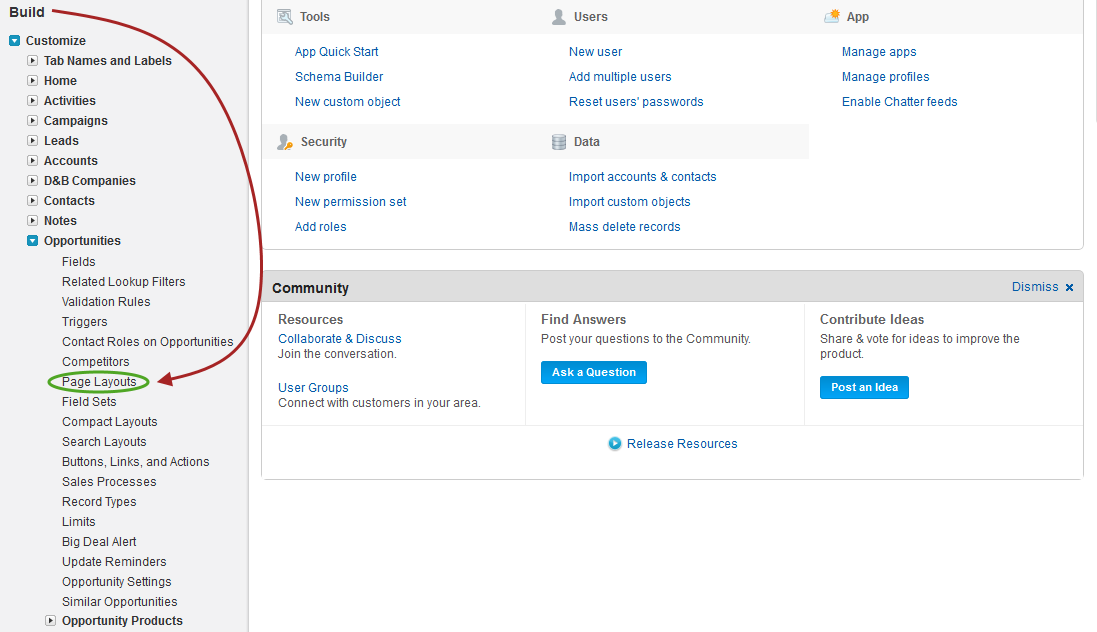
Now click Edit next to “YourObjectName Layout.” (There may be other layouts, such as “YourObjectName Layout SDoc”. Do not edit these; only edit “YourObjectName Layout.”)
This concludes part (b).
Here’s how the finished page will appear.
Click Save and you’re all done! You should now have an S-Docs button on your object’s page that can be used by users in your communities, as well as users in your production org.
S-Docs works great with the custom objects and even the Force.com platform edition, which is entirely comprised of custom objects. Your documents can span many relationships to include data from formula fields, rich text, parent records, child, grandchild and related objects--all within the same document.
Since every organization creates different custom objects to meet their unique requirements, you need to configure S-Docs to recognize which custom objects you want to leverage with S-Docs.
To learn how to configure S-Docs with custom objects in Salesforce Classic, you can watch the following tutorial video, which will walk you through the process. You can also refer to the written instructions below the video, which provide a detailed, step-by-step guide to configuring S-Docs with custom objects. Timestamps from the video are provided in the table of contents. To view the same guide for Salesforce Lightning Experience, click here.
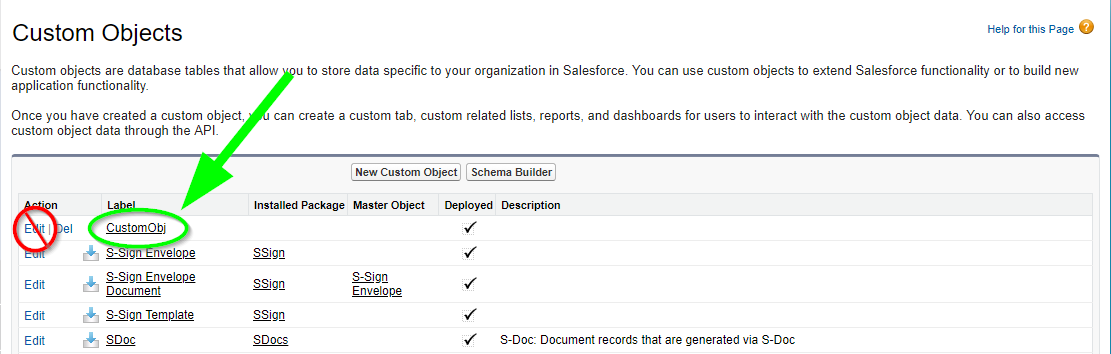
For the purposes of this guide, we assume your custom object is named CustomObj and has an API name of CustomObj__c. (Note: the API name has two underscores.) Whenever you see "CustomObj" in this document, you can replace it with the name of your custom object. S-Docs can also integrate with other AppExchange apps. (Note: there are a few setup differences.) This document will walk you through the step-by-step configuration process. It is intended for Salesforce.com administrators who are familiar with standard configuration tasks.
Sample templates can be found here.
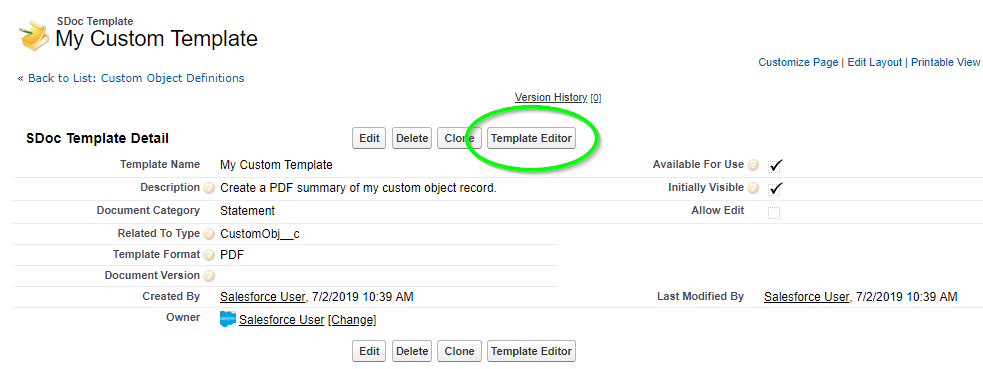
This step allows you to associate the S-Doc with the Custom object, so that users can see a related list of all S-Docs created on your Custom Objects page layout.

Step 1 of 6 - Pick Lookup Relationship. Click Next.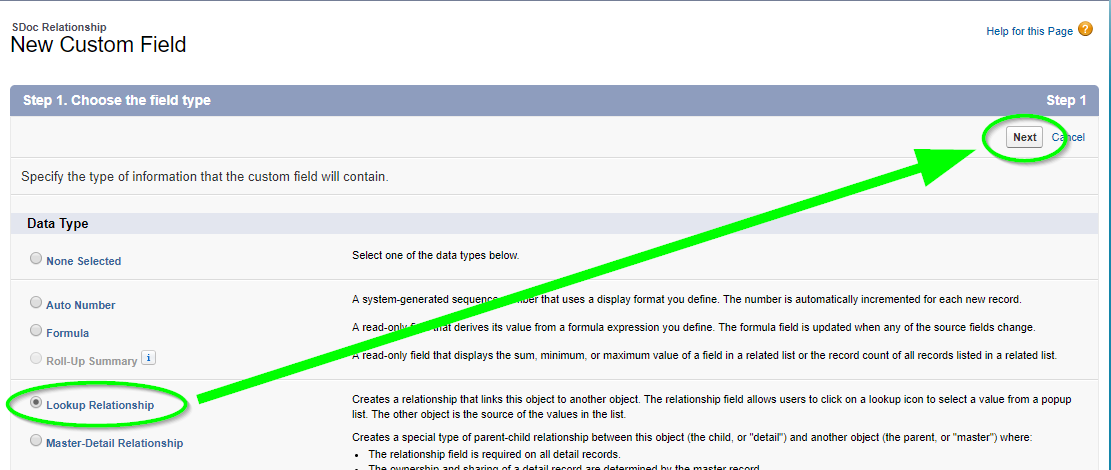
Step 2 of 6 - Select your Custom Object (e.g. CustomObj__c) from picklist values, then click Next.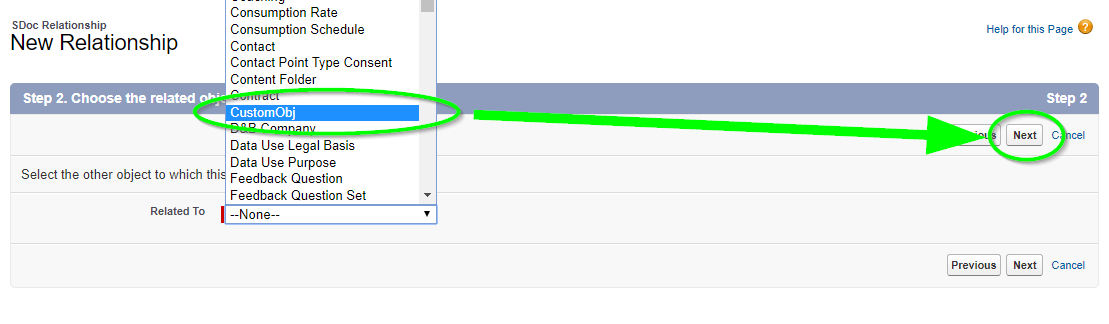
Step 3 of 6* - Field label and field name should be your custom object name without the “__c.” In our example it would be "CustomObj." Click Next.
Step 4 of 6 - Checkbox should be visible for all users. Click Next.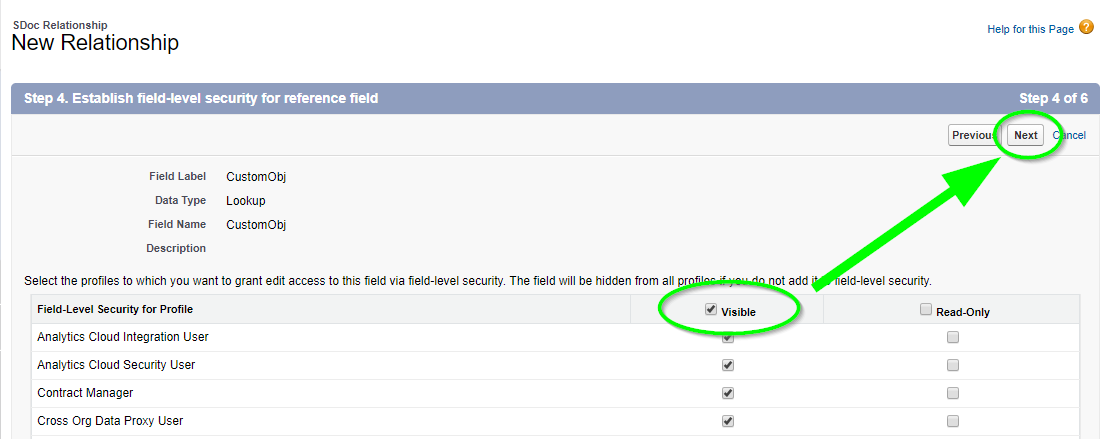
Step 5 of 6 - Checkbox should add the field for the layout.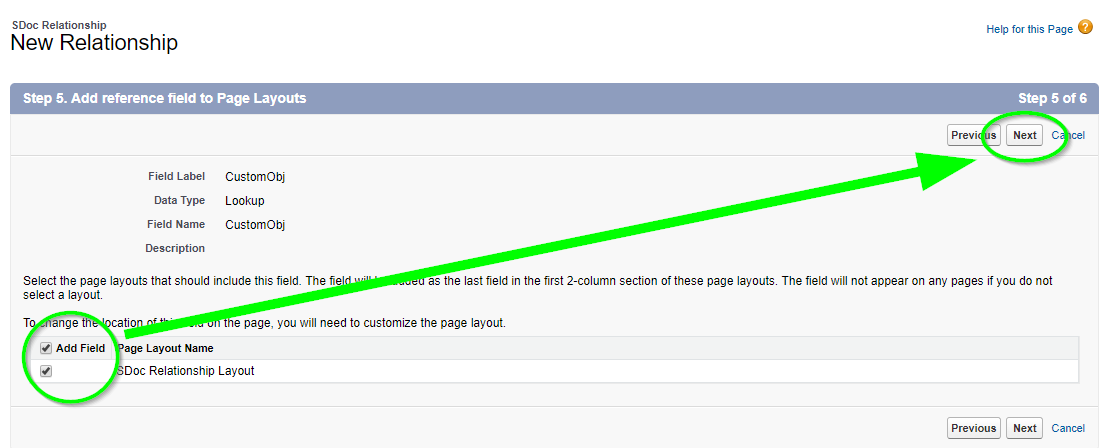
Step 6 of 6 - Accept default. Click Save.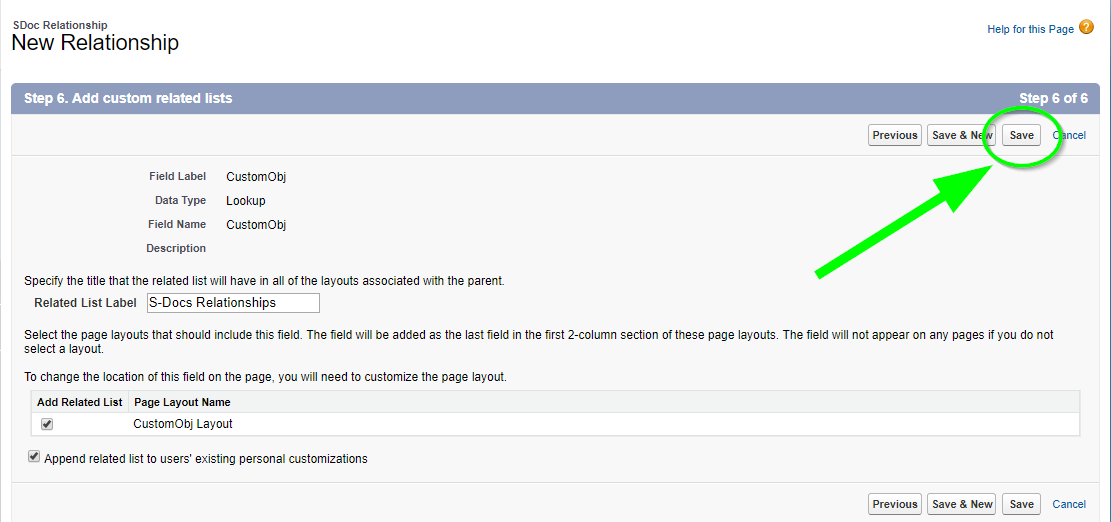
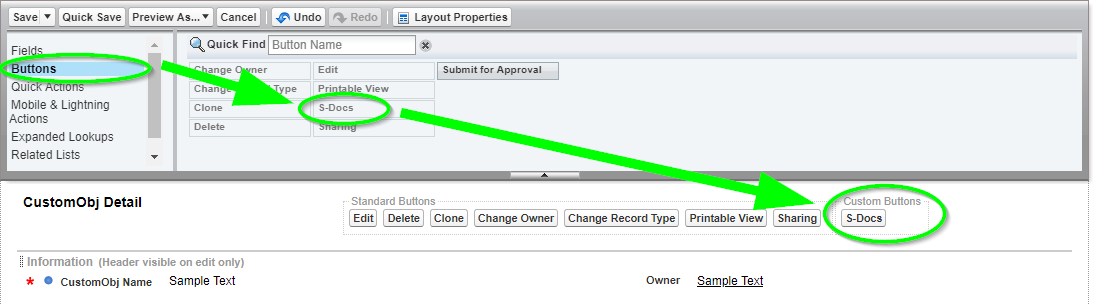
Just like using S-Docs with other objects, you need to place an S-Docs button on the record detail page layout. Users click the button to initiate creating a document from the record detail page.


Note: If you are using S-Docs with an object within another AppExchange managed package, your button syntax should include the entire object API name that includes the domain (e.g. package__CustomObj__c). Note that double underscores are used throughout. Your button syntax should therefore look similar to the following:
{!URLFOR('/apex/SDOC__SDCreate1', null,[id=Package__CustomObj__c.Id, Object='Package__CustomObj__c'])}

To use this new S-Docs button, you first need to add your custom object as an available picklist value in the "Related to Type" field on the S-Docs template detail page, and then create at least one template to use with your custom object. The next two steps describe this process.
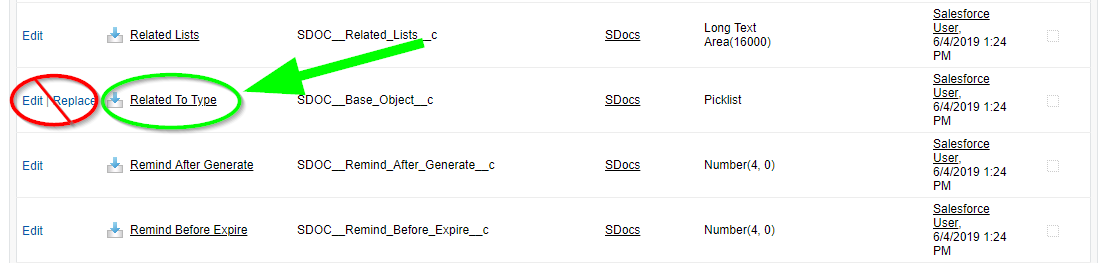
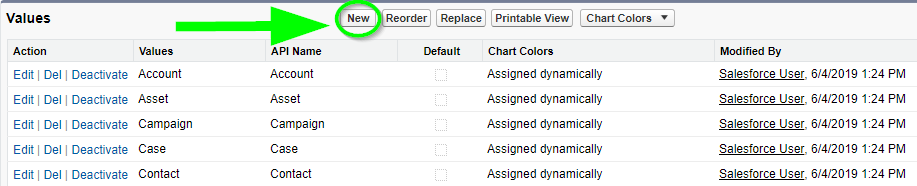
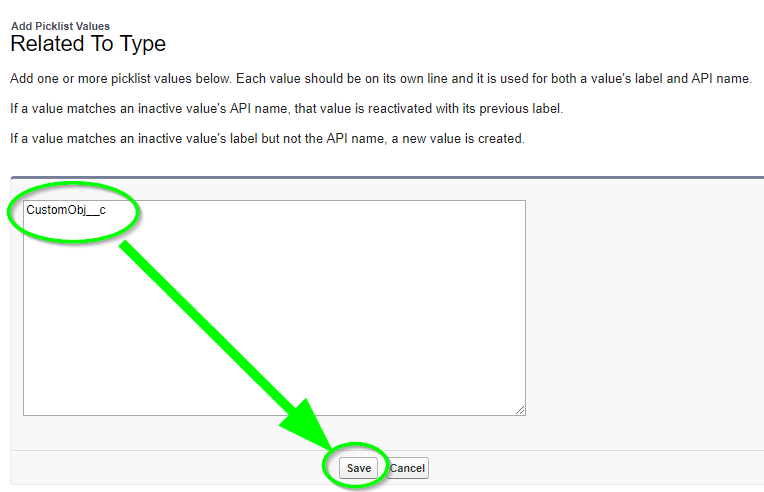
As a reminder, you should substitute your object’s API name (not use the example CustomObj__c shown above).


If you need to conditionally show or hide certain field values on your documents, S-Docs has you covered; this document will explain this simple process.
To explain this feature, let's assume we're building an S-Docs template for a sales quote. In this quote, we would like to waive charges for a particular product if the customer is "Gold" tier; that is, if their tier is equal to Gold, we don't want a charge to be displayed; otherwise, the charge should be displayed. This is a common request and there are several options.
Use a Salesforce Formula Field. To accomplish this you should simply create a formula field on the Salesforce object for your template that does all the work for you. You then drop that formula field into your S-Docs template.
For example, you could create the following Salesforce formula field on your base object:
[code lang="html"]IF( Tier__c=’Gold’, 'No Charge', Fee__c)[/code]
If the Customer’s Tier is Gold, then the text ‘No Charge’ would appear; otherwise the Fee would be displayed. You would then just insert this new formula field into you S-Docs Template using the template editor’s Insert Field button, just like any other merge field.
Alternatively, if your output format is MS Excel, you have the option of using an Excel Formula.
Leverage the S-Docs RENDER feature. S-Docs provides a RENDER feature that will evaluate an expression, and if it is true, will display all of the content until the ENDRENDER tag is found. You can use the Insert RENDER button to utilize this feature, or write the statements yourself. The example below shows how to meet the same requirement above. ‘No Charge’ will be displayed for Gold tier, and the Fee will be displayed for all other Tiers. Note the use of two equals (==) vs not equals (!=) as the comparator.
[code lang="html"]<!--RENDER='{{!CustomObject__c.Tier__c}}'==’Gold’ -->
No Charge
<!--ENDRENDER-->
<!--RENDER='{{!CustomObject__c.Tier__c}}'!='Gold' -->
{{! CustomObject__c.Fee__c}}
<!--ENDRENDER-->[/code]
Here is an example to insert a paragraph under a conditional statement.
[code lang="html"]<!--RENDER='{{!Opportunity.Account.ShippingState}}'=='CA' -->
Pursuant to California Code Section 2930-2935, the ARD administers the program through a primary contractor, currently
...
<!--ENDRENDER-->[/code]
[code lang="html"]<!--RENDER='{{!Contact.Language__c}}'=='French'-->
Bonjour {{!Contact.firstname}},
<!--ENDRENDER-->[/code]
OR,
[code lang="html"]<!--RENDER='{{!Account.Owner.name}}'=='{{!Username}}'-->
You own this account.
<!—ENDRENDER-->[/code]
3. You can use a check box field (Boolean) without an operator if you are checking if it is checked (true), e.g.
[code lang="html"]<!--RENDER='{{!Account.IsGoldCheckBox__c}}'-->
Contact me at {{!Account.owner.phone}} if you have questions
<!—ENDRENDER-->[/code]
But if you want to check if it’s unchecked (false) you need to specify an operator.
[code lang="html"]<!--RENDER='{{!CustomObject__c.IsGoldCheckBox__c}}' == 'false'-->
Contact us at service@sdocs.com if you have questions
<!—ENDRENDER-->[/code]
There is no limit on the number of Render statements you can have on a template, but each must be terminated by its own ENDRENDER tag (<!—ENDRENDER-->)
If you have only a few conditional statements, leveraging Salesforce’s formula fields (Option 1) provides a simple, powerful and familiar way to handle conditional data within S-Docs without adding complexity or having to learn any specialized syntax.
However, you may not want to alter your schema, because your organization has schema-level change restrictions, or perhaps you need to create too many formula fields just to handle document generation. You therefore have the option of handling this requirement within the S-Docs template as shown in Option 2.
When using the S-Docs rendering service for PDF output, please be aware of the following additional considerations and limitations:
These limits are upper limits only; depending on the complexity of your document, you may run into limits on the file size or processing time well below these limits. Nonetheless, we estimate that at least 80% of DOCX/PPTX templates should be able to reach these upper limits. For DOCX templates that exceed these limits, other formats such as DOC can be used to fulfill your use case.
The following parameters can be appended to an Apex button or to the end of an S-Doc creation call.
Parameter |
Values |
Function |
|---|---|---|
| prepemail= | 1 to enable, 0 to disable (disabled by default). | This will create but not automatically send an email. |
| sendemail= | 1 to enable, 0 to disable (disabled by default). | This will create and automatically send an email. |
| doclist= | Comma delimited list of S-Docs template names or IDs. Example: doclist=Template1,Template2 |
This will automatically generate the documents specified in the parameter and route the user to the "Generated Documents" screen. It's also used for specifying which documents to generate when using S-Docs with the Salesforce Process Builder. |
| oneclick= | True to enable, False to disable (enabled by default). | This parameter modulates the doclist parameter; if it is set to "false," the doclist parameter will not automatically generate documents, but will simply route the user to the template selection page with the documents pre-selected. |
| autodownload= | True to enable, False to disable (disabled by default). | This parameter will automatically download the document(s) to the user's device after generation is complete. Note that this parameter is not supported for DOCX, PPTX, or XLSX documents. |
| previewFirst= | True to enable, False to disable (disabled by default). | This parameter will prevent attachments, files, and S-Doc Relationships from being created when a document is generated. Upon generation, a Generate and Save button will replace the Email Selected Docs button. Clicking this button will create the attachments, files, and S-Doc Relationship. Users can also click Cancel Preview to return to the base record. |
| aid= | Comma delimited list of IDs for attachments on a record’s “Attachments” related list. | For attaching attachments to your email. |
| fid= | Comma delimited list of IDs for files from your "Files" tab. | For attaching files to your email. |
| did= | Comma delimited list of IDs for documents from your “Documents” tab. | For attaching documents to your email. |
| autoopen= | To open in the same browser tab: 1 to enable, 0 to disable (disabled by default). Example: autoopen='1'To open in a new browser tab: newtab Example: autoopen='newtab'Note that your popup blocker must be disabled for Salesforce in order for the newtab value to function properly. |
This will automatically open the document after generation. Note that this shouldn’t be used on calls to create S-Docs via automation. |
| useExistingNoContactRecord= | True to enable, False to disable (disabled by default). | By default, when an email is sent by S-Docs to an address that isn’t listed under a contact in your org, S-Docs creates and immediately deletes a contact record called “No Contact Record.” If you have validation rules in place that require multiple contact fields be completed, you can create your own No Contact Record and use this parameter. The record should have a last name of No Contact Record (first name not required) and an email address of this.email@is.invalid |
| attParentId2= | A single Salesforce record ID Example: attParentId2='a0C4N00003LcItc' |
When you click Attach or Remove Files on the S-Docs email page, the menu will show all attachments and files of the base record used to generate the documents by default. When you use this parameter and specify another record ID, this page will also show all of the attachments and files of that additional record. Note that additional attachments are not supported for S-Sign email templates at this time. |
| attParentId2FilterAtt= | SOQL Query filter for the list of attachments related to the attparentID2 record. | Allows you to set filter criteria for which attachments are displayed from the record specified by the attParentId2 parameter. |
| attParentId2FilterFile= | SOQL Query filter list of files related to the attparentID2 record. | Allows you to set filter criteria for which files are displayed from the record specified by the attParentId2 parameter. |
| hideContactLookup= | True to enable, False to disable (disabled by default). | Allows you to hide the Contact Lookup window that appears on the S-Docs Email Page. |
| generatedFields= | Comma delimited list of Salesforce field API names. Example: generatedFields='Base_Object_Type__c,Name' would show the related list object and the template name in columns on the generated document page table. |
Allows you to display fields from your template(s) as custom columns on the "Generated Documents" page that is displayed after a user generates their documents (after users select their template(s) and click "Next Step").This parameter is similar to the additionalFields parameter, however fields specified with that parameter appear on the select templates page, while fields specified with this parameter appear on the generated documents page. |
| autoBox= | 1 to enable, 0 to disable (disabled by default). | This parameter will automatically upload generated documents to Box if you have enabled S-Docs Box Integration. |
| UIlanguage= | Admin-defined language name (see article: Translate the S-Docs UI). | This will translate the user interface of S-Docs (see article: Translate the S-Docs UI). |
| GenAtEmail= | True to enable, False to disable (disabled by default). | This parameter adds a button to the S-Docs email page that allows you to generate & attach a new document to your current email. |
| language= | Salesforce Language ID. | This parameter will allow merge fields and field labels to be translated (provided that the translate keyword is used in the merge fields in the template). (See article: Translate Merge Fields and Field Labels) |
| replyToMostRecentEmail= | True to enable, False to disable. | This will include the most recent email’s text in the body email on the S-Docs email page. |
| useAttNameForDocName= | True to enable, False to disable. | Will display the attachment name instead of the document name on the generated documents page. |
| quickPickJunctions= | Contact Quick Pick picklist. Example (single junction): quickPickJunctions=Contact_Junction_Obj_API_Name, Base_Obj_Lookup_API_Name, Contact_Lookup_API_Name Example (multiple junctions): quickPickJunctions=Contact_Junction_1__c, Opportunity_1__c,Contact_1__c; Contact_Junction_2__c,Opportunity_2__c,Contact_2__c; |
This is used to notify the S-Docs email page of a junction object between Contact and the base object that a document was generated from. It adds the junction object’s contacts to the email contact quickpick list. |
| customRedirect= | Custom VisualForce page URL. | This will redirect users to a custom VisualForce page in your org after their documents finish generating. The IDs for the documents that generated with this parameter will be visible in the URL after "sdocsIds=" |
| editorWidth= |
String (number of pixels). Example: editorWidth='500' |
Adjusts the width of the rich text editor on the S-Docs email page. It is useful mainly if you’re using Salesforce on a phone or tablet. |
| prefillRTP= |
Runtime Prompt merge field names paired with values (MergeField,Value) Example: If you want to prefill 2 Runtime Prompts whose merge fields are named "patientAge" and "patientBirthdate," your syntax would look something like: prefillRTP=patientAge,23;patientBirthdate,1997-06-04 |
This parameter allows you to prefill Runtime Prompt answers, which can be useful for templates that need to be used with one-click automation and also contain Runtime Prompts.
Note: Date type Runtime Prompts should be formatted as yyyy-MM-dd Note 2: Checkbox type Runtime Prompts can include multiple values in a comma-delimited list Note 3: If all Runtime Prompts are filled in using this parameter, the Runtime Prompt interface will be skipped during document generation |
Parameter |
Values |
Function |
|---|---|---|
| SDEditSameTab= | True to enable, False to disable (false by default) |
If a template has the Live Edit feature enabled, this will cause a pencil icon to appear next to the document once a user generates it (e.g. after clicking Next Step during the document generation process). By default, clicking this pencil will open the Allow Edit live editor in a new tab. This parameter causes the Live Edit live editor to open in the same tab as the "View Documents" page. This parameter also replaces the Close button in the Live Edit live editor with a Return to Record button. |
| customSave= | Override to replace the current Save button, newbutton to add a new Save button.
Example: customSave='Override' |
This will modify the Save button on the S-Docs Allow Edit live editor (which allows users to edit a document after it has been generated).Override will replace the Save button with a button that saves the document and redirects the user to a specified URL. Newbutton will retain the original Save button and add a new button that saves the edited document and redirects the user to a specified URL. Both of these need to be enabled in Custom Settings > SDocsSettings and added to the URL in specified SDEdit Custom URL. |
| color= |
Color hex number without the pound (#) symbol. Example: color=FFFFFF |
This can be added to the SDEdit Custom URL (In Custom Settings > SDocs Settings) to change the button text color. |
| backgroundColor= |
Color hex number without the pound (#) symbol. Example: color=FFFFFF |
This can be added to the SDEdit Custom URL (In Custom Settings > SDocs Settings) to change the button background color. |
Parameter |
Values
|
Function |
|---|---|---|
| autoSSign= | 1 to enable, 0 to disable (disabled by default). | This will generate an S-Sign e-signature request and navigate the user to the Email page. For sign in-person use cases, the signing experience will open after generation. |
| showSSignInPerson= | True to enable, False to disable (enabled by default). | Allows you to hide the E-Sign Documents In Person button. |
| ssignParams= | Language that is supported by a downloaded translation template (see article: Translate the S-Sign UI). | This will translate the user interface of S-Sign (see article: Translate the S-Sign UI). |
Founded in 2010, the S-Docs team is led by a former Director and Technical Architect from Salesforce and is comprised of experts in Salesforce and document solutions. S-Docs is now used by thousands of global subscribers from all industries with a multitude of use cases, but they all share one key theme: The need for a powerful yet easy-to-use native solution. We are proud that they have made us the #1 native document generator and e-signature solution and put us in the top 1% of all apps on the Salesforce AppExchange.
© 2024 S-Docs Inc. All Rights Reserved | Privacy