Category

S-Docs Cookbook

Saving S-Docs As Salesforce Attachments Or Files

By Documentation, General Solutions, S-Docs Cookbook No Comments

Using The S-Docs Create Salesforce Attachment / Create Salesforce File Settings

By default, S-Docs are saved as Salesforce Attachments in the Notes & Attachments related list on your base object record each time you generate a document. To change this setting, all you have to do is open up the template editor for the template(s) you wish to edit, then open up the Document Options tab.

You can configure attachment and file settings under the Attachment & File Options section.

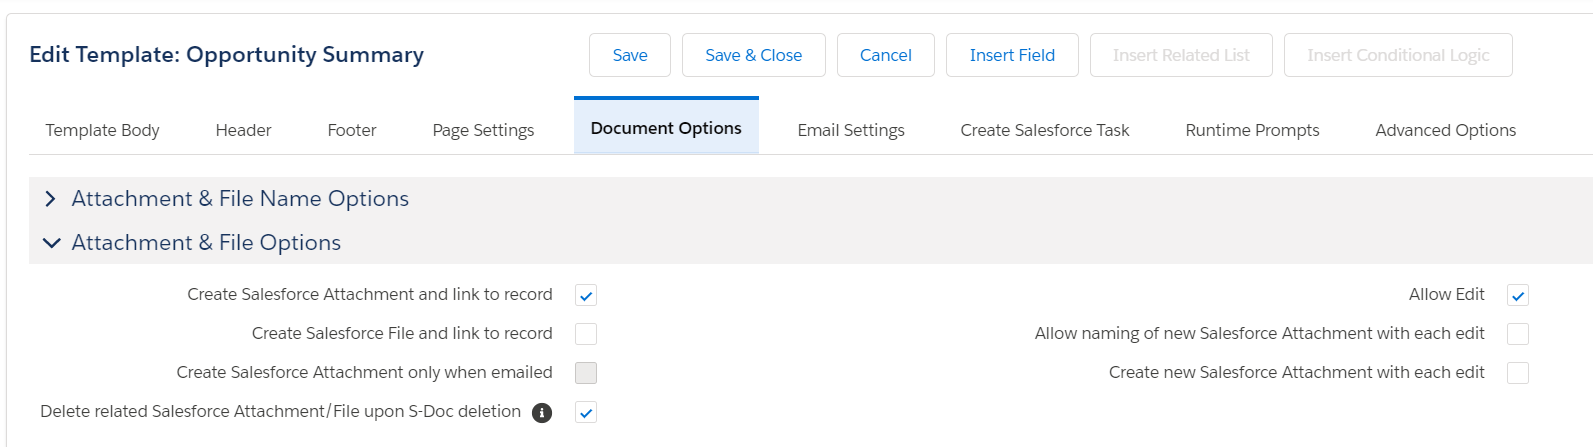
Create Salesforce Attachment and link to record is checked by default. This option creates Salesforce Attachments in addition to the S-Doc record each time this template is generated going forward. Checking this option again after it has been unchecked will not create attachments for previously created documents.

You can also opt to create Salesforce Files each time this template is generated. For more information on Attachment and File Options, please view the Document Options section of the Template Editor Overview.

Querying Attachments or Files Created By S-Docs

You may need to query just the Salesforce Attachments or Files that are generated by S-Docs. This can be accomplished using the Description field on the ContentVersion object. Whenever S-Docs creates a Salesforce Attachment or File, the Description field on ContentVersion is populated with the record ID of the corresponding S-Doc record (SDOC__SDoc__c).

This can be useful if, for example, you have a required custom field on the ContentVersion object. To avoid errors when S-Docs creates a Salesforce Attachment or File, you can create a trigger that populates that custom field on any Salesforce Attachment or File that S-Docs creates.

The following trigger will populate the custom required ContentVersion field Required__c for Salesforce Attachments or Files created by S-Docs:

[code lang="html"]trigger SDocsContentVersionTrigger on ContentVersion (before insert) {
for (ContentVersion cv : trigger.new) {
try {
*/ Whenever S-Docs creates a ContentVersion record related to an SDOC__SDoc__c record,
it sets the SDOC__SDoc__c record ID as the ContentVersion Description. Hence we can
check for this to determine if the ContentVersion was created by S-Docs. */
Boolean createdBySDocs = ('' + Id.valueOf(cv.Description).getSObjectType()) == 'SDOC__SDoc__c';
if (createdBySDocs) {
cv.Required__c = 'Other';
}
} catch (Exception e) {}
}
}[/code]

Attachment Discussion

There are advantages and disadvantages to using Salesforce Attachments. On one hand, attachments are more permanent, faster to view, and can be exported for archiving or for legal/compliance purposes. Attachments also aren't affected by future template changes, whereas regular S-Docs use the template record each time they are viewed.

On the other hand, the attachment record itself cannot be easily related to multiple records (you should leverage the S-Docs Relationship for this) and attachments can consume a significant amount of file storage space within Salesforce. You also cannot easily report on data located within an attachment. S-Docs lets you choose whether you want to enable attachments or not on a per-template basis. We typically recommend you keep this feature enabled.

Link one document to many objects

By Documentation, General Solutions, S-Docs Cookbook No Comments

The S-Doc Relationship Object

You can relate many records to the same S-Doc by leveraging the SDoc_Relationship__c junction object.

By default, one S-Doc record can be simultaneously related to up to 9 distinct standard Salesforce objects (Account, Asset, Case, Contact, Contract, Lead, Opportunity, Product and Solution). This can be easily expanded to more standard objects (e.g. Campaign) and custom objects by adding a lookup field to the SDoc_Relationship__c object. However, if a user wants to relate one S-Doc to multiple records of the same object type (e.g. one S-Docs Contract to two Salesforce Accounts), the user simply clicks on the New SDoc Relationship button from the S-Doc related list on the record and then relates it to the S-Doc. One additional SDoc_Relationship__c record is needed for each record of the same object type you want to relate to the same S-Doc.

You may also notice that the comments field and status field are conveniently located on the SDocs_Relationship object. S-Docs will automatically synchronize these fields among all relationships that point to the same generated document. For example, if you update the status of a Contract that is related to two different Accounts, the status will be consistent across all views.

The SDoc relationship junction object provides more power and flexibility in relating S-Docs to your Salesforce objects rather than just linking them directly.

The Additional Relationship Field

When a document is first generated, one S-Doc relationship record is automatically created and linked to the base object (the object that the template's Related To Type field is set to). In Salesforce Classic, you can also choose an additional object to automatically link documents to by setting the template's Additional Relationship field to the additional object.

Note: This functionality is not available in Salesforce Lightning. Click here for more information.

The Additional Relationship field needs to be a related object field on the template's base object. For example, you can relate a document to an Opportunity and an Account (as an Additional Relationship) because there is an Account lookup field on the Opportunity record. Likewise, you can link an S-Docs to a Contact and the Account, since there is an Account lookup field on Contact. However, you could not, for example, automatically link an S-Docs to an Account (base object) and an Opportunity (Additional Relationship) because this is a one-to-many relationship.

Note: If you don't see this field, simply modify your page layout for the SDoc Template object and add the Additional Relationships field. 

To edit the SDoc Template page layout in Salesforce Classic, navigate to an S-Docs template record and click Edit Layout.

Navigate to the Fields tab in the layout editor, find the Additional Relationships field, and drag it into the SDoc Template Detail section.

Use S-Docs with your custom object

By Documentation, General Solutions, S-Docs Cookbook No Comments

S-Docs works great with your custom objects, but there are a few configuration steps you will need to take.

Below, you will find an overview of the configuration steps. Detailed step-by-step instructions on how to configure S-Docs with your custom object are available here: Configuring S-Docs with Custom Objects.

First, you will need to add your custom object to the picklist value “Related to Type” field in the SDOC Template object. When adding your object, be sure to use your object’s API name (e.g. myObject__c) as the new picklist value. This step is critical, as it allows S-Docs templates to be associated to your custom object.

Second, you need to create an S-Docs button and place it on your custom object’s detail page. We’ve found that a Detail Page button displayed in the “existing window without sidebar or header” works great.

You should create a button link using a URL similar to the following, but replacing ‘myObject__c’ with your Custom Object API name:

{!URLFOR('/apex/SDOC__SDCreate1', null,[id=myObject__c.Id, Object='myObject__c'])}

Lastly, this step allows generated S-Docs to be associated to your custom object and further allows you to place an S-Docs related list on your custom object’s detail page layout. You simply need to add a look-up field to the SDOC Relationship object that points to your custom object.

Note: The “Field Name” of this new lookup field must match the name of your object (e.g. myObject) without the “__c.”

Discussion: When using S-Docs with custom objects, the field template designer will automatically correct and append your related object fields with a “__r.” If you are comfortable creating your templates in the source code, be sure to use the standard Salesforce conventions and dot notation and be mindful of capitalization differences.

Conditionally show a field value on a document

By Documentation, General Solutions, S-Docs Cookbook No Comments

Introduction

If you need to conditionally show or hide certain field values on your documents, S-Docs has you covered; this document will explain this simple process.

To explain this feature, let's assume we're building an S-Docs template for a sales quote. In this quote, we would like to waive charges for a particular product if the customer is "Gold" tier; that is, if their tier is equal to Gold, we don't want a charge to be displayed; otherwise, the charge should be displayed. This is a common request and there are several options.

Option 1: Salesforce Formula Fields

Use a Salesforce Formula Field. To accomplish this you should simply create a formula field on the Salesforce object for your template that does all the work for you. You then drop that formula field into your S-Docs template.

For example, you could create the following Salesforce formula field on your base object:

[code lang="html"]IF( Tier__c=’Gold’, 'No Charge', Fee__c)[/code]

If the Customer’s Tier is Gold, then the text ‘No Charge’ would appear; otherwise the Fee would be displayed. You would then just insert this new formula field into you S-Docs Template using the template editor’s Insert Field button, just like any other merge field.

Alternatively, if your output format is MS Excel, you have the option of using an Excel Formula.

Option 2: The S-Docs Render Feature

Leverage the S-Docs RENDER feature. S-Docs provides a RENDER feature that will evaluate an expression, and if it is true, will display all of the content until the ENDRENDER tag is found. You can use the Insert RENDER button to utilize this feature, or write the statements yourself. The example below shows how to meet the same requirement above. ‘No Charge’ will be displayed for Gold tier, and the Fee will be displayed for all other Tiers. Note the use of two equals (==) vs not equals (!=) as the comparator.

[code lang="html"]<!--RENDER='{{!CustomObject__c.Tier__c}}'==’Gold’ -->
No Charge
<!--ENDRENDER-->
<!--RENDER='{{!CustomObject__c.Tier__c}}'!='Gold' -->
{{! CustomObject__c.Fee__c}}
<!--ENDRENDER-->[/code]

Here is an example to insert a paragraph under a conditional statement.

[code lang="html"]<!--RENDER='{{!Opportunity.Account.ShippingState}}'=='CA' -->
Pursuant to California Code Section 2930-2935, the ARD administers the program through a primary contractor, currently
...
<!--ENDRENDER-->[/code]

Important considerations when using the RENDER feature:

Note: If any fields in your render statement contain words and have a field type anything other than a basic string type (rich text, textarea, longtext, function, etc.) you will need to add the  merge field attribute render. For example, if your merge field looked like this: {{!MyTestField}}
The field with the attribute added would look like this: {{!MyTestField render}} Within a render statement, it would look like this:
<!--RENDER= '{{!MyTestField render}}' == 'Test' -->{{!Opportunity.closedate M/d/yyyy}}<!--ENDRENDER-->
Note that this attribute should only be added to merge fields within render tags (e.g. enclosed by <!-- and -->). In the above example, the attribute  is not added to the {{!Opportunity.closedate M/d/yyyy}} because this merge field is outside of the render tags.
Additionally, note that the Insert RENDER button will not add this attribute automatically. This functionality was added in version 4.48
  1. It currently supports ==,!=, >, <, =>, =<, CONTAINS, and NOT CONTAINS for the comparison operator.
  2. The right hand side can contain a field value or a hard-coded value:  e.g.

[code lang="html"]<!--RENDER='{{!Contact.Language__c}}'=='French'-->
Bonjour {{!Contact.firstname}},
<!--ENDRENDER-->[/code]

OR,

[code lang="html"]<!--RENDER='{{!Account.Owner.name}}'=='{{!Username}}'-->
You own this account.
<!—ENDRENDER-->[/code]

3. You can use a check box field (Boolean) without an operator if you are checking if it is checked (true), e.g.

[code lang="html"]<!--RENDER='{{!Account.IsGoldCheckBox__c}}'-->
Contact me at {{!Account.owner.phone}} if you have questions
<!—ENDRENDER-->[/code]

But if you want to check if it’s unchecked (false) you need to specify an operator.

[code lang="html"]<!--RENDER='{{!CustomObject__c.IsGoldCheckBox__c}}' == 'false'-->
Contact us at service@sdocs.com if you have questions
<!—ENDRENDER-->[/code]

There is no limit on the number of Render statements you can have on a template, but each must be terminated by its own ENDRENDER tag (<!—ENDRENDER-->) 

Discussion

If you have only a few conditional statements, leveraging Salesforce’s formula fields (Option 1) provides a simple, powerful and familiar way to handle conditional data within S-Docs without adding complexity or having to learn any specialized syntax.

However, you may not want to alter your schema, because your organization has schema-level change restrictions, or perhaps you need to create too many formula fields just to handle document generation. You therefore have the option of handling this requirement within the S-Docs template as shown in Option 2.

Top