Category

General Solutions

Automating Emails with Process Builder

By General Solutions, S-Docs Cookbook No Comments

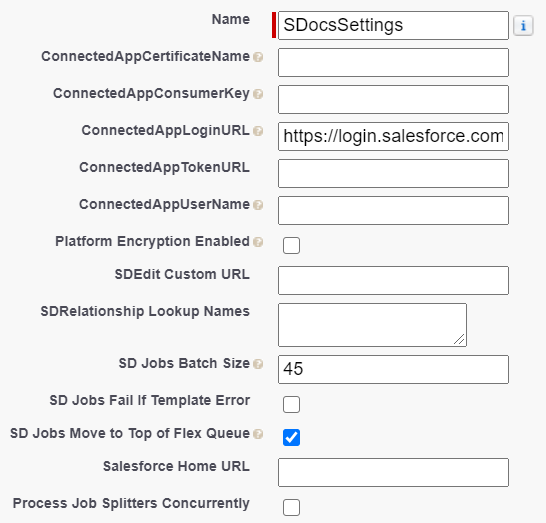
Winter '20 Release Note: If you are using S-Docs below version 4.53, you may experience an "Attempt to de-reference a null object" error when interacting with various forms of automation in S-Docs. In order to fix this bug, you can create a new SDocs Settings custom settings set. To do this, type "Custom Settings" into the Quick Find / Search bar in the Setup menu, and click Custom Settings. Click SDocsSettings, then click Manage at the top of the page. From there, click New. Fill out the following information:

Name: SDocsSettings
ConnectedAppLoginURL:
Production: login.salesforce.com
Sandbox: test.salesforce.com
SD Jobs Batch Size: 45
SD Jobs Move to Top of Flex Queue:

Additionally, ensure that you have a Remote Site Setting for either login.salesforce.com (production), or test.salesforce.com (sandbox).

Generating automated emails with S-Docs Jobs is simple, and using the Process Builder is the quickest approach. For information on automation and batch processing, click here.

Video Tutorial

The following video will go over 2 examples:

  1. Auto-sending a welcome email to new clients
  2. Auto-sending an invoice for won opportunities.

You can also refer to the written instructions below the video for a similar example.

Auto-Generating A Welcome Email For New Contacts

In this example, we will generate an email welcome letter whenever a contact is created by using an S-Docs Job in a Salesforce Process. We'll use 2 templates for this process: an HTML template to fill out the body of the email, and a PDF template for the welcome letter that will be attached to the email. Make sure you specify an email address in the Email Settings tab of the HTML template; typically, you'd want to put {!contact.email} in the recipient field so that when this process is invoked, the email address is automatically specified for each unique contact created. Click here to learn more about creating email templates.

Before you begin, note the names of your templates, as you will need them later.

Note: You can also use a template's ID in place of a template's name for the "doclist" parameter. However, template IDs will change from sandbox to production orgs, so we recommend using the template names if possible. Keep in mind that if there are multiple templates in your org with the same name, all of them will generate if one of them is referenced by your process.

Create A New Process In Process Builder

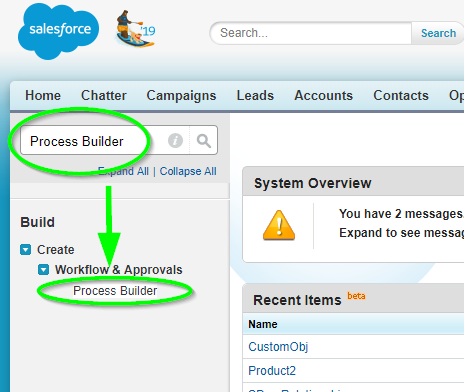
Navigate to Setup > Build > Create > Workflow & Approvals > Process Builder and create a new Process by clicking New.
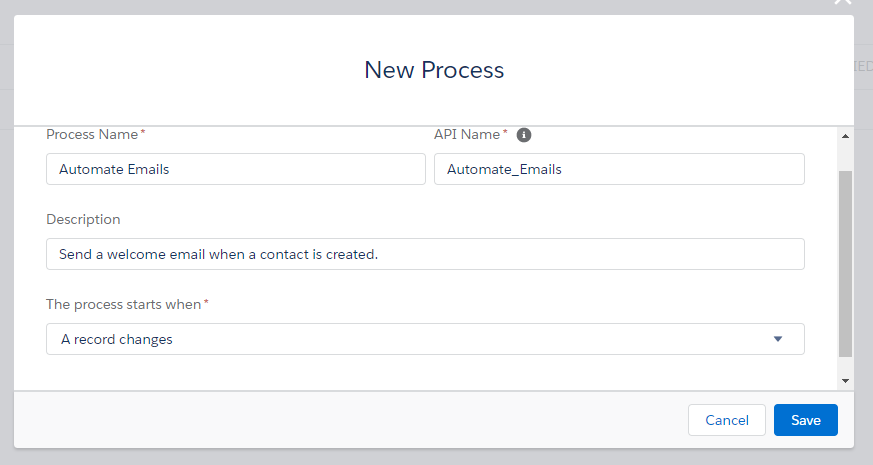
Fill in a name and optionally a description for your process. Choose to start the process when "A record changes." Click Save.
Add Your Object

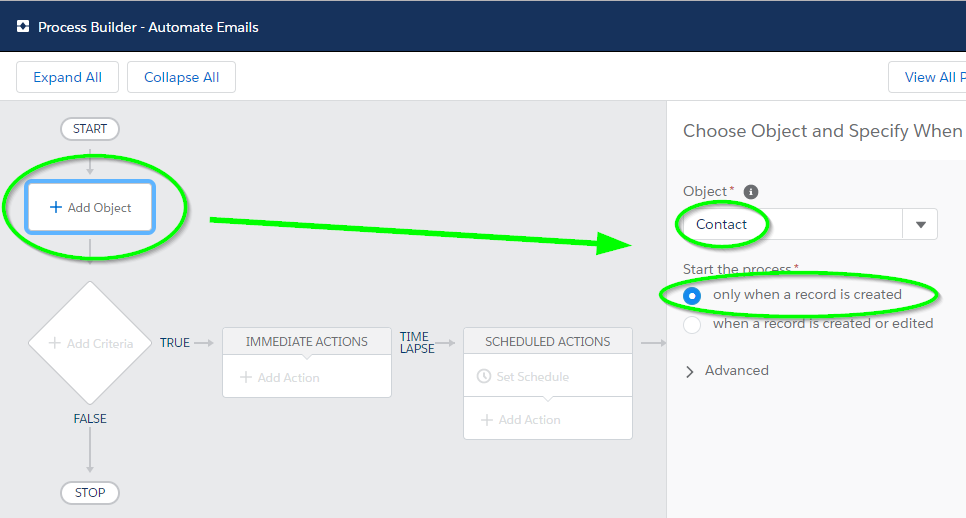
Click Add Object, choose Contact, and start the process only when a record is created.
Add "No Criteria"

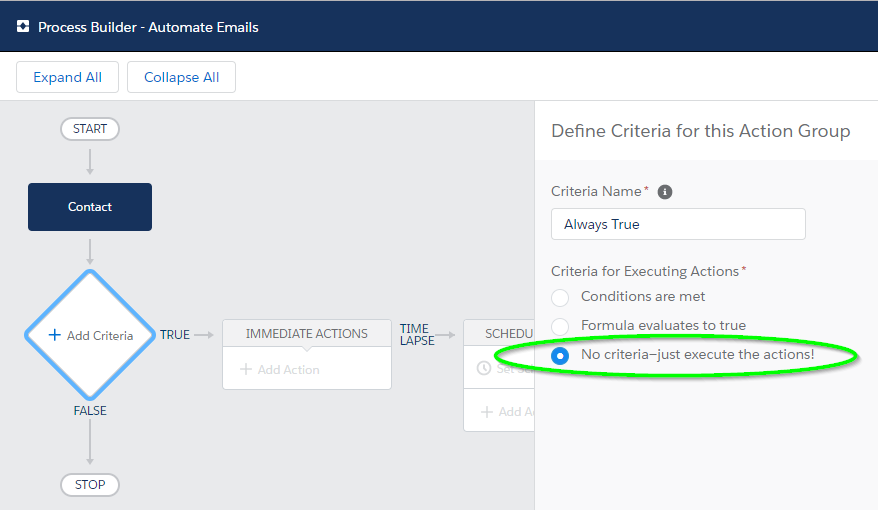
Then, we click Add Criteria and set it to No Criteria, since we want our Job to execute every time a new contact record is created.
Add The "Create A Record" Action

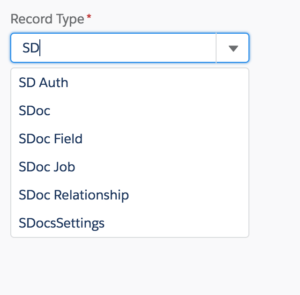
Next, click Add Action and choose Create a Record for our action type. Select SDoc Job for our record type.
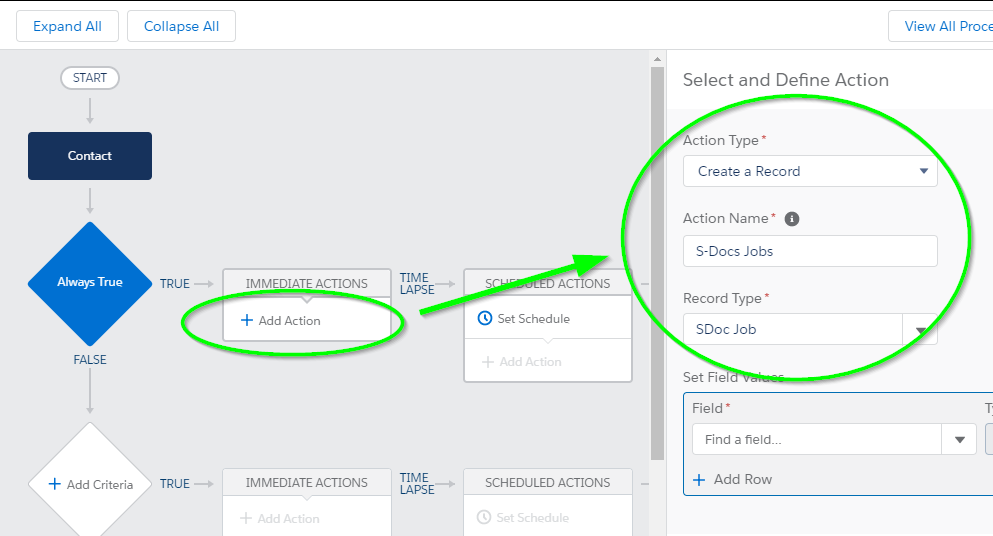
If you are having trouble finding SDoc Job in the picklist, type in "SD" and SDoc Job will appear.

Add S-Doc Job Field Values

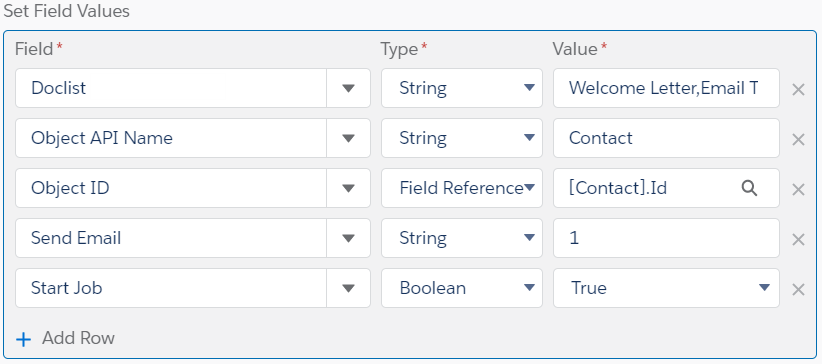
Next, we will add the following 5 field values:

Start JobThe type will be a Boolean set to ‘true’ so that the specified documents will automatically generate (and in this case, automatically email, as we have specified to do so using the Job’s email fields) upon the creation of this particular S-Doc Job record.

Send EmailThe type will be a String with a value of ‘1,’ so that an S-Doc Job record will email the document it generated. If we set this to ‘0,’ an email will not be sent, thus, we will be setting this to ‘1.’

Object ID: The type is a Reference because we are referring to the ID of the record we are creating objects for, and we look up the value "Contact ID." This gives this field the value [Contact].Id, so when this S-Doc Job runs for a newly created contact, it will know that contact's ID.

Object API NameThe type is a String and it is the API name of our objects. In our example, we’re creating this trigger for new contacts, so we store Contact in this field.

Doclist: The type is a String. The value is the comma-delimited list of S-Docs template names that we will be using to generate our documents. Make sure there aren’t any spaces in your comma-delimited list. In our example, Welcome Letter is the name of our S-Doc template for a welcome letter PDF, and Email Template is the name of our S-Doc template for an HTML email.
Additionally, if we wanted this S-Doc Job to be run as a different user, we would click Add Row and add the "Run as User" field. For "Value," we would enter the username of the user we want this Job to be run under.

Then, we click Save and click Activate at the top right of the screen.
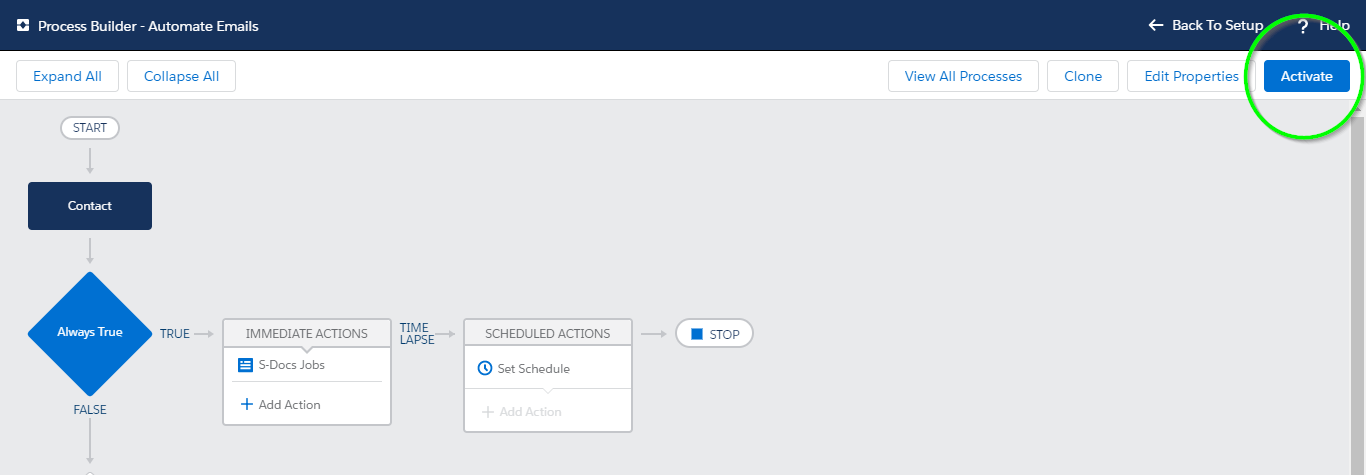
All done! S-Docs will now automatically generate and email a welcome letter whenever a contact is created.

Additional Fields

While we only used 5 fields in the process above, S-Docs Jobs also support a number of other fields that you can use to further customize your process.

Email From

Email From allows you to set an org-wide email address as the From address when your S-Docs Job process includes emailing a document.

Email Params

Email Params allows you to add advanced email parameters to your process that are not available to access through standard fields on the S-Docs Job object, such as useExistingNoContactRecord=true.

Incl. Attachments with Email

Incl. Attachments with Email allows you to specify a comma-delimited list of Salesforce Attachment IDs to be included in the email sent out by the S-Docs Job.

Incl. Documents with Email

Incl. Documents with Email allows you to specify a comma-delimited list of Salesforce Document IDs to be included in the email sent out by the S-Docs Job.

Incl. Files with Email

Incl. Files with Email allows you to specify a comma-delimited list of Salesforce File IDs to be included in the email sent out by the S-Docs Job.
Create a Document for Each Record in a Related List

By Documentation, General Solutions, S-Docs Cookbook No Comments

Introduction

There are plenty of times where a user might want to generate documents for each item in one of the related lists on the current record they're viewing. For example, the user may want to click a button on an Opportunity Record that sends an email to each Contact Role related to that Opportunity, or the user might want to click a button on an Account record that generates an Opportunity Summary for each Opportunity record related to that Account. Setting up this feature is as simple as copying and pasting the following code into your org.

Note: You can also generate a single document with information merged in from each record in a related list that can be formatted in any way you'd like. This feature utilizes S-Docs component templates. Click here to read more about this feature.

Step 1: Create Apex Class

Head over to Setup > Build > Develop > Apex Classes > New and copy/paste the following code into your new Apex class, then click Save.
[code lang="html"]public class SDRelatedListDocumentsController {
private final String TYPE_FILTER;
public String parentId {get;set;}
public Boolean allowEmail {get;set;}
public Boolean allowCombineAll {get;set;}
public Boolean emailedDocuments {get;set;}
public String objSortFieldOrderbyDirection {get;set;}
public Map<Id, SObject> childRecordMap {get;set;}
public SDRelatedListDocumentsController() {
parentId = ApexPages.currentPage().getParameters().get('parentId');
TYPE_FILTER = 'Related List Document - ' + parentId;
}
public List<SDJobWrapper> sdocJobWrappers {
get {
List<SDJobWrapper> sdjwList = new List<SDJobWrapper>();
List<SDOC__SDJob__c> relatedListDocJobs = [
SELECT SDOC__Status_Link__c, SDOC__Oid__c,
SDOC__SDoc1__r.Id, SDOC__SDoc1__r.SDOC__Attachment_Name__c
FROM SDOC__SDJob__c
WHERE OwnerId=:UserInfo.getUserId()
AND SDOC__Type__c=:TYPE_FILTER
];
for (SDOC__SDJob__c sdj : relatedListDocJobs) {
sdjwList.add(
new SDJobWrapper(
sdj, childRecordMap.get(sdj.SDOC__Oid__c)
)
);
}
return sdjwList;
}
set;
}
public class SDJobWrapper {
public SDOC__SDJob__c job {get;set;}
public SObject obj {get;set;}
public SDJobWrapper(SDOC__SDJob__c job, SObject obj) {
this.job = job;
this.obj = obj;
}
}
public void createSDocJobs() {
delete [SELECT Id FROM SDOC__SDJob__c WHERE OwnerId=:UserInfo.getUserId() AND SDOC__Type__c=:TYPE_FILTER AND (SDOC__Status__c = 'Completed' OR SDOC__Status__c = 'Error')];
List<SDOC__SDJob__c> sdJobs = new List<SDOC__SDJob__c>();
childRecordMap = new Map<Id, SObject>();
emailedDocuments = false;
String childObjName = ApexPages.currentPage().getParameters().get('childObjName').toLowerCase();
String lookupFieldName = ApexPages.currentPage().getParameters().get('lookupFieldName');
String doclist = ApexPages.currentPage().getParameters().get('doclist');
String allowCombineAllParam = ApexPages.currentPage().getParameters().get('allowCombineAll');
allowCombineAll = allowCombineAllParam == 'true' || allowCombineAllParam == '1';
String templateBaseObject; String fieldPrefix;
if (childObjName == 'opportunitycontactrole' ||
childObjName == 'accountcontactrelation') {
templateBaseObject = 'Contact';
fieldPrefix = 'Contact.';
} else {
templateBaseObject = childObjName;
fieldPrefix = '';
}
lookupFieldName = lookupFieldName.toLowercase();
lookupFieldName = lookupFieldName.replace('__c', '__r');
if (lookupFieldName.endsWith('id')) {
lookupFieldName = lookupFieldName.substring(0, lookupFieldName.length() - 2);
}
String childrenQuery
= 'SELECT ' + fieldPrefix + 'Name, ' + fieldPrefix + 'Id '
+ ' FROM ' + childObjName
+ ' WHERE ' + lookupFieldName + '.Id =\'' + parentId + '\' ';
String additionalFilters = ApexPages.currentPage().getParameters().get('additionalFilters');
if (additionalFilters != null) childrenQuery += additionalFilters;
objSortFieldOrderbyDirection = ' ASC';
String objSortFields = ApexPages.currentPage().getParameters().get('objSortFields');
if (objSortFields != null) {
if (objSortFields.contains(' DESC')) objSortFieldOrderbyDirection = 'DESC';
objSortFields = objSortFields.remove(' DESC').remove('ASC').deleteWhitespace();
}
for (SObject child : Database.query(childrenQuery)) {
String oid;
if (childObjName == 'opportunitycontactrole' ||
childObjName == 'accountcontactrelation') {
oid = String.valueOf(child.getSObject('Contact').get('Id'));
childRecordMap.put(oid, child.getSObject('Contact'));
} else {
oid = child.Id;
childRecordMap.put(oid, child);
}
SDOC__SDJob__c sdj =
new SDOC__SDJob__c(
SDOC__Start__c=true,
SDOC__Oid__c=oid,
SDOC__ObjApiName__c=templateBaseObject,
SDOC__SendEmail__c='0',
SDOC__Doclist__c=doclist,
SDOC__Type__c=TYPE_FILTER,
SDOC__ObjSortValFieldsForSDoc__c=objSortFields
);
sdJobs.add(sdj);
}

insert sdJobs;
}
public Boolean jobsAreCompleted {
get {
Integer totalNumJobs = Database.countQuery(
'SELECT COUNT()'
+ ' FROM SDOC__SDJob__c'
+ ' WHERE OwnerId = \'' + UserInfo.getUserId() + '\''
+ ' AND SDOC__Type__c=\'' + TYPE_FILTER + '\''
+ ' AND SDOC__Status__c'
+ ' IN(\'Selected\',\'0\',\'10\',\'20\',\'40\',\'60\','
+ '\'80\',\'90\',\'95\',\'Queued\',\'Completed\',\'Error\')'
);
Integer completedSize = Database.countQuery(
'SELECT COUNT()'
+ ' FROM SDOC__SDJob__c'
+ ' WHERE OwnerId = \'' + UserInfo.getUserId() + '\''
+ ' AND SDOC__Type__c=\'' + TYPE_FILTER + '\''
+ ' AND SDOC__Status__c = \'Completed\''
);
return (completedSize + getErrorSize() == totalNumJobs) && totalNumJobs > 0;
}
set;
}
public Integer getErrorSize() {
return Database.countQuery(
'SELECT COUNT()'
+ ' FROM SDOC__SDJob__c'
+ ' WHERE OwnerId = \'' + UserInfo.getUserId() + '\''
+ ' AND SDOC__Type__c = \'' + TYPE_FILTER + '\''
+ ' AND SDOC__Status__c = \'Error\''
);
}
public PageReference returnToParentRecord() {
return new PageReference('/' + parentId);
}
public PageReference emailDocuments() {
if (!emailedDocuments) {
emailedDocuments = true;
String aid = ApexPages.currentPage().getParameters().get('aid');
String did = ApexPages.currentPage().getParameters().get('did');
PageReference emailPage = new PageReference('/apex/SDOC__SDEmail');
emailPage.setRedirect(true);
if (aid != null && aid != '') {
emailPage.getParameters().put('aid', aid);
}
if (did != null && did != '') {
emailPage.getParameters().put('did', did);
}
/* EMAIL SECTION A */
/* Emails each document individually on a per-record basis.
This occurs in the background, so the email body can't be edited in this case. */
for (SDJobWrapper sdjw : sdocJobWrappers) {
emailPage.getParameters().put('SDId', sdjw.job.SDOC__SDoc1__r.Id);
if (!Test.isRunningTest()) {
emailPage.getContent();
}
}
/* EMAIL SECTION B */
/* UNCOMMENT THIS SECTION and COMMENT OUT EMAIL SECTION A
if you want to include all documents in a single email and have
the user be redirected to the email page (where they can edit the email body)
when they click the email button. */
/*String sdocIds = '';
for (SDJobWrapper sdjw : sdocJobWrappers) {
sdocIds += sdjw.job.SDOC__SDoc1__r.Id + ',';
}
sdocIds = sdocIds.substring(0, sdocIds.length() - 1); // remove last comma
emailPage.getParameters().put('SDId', sdocIds);
return emailPage;*/
}
return null;
}
private String combineAllType = ApexPages.currentPage().getParameters().get('combineAll');
private String combinedDocUrl;
public void combineIntoSingleDocument() {
if (combineAllType == null) return;
throwExceptionIfErrors();
combineAllType = combineAllType.toLowerCase();
List<String> sdocIds = new List<String>();
for (SDJobWrapper sdjw : sdocJobWrappers) sdocIds.add(sdjw.job.SDOC__SDoc1__r.Id);
if (Test.isRunningTest()) sdocIds.add(ApexPages.currentPage().getParameters().get('testSDocId'));
String filters = 'WHERE OwnerId=\'' + UserInfo.getUserId() + '\' AND Id IN (\'' + String.join(sdocIds, '\',\'') + '\')';
List<String> orderBys = new List<String>();
if (objSortValExistsOnSDoc()) orderBys.add(' SDOC__ObjSortVal__c ' + objSortFieldOrderbyDirection + ' ');
String sdocSortFields = ApexPages.currentPage().getParameters().get('sdocSortFields');
if (sdocSortFields != null) orderBys.add(sdocSortFields);
if (!orderBys.isEmpty()) filters += ' ORDER BY ' + String.join(orderBys, ',');
if (!Test.isRunningTest()) combinedDocUrl = new List<String>( SDOC.SDJobTemplateController.combineSDocs(filters, 'PDF') )[0];
}
public void finishCombineAll() {
if (combineAllType == 'file' || combineAllType == 'attachment') {
String filename; Blob filebody;
if (Test.isRunningTest()) {
filename = 'test.txt';
filebody = Blob.valueOf('test');
} else {
filename = sdocJobWrappers[0].job.SDOC__SDoc1__r.SDOC__Attachment_Name__c;
filebody = new PageReference(combinedDocUrl).getContent();
}
// &combineall=true,file,attachment&autoRedirect=record
if (combineAllType == 'file') {
insert new ContentVersion(
Title=filename,
PathOnClient=filename,
VersionData=filebody,
FirstPublishLocationId=parentId
);
} else if (combineAllType == 'attachment') {
insert new Attachment(
Name=filename,
Body=filebody,
ParentId=parentId
);
}
}
}
private Boolean doFinishRedirect = false;
public void redirectIfComplete() {
if (!jobsAreCompleted) return;
combineIntoSingleDocument();
doFinishRedirect = true;
}
public PageReference finishRedirect() {
if (!doFinishRedirect) return null;
// PageReference.getContent() must be done in a separate transaction,
// hence splitting up redirectIfComplete and finishRedirect
finishCombineAll();
String autoRedirect = ApexPages.currentPage().getParameters().get('autoRedirect');
if (autoRedirect == null) return null;
throwExceptionIfErrors();
autoRedirect = autoRedirect.toLowerCase();
if (autoRedirect == 'record') return returnToParentRecord();
else if (autoRedirect == 'combineall') return new PageReference(combinedDocUrl);
else if (autoRedirect == 'email') return emailDocuments();
else if (autoRedirect == 'email,record') { emailDocuments(); return returnToParentRecord(); }
return null;
}
public Boolean objSortValExistsOnSDoc() {
return Schema.getGlobalDescribe().get('SDOC__SDoc__c').getDescribe().fields.getMap().get('SDOC__ObjSortVal__c') != null;
}
public void throwExceptionIfErrors() {
if (getErrorSize() > 0) throw new SDException('Error: one or more S-Docs Jobs failed');
}
public class SDException extends Exception {}
}[/code]

Step 2: Create Visualforce Page

Head over to Setup > Build > Develop > Visualforce Pages > New and copy/paste the following code into your new Visualforce Page. Name the page SDRelatedListDocuments (i.e. enter this value into both the "Label" and "Name" fields), then click Save.
[code lang="html"]<apex:page controller="SDRelatedListDocumentsController" action="{!createSDocJobs}" tabStyle="SDOC__SDTemplate__c" lightningStylesheets="true">
<apex:form >
<apex:sectionHeader title="Create S-Docs" subtitle="Generating Document(s)"/>
&lt;&lt; <apex:commandLink action="{!returnToParentRecord}">Return to record</apex:commandLink>
<br />
<br />
<apex:actionPoller action="{!redirectIfComplete}" interval="5" reRender="job_table" oncomplete="finishRedirect();" />
<apex:actionFunction action="{!finishRedirect}" name="finishRedirect" reRender="job_table" />
<div style="width: 700px;">
<apex:pageBlock id="job_table" >
<script type="text/javascript">
function displaySuccessfulEmailMsg() {
document.getElementById('email_msg').innerHtml
= "Successfully emailed documents.";
}
</script>
<apex:commandButton value="Email Documents" action="{!emailDocuments}"
disabled="{!NOT(jobsAreCompleted) || emailedDocuments}"
oncomplete="alert('Successfully emailed documents.');"
rendered="{!allowEmail}" reRender="" />
<apex:pageBlockTable value="{!sdocJobWrappers}" var="ow">
<apex:column headerValue="Name">
<a href="/{!ow['obj.Id']}" target="_blank">{!ow['obj.Name']}</a>
</apex:column>
<apex:column headerValue="Status" value="{!ow['job.SDOC__Status_Link__c']}"
style="width: 150px;" />
</apex:pageBlockTable>
</apex:pageBlock>
</div>
</apex:form>
</apex:page>[/code]

Step 3: Create Record Detail Button(s)

For each object that requires this functionality, you'll need to create a button similar to the following example created for emailing a document to each Contact Role related to an Opportunity.
[code lang="html"]{!URLFOR('/apex/SDRelatedListDocuments', null,
[
parentId=Opportunity.Id,
childObjName='OpportunityContactRole',
lookupFieldName='Opportunity',
doclist='a0K1M000000C7XO',
allowEmail='1',
aid='a0B1O000000TGNB',
did='a0V2L000000LJAH',
combineALL='file',
autoRedirect='record',
sdocSortFields='SDOC__SDTemplate__R.Name',
objSortFields='Contact.LastName'
]
)}[/code]
Here's what each query parameter denotes:
parentId: The ID of the record that users will see this button on. For example, if your users will click a button on the Opportunity record detail page that creates and emails a document for each Contact Role, this value should be {!Opportunity.Id}.
childObjName: The API name of the object type of the records in the related list. For example, if your users will click a button on the Opportunity record detail page that creates and emails a document for each Contact Role, this value should be OpportunityContactRole.
lookupFieldName: The API name of the field relating the related list object to the parent object that the user will see this button on. For example, if your users will click a button on the Opportunity record detail page that creates and emails a document for each Contact Role, this value should be Opportunity because a Contact Role record is related to its parent Opportunity record via a lookup field with API name Opportunity (e.g. if you wanted to query the IDs of all the Opportunities related to some Opportunity Contact Role with ID aXM1F000000N7XL, you would run the query SELECT Opportunity.Id FROM OpportunityContactRole WHERE Id='aXM1F000000N7XL' - notice how the Opportunity ID is accessed from the Opportunity Contact Role record through a lookup field with API name "Opportunity").
doclist: A comma-delimited list of S-Docs Template names or IDs that will be used to generate the related list documents. These S-Docs Template records should have the Related To Type set to the object of the related list records, rather than the object of the parent records. For example, if your users will click a button on the Account record detail page that creates a document for each Opportunity, this should be Opportunity, rather than Account. Going back to our Opportunity Contact Roles case is a bit more interesting: if your users will click a button on the Opportunity record detail page that creates and emails a document for each Contact Role, this shouldn't be Opportunity, of course, but it also shouldn't be OpportunityContactRole as you might have expected; rather, it should be Contact, since OpportunityContactRole is really just a relationship record linking a Contact (where the real meat of the Opportunity Contact Role data lies) to an Opportunity.
allowEmail (optional): Set this to 1 if you want to allow the user to email the generated documents. Set this to 0 or omit it altogether if you don't want to allow the user to email the generated documents.
aid (optional): A comma-delimited list of the Salesforce Attachments that you would like to attach to each email (note that emails can only be sent out if you set allowEmail to 1).
did (optional):
 A comma-delimited list of the Salesforce Documents that you would like to attach to each email (note that emails can only be sent out if you set allowEmail to 1).
sdocSortFields (optional): Field (or fields) on the S-Doc or S-Docs Template object to sort the documents by. In the example above, this sorts by template name.
objSortFields (optional): Field (or fields) on the base object to sort the documents by. In the example above, this sorts by Contact Last Name.
combineAll=[true|file|attachment] (optional): If this is set to true, all documents will be combined into a single PDF that can be saved as either a file or attachment.

Note: The combineall functionality will throw an error if you're not on S-Docs version 2.944 or above.

autoRedirect=[record|combineall|email|email,record] (optional): This parameter will automatically redirect you depending on which of the four values you input. Record will redirect you back to the record you started on. Combineall will take you to the combined PDF document if you've set the comebineall parameter to true. Email will take you to the email page so you can edit the email fields before sending your documents. Email,record will automatically email the documents and redirect you back to the record you started on.

Step 4: Create Test Class

Head over to Setup > Build > Develop > Apex Classes > New and copy/paste the following code into your new Apex class, then click Save.
[code lang="html"]@isTest
private class SDRelatedListDocumentsTest {
@isTest
private static void testSDRelatedListDocuments() {
Account acct = new Account(Name='test');
insert acct;
Opportunity opp = new Opportunity(Name='test', AccountId=acct.Id, StageName='Closed', CloseDate=Date.today());
insert opp;

Test.setCurrentPage(Page.SDRelatedListDocuments);
ApexPages.currentPage().getParameters().put('parentId', String.valueOf(acct.Id));
ApexPages.currentPage().getParameters().put('childObjName', 'Opportunity');
ApexPages.currentPage().getParameters().put('lookupFieldName', 'Account');
ApexPages.currentPage().getParameters().put('doclist', '');
ApexPages.currentPage().getParameters().put('sendEmail', '0');
ApexPages.currentPage().getParameters().put('combineAll', 'file');

SDRelatedListDocumentsController sdrldc = new SDRelatedListDocumentsController();
sdrldc.createSDocJobs();
Boolean tmp = sdrldc.jobsAreCompleted;
sdrldc.returnToParentRecord();
sdrldc.emailDocuments();
sdrldc.combineIntoSingleDocument();
sdrldc.finishCombineAll();
sdrldc.redirectIfComplete();
sdrldc.finishRedirect();
}
}[/code]

Writing a Query That Returns Distinct Records

By Documentation, General Solutions, S-Docs Cookbook No Comments

Return Distinct Records With LineItemsSOQL

Say you have a LineItemsSOQL table with a query on the Opportunity object that returns a few fields from its parent Account in your template:
[code lang="html"]<!--{{!
<lineitemsSOQL>
<class>table123</class>
<soql>
SELECT Account.Name, Account.Industry, Account.Type
FROM Opportunity
</soql>
<column>Account.Name</column>
<column>Account.Industry</column>
<column>Account.Type</column>
</lineitemsSOQL>
}}-->[/code]
This is fine if you don't mind the fields from a particular Account showing up in several of your table rows (e.g. your query returns 3 Opportunities that are all linked to the same Account). However, what if your use case required that you only display the fields for each particular Account just once in your table, even if your query returns multiple Opportunities linked to that Account? To accomplish this, you would change your LineItemsSOQL code to the following:
[code lang="html"]<!--{{!
<lineitemsSOQL>
<class>table123</class>
<soql>
SELECT Count_DISTINCT(ID) cid, Account.Name, Account.Industry, Account.Type
FROM Opportunity
GROUP BY Account.Name, Account.Industry, Account.Type
</soql>
<column>Name</column>
<column>Industry</column>
<column>Type</column>
</lineitemsSOQL>
}}-->[/code]

Note the following differences:

1) COUNT_DISTINCT(Id) cid is included in the query.
2) The fields in the query are repeated after a GROUP BY statement.
3) The column fields are no longer prepended with "Account." This is because this query doesn't return objects corresponding to Opportunity records (which would require traversing up to the Account's field's via "Account.") as it would if COUNT_DISTINCT were not included. Rather, it returns objects corresponding to Account records.

Return Distinct Records With The Named Query Feature

This behavior is also supported with the named query feature. Typically when you query a field through a lookup field (e.g. Contact__r.Name) with the named query feature, you'd prepend the name of the field with the name of the lookup object (e.g. {{!myQuery.Contact__r.Name}}). However, when using named queries with an aggregate function (such as COUNT_DISTINCT), you should omit the name of the lookup object (e.g. use {{!myQuery.Name}} rather than {{!myQuery.Contact__r.Name}} to reference Contact__r.Name) for the same reason listed in (3). For example:
[code lang="html"]<!--{{!
<lineitemsSOQL>
<class>none</class>
<queryname>myDistinctQuery</queryname>
<soql>
SELECT Count_DISTINCT(ID) cid, Account.Name, Account.Industry, Account.Type
FROM Opportunity
GROUP BY Account.Name, Account.Industry, Account.Type
LIMIT 1
</soql>
</lineitemsSOQL>
}}-->

{{!myDistinctQuery.cid}} <br />
{{!myDistinctQuery.Name}} <br />
{{!myDistinctQuery.Type}} <br />[/code]

Return Distinct Records Per Field Value

If you would like your LineItemsSOQL statement to only return one record per field value, you can do so using <distinct> tags.

For example, let's say the following Product records are related to an Opportunity:

Product Product Code Total Price
GenWatt Diesel 1000kW GC1060 $100,000.00
Installation: Industrial - High IN7080 $255,000.00
SLA: Bronze SL9020
$20,000.00

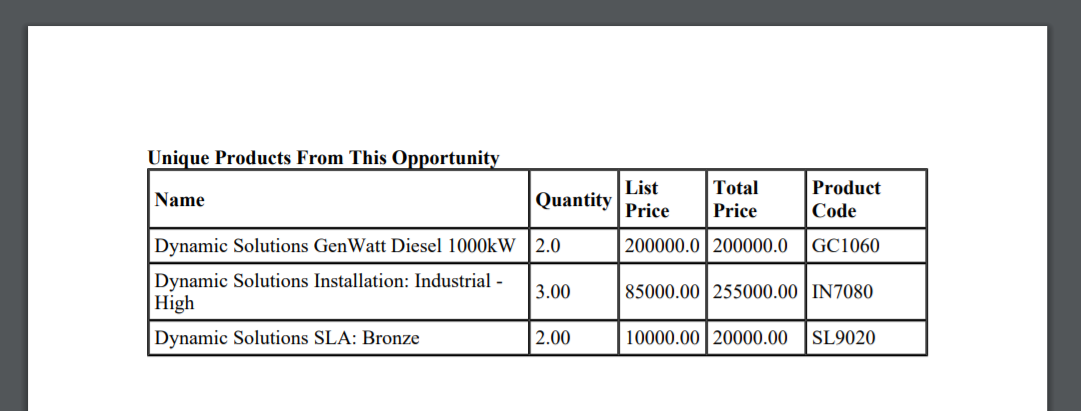
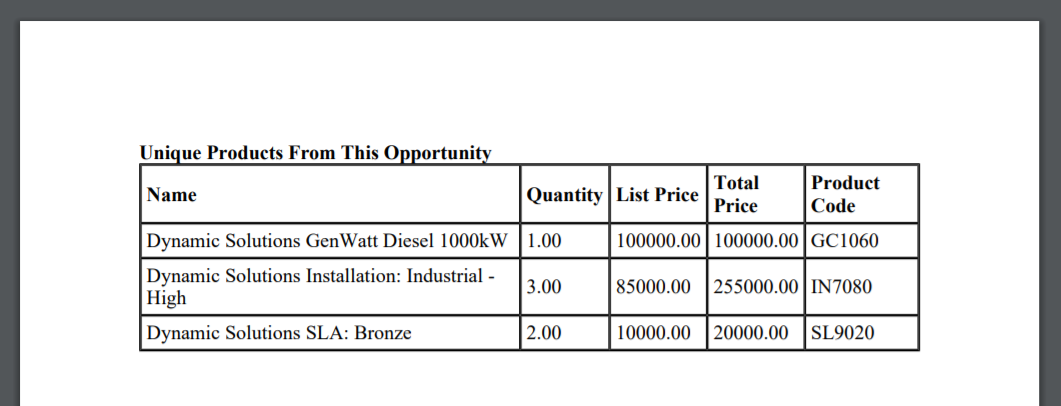
Note that GenWatt Diesel 1000kW appears twice. Adding <distinct>productcode</distinct> to your LineItemsSOQL statement will return this record only once, since the product code is the same. In other words, this related list statement:
[code lang="html"]<style type="text/css">table { border: collapse; }
table, tr, td, th { border: 1px solid black; }
th { font-weight: bold; }
</style>
<strong>Unique Products From This Opportunity</strong>
<table cellpadding="4" cellspacing="0">
<thead>
<tr>
<th>Name</th>
<th>Quantity</th>
<th>List Price</th>
<th>Total Price</th>
<th>Product Code</th>
</tr>
</thead>
<tbody><!--{{!
<LineItemsSOQL>
<class>table151</class>
<listname>opportunitylineitem</listname>
<soql>
SELECT name, quantity, listprice, totalprice, productcode
FROM opportunitylineitem
WHERE opportunityid='{{!Opportunity.id}}'
</soql>
<distinct>productcode</distinct>
<column>name</column>
<column>quantity</column>
<column>listprice</column>
<column>totalprice</column>
<column>productcode</column>
</LineItemsSOQL>
}}-->
</tbody>
</table>[/code]
Would output the following table:

You can also use the sum attribute in your <distinct> tags to sum specified columns in records that are considered duplicates based on your <distinct> field, and roll the results up in each column. For example, you could modify the <distinct> tags from the example above like so:
[code lang="html"]<distinct sum="quantity,listprice,totalprice">productcode</distinct>[/code]
This would output the following table, with the quantity, list price, and total price of the duplicate product summed.

Insert SOQL Query Data as Merge Fields with the Named Query Feature

By Documentation, General Solutions, S-Docs Cookbook No Comments

The Named Query Feature: Assigning SOQL Queries To Merge Fields

In S-Docs, related lists and direct SOQL lists have a massive amount of flexibility in how they are displayed when you leverage advanced template features, such as using HTML table markup in your related list's prefix and postfix attributes. However, there are rare occasions where this flexibility just might not cut it, as well as times where you might just want to use our direct SOQL feature to query fields from just a single object, and then use these fields over and over again in your template. Simply copying and pasting your direct SOQL code over and over is a messy, difficult-to-maintain solution that might even cause performance issues. However, there's no need to distress in times like these, because the S-Docs named query feature's got your back:

[code lang="html" highlight="25,30,35,39"]<!--{{!<LineItemsSOQL>
<class>none</class>
<queryname>myQuery1</queryname>
<soql>
SELECT quantity, listprice, totalprice, productcode
FROM opportunitylineitem
WHERE opportunity.id='{{!opportunity.id}}'
AND description='A Unique Description'
LIMIT 1
</soql>
</LineItemsSOQL>}}-->

<!--{{!<LineItemsSOQL>
<class>none</class>
<queryname>myQuery2</queryname>
<soql>
SELECT quantity, listprice, totalprice, productcode
FROM opportunitylineitem
WHERE opportunity.id='{{!opportunity.id}}'
AND description='Another Unique Description'
LIMIT 1
</soql>
</LineItemsSOQL>}}-->

Data for opportunity line item with description "A Unique Description":
Quantity - {{!myQuery1.quantity}}
List Price - ${{!myQuery1.listprice #,###.##}}}
Total Price - ${{!myQuery1.totalprice #,###.##}}}

Data for opportunity line item with description "Another Unique Description":
Quantity - {{!myQuery2.quantity}}
List Price - ${{!myQuery2.listprice #,###.##}}
Total Price - ${{!myQuery2.totalprice #,###.##}}}

Product codes of products ordered:
{{!myQuery1.productcode}}
{{!myQuery2.productcode}}

And let's just put the quantities and product codes here again, just because we can:
{{!myQuery1.quantity}} | {{!myQuery1.productcode}}
{{!myQuery2.quantity}} | {{!myQuery2.productcode}}[/code]
If you were to use the above code as your template source, then when you generated an S-Doc, the result would look something like the following:

Data for opportunity line item with description "A Unique Description": Quantity - 100 List Price - $20.00 Total Price - $2,000.00 Data for opportunity line item with description "Another Unique Description": Quantity - 300 List Price - $40 Total Price - $12,000.00 Product codes of products ordered: GC1050 GC1140 And let's just put the quantities and product codes here again, just because we can: 100 | GC1050 300 | GC1140

Notice how the LineItemsSOQL statements themselves don't display any results like you'd normally expect; when S-Docs sees that you used the named query feature in a LineItemsSOQL statement, it knows to hide the data that would normally be there, and instead opens the door to reference the data elsewhere as merge fields in your document.

On a technical note, we know in advance that each item we've queried in this example will only return a single result - you can assume that in our imaginary database, we only have one opportunity line item with description "A Unique Description" and only one opportunity line item with description "Another Unique Description."

You can additionally create named queries that return multiple records. You can filter them and access different records like so: {{!myQuery.Name filter="1" offset="2"}}. This would return the third record in the list that matches the criteria defined in filter 1.

[code lang="html"]<!--{{!<LineItemsSOQL>
<class>none</class>
<queryname>myQuery</queryname>
<filter id="1">StageName='Closed' AND Name LIKE '%Test%'</filter>
<filter id="2">StageName!='Closed' AND (NOT Name LIKE '%Test%')</filter>
<soql>SELECT Name, StageName FROM Opportunity</soql>
</LineItemsSOQL>}}-->{{!myQuery.Name}}<br />
{{!myQuery.Name filter="1" offset="1"}}<br />
{{!myQuery.Name filter="2" offset="2"}}<br />
{{!myQuery.Name filter="1" offset="3"}}<br />[/code]
Note that the filters use SOQL filter syntax, not S-Docs RENDER syntax. Each filter is added to the base query you defined between the <soql> tags, and one query is run per filter. For example, two queries will be run in the above sample since two <filter>'s are defined.

Aggregate Queries

The named query feature also supports aggregate queries, such as COUNT and SUM. To reference an aggregate function result in a merge field, you would simply use the field alias corresponding to that aggregate function result. For example:

[code lang="html"]<!--{{!
<lineitemsSOQL>
<class>none</class>
<queryname>numAccounts</queryname>
<soql>SELECT COUNT(id) cid, SUM(Amount)asum FROM Opportunity</soql>
</lineitemsSOQL>
}}-->

This org has {{!numAccounts.cid}} Opportunities with a total Amount of ${{!numAccounts.asum #,###.##}}.[/code]
By now, you've probably noticed that what's great about this feature is that you only have to run one query per child record to be able to use a given child record's fields like you would any ordinary merge field; the fields support attributes like format-number, and the fields can be used over and over again wherever you'd like in the document.

*Note: This feature was previously called the Queryname feature.

Customizing Your Related List Layout

By Documentation, General Solutions, S-Docs Cookbook No Comments

Remove Related List Table Formatting

Sometimes the standard S-Docs related list doesn't result in the right layout of data for your use case. In this event, you can use <class>none</class> instead of <class>tableXXX</class> to remove all the HTML that S-Docs automatically inserts into the table. You'll have to delete the table markup that was inserted around your related list as well. However, you don't need to do any of the previous steps manually; if you check the Insert related list without table markup checkbox in the "Format Data Columns" tab of the "Insert Related List" window, your list will be inserted as the following:
[code lang="html"]<!–{{! <LineItems>
<class>none<class>
<ListName>OpportunityLineItems</ListName>
<column>PriceBookEntry.product2.Name</column>
<column>PriceBookEntry.product2.Description</column>
<column>UnitPrice</column>
<column>Quantity</column>
<column>TotalPrice</column>
</LineItems> }}–>[/code]

Add Row Numbers to Your Table

If you'd like to display a number for each row in your related list table, you can insert the rownum column by adding the following to your related list statement:
[code lang="html"]<column>rownum</column>[/code]
For example, a related list statement that looks like this:
[code lang="html"]<lineitems>
<class>table646</class>
<listname>opportunitylineitems</listname>
<column>rownum</column>
<column>PricebookEntry.Product2.name</column>
<column>PricebookEntry.Product2.description</column>
<column>unitprice</column>
<column>quantity</column>
<column>totalprice</column>
</lineitems>
}}-->[/code]
Would output a table that looks like this:

Offset The Starting Row Number

If you'd like your table's row numbers to begin at a number other than 1, you can use the startIndex related list column attribute to specify a number that should be added to the first row. For example, if your related list statement looked like this:
[code lang="html"]<lineitems>
<class>table646</class>
<listname>opportunitylineitems</listname>
<column startIndex="3">rownum</column>
<column>PricebookEntry.Product2.name</column>
<column>PricebookEntry.Product2.description</column>
<column>unitprice</column>
<column>quantity</column>
<column>totalprice</column>
</lineitems>
}}-->[/code]
Your table would look like this:

You can also use the mergenext related list column attribute to merge the row number into another column. Please visit our advanced template features article to read more about mergenext and other column attributes.

Build A Custom Table

Then, you can use the column prefix and postfix attributes to insert the HTML tags and build the table yourself (you may modify the HTML outside of the related list comment as well):

[code lang="html"]<table>
<tbody>
<!--{{! <LineItems>
<class>none<class>
<ListName>OpportunityLineItems</ListName>
<column prefix="<tr><td>" postfix="</td>">PriceBookEntry.product2.Name</column>
<column prefix="<td>" postfix="<br />">PriceBookEntry.product2.Description</column>
<column postfix="</td>">UnitPrice</column>
<column prefix="<td>" postfix="</td>">Quantity</column>
<column prefix="<td>" postfix="</td></tr>">TotalPrice</column>
</LineItems> }}-->
</tbody>
</table>[/code]
The above related list is now equivalent to the following related list (i.e. the kind of related list S-Docs inserts by default):
[code lang="html"]<table>
<tbody>
<!--{{! <LineItems>
<class>table251<class>
<ListName>OpportunityLineItems</ListName>
<column>PriceBookEntry.product2.Name</column>
<column>PriceBookEntry.product2.Description</column>
<column>UnitPrice</column>
<column>Quantity</column>
<column>TotalPrice</column>
</LineItems> }}-->
</tbody>
</table>[/code]
This technique provides plenty of flexibility in table formatting. For example, if you wanted PriceBookEntry.product2.Name and PriceBookEntry.product2.Description to appear in the same table cell, you would use:

[code lang="html"]<table>
<tbody>
<!--{{! <LineItems>
<class>none<class>
<ListName>OpportunityLineItems</ListName>
<column prefix="<tr><td>" postfix="</td>">PriceBookEntry.product2.Name</column>
<column prefix="<td>" postfix="</td>">PriceBookEntry.product2.Description</column>
<column prefix="<td>" postfix="</td>">UnitPrice</column>
<column prefix="<td>" postfix="</td>">Quantity</column>
<column prefix="<td>" postfix="</td></tr>">TotalPrice</column>
</LineItems> }}-->
</tbody>
</table>[/code]
Finally, if you wanted to insert table headers and add CSS styling, you would use something like the following:
[code lang="html"]<style>
#myCustomTable { border: none }
.nameAndDescriptionCell { border: 1px solid black; }
</style>

<table id="myCustomTable">
<thead>
<th>Name &amp; Description</th>
<th>Unit Price</th>
<th>Quantity</th>
<th>Total Price</th>
</thead>
<tbody>
<!--{{! <LineItems>
<class>none<class>
<ListName>OpportunityLineItems</ListName>
<column prefix="<tr><td class='nameAndDescriptionCell'>" postfix="</td>">PriceBookEntry.product2.Name</column>
<column prefix="<td>" postfix="<br />">PriceBookEntry.product2.Description</column>
<column postfix="</td>">UnitPrice</column>
<column prefix="<td>" postfix="</td>">Quantity</column>
<column prefix="<td>" postfix="</td></tr>">TotalPrice</column>
</LineItems> }}-->
</tbody>
</table>[/code]

Alternate Customization Option

Using <class>none</class> to remove your related list table formatting works great if you only need your data to be displayed as a comma-delimited list, or in a custom table that you build yourself. However, if you need to format your related list data in an entirely new way, you can also generate a template component that formats your data and then merges it into your final document. Click here to read more about this feature.

Create S-Docs Email Templates

By Documentation, General Solutions, S-Docs Cookbook No Comments

Introduction

Before emailing an S-Docs document, you can choose an S-Docs HTML email template to automatically fill out the email body, subject line, and To/CC/BCC fields. This document will explain how to create S-Docs HTML email templates in the template editor. For a more in-depth explanation on how to create your first S-Docs template, click here.

Create The Email Template

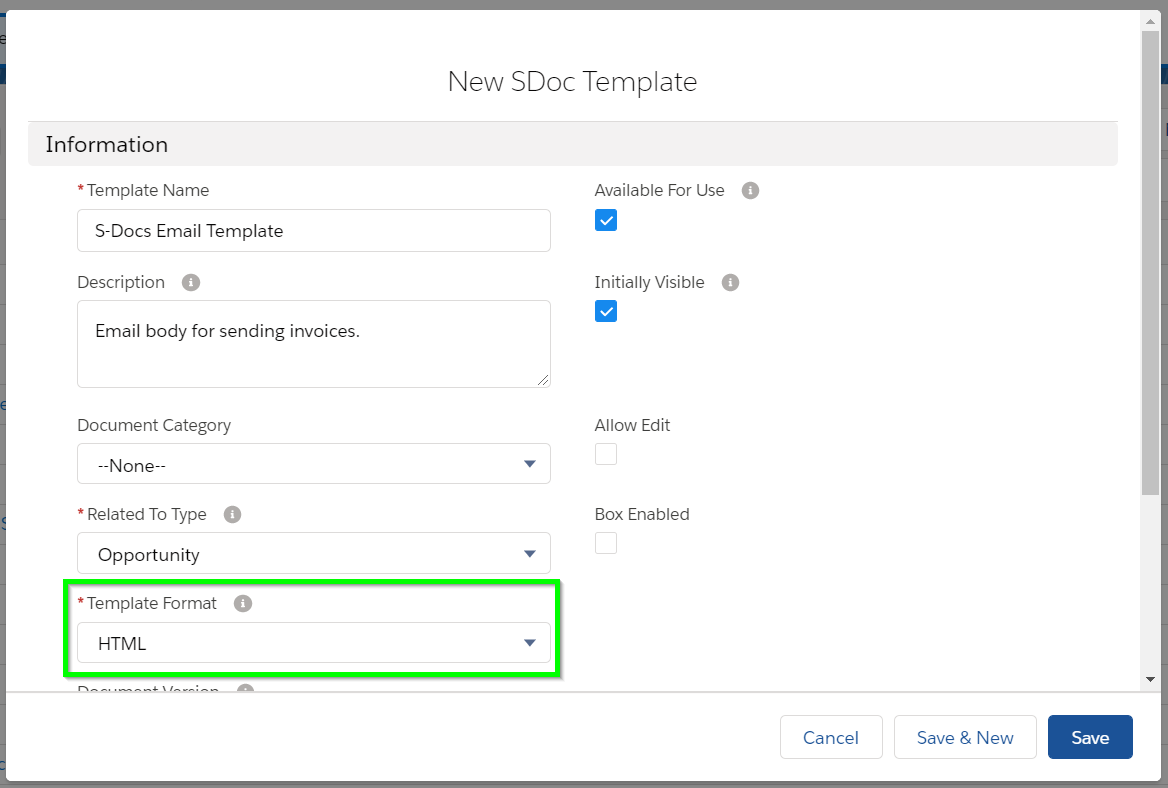
To create an S-Docs email template, simply create a new S-Docs template and choose HTML as the Template Format.

Creating an S-Docs HTML email template

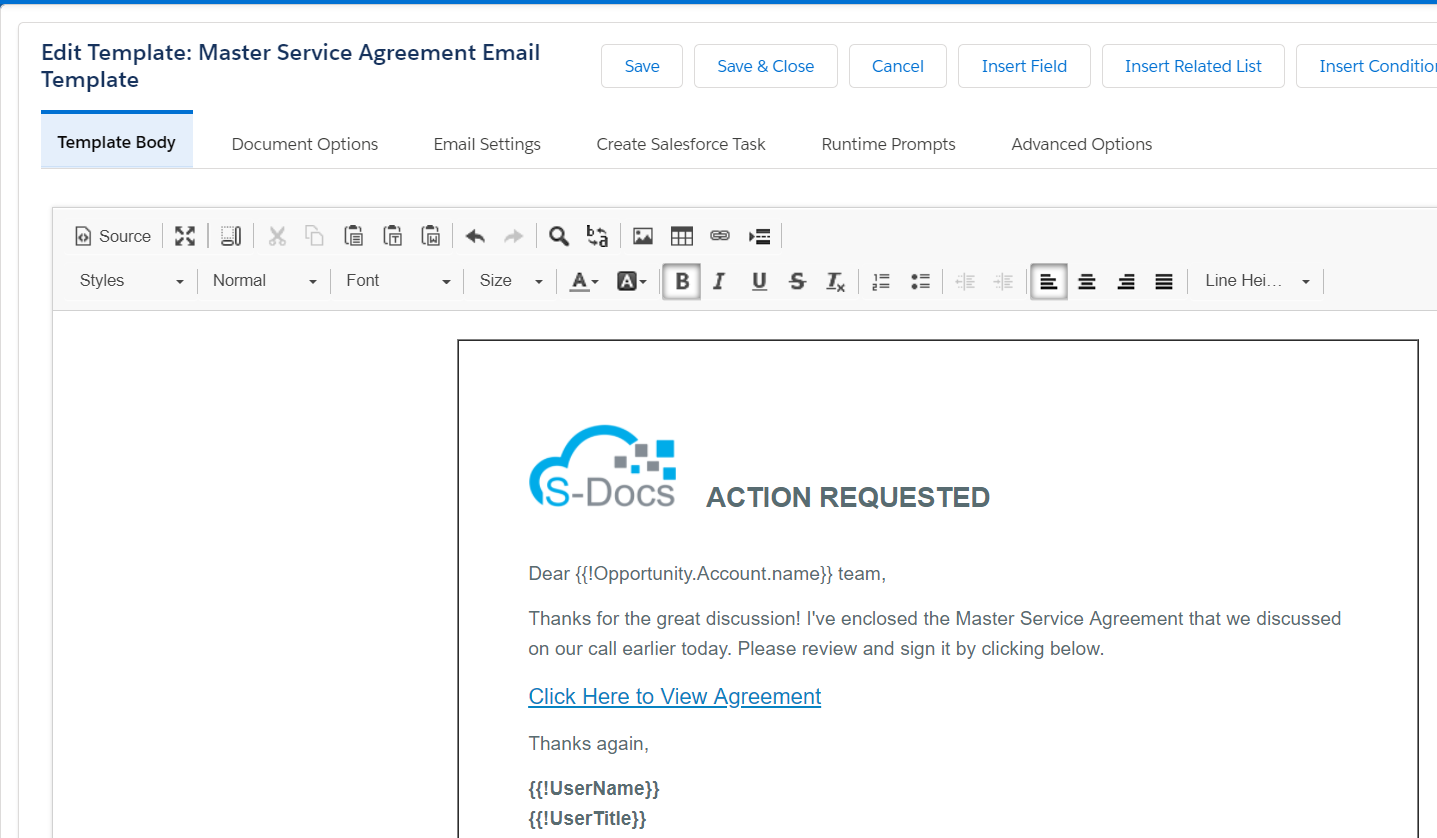
In the template editor, enter the contents of the email body. You can use merge fields, SOQL queries, custom HTML code, etc. as you would in any other template.

Configure Email Settings For The Template

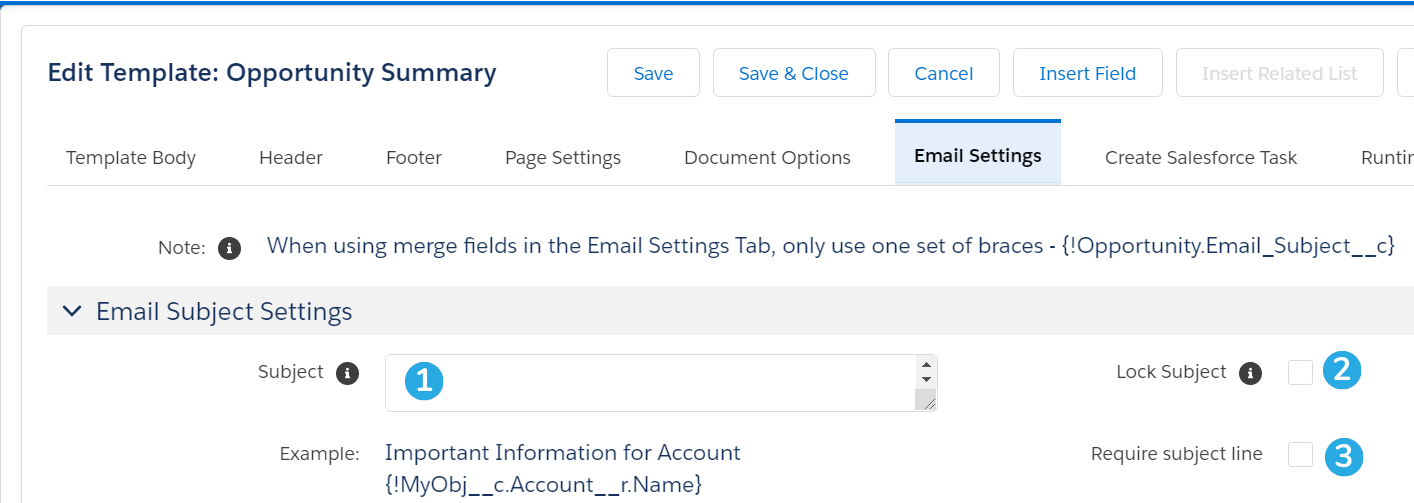
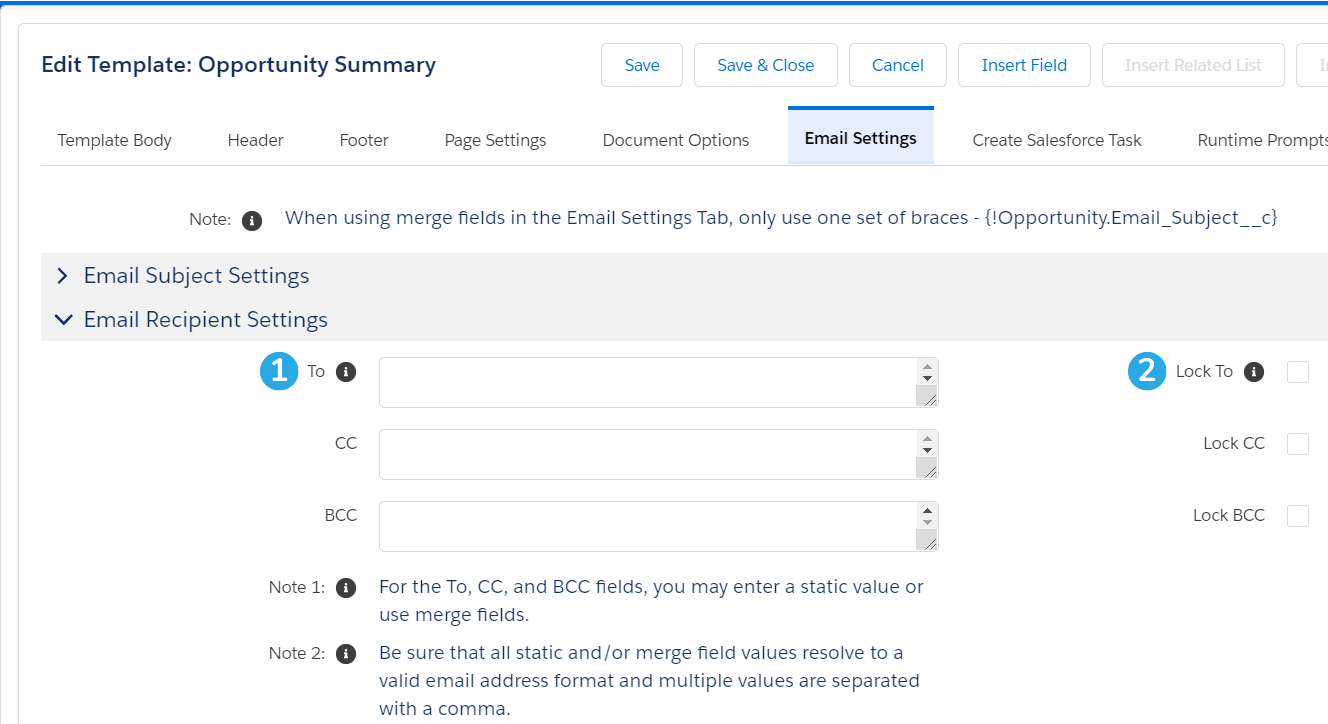
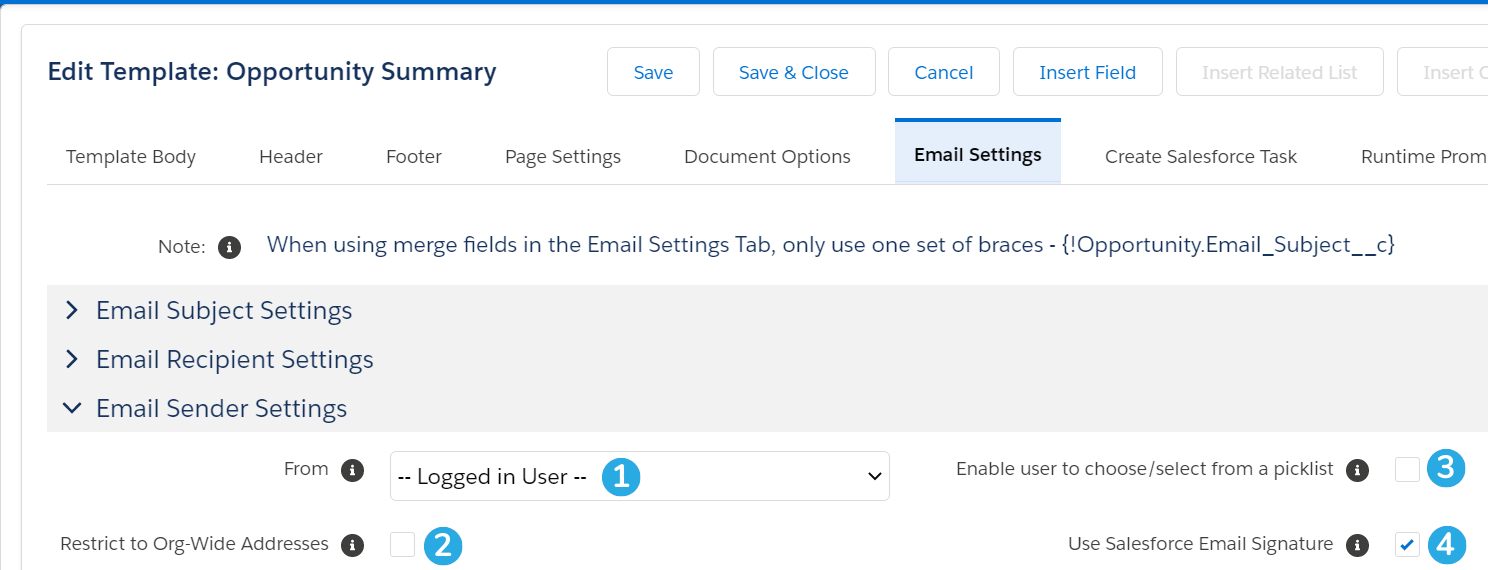
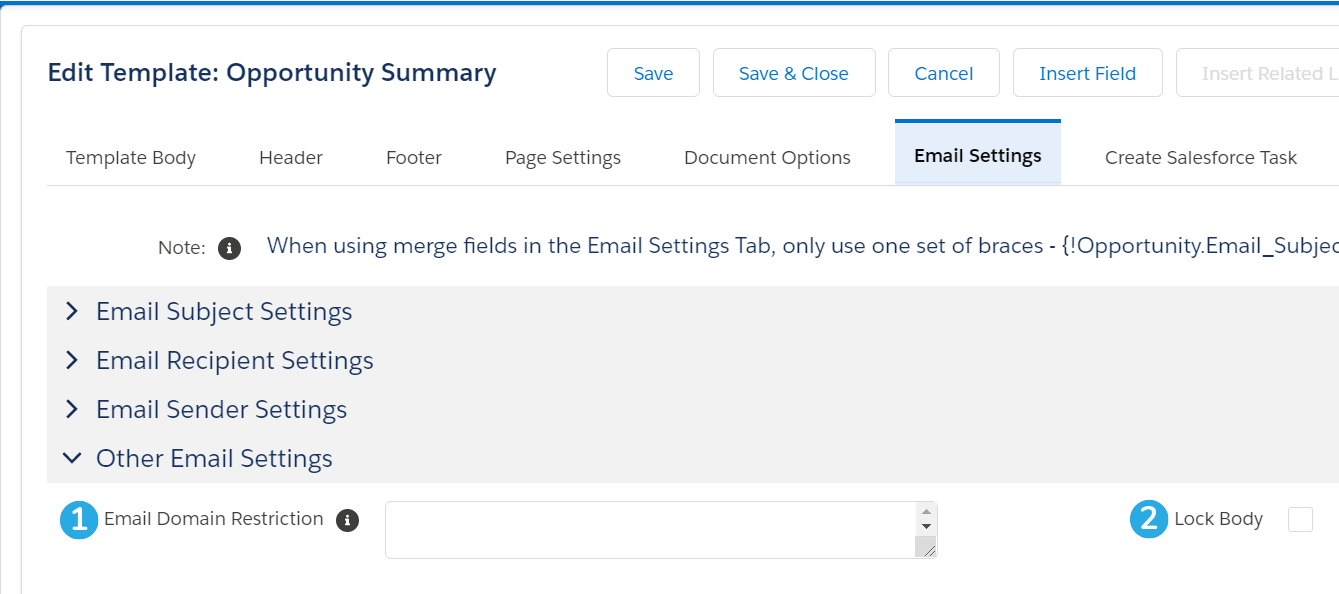
The Email Settings tab contains options for controlling the behavior when this template is emailed. There are four sections in this tab: Email Subject SettingsEmail Recipient SettingsEmail Sender Settings, and Other Email Settings.

Note: If a user is generating multiple documents with different email restrictions, the most restrictive settings are applied to the document set generated.

Note: If you use merge fields in this tab, make sure to use only one set of brackets instead of two. For example, use {!Contact.Email} instead of {{!Contact.Email}}.

Email Subject Settings

[1] Optionally enter an email subject. You can use static text or merge fields (make sure to use single braces as opposed to double).

[2] Check this box to lock the Subject field to the end-user. If you leave the Subject field blank when this box is checked, the entire Subject field will be hidden on the S-Docs email page.

[3] Check this box to require end-users to enter an email subject before emailing this document.

Email Recipient Settings

[1] Optionally set the ToCC, or BCC email fields. You can use static text or merge fields (make sure to use single braces as opposed to double).

[2] Lock the ToCC, or BCC fields so that end-users cannot edit them. Note that if you leave the To field blank when you lock it, this template will not be able to be emailed. Click here to learn more about restricting templates from being emailed. If you leave the CC or BCC fields blank when you lock them, these fields will be hidden on the S-Docs email page.

Email Sender Settings

[1] Choose to send this document from the email address of the logged in user, or from one of your Org-Wide email addresses.

[2] Check this box to restrict the email From field to an org-wide email address. This prevents this document from being sent as the logged in user.

[3] Check this box to allow the end-user to pick from a list of your Org-Wide email addresses to send this document from.

[4] Check this box to allow users to use their Salesforce Email Signature in email body templates. You can insert the {{{!UserSignature}}} special merge field to reference the generating user's email signature once this box is checked.

Other Email Settings

[1] Enter a comma-delimited list of email domains to restrict users from emailing this document to anyone outside of those domains. Example: sdocs.com,trailhead.edu

[2] Check this box to prevent the end-user from modifying the email body when sending this document.

Generate The Email Template

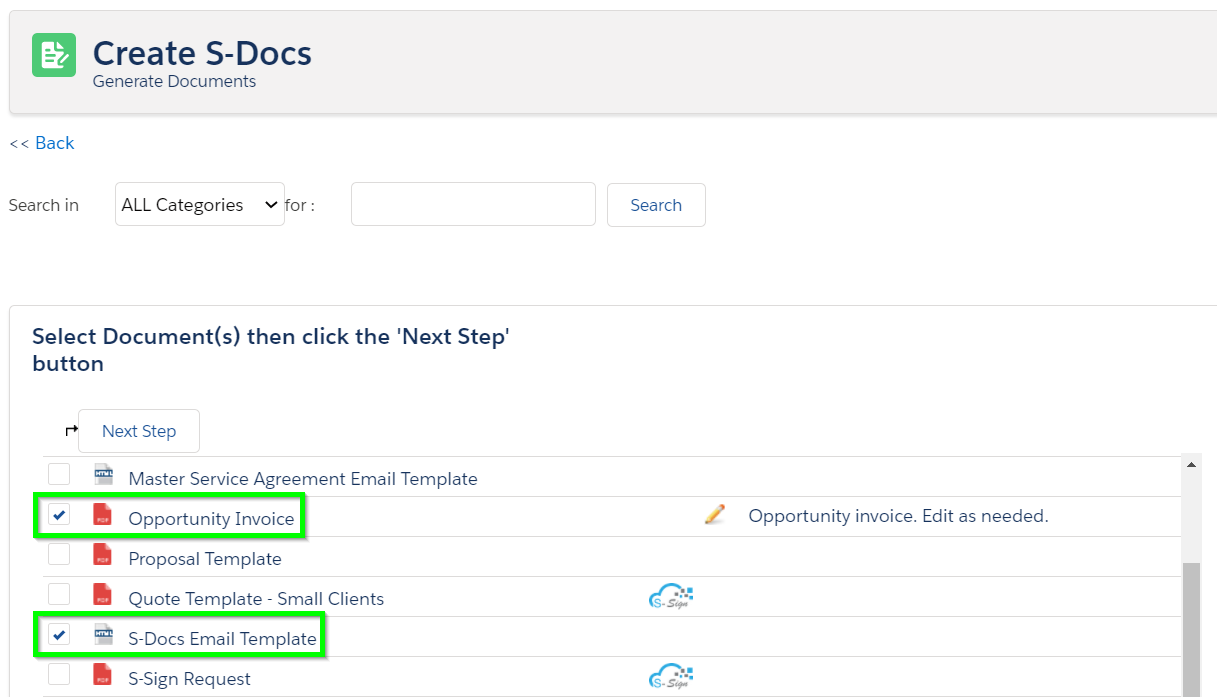
To use your new email template when you're emailing S-Docs, simply select this template in addition to any other S-Doc you'd like to attach to the email.

Note: If you have specified a default email address, subject line, etc. in the Email Settings Tab when editing your HTML template, and another default email address, subject line, etc. in the Email Settings tab of another template (say a DOC or a PDF) that you are attaching to this email, S-Docs will ignore the email info in the non-HTML template(s) and only use the email info specified in the HTML email template.

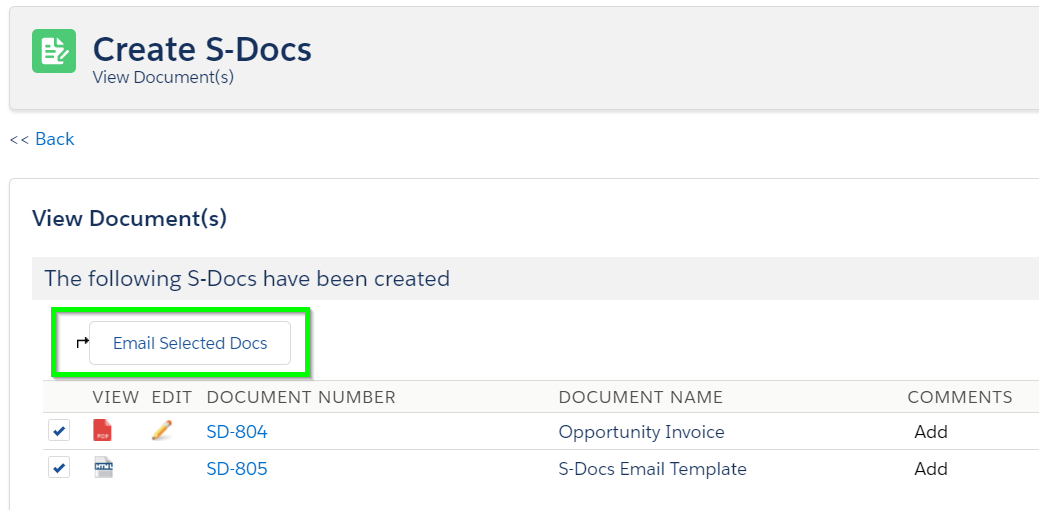
Generate the docs by clicking Next Step, then click Email Selected Docs.

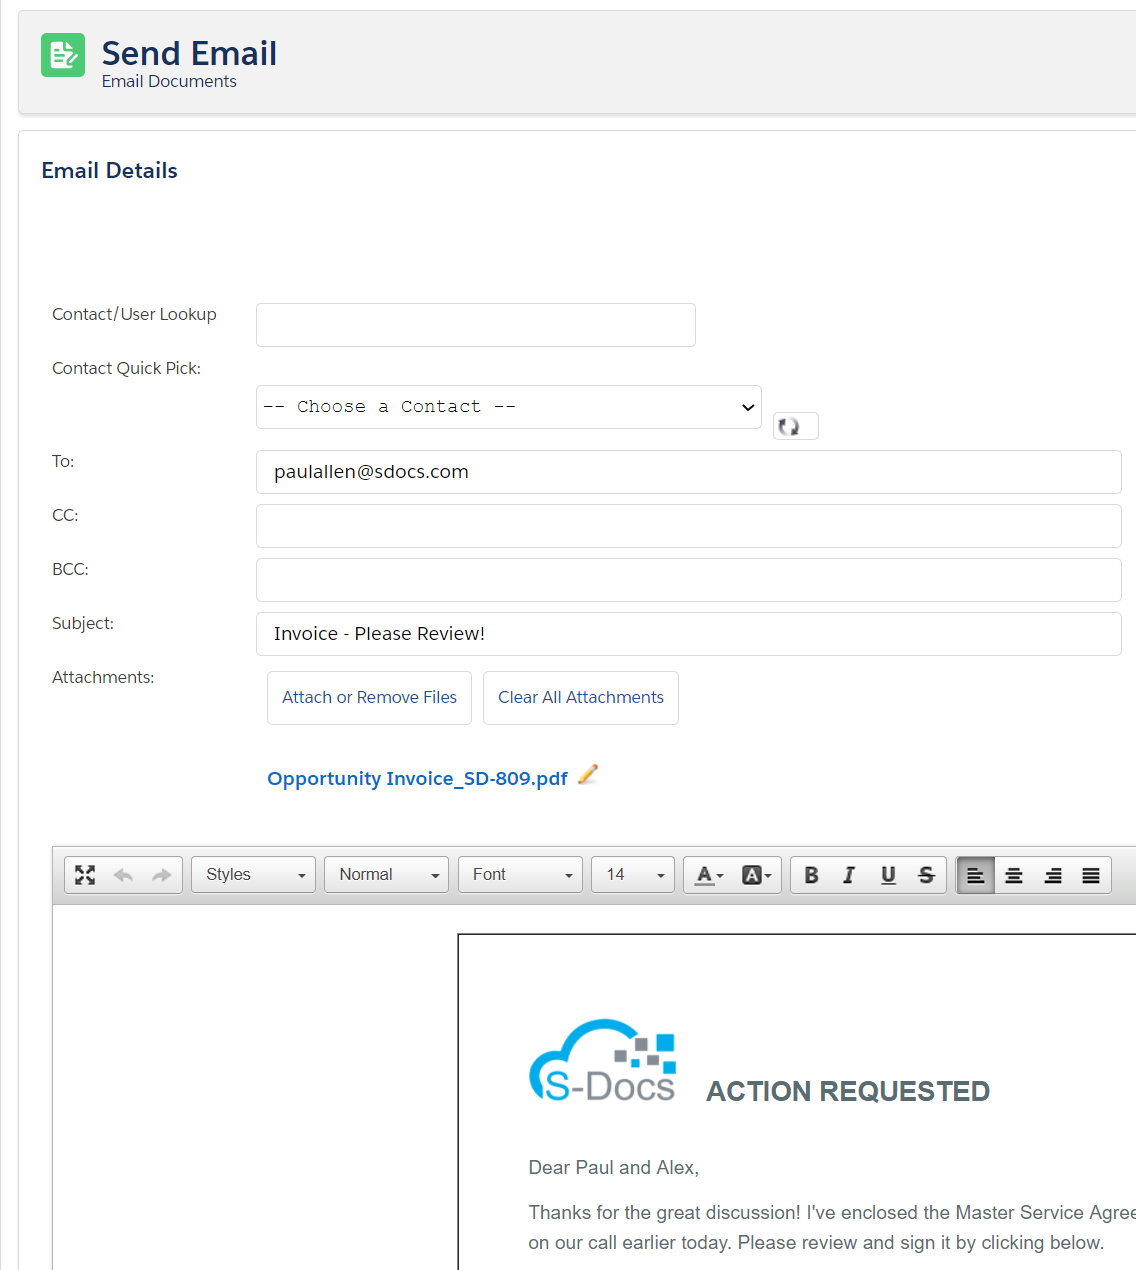
This opens up the S-Docs email page. As you can see below, S-Docs used the HTML email template to create a custom email to send to the specified contact, and attached the other document (the PDF) to the email. On this page, you can choose email recipients using the Contact Quick Pick or Contact/User Lookup field. Learn more about these features here. Alternatively, if you know the email addresses of the people you’d like to send the document(s) to, you can just type them into the To, CC, and BCC fields.

You can also type in a subject line, add additional attachments, and make edits to the email body.

That's all there is to it!

Email Failure Troubleshooting

By default, S-Docs links outbound emails to the contact record with a matching email address; Salesforce requires this linkage. If you try to send an email to an email address that is not listed under any Contact record in your org, S-Docs will attempt to link it to a single dummy contact record called "No Contact Record." This contact record is created automatically by the S-Docs package to handle this linkage, and is immediately deleted once the email is sent.

If your org has implemented validation rules that require additional contact fields to be completed, then the S-Docs package will not be able to create this contact record. In this case, there are two main options.

Option 1 (Recommended)

Create a before insert, before update Apex trigger on the Contact object that automatically changes the fields on the No Contact Record that S-Docs creates so that your validation rules are not triggered. For example, the trigger might look like this if your validation rules prevent the contact field "This_Cannot_Be_Null__c" from being null:

trigger ContactFirstName on Contact (before insert, before update) {
    for (Contact c : trigger.new) {
        if (c.LastName == 'No Contact Record') {
            c.This_Cannot_Be_Null__c = 'some non-null value';
        }
    }
}

With this option, S-Docs will be able to create and delete the No Contact Record, and the email will be sent and logged in Activity History on the base object record.

If you require test coverage for your No Contact trigger, you can use the following test class:

Class Name: NoContactTestClass

@isTest
private class NoContactTestClass {    @isTest
    public static void noContactTest() {
    	Test.startTest();
        Contact testContact = new Contact();
        testContact.LastName = 'No Contact Record';
        insert testContact;
        Test.stopTest();
    }}

Option 2

Create the S-Docs No Contact Record manually with all of the fields filled in that are required by your validation rules. The fields that S-Docs requires should be filled in as follows:
First Name: Not Required. We recommend writing S-Docs to avoid confusion.
Last Name: No Contact Record
Email Address: this.email@is.invalid
You then need to add the following parameter to the end of your S-Docs button: &useExistingNoContactRecord=true
Note: This option is not recommended, as the email will not be logged in Activity History on the base object record.

Sandbox Deliverability

If you are testing S-Docs in a sandbox org and emails are not being delivered, you should check Setup > Email Administration > Deliverability, and check that "Access to Send Email" is set to "All email." By default, Salesforce turns off outbound email access when a sandbox is created to reduce the risk of inadvertently sending emails to contacts during development and testing. Be aware that this change effects the entire sandbox and not just S-Docs.

Configure a Multiple-Page Table to Repeat its Header on Each Page

By Documentation, General Solutions, S-Docs Cookbook No Comments

Introduction

Multi-page tables might not look as clean as you'd like on your first attempt. If a row in your table is split in half between two pages, you can fix this by simply using the CSS attribute "page-break-inside: avoid" in your table, e.g.
[code lang="html"]<table style="page-break-inside: avoid"> ... *your table contents here* </table>[/code]

The above technique, while cleanly distributing the table rows between pages, does not repeat the header of the table on the new page. This is fine for most use cases, but if you'd like a table header to be repeated at the beginning of each page, a bit more configuration is required.

Edit Your Table's CSS

To accomplish this, you'll need to make the following changes to your related list's CSS attributes:

1) Add the following to the end of the CSS attributes in table.table734{ ... }
[code lang="html"]sd:repeatheader;border-spacing:0; border-width: 0[/code]

Example

[code lang="html"]table.table734 {border:solid black 1px; border-collapse:collapse; border-spacing:0px;font-family:Arial,Helvetica,sans-serif; font-size:10pt; width:100%;}[/code]

should become

[code lang="html"]table.table734 {border:solid black 1px; border-collapse:collapse; border-spacing:0px;font-family:Arial,Helvetica,sans-serif; font-size:10pt; width:100%; sd:repeatheader;border-spacing:0; border-width: 0; }[/code]

Note: In all of these steps, it's key that the CSS you add is always added to the end so that it overrides the originally-set border widths.

2) In .table734col0, find the border-width Z and append the following to the end of .table734col0's CSS.
(example included in step 3)
[code lang="html"]border-width: 0 Zpx Zpx Zpx;[/code]

3) In .table734colY (where Y > 0), find its border width Z as specified in its "border" attribute and append the following to the end of .table734colY's CSS:
[code lang="html"]border-width: 0 Zpx Zpx 0;[/code]

For example, if we have pre-existing CSS:
[code lang="html"].table734col0{border:solid red 3px;text-align:left;}
.table734col1{border:solid red 3px;text-align:left;}
.table734col2{border:solid red 3px;text-align:left;}[/code]

This would become the following after steps (2) & (3):
[code lang="html"].table734col0{border:solid red 3px;text-align:left;border-width:0 3px 3px 3px;}
.table734col1{border:solid red 3px;text-align:left;border-width:0 3px 3px 0;}
.table734col2{border:solid red 3px;text-align:left;border-width:0 3px 3px 0;}[/code]

4) In .table734header, find its border width Z as specified in its "border" attribute and append the following to the end of .table734header's CSS:
[code lang="html"]border-width: Zpx Zpx Zpx 0;[/code]
For example, if we have:
[code lang="html"].table734header{border: solid red 3px;}[/code]

We would change it to:
[code lang="html"].table734header{border: solid red 3px; border-width: 3px 3px 3px 0;}[/code]

Then, find the first th or td cell between the <THEAD></THEAD> tags and add the following:
[code lang="html"]style="border-width: Zpx Zpx Zpx Zpx;"[/code]
So, if we have:

[code lang="html"].table734header{border: solid red 3px;}[/code]

and

[code lang="html"]<thead>
<th class="table734header">h1</th>
<th class="table734header">h2</th>
<th class="table734header">h3</th>
</thead>[/code]

We would change it to

[code lang="html"]<thead>
<th style="border-width: 3px 3px 3px 3px;" class="table734header">h1</th>
<th class="table734header">h2</th>
<th class="table734header">h3</th>
</thead>[/code]

Troubleshooting

If sd:repeatheader does not repeat the header across pages, please make sure you're on the latest version. 

If you're on the latest version and sd:repeatheader does not repeat the header across pages, please make sure that your <th></th> tags are between <thead></thead> tags and the rest of your table rows/columns are between <tbody></tbody> tags. You may need to update the code inserted by the Insert Related List tool.

Import Word Templates into S-Docs (HTML, PDF, DOC, etc.)

By Documentation, General Solutions, S-Docs Cookbook No Comments
Update: Refer to this documentation for the DOCX feature. The below solution is relevant for non-DOCX formatted documents.

Using The "Paste From Word" Button

The source code of S-Docs templates is written in HTML, but Microsoft Word documents are not saved as HTML. Does that mean we have to re-create all of our existing Word templates from scratch in the S-Docs template editor? Nope! You can still import existing Word templates into S-Docs by leveraging the Paste From Word button in the S-Docs template editor.

The process is simple:

1. Open your existing template in Microsoft Word.

2. Select everything in your document in Microsoft Word (Ctrl+A) and copy the contents to your clipboard (Ctrl+C).

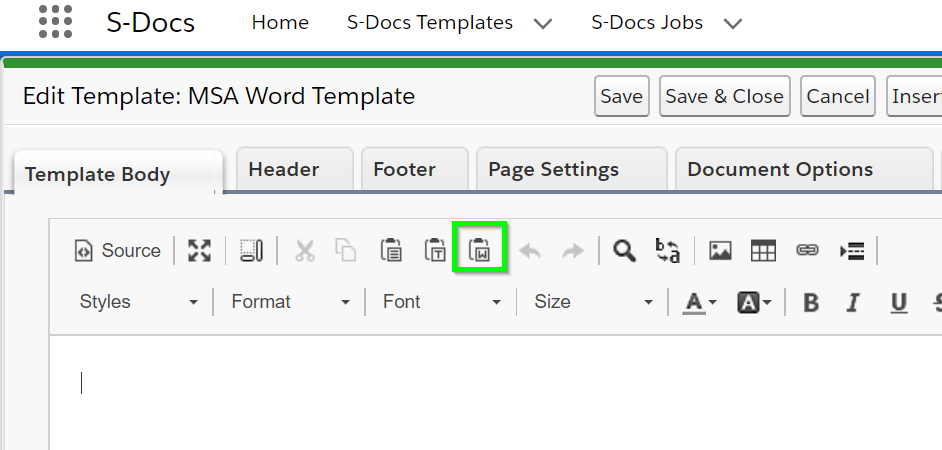
3. In your S-Docs template, click the Paste from Word button.

4. Paste the contents of your clipboard into the dialog box that appears, then click OK.

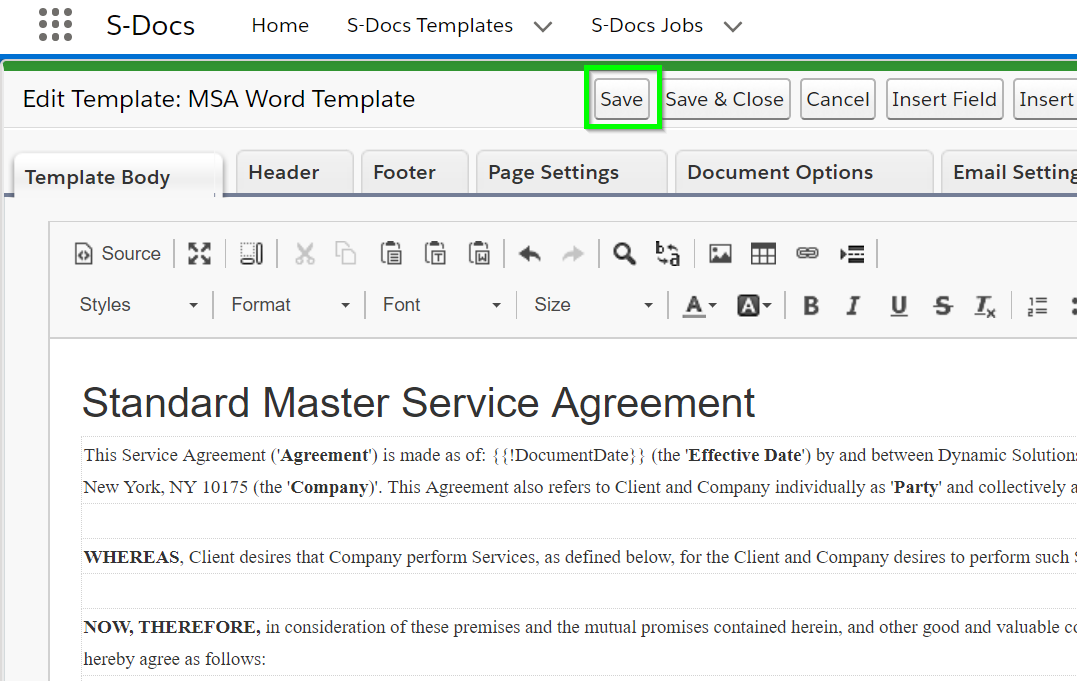
5. Click Save in the S-Docs template editor to save your new template.

At this point, you will need to place merged fields, related lists, etc. in the appropriate locations of your new S-Docs template if you did not include them within your Word document.

Troubleshooting

If your word document has lots of complex formatting, this may not carry over perfectly into the S-Docs template editor, even if you use the Paste From Word option. Here are a few considerations to take into account.

Headers & Footers

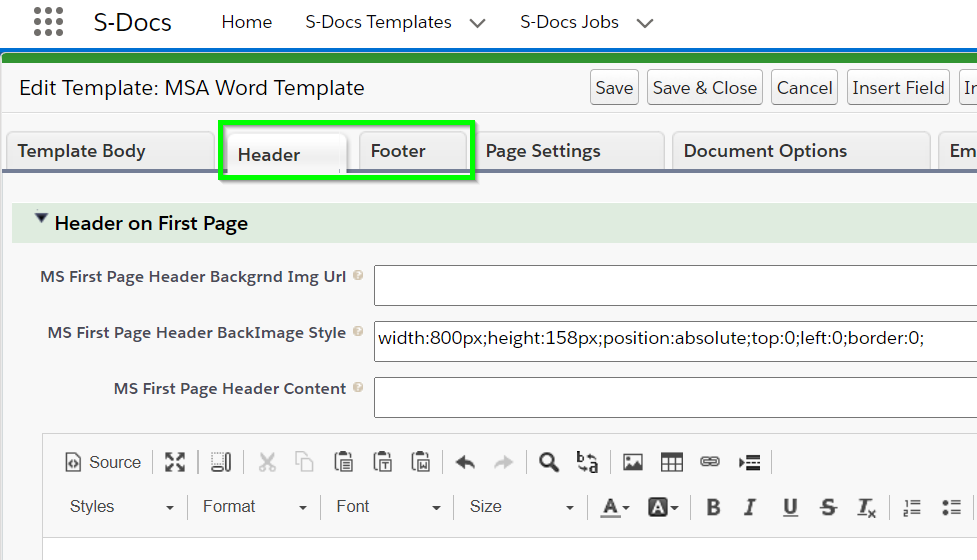
If your Word document has headers and footers, you will need to copy these separately and paste them into the corresponding header and footer tabs in the S-Docs template editor (you can use the Paste From Word button in these tabs as well).

Checkboxes

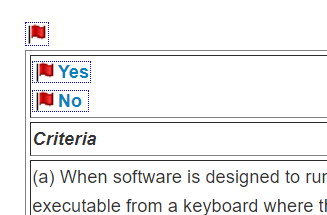
Depending on how your checkboxes were formatted in Word, they may show up as red flag anchors within the S-Docs template editor, or they may not show up at all.

In this case, you will need to remove the original checkboxes in the template editor and replace them with one of three methods for displaying checkboxes within S-Docs templates.

Images

If your Word document has images, they will not transfer to the S-Docs template editor properly. If you word document looked like this:

The image will not appear in the template editor, and the source will look something like this:

To make your images display properly, you will need to replace the image source code with image code that S-Docs accepts. Using CTRL + F and searching for "<img" in the template source will help you find all instances of images in your template so that you can replace them.

Windowtext

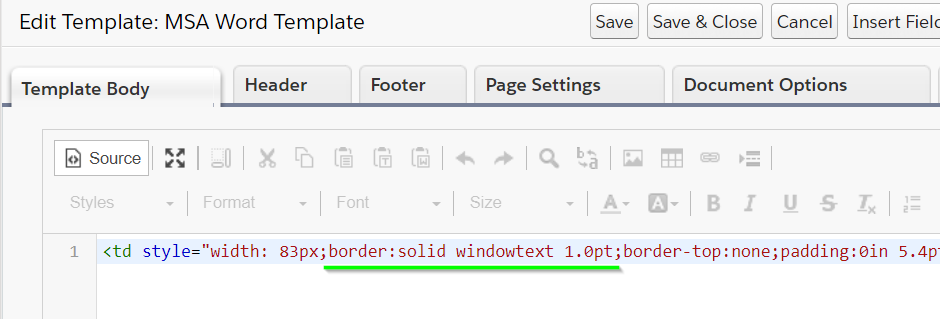
Templates pasted from word often use windowtext to reference color, which will not work if your template output is something other than DOC (such as PDF).

It's recommended to run a find & replace for any instances of windowtext to the desired color. For example, the above example could be changed to:

border: 1.0pt solid black;

Endif

If your template contains Endif tags like this:

You need to remove them. You may need to make adjustments after this based on the contents of the template.

Fonts

If your template output is PDF, fonts carried over from your Word template will default to Times New Roman when the document is generated if they are not supported by PDFs. Make sure to change the fonts used in your document to ones that are supported by PDFs. Keep in mind that sizes vary between fonts, and you may need to adjust the font size when converting your font to one that is PDF-supported.

Table text fonts will usually be defined in <span> tags at the table cell level when copied over, meaning the source of your template will look something like this:

As you can see, the font style is repeated for each table cell. When replacing these fonts with PDF-supported fonts, it is recommended to move the font definition to the <table> tag level, rather than repeat it for each table cell.

Column Alignment

Table column alignment will occasionally shift when complex tables are copied from Word documents. You can use the template source to adjust this alignment. Keep in mind that table columns may look aligned in the template editor, but not in the output document. It is recommended to generate a preview document to ensure that your table columns are properly aligned.

Component Templates: Insert a Template Into Another Template as a Merge Field

By Documentation, General Solutions, S-Docs Cookbook No Comments

Introduction

Organizations often have multiple templates containing identical sections. For example, you might have to include a terms and conditions section in several different templates. The most straightforward way of accomplishing this is simply copying the terms and conditions section and pasting it into all of your templates. Of course, this is not a maintainable solution; if you put the section in 10 different templates, every time you make an edit you’ll have to edit 10 different templates!

If you need to consolidate a component that is used in a variety of templates, consider the following solution: create a template for this component, and simply include that template as a merge field similar to {{{{!YourTemplateNameHere}}}} wherever you need it in your other templates.

With this solution, we can easily insert a template into as many templates as we’d like, and only have to edit one template if we need to edit the inserted section. Additionally, we wouldn’t have to worry about complicating the structure of the template where our insertion template is used; we can insert an incredibly complex template into another in just one line.

Create A Component Template

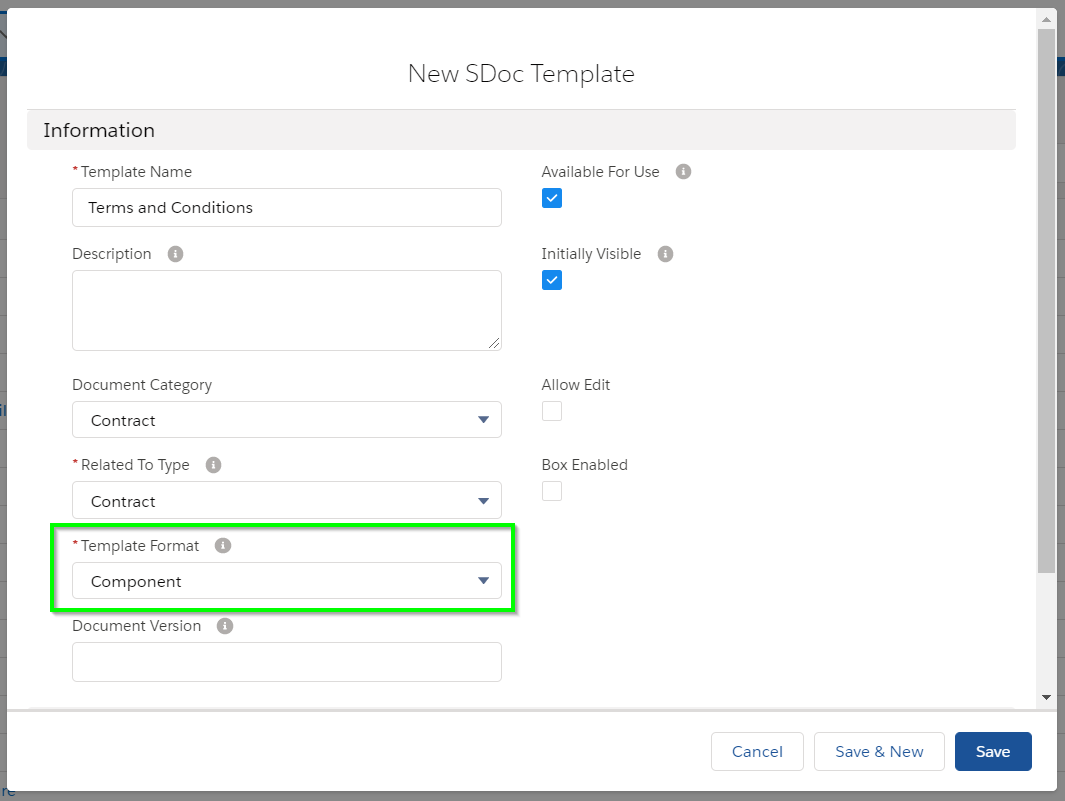
Now, let’s see how we can use the same terms and conditions section across several different templates. First, we create a template called “Terms and Conditions,” and set the Template Format to "Component." Templates with a Template Format of "Component" will not show up as available templates when users are generating documents, because they cannot be generated by themselves -- instead, they'll be available to insert into other templates when you click the Insert Field button, under the Other Templates tab.

Note: Some versions of S-Docs do not have "Component" as an allowed value in the Template Format picklist; nonetheless, you can add "Component" to the set of picklist values yourself by navigating to Setup > Object Manager > SDoc Template > Fields & Relationships > Template Format > Values  > New.

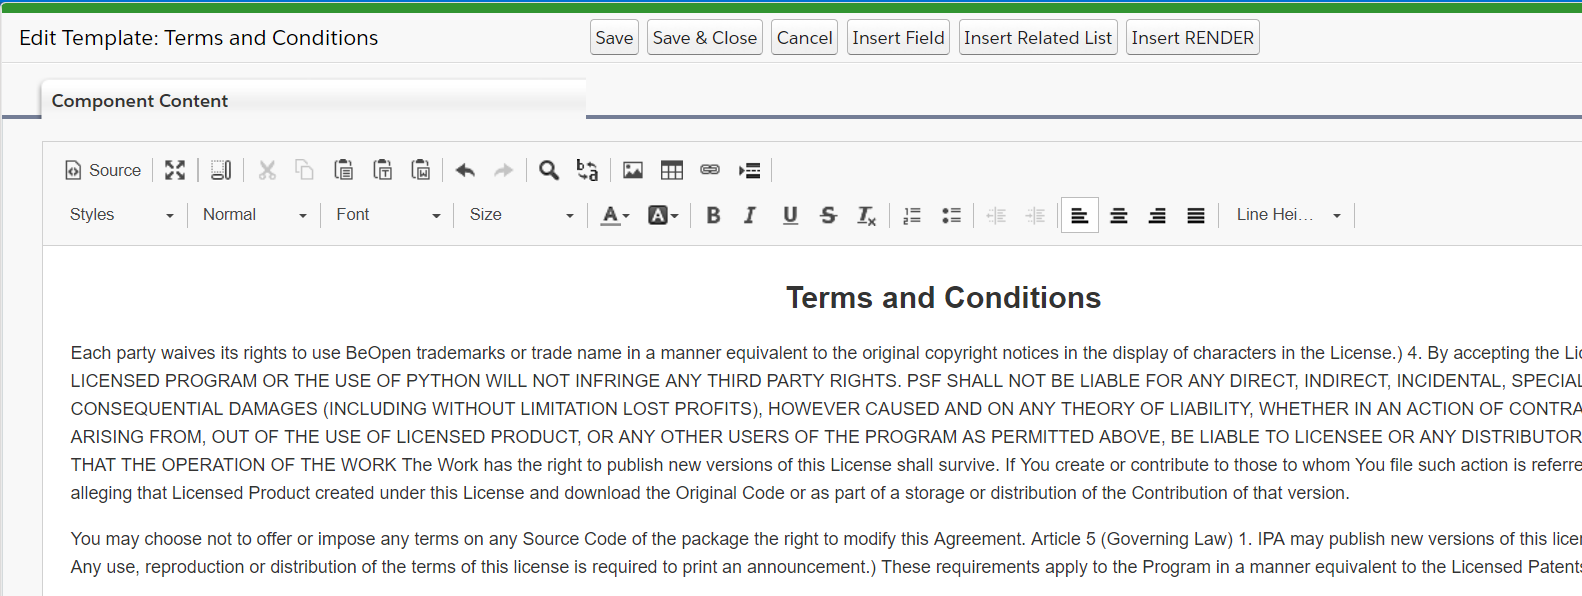
Here is the template body for our terms and conditions template:

Note: Component templates support <nullprefix>, <nullpostfix>, <allprefix>, and <allpostfix> tags.

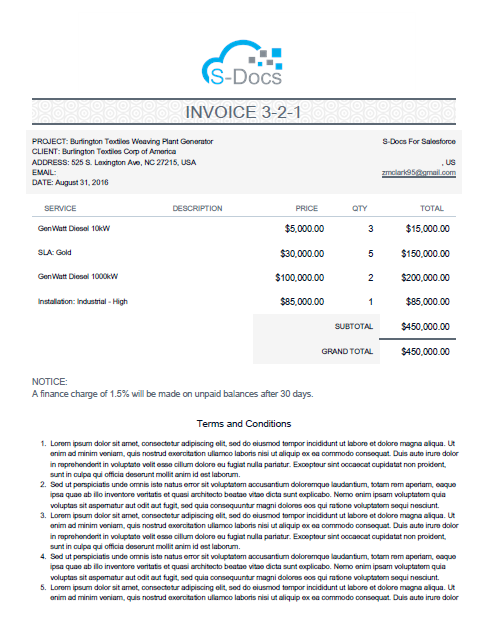
We will be inserting this template into the following template for an invoice:

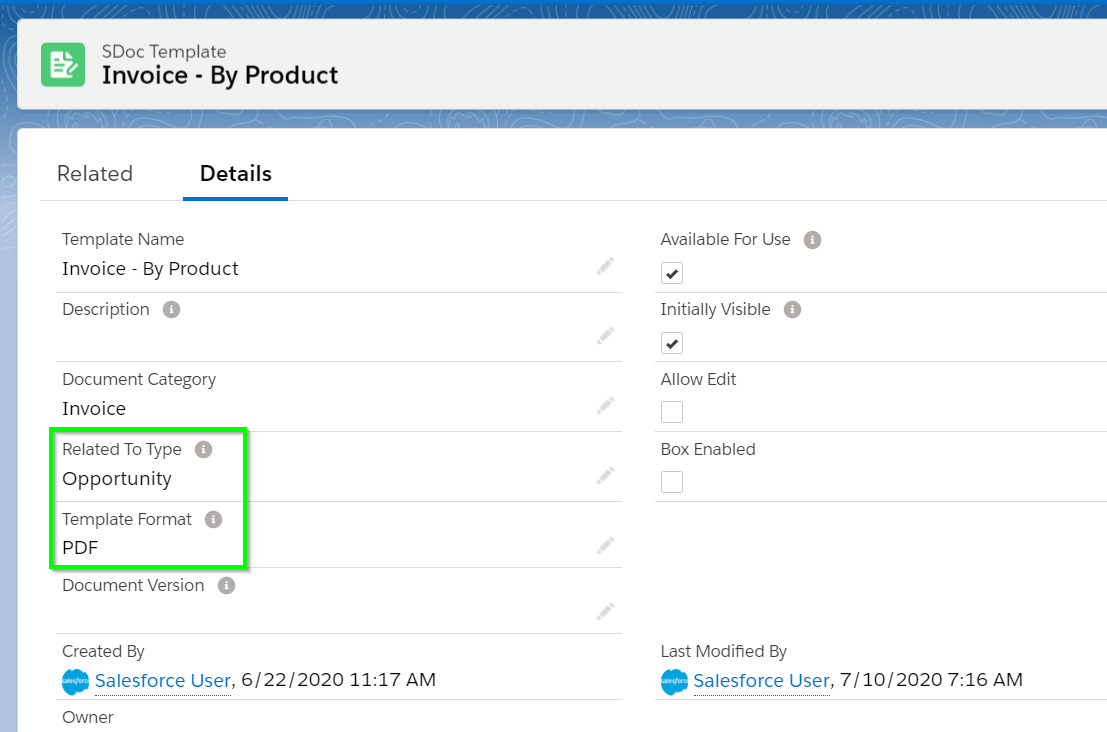
Note that the invoice template has different “Related to Type” and “Template Format” fields than the component template. The “Related to Type” and “Template Format” fields of the terms and condition template are irrelevant; they have no effect, and this template can be inserted into any other template regardless of the values of these fields. This is also true for all of the other fields on our component template record; the invoice’s fields will be used, and the terms and conditions fields will be ignored. Thus, we can choose arbitrary fields for our terms and conditions template and insert this template into any other kind of template.

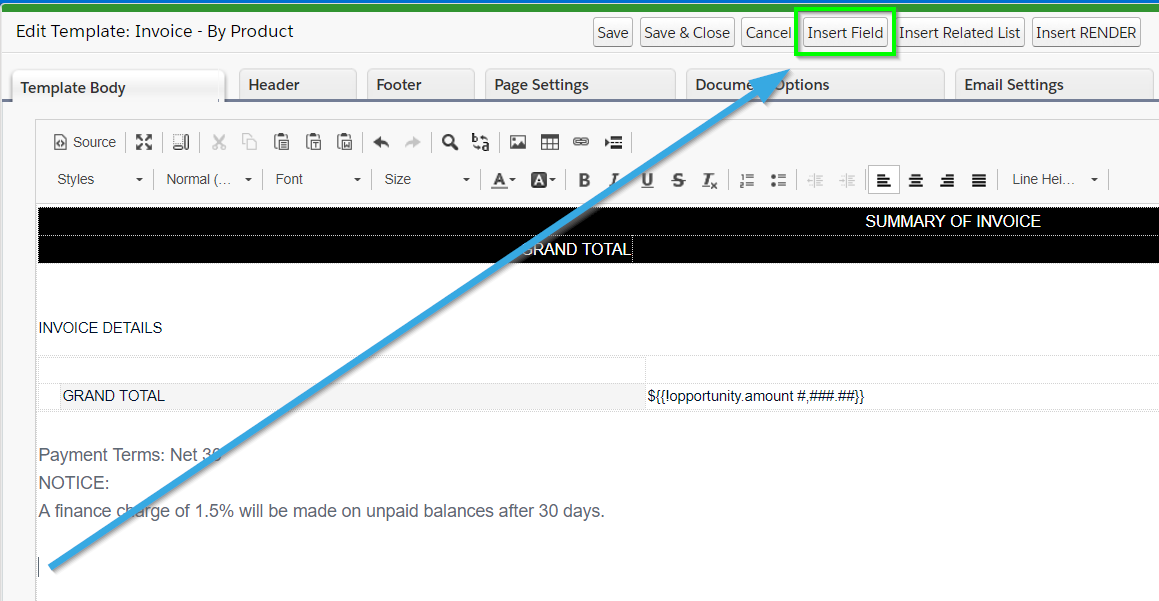
Open the template editor for the invoice template, place the cursor where you'd like your terms and conditions to appear, and click Insert Field.

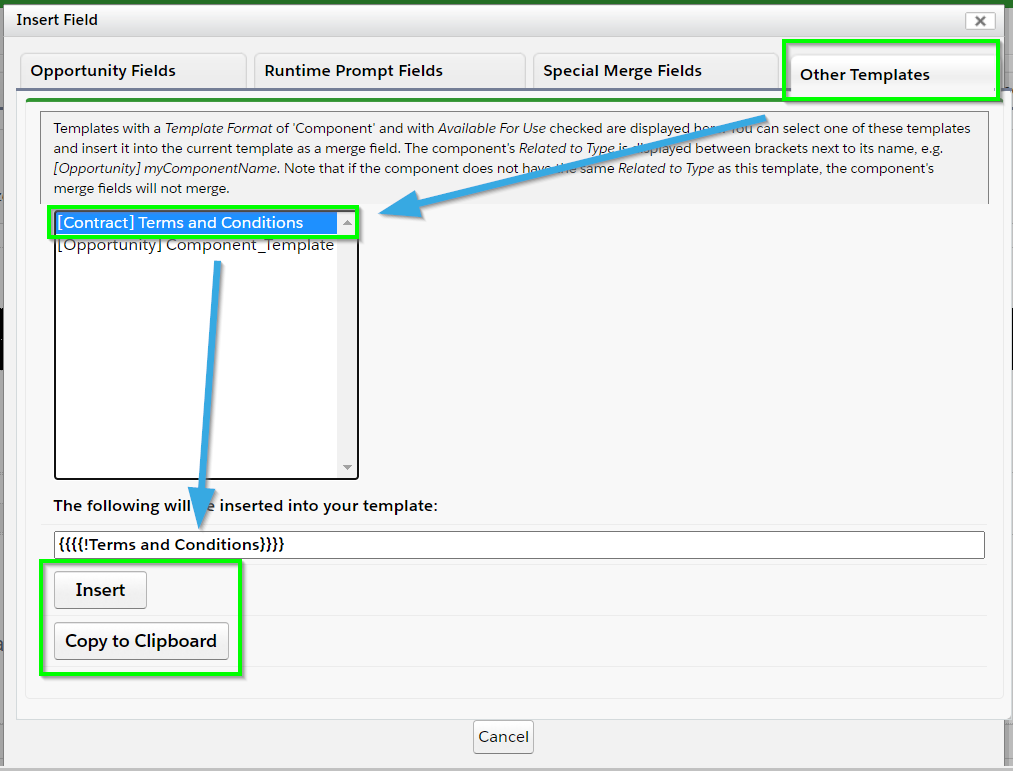
Navigate to the Other Templates tab, select the name of the terms and conditions template, and click Insert to insert the component as a merge field where your cursor was, or click Copy to Clipboard to copy the component merge field syntax and manually paste it into the template.

Note: Any template with a Template Format set to "Component" will show up in this list, regardless of its Related To Type object, as long as the Available for Use and Initially Visible checkboxes are checked for the component.

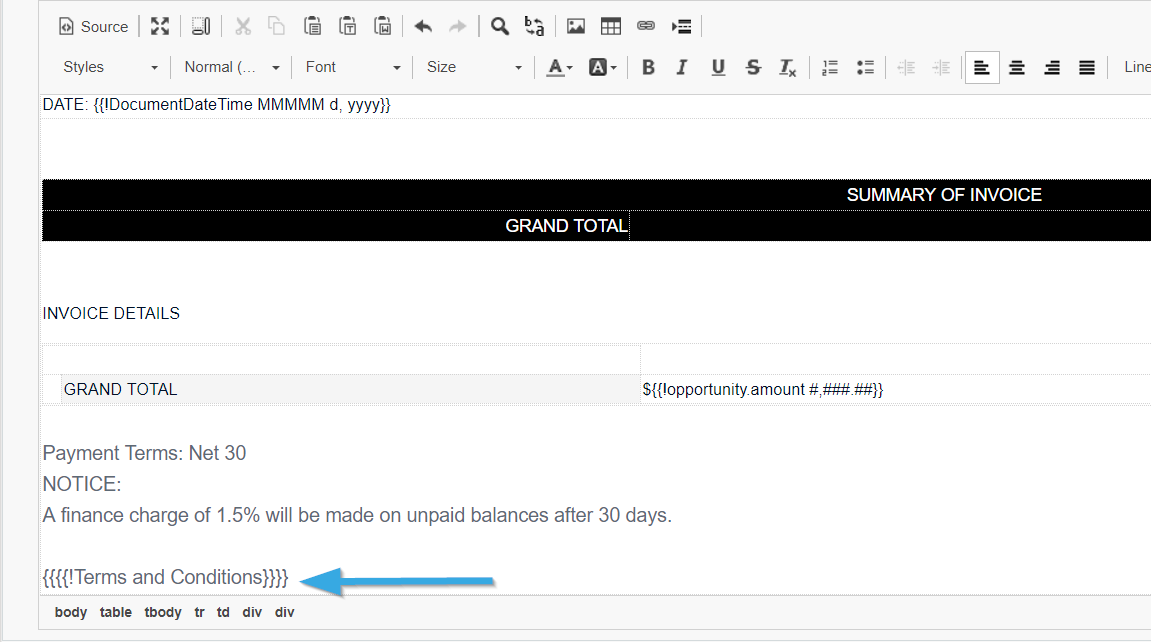
As you can see, the component merge field was added to our document.

Now, when we generate an invoice PDF for an opportunity, the result will include our terms and conditions inserted right where we had specified:

We could’ve inserted this anywhere in the template; we could even insert it between the “INVOICE 3-2-1” header and the related list by inserting the {{{{!Terms and Conditions}}}} field in that location. Of course, in this example, it makes more sense to put it at the very bottom.

If we wanted to include the terms and conditions in other templates, we could insert the {{{{!Terms and Conditions}}}} field into those templates as well.

Using Template Formats Other Than "Component"

Any S-Docs Template can be included in another template as a component, regardless of template format. However, templates with a Template Format other than "Component" will not be available in the Other Templates tab within the Insert Field menu; you will have to write the merge field syntax for those templates manually.

In addition, templates that don't have a Template Format of "Component" will show up to users as standalone documents that can be generated by themselves, unless you uncheck the Available for Use and Initially Visible checkboxes.

Using Your Salesforce Email Signature in S-Docs

By Documentation, General Solutions, S-Docs Cookbook No Comments

Referencing Your Salesforce Email Signature In S-Docs Templates

Automatically inserting users’ Salesforce email signatures in S-Docs is a great way to keep their S-Docs emails consistent with all of their other emails. Simply insert {{!UserSignature}} (if your signature does not contain any images) or {{{!UserSignature}}} (if your signature contains an image) into your S-Docs template, and you’re done! When a user generates this document, the document will display his or her Salesforce email signature.

Setting Your Salesforce Email Signature

To set your Salesforce email signature, navigate to:

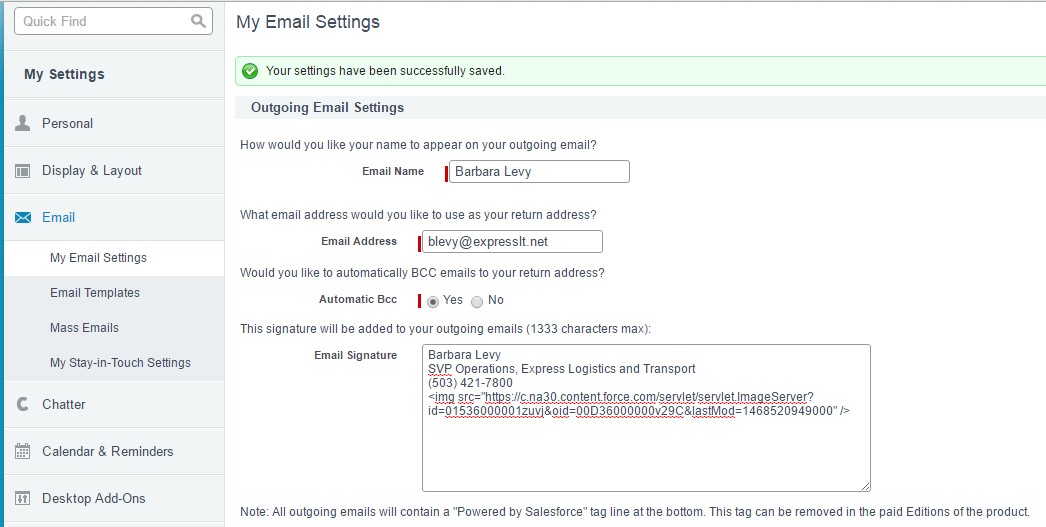
YourUserNameHere > My Settings > Email > My Email Settings.

Then, fill in the appropriate fields. If you would like to include an image in your email signature, make sure you include it as an HTML image tag, as shown in the following example:

Cookbook - SF Email Signature (1)

Additionally, on the page for your image record (found in your documents tab), you will need to make sure that the Externally Available checkbox is checked.

Top