All Posts By

S-Docs Team

Translate The S-Sign UI

By Documentation, S-Sign No Comments

Defining Your Own Translations

Translating the user experience of S-Sign is simple. Currently, only Spanish and German translations are available to download; this process is explained in the section below. If you want to define your own translations, you can do so on the S-Sign translation page. If you are using S-Docs 4.381+, navigate to this page by clicking the App Launcher, typing in "S-Docs Setup," and clicking S-Docs Setup in the dropdown menu. From there, scroll down to the Translate UI section and click Go To S-Sign UI Translation Page.

If you are using a version of S-Docs below 4.381, the S-Sign Translation page can be accessed by adding the following URL after "salesforce.com" in your browser:

[code lang="html"]/apex/SDOC__SDConfig?translateSSign=true[/code]

The S-Sign Translation page appears as follows:

If you've defined translations for a language on this page before, you'll be able to [1] choose a language and [2] edit the translations for that language. If you haven't accessed this page before, you'll need to [3] enter the name of a language and then [4] click Define new translations for this language to bring up a list of available S-Sign fields that you can translate.

[1] The English version of each S-Sign field that can be translated appears on the left. You can translate the text in the text box on the right. Make sure to [2] click Save when you are done entering your translations.

Using S-Docs Translation Templates

1. Import The Template

To use the translations we provide, begin by importing either the Spanish or German translation template. To do this, create a new template. You can set whatever values you want for "Related to Type" and "Template Format," as these will be overwritten when you import the translation template.
Next, navigate to the template editor and paste in the code from one of the links below, then click Save & Close.

Spanish: S-Sign Translation Spanish v1.960
German: S-Sign Translation German v1.960

Once you click Save & Close, the template record should look like this.

Notice that Available for Use and Initially Visible have been unchecked, since this isn't a template that can be used for document generation; it's simply providing the translation for the S-Sign user experience.

2. Add The Translate Parameter to Your S-Docs Button

Note: The S-Docs button comes prepackaged for the following standard objects: Contract, Opportunity, Account, Contact, Lead, Task, and Event. Because of this, the button will be managed and therefore unable to be edited for these objects. You will need to create a new S-Docs button (and replace the old button on the object's page layout) to make edits.

Next, you need to add the following parameter to the S-Docs button you will be using with S-Sign (replace Spanish for German if using the German translation):

[code lang="html"]ssignParams='language:Spanish'[/code]

In this example, we'll add it to the S-Docs button for the Contact object. Navigate to Setup by clicking the cog in the upper right of your screen, then go to the Object Manager tab. Click your object.

Then, navigate to the Buttons, Links, and Actions tab. Find your S-Docs button and click Edit.

Add the parameter to your button.

[code lang="html"]{!URLFOR('/apex/SDOC__SDCreate1', null,[id=Contact.Id, Object='Contact',
ssignParams='language:Spanish'])}[/code]

Click Save, and you're all set! The S-Sign user experience will now be translated.

Setting Language on a Per-Document-Envelope Basis

You can also set the S-Sign language for individual document envelopes through the SSIGN__Language__c field. When building automation using the S-Docs Job object in conjunction with Salesforce Process Builder or Apex, set the S-Doc Job field SSign Language to your chosen language. This will cause the S-Doc Job record to set the S-Sign Envelope Document field SSIGN__Language__c to that language.

S-Sign Features: Validation Rules & Write Data Back to Salesforce

By Documentation, S-Sign No Comments

Introduction

S-Sign excels when it comes to sending and receiving e-signature requests, but it can do much more than just accept signatures. By utilizing the template editor, you can add a variety of different text fields and checkboxes to your S-Sign documents to capture user input like title, department, phone number, or any number of things that fit your organization's needs. Once the user fills these fields in, the data will be automatically written back to Salesforce, and the appropriate fields on the base record will be updated.

Additionally, S-Sign will automatically run your Salesforce validation rules and display your error messages directly on the document(s) users are signing. This is useful when there are certain field values that you want to restrict users from inputting.

Creating a Sample Validation Rule

To showcase these features, we will start by creating a validation rule that prevents individuals from entering a title of "Finance" and a department of "Marketing," but S-Sign will run any validation rules you have in place. You'll see this in action later. There is no configuration necessary for S-Sign to run your validation rules; this happens automatically.

Writing User Input Back to Salesforce - Configuration

Now that we have written our validation rule, we will showcase how S-Sign writes data back to Salesforce fields based on what users input into your e-signature documents.

In this example, we will send a purchase agreement to a contact in Salesforce. Note that the contact’s title is “Financial Manager” and their department is “Financial Services” in the Salesforce contact record. These are the fields that will be updated when the contact signs the document and enters their information. To begin, there are a few configuration steps we need to take.

Step 1: Edit Your S-Sign Site's Public Access Settings

First, you will need to edit the Public Access Settings of your S-Sign Site (The site you set up when you first installed and configured S-Sign). To do this, click Setup in the upper right corner, then type "Sites" into the "Quick Find/Search" bar. Click Sites (under Build > Develop) from the list that drops down.

From there, click S-Sign Site under "Site Label."

Click Public Access Settings.

Click Edit at the top of the page.

Scroll down to "Standard Object Permissions" and check the Read and Create boxes for the base object of your S-Sign template(s) (in this case, we're using the Contact object).

Click Save. You will be taken back to the Public Access Settings page. Scroll down to "Field Level Security" and click the View link next to the base object of your S-Sign template(s) (Contact in this case).

On the next page, click Edit and check the boxes for Read Access and Edit Access for all of the fields that you want S-Sign to write data back to.

Click Save. This concludes part 1.

Part 2: Associate S-Sign Fields to Salesforce Fields

Now that you've given S-Sign permission to write user input back to your Salesforce records, you must now associate S-Sign input fields to the Salesforce fields that they will write data back to. This is done in the S-Docs template editor. To begin, navigate to the template editor by clicking on All tabs (“+” symbol). Click on S-Docs Templates, choose your template, then click Template Editor. To learn how to create S-Sign-enabled templates, click here.

In our purchase agreement, we’re going to include three fields: a signature field where the user can sign their name, and two text fields where the user can enter their title and department. We do this by adding three S-Sign fields into the document. We set the type of field 1 to Signature, and the types of fields 2 and 3 to Text.

Since field 1 is just a signature, it is ready to go: we simply copy the S-Sign Field tag and paste it into our template wherever we want the recipient to sign.

We will now associate text fields 2 and 3 to specific Salesforce fields; this will enable S-Sign to write the data back to Salesforce and update the contact record when the user fills in their information. To do this, we click Insert Field at the top of the template. This will bring up a list of numerous fields to choose from. Select the field you want, then click Copy to Clipboard.

Next, we paste this merge field into the Write signer input to the following field in Salesforce field in the S-Sign menu. From there, we can copy the S-Sign Field tag and insert it wherever we want. It will now write user-inputted data back to the appropriate Salesforce field.

This step is repeated for however many fields are desired. After we save this template, it is now ready to be sent to our contact to be signed. To learn how to send e-signature requests with S-Sign, click here.

Let's See it in Action

Once the recipient receives your S-Sign request and opens the document, they can enter their information and sign. Here’s where the validation rule comes into play. If they enter values not allowed by your validation rule, they will see the error message you wrote.

However, if the recipient enters their information correctly, they will be able to submit the signed document.

Notice that this user input “SVP Finance” into the Title field and “Finance” into the Department field. These values differ from what was previously written in the Salesforce contact record for this person (“Financial Manager” for title and “Financial Services” for department). As you can see, S-Sign automatically updated these fields in Salesforce when the user signed the document. No manual updates needed!

Use S-Sign To Send A Document To Multiple Signers For E-Signature

By Documentation, S-Sign No Comments

There are many instances where multiple people need to sign a single document. Fortunately, S-Sign provides this capability! This article will explain how to configure S-Sign for multiple signers in Salesforce Lightning Experience.

Create an S-Sign Enabled Template

Start by creating a new S-Docs template. We'll call our example template "Loan Agreement." If you are working with a pre-existing S-Sign enabled template, you can skip this step.

Click Save, and then open the S-Docs template in the S-Docs Template Editor.

To enable S-Sign for this template, navigate to the Advanced Options tab and check the Enable S-Sign checkbox. The S-Sign panel will appear on the left, and allow you to edit the options associated with this S-Sign template.

Create Signer Profiles in the S-Sign Settings Menu

Signer profiles allow you to define the email address of each signer, the order in which they will receive and sign the document, and whether or not each one receives a copy of the audit record after the document has been finalized. To learn more about these settings, please visit our S-Sign Template Settings article.

The Signer profiles menu is located in the S-Sign panel to the left of the template editor. By default, S-Sign provides you with two profiles: Signer 1 and Signer 2. In our example, we have renamed our profiles to "Borrower" and "Lender." You can create additional profiles here as well, though we'll just stick with two profiles in this example.

Next, we will associate emails to the two profiles. You can either type in each signer's email address directly, or use merge fields to dynamically populate the email address field based on the record that this document is generated from.

Previously, we created custom fields on our template's base object (Contract) to determine the email addresses that will be assigned to each profile. Our two custom fields are Lender email and Borrower email. To pull data from these fields, first click Insert Field in the template editor.

This will show all available fields to pull data from on the contract object. Search for your custom fields and click Copy to Clipboard.

You can then paste them into the "Email Address" field in the signer profile menu. As we mentioned before, you can also specify the order in which the users will receive the E-Signature request; in this example, the Borrower will receive the request first since the Borrower's Signing Order is "1," and the Lender will receive the request after the Borrower has signed the document since the Lender's Signer Order is "2."

Associating S-Sign Fields to Specific Signer Profiles

The next step is associating S-Sign fields to the appropriate signer profiles. Click over to the S-Sign Fields tab in the S-Sign settings menu. S-Sign provides you with a single S-Sign Field by default. In this example, we created 3 S-Sign fields for each signer: signature, checkbox, and text (6 fields total).

We can then edit, copy, and paste our S-Sign Fields into the template body:

Each signer will only be able to interact with the fields that are assigned to their profile.

Emailing The Document

After saving your template, users can generate documents using this template and an S-Sign-enabled HTML email template and then send those documents for e-signature. The email page will inform the end user of the routing logic that will be used in the emailing:

What Signer 1 Sees

Signer 1 (the "Borrower" in our example) will be emailed the document first. When they click the S-Sign link in the email, they will be asked to verify their identity (if enabled for that template) and will be informed of the email routing logic.

Once Signer 1 has verified their identity (if required), they will be able to provide values for their assigned S-Sign Fields (the checkbox, text field, and signature), but NOT for the S-Sign Fields assigned to Signer 2 (the "Lender" in our example). Signer 1 can use the Previous and Next buttons to navigate through their assigned inputs.

Here is an example of input provided by Signer 1 (the "Borrower"):

Once Signer 1 (the "Borrower") submits their responses, the document will be emailed to Signer 2 (the "Lender"), and Signer 1 (the "Borrower") will see the following screen:

What Signer 2 Sees

When Signer 2 (the "Lender") opens the e-signature request, they will see previous signer's responses merged into the document.

Signer 2 (the "Lender") can then provide their input:

Signer 2 (the "Lender") will see the following page once they have submitted the signed document, and the signed document will be sent to Signer 1 (the "Borrower"), Signer 2 (the "Lender"), and the Salesforce user who originally sent the e-signature request.

The final signed document from our example will appear as follows:

By scrolling down, the audit trail for the document can also be viewed.

That's it! You are now ready to send e-signature requests that require multiple signers.

Upload Templates From Microsoft PowerPoint With The PPTX Feature

By Documentation No Comments

S-Docs enables users to efficiently upload .pptx files using the PPTX feature. Much like the DOCX feature, uploading a .pptx file allows you to import pre-existing PowerPoint templates.

Adding PPTX to the Template Format Picklist

Before we get started, we need to add the PPTX value to the Template Format picklist. To do this, nagivate to Setup > Build > Create > Objects and click SDoc Template.

Within the Custom Fields & Relationships related list, click the name Template Format.

Next, scroll to the Values relate list and click New.

Write “PPTX” and click Save. PPTX is now a value on your Template Format picklist!

Generating PPTX Files Via S-Docs

Similar to generating a DOCX document, create a new S-Docs template. Click on the Template Format dropdown menu and choose PPTX.

Next, head to the Template Editor, like we would with any other template. With the PPTX feature, all you have to do is upload your .pptx template file that you’ve already created.


Let’s start by putting a merge field into our template. In the Template Editor, click Insert Field.

Select a merge field. Rather than inserting the field into the typical source code editor, you will click the Copy to Clipboard button and paste it in your PowerPoint.


You can also add related lists to PPTX templates. To do this, click Insert Related List in the template editor, choose the columns that will appear in your related list, click the Get Related List tab in the Insert Related List window, and paste the related list into the first cell of a table in your PPTX template. Type in your headers and leave a second row beneath your pasted related list code. When you generate the document, S-Docs will retain this table's formatting and add data to it.

Once you’ve pasted all the necessary merge fields and related lists into your PPTX template, save your file and return to the Template Editor. Select Choose File and upload the PowerPoint you have been working with. After selecting the file, you will see a message indicating that your file is uploading. In a matter of seconds, your template will successfully upload.

Congratulations! You can now generate your PPTX files using your S-Docs template.

Limitations of PPTX Documents in S-Docs

  • Related list tables cannot span multiple pages. You can use LIMIT and OFFSET in your SOQL query.
  • PPTX templates have a limit of approximately 10 slides when uploaded to the template editor.
Note: For information on PPTX and DOCX syntax, refer to the syntax portion of the DOCX article.

Using S-Sign to Send Multiple Documents

By Documentation No Comments

S-Sign allows you to send multiple documents in a single e-signature request. This document will teach you how to configure and send S-Sign requests with multiple documents. 

Add The SSMultiSign VisualForce Page To Your Site

To send multiple documents, go to your S-Sign Site settings and add the VisualForce page SSMultiSign to the list of VisualForce pages for the site (if you didn't do so while configuring S-Sign): Setup > Build > Develop > Sites > [Your S-Sign Site].

Scroll down to Site Visualforce Pages​ and click Edit.

Add the page SSMultiSign to your site's Visualforce Pages to enable this feature.

You can now select multiple documents to generate for e-signature.

Note: All documents must be S-Sign enabled. Additional attachments (non-S-Sign or pregenerated documents) are not supported with S-Sign emails at this time.

What The Signer Sees

The signer will be informed that there are multiple documents to sign when they click the S-Sign link in the email that they receive.

Once they sign the first document, all they need to do is click Submit like normal.

They will then be able to sign the next document by clicking anywhere on the screen.

Once they've signed all of the documents, they will receive an email that contains all of the signed documents. That's all there is to it!

Generate And Attach A New Document To Your Current Email

By Documentation, General Solutions, S-Docs Cookbook No Comments
S-Docs allows you to generate and attach new documents to your current email right from the email page in Salesforce. This is useful if you forgot about certain documents you wanted to send but don't want to exit the email page and start all over.

Add The GenAtEmail Parameter To Your S-Docs Button

To enable the ability to generate and attach new documents to your current email, all you have to do is add the  GenAtEmail='true' parameter to the S-Docs button for your object.

Use The Generate New Documents Button

After adding the GenAtEmail parameter to your S-Docs button, you'll see a Generate New Documents button appear on the email page whenever you click the S-Docs button that you edited. You can click it to select more documents to generate and automatically attach to your current email.
Note that the S-Docs button comes prepackaged for certain standard objects, such as the Contact object in the example above, and that this button cannot be edited. If you wish to enable the Generate New Documents on Email Page feature for these objects, you will need to create a new custom S-Docs button and add it to your page layout, and remove the prepackaged button from the page layout (if it's already there). Visit the Quick Install & Configuration Guide to learn about how to create an S-Docs button.
For information about other apex parameters that you can use to modify your S-Docs button, click here.

The Template Editor “Insert Conditional Logic” Button

By Documentation, General Solutions, S-Docs Cookbook No Comments

Introduction

S-Docs allows you to easily leverage conditional logic within your templates using the Insert Conditional Logic button. You can insert conditional statements with the click of a button in the WYSIWYG template editor without any HTML code. Watch the video below for a quick tutorial, or refer to the written instructions under the video.

Video Tutorial

Use The Insert Conditional Logic Button

Go to the template for which you would like to add conditional statements, and click the Insert Conditional Logic button.

Using this button, you can add a variety of conditional statements into your template.

The Insert Conditional Logic Menu

This is the Insert Conditional Logic menu. Using this interface, we will build our conditional statement by simply pointing and clicking, and then enter the content that will be conditionally rendered based on our conditions. Let's start with step 1: Select your conditions.

Start by [1] selecting a field. This picklist will let you choose from any field available on your template's base object. Then, [2] choose your operator. You can choose from equal-to, not-equal-to, greater-than, less-than, greater than or equal to, less than or equal to, contains, and not contains. Next, [3] choose the field value that you want your statement to evaluate. Then, [4] add the condition to the conditional statement.

Your condition will [1] be added to the conditional statement below. After you add your first condition, you can [2] add additional ones using AND/OR. Once your conditions are added into Step 2, you can edit them manually by simply clicking within the text box. After completing your conditional statement, you can move on to Step 3 to enter your conditionally rendered contents.

As you can see here, we've [1] finished our conditional statement, which will evaluate whether or not this contact has mobile and business phone information available. Now it's time to tell S-Docs what to render if the statement evaluates to true. To make this easier, you can [2] select fields from your object to include in your conditionally rendered contents. When you select a field, [3] the merge field syntax will be added to the text box underneath the field picker. Click Add Field to [4] add the merge field into the bottom text box, which contains the content that will be conditionally rendered if your conditional statement evaluates to true. As you can see here, if a contact has both a mobile and business phone on record, the document will include a small paragraph that provides this information.

Once you finish entering your conditionally rendered contents, click Insert. The template editor will format your conditional statement in the correct syntax, as follows:

[code lang="html"]<!--RENDER= '{{!Contact.mobilephone}}' != 'NULL' && '{{!Contact.phone}}' != 'NULL' -->
This contact has phone information available. Their mobile number is {{!Contact.mobilephone}} and their business number is {{!Contact.phone}}.
<!--ENDRENDER-->[/code]

From here, you can continue formatting your document however you like, or edit the conditional statement itself. For more information on conditional logic within a template and nested conditional statements (including writing conditional statements yourself), click here.

Note: If any fields in your conditional statement contain words and have a field type anything other than a basic string type (rich text, textarea, longtext, function, etc.) you will need to add the merge field attribute render. For example, if your merge field looked like this: {{!MyTestField}}
The field with the attribute added would look like this: {{!MyTestField render}} Within a conditional statement, it would look like this:
<!--RENDER= '{{!MyTestField render}}' == 'Test' -->{{!Opportunity.closedate M/d/yyyy}}<!--ENDRENDER-->
Note that this attribute should only be added to merge fields within render tags (e.g. enclosed by <!-- and -->). In the above example, the attribute is not added to the {{!Opportunity.closedate M/d/yyyy}} because this merge field is outside of the render tags (e.g. not used as a condition in your conditional statement).
Additionally, note that the Insert RENDER button will not add this attribute automatically. This functionality was added in version 4.48

Add Custom Filters When Selecting Your Templates

By Documentation, General Solutions, S-Docs Cookbook No Comments

Create A New S-Doc Relationship

S-Docs makes sorting through your templates easier by allowing you to create custom filters.

In this example, the filter we're creating is a picklist that will help us sort through templates by region. This can be done by creating a new S-Doc Relationship. You can learn more about custom relationships here.

When you reach the third step of creating your object, make sure to check the Visible checkbox.

Create A New S-Docs Button

Once you finish creating your relationship, proceed to making your new custom button. Be sure to check Detail Page Button, and choose Display in existing window without sidebar or header for its behavior. Append  AdditionalFields='Region__c', to your button's apex command. You can learn more about creating custom objects, such as buttons, here.

{!URLFOR('/apex/SDOC__SDCreate1', null,[id=Task.Id, Object='Task',
AdditionalFields='Region c'])}


Add the button to your page's layout. Since we named this button S-Docs, it can replace the previous S-Docs button on your page's layout.

Now, click your S-Docs button and see your picklist at work!

Merge External Data Into Your Documents

By Documentation, General Solutions, S-Docs Cookbook No Comments

Merge in External Data: XML Strings

To merge external data (in the form of an XML string) into an S-Docs document, you can create an S-Docs Job record and write the external data to the S-Docs Job record. You can then reference the XML data values as merge fields in your template.

For example, if you have {{!MyXXXField}} in your template and you write <MyXXXField>Tutorial</MyXXXField> to the S-Docs Job, you will see "Tutorial" in your generated document.

Nested XML Tags

This feature also supported nested XML tags, with the * character used as a delimiter between each level:

[code lang="html" highlight="1,19,25"]XML STRING
<aaa1>
<bbb1>
<ccc>test1</ccc>
</bbb1>
<bbb2>
<ccc>test2</ccc>
</bbb2>
</aaa1>
<aaa2>
<bbb1>
<ccc>test3</ccc>
</bbb1>
<bbb2>
<ccc>test4</ccc>
</bbb2>
</aaa2>

TEMPLATE
Field 1: {{!aaa1*bbb1*ccc}}
Field 2: {{!aaa1*bbb2*ccc}}
Field 3: {{!aaa2*bbb1*ccc}}
Field 4: {{!aaa2*bbb2*ccc}}

GENERATED DOCUMENT
Field 1: test1
Field 2: test2
Field 3: test3
Field 4: test4[/code]

Apex Code

You can also use this feature in your Apex code (for example, in an Apex class that does a webservice callout to retrieve the XML data string). In your Apex code, you can use the function SDBatch.writeRecordDataXML(SDJob__c sdjob, String xml) to write the XML string to an S-Docs Job record (this will store the XML string in the S-Docs Job's SDOC__RecordDataXML__c field, as well as the SDOC__RecordData2XML__c field if the string is too large to fit in the first field alone). For example:

[code lang="html"]String xmlData; // Your XML data goes here
SDOC__SDJob__c sdjob = new SDOC__SDJob__c(
SDOC__ObjAPIName__c='Opportunity', // Object API Name
SDOC__OID__c='006000000018HK6', // Object ID
SDOC__Doclist__c='a15000000012GQ2', // Template ID
SDOC__Start__c=true // Generate document upon insertion of S-Docs Job
);
SDBatch.writeRecordDataXML(sdjob, xmlData); // Write XML Data to S-Docs Job record
insert sdjob;[/code]

Given that you've configured your template to use merge fields referencing the XML data values, this code should generate a document that has your XML data merged into the specified locations.

Merge in External Table Data

You can also merge in external table data into your S-Docs documents. This involves formatting your external table data into an XML string and using Apex code to pass that string into an S-Docs Job record. This will allow the external table data to populate a table within an S-Docs document. Let's take a look at an example to see how this works.

Note: You can also merge XML table data into your documents synchronously via callable apex. Learn more here.

First, we built out a table within the S-Docs template editor that includes three columns -- one for product name, product description, and product code -- information that we'll assume is currently stored outside of Salesforce. Here's the source code for our table:

[code lang="html"]<img src="data:image/gif;base64,R0lGODlhAQABAIAAAAAAAP///yH5BAEAAAAALAAAAAABAAEAAAIBRAA7" data-wp-preserve="%3Cstyle%20type%3D%22text%2Fcss%22%3Etable%0A%20%20.table499%20%7Bborder%3Asolid%20black%201px%3B%20border-collapse%3Acollapse%3B%20border-spacing%3A0px%3Bfont-family%3AArial%20Unicode%20MS%2CArial%2CHelvetica%2Csans-serif%3B%20font-size%3A10pt%3B%20width%3A100%25%20%7D%0A%20%20.table499header%20%7Btext-align%3Acenter%3Bfont-weight%3Abold%3Bborder%3Asolid%20black%201px%3Bcolor%3A%23FFFFFF%3Bbackground-color%3A%23000000%3B%7D%0A%20%20.table499footer%20%7Btext-align%3Aright%3Bfont-weight%3Abold%3Bborder%3Asolid%20black%201px%3B%20height%3A%2030px%7D%0A%20%20.table499RowEven%7Bborder%3Asolid%20black%201px%3B%7D%0A%20%20.table499RowOdd%7Bbackground-color%3A%23cdcdcd%3Bbackground-color%3A%23a8a8a8%3Bborder%3Asolid%20black%201px%3B%7D%0A%20%20.table499col0%2C%20.table499col1%2C%20.table499col2%20%7Bborder%3Asolid%20black%201px%3Btext-align%3Aleft%3Bfont-weight%3Anormal%3Bfont-size%3A12pt%3Bfont-family%3AArial%2C%20Helvetica%2C%20sans-serif%3B%7D%0A%3C%2Fstyle%3E" data-mce-resize="false" data-mce-placeholder="1" class="mce-object" width="20" height="20" alt="&lt;style&gt;" title="&lt;style&gt;" />
<table cellpadding="4" cellspacing="0" class="table499">
<thead>
<tr>
<th class="table499header">Product Name</th>
<th class="table499header">Product Description</th>
<th class="table499header">Product Code</th>
</tr>
</thead>
<tbody><!--{{!
<LineItems>
<class>table499</class>
<listname externalList="true">products</listname>
<column>productname</column>
<column>productdescription</column>
<column>productcode</column>
</LineItems>
}}-->
</tbody>
</table>[/code]

As you can see, we've included some styling CSS within the <style> tags, and then defined our three table columns within <th> tags. Next, we added a LineItems statement within the <tbody> tags -- this statement will use your XML string to populate the table. Note that the <listname> tags include the externalList="true" attribute to denote that we will be merging in external data.

To ensure that our external table data will merge in correctly, we first need to format it into an XML string. You can write Apex code to format your table data into XML that follows the format below. Each product record includes one XML tag for each table column (in our example, 3 per record), and is enclosed within parent tags that have the same name as the <listname> in our S-Docs template.

[code lang="html"]<products>
<productname>Apple</productname>
<productdescription>Red fruit</productdescription>
<productcode>4016</productcode>
</products>
<products>
<productname>Banana</productname>
<productdescription>Yellow fruit</productdescription>
<productcode>4011</productcode>
</products>
<products>
<productname>Pear</productname>
<productdescription>Green fruit</productdescription>
<productcode>3012</productcode>
</products>[/code]

Once your external table data is formatted correctly, the last step is to write Apex code similar to the following so that your XML string can be written to an S-Docs Job record and merged into your S-Docs template.

[code lang="html"]String lineItemDataXML = ''; // Your XML data goes here
SDOC__SDJob__c sdjob = new SDOC__SDJob__c(
SDOC__ObjAPIName__c='Opportunity', //Object API name
SDOC__OID__c='006000000018HK6', // Object ID
SDOC__Doclist__c='a15000000012GQ2', //Template ID
SDOC__Start__c='true' // Generate document upon insertion of S-Docs Job
);
SDOC.SDBatch.writeLineItemDataXML(sdjob, lineItemDataXML); // Write XML Data to S-Docs Job record
insert sdjob;[/code]

This code will generate a document with your XML data merged into the table. Using the data listed above, the generated document will look like this:

Specify Coloration on Even and Odd Rows in Subquery Records

By Documentation, General Solutions, S-Docs Cookbook No Comments

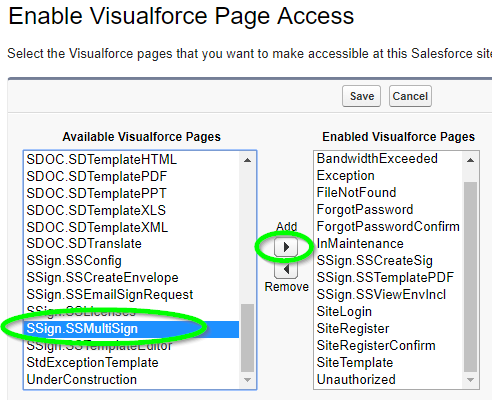
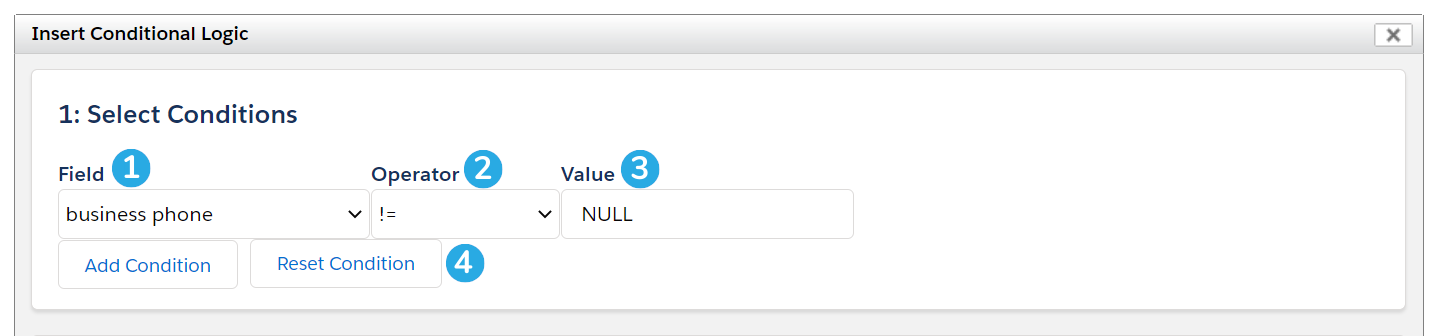
Row Coloration Syntax

S-Docs offers support to specify coloration on even and odd rows in subquery records.

The syntax, which is tableXXXsubRowEven and tableXXXsubRowOdd, is case-sensitive, and if not specified, will revert to the CSS that's specified by tableXXXRowEven and tableXXXRowOdd.

Coloration in LineItemsSOQL can be specified by <rowcoloration>tablerow</rowcoloration> and <rowcoloration>record</rowcoloration>.

If <rowcoloration>tablerow</rowcoloration> is specified, the table row class is changed from tableXXXRowOdd to tableXXXRowEven (and vice versa) every time a new table row (<tr>) is insertedThis is also true for table rows inserted by newrow="true"groupbysum, etc.

Example Table & Code

In this case, the table would look something like the following, given the sample code below:

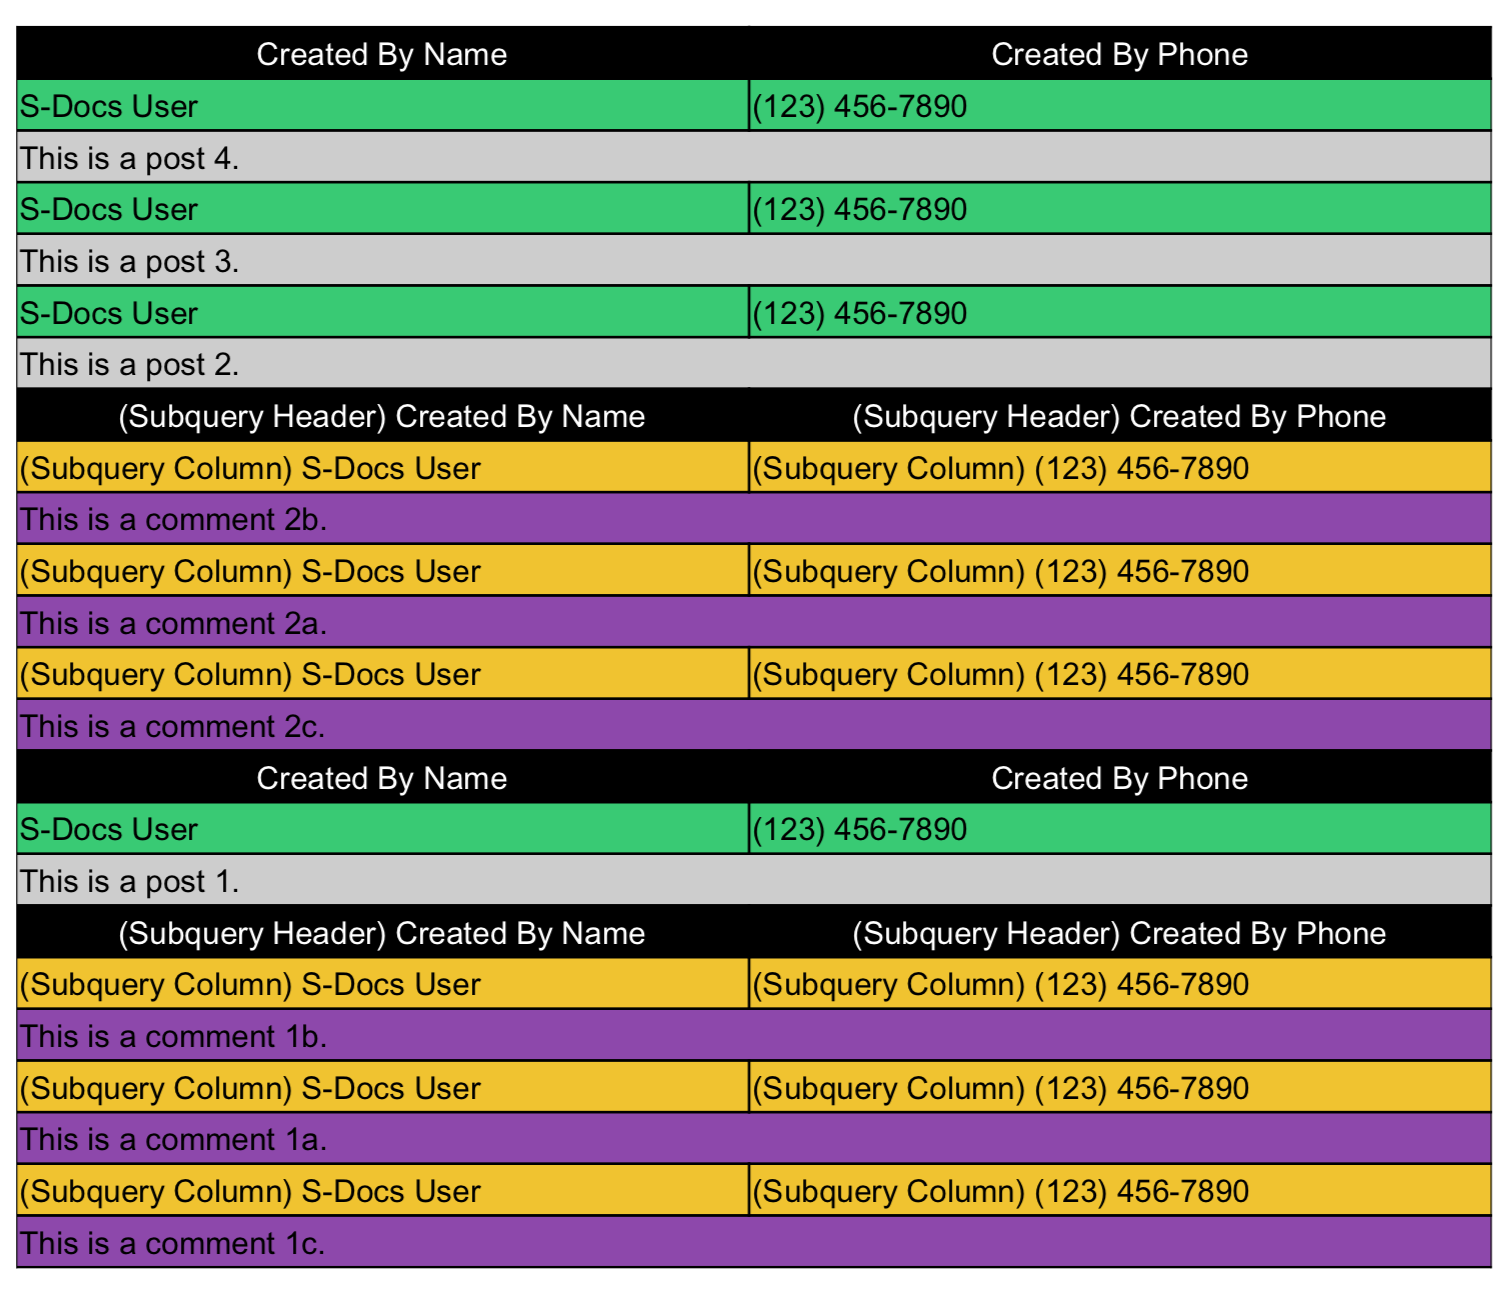
[code lang="html" collapse="1"]<span style="font-family:arial,helvetica,sans-serif;"><span style="color:#FF0000;"><span style="font-family:arial,helvetica,sans-serif;"><span style="color:#FF0000;"><strong>&lt;rowcoloration&gt;record&lt;/rowcoloration&gt; w</strong></span></span><strong>ith newrow="true" </strong></span></span>
<ul>
<li><span style="color:#000000;"><span style="font-family:arial,helvetica,sans-serif;"><em>Row colors change every other record.</em></span></span></li>
<li><span style="color:#000000;"><span style="font-family:arial,helvetica,sans-serif;"><span style="font-family:arial,helvetica,sans-serif;"><em>The body of each chatter post/comment record is inserted in a new row after the the record's other columns.</em></span></span></span></li>
</ul>
<br />
<!-- ******************** START RELATED LIST SECTION UNIQUEID:876********************-->
<style type="text/css">table.table876 {border:solid black 1px; border-collapse:collapse; border-spacing:0px;font-family:Arial Unicode MS,Arial,Helvetica,sans-serif; font-size:10pt; width:100% }
.table876header {text-align:center;font-weight:bold;border:solid black 1px;color:#FFFFFF;background-color:#000000;}
.table876footer {text-align:right;font-weight:bold;border:solid black 1px; height: 30px}
.table876subheader {text-align:center;font-weight:bold;border:solid black 1px;color:#FFFFFF;background-color:#000000;}
.table876RowEven{border:solid black 1px;background-color:#2ecc71;}
.table876RowOdd{background-color:#cdcdcd;border:solid black 1px;}
.table876subRowEven{border:solid black 1px;background-color:#f1c40f;}
.table876subRowOdd{background-color:#8e44ad;border:solid black 1px;}
.table876col0{border:solid black 1px;text-align:left;}
.table876col1{border:solid black 1px;text-align:left;}
.table876col2{border:solid black 1px;text-align:left;}
.table876col3{border:solid black 1px;text-align:left;}
.table876col4{border:solid black 1px;text-align:left;}
.table876col5{border:solid black 1px;text-align:left;}
</style>
<table class="table876">
<tbody><!--{{!
<lineitemsSOQL><class>table876</class>
<listname>feeds</listname>
<soql>
SELECT createdby.name, Body, createdby.phone,
(SELECT createdby.name, createdby.phone,CommentBody FROM FeedComments)
FROM FeedItem WHERE ParentId = '{{!ObjectID15}}'
ORDER BY createddate desc</soql>
<column header="Created By Name">createdby.name</column>
<column header="Created By Phone">createdby.phone</column>
<column newrow="true" colspan="2" type="text">body</column>
<column header="(Subquery Header) Created By Name" prefix="(Subquery Column) " nullprefix="(Subquery Column) ">sub.FeedComments.createdby.name</column>
<column header="(Subquery Header) Created By Phone" prefix="(Subquery Column) " nullprefix="(Subquery Column) ">sub.FeedComments.createdby.phone</column>
<column newrow="true" colspan="2" type="text">sub.FeedComments.CommentBody</column>
</lineitemsSOQL>
}}-->
</tbody>
</table>
<span style="font-family:arial,helvetica,sans-serif;"> </span><!-- ******************** END RELATED LIST SECTION UNIQUEID:876********************-->

<div style="page-break-after: always"><span style="display: none;">&nbsp;</span></div>
<span style="color:#FF0000;"> </span><span style="font-family:arial,helvetica,sans-serif;"><span style="color:#FF0000;"> </span><strong><span style="color:#FF0000;"></span></strong><span style="font-family:arial,helvetica,sans-serif;"><span style="color:#FF0000;"><strong>&lt;rowcoloration&gt;record&lt;/rowcoloration&gt; w</strong></span></span><strong><span style="color:#FF0000;">ithout newrow="true" </span></strong></span>

<ul>
<li><span style="font-family:arial,helvetica,sans-serif;"><span style="font-family:arial,helvetica,sans-serif;"><em>Row colors change every other record. </em></span></span></li>
<li><span style="font-family:arial,helvetica,sans-serif;"><em>The body of each chatter post/comment record is inserted in the same row as the the record's other columns.</em></span></li>
</ul>
<br />
<!-- ******************** START RELATED LIST SECTION UNIQUEID:876********************-->
<table class="table876">
<tbody><!--{{!
<lineitemsSOQL><class>table876</class>
<listname>feeds</listname>
<soql>
SELECT createdby.name, Body, createdby.phone,
(SELECT createdby.name, createdby.phone,CommentBody FROM FeedComments)
FROM FeedItem WHERE ParentId = '{{!ObjectID15}}'
ORDER BY createddate desc</soql>
<column header="Created By Name">createdby.name</column>
<column header="Created By Phone">createdby.phone</column>
<column header="Body" type="text">body</column>
<column header="(Subquery Header) Created By Name" prefix="(Subquery Column) " nullprefix="(Subquery Column) ">sub.FeedComments.createdby.name</column>
<column header="(Subquery Header) Created By Phone" prefix="(Subquery Column) " nullprefix="(Subquery Column) ">sub.FeedComments.createdby.phone</column>
<column header="(Subquery Header) Comments" type="text">sub.FeedComments.CommentBody</column>
</lineitemsSOQL>
}}-->
</tbody>
</table>
<span style="font-family:arial,helvetica,sans-serif;"> <!-- ******************** END RELATED LIST SECTION UNIQUEID:876********************--></span><br />
<br />
<style type="text/css">
</style>
<div style="page-break-after: always"><span style="display: none;">&nbsp;</span></div>
<span style="font-family:arial,helvetica,sans-serif;"><span style="color:#FF0000;"><span style="font-family:arial,helvetica,sans-serif;"><span style="color:#FF0000;"><span style="font-family:arial,helvetica,sans-serif;"><span style="color:#FF0000;"><strong>&lt;rowcoloration&gt;tablerow&lt;/rowcoloration&gt; w</strong></span></span></span></span><strong>ith newrow="true"</strong></span></span>

<ul>
<li><span style="font-family:arial,helvetica,sans-serif;"><span style="font-family:arial,helvetica,sans-serif;"><em>Row colors change every other table row. </em></span></span></li>
<li><span style="font-family:arial,helvetica,sans-serif;"><em>The body of each chatter post/comment record is inserted in a new row after the the record's other columns.</em></span></li>
</ul>
<br />
<!-- ******************** START RELATED LIST SECTION UNIQUEID:876********************-->
<table class="table876">
<tbody><!--{{!
<lineitemsSOQL><class>table876</class>
<listname>feeds</listname>
<rowcoloration>tablerow</rowcoloration>
<soql>
SELECT createdby.name, Body, createdby.phone,
(SELECT createdby.name, createdby.phone,CommentBody FROM FeedComments)
FROM FeedItem WHERE ParentId = '{{!ObjectID15}}'
ORDER BY createddate desc</soql>
<column header="Created By Name">createdby.name</column>
<column header="Created By Phone">createdby.phone</column>
<column newrow="true" colspan="2" type="text">body</column>
<column header="(Subquery Header) Created By Name" prefix="(Subquery Column) " nullprefix="(Subquery Column) ">sub.FeedComments.createdby.name</column>
<column header="(Subquery Header) Created By Phone" prefix="(Subquery Column) " nullprefix="(Subquery Column) ">sub.FeedComments.createdby.phone</column>
<column newrow="true" colspan="2" type="text">sub.FeedComments.CommentBody</column>
</lineitemsSOQL>
}}-->
</tbody>
</table>
<span style="font-family:arial,helvetica,sans-serif;"> </span><!-- ******************** END RELATED LIST SECTION UNIQUEID:876********************-->

<div style="page-break-after: always"><span style="display: none;">&nbsp;</span></div>
<span style="color:#FF0000;"> </span><span style="font-family:arial,helvetica,sans-serif;"><span style="color:#FF0000;"> </span><strong><span style="color:#FF0000;"></span></strong><span style="font-family:arial,helvetica,sans-serif;"><span style="font-family:arial,helvetica,sans-serif;"><span style="color:#FF0000;"><span style="font-family:arial,helvetica,sans-serif;"><span style="color:#FF0000;"><strong>&lt;rowcoloration&gt;tablerow&lt;/rowcoloration&gt; w</strong></span></span></span></span></span><strong><span style="color:#FF0000;">ithout newrow="true"</span></strong></span>

<ul>
<li><span style="font-family:arial,helvetica,sans-serif;"></span><span style="font-family:arial,helvetica,sans-serif;"><span style="font-family:arial,helvetica,sans-serif;"><span style="font-family:arial,helvetica,sans-serif;"><em>Row colors change every other table row. </em></span></span></span></li>
<li><span style="font-family:arial,helvetica,sans-serif;"><em>The body of each chatter post/comment record is inserted in the same row as the the record's other columns.</em></span></li>
</ul>
<br />
<!-- ******************** START RELATED LIST SECTION UNIQUEID:876********************-->
<table class="table876">
<tbody><!--{{!
<lineitemsSOQL><class>table876</class>
<listname>feeds</listname>
<rowcoloration>tablerow</rowcoloration>
<soql>
SELECT createdby.name, Body, createdby.phone,
(SELECT createdby.name, createdby.phone,CommentBody FROM FeedComments)
FROM FeedItem WHERE ParentId = '{{!ObjectID15}}'
ORDER BY createddate desc</soql>
<column header="Created By Name">createdby.name</column>
<column header="Created By Phone">createdby.phone</column>
<column header="Body" type="text">body</column>
<column header="(Subquery Header) Created By Name" prefix="(Subquery Column) " nullprefix="(Subquery Column) ">sub.FeedComments.createdby.name</column>
<column header="(Subquery Header) Created By Phone" prefix="(Subquery Column) " nullprefix="(Subquery Column) ">sub.FeedComments.createdby.phone</column>
<column header="(Subquery Header) Comments" type="text">sub.FeedComments.CommentBody</column>
</lineitemsSOQL>
}}-->
</tbody>
</table>
<span style="font-family:arial,helvetica,sans-serif;"> <!-- ******************** END RELATED LIST SECTION UNIQUEID:876********************--></span><br />
<br />
<style type="text/css">
</style>[/code]
If <rowcoloration>record</rowcoloration> is specified, the table row class changes from tableXXXRowEven to tableXXXRowOdd (and vice versa) upon iterating through all of the columns for the current record, regardless of how many table rows (<tr>) were inserted during that time.

If neither are specified, the default will be <rowcoloration>record</rowcoloration>.

Top