All Posts By

Admin

Uploading Documents to Google Drive

By Documentation, S-Docs GDI: Google Drive Integration No Comments
Note: If you haven't configured the S-Docs and Google Drive integration, please review this article first.

Uploading a Document to Google Drive

When you generate any document that is Google Drive enabled, an Upload Selected to Google Docs button appears above the list of generated documents. Click the button to upload the selected documents.

Authorizing Access to Google Drive

The first time you try to upload a document using S-Docs, you will be presented with S-Docs Authorization page that you saw when setting up the Google Drive integration. Click Authorize Google Drive Access to grant permission for S-Docs to access your account.


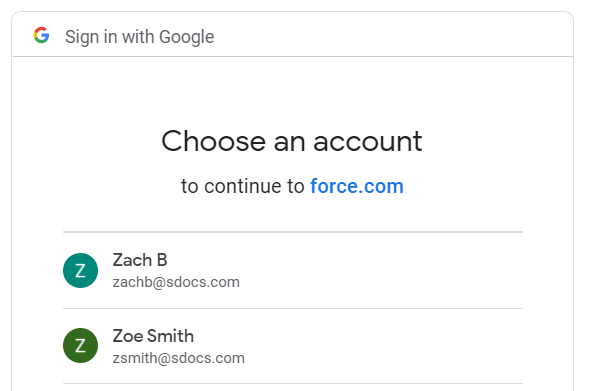
You will be redirected to a Google-hosted sign-in page. Sign into your Google account now.

Note: If you receive an error at this step, confirm you have completed the S-Docs & Google Drive setup steps correctly.

Once signed in, Google will present a warning. Click Advanced Options and then Go to force.com.

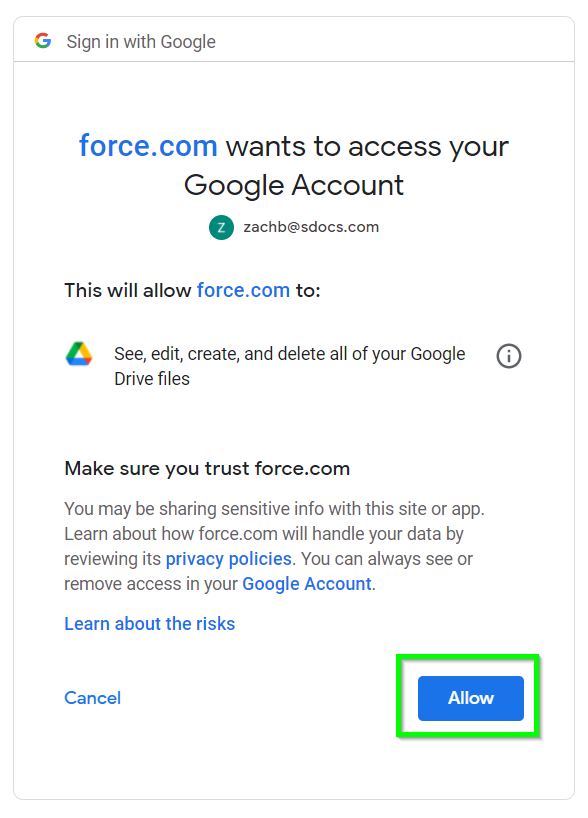
Finally, click Allow.

This step needs to be done only once, as this access authorization is retained with your Salesforce account. Once authenticated, S-Docs uses OAuth 2.0 technology to manage access between S-Docs and Google Drive.

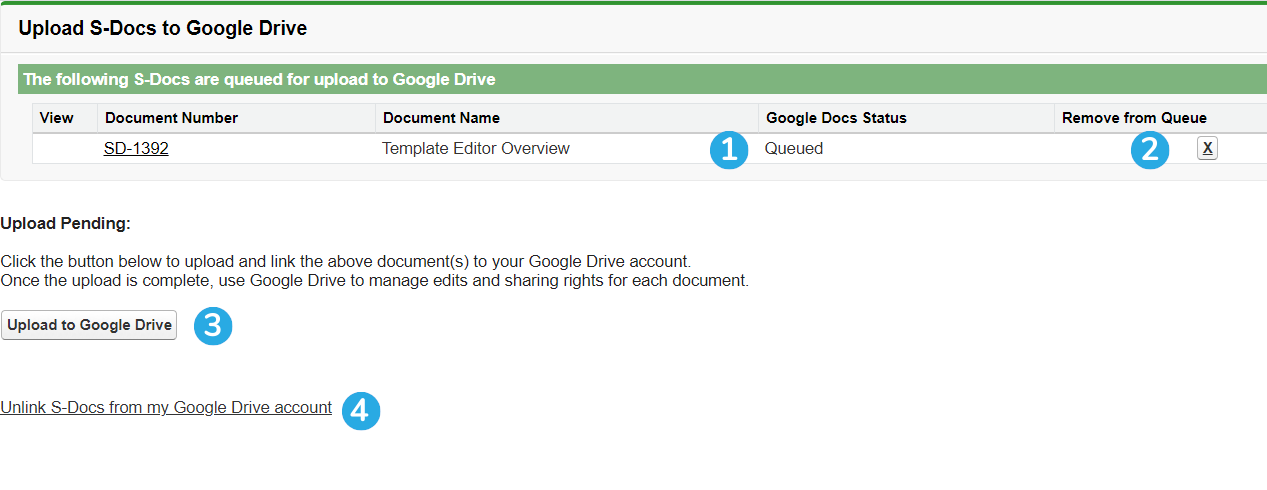
Going forward, the authorization step will be skipped, and you will be directed to the upload confirmation page below.

On this page, you can [1] see which documents are queued for upload, [2] remove individual documents from the queue, and finally [3] click Upload to Google Drive to upload your documents. You can also [4] deauthorize S-Docs from your Google Account by clicking on the Unlink S-Docs from my Google Drive account link at the bottom of the page.

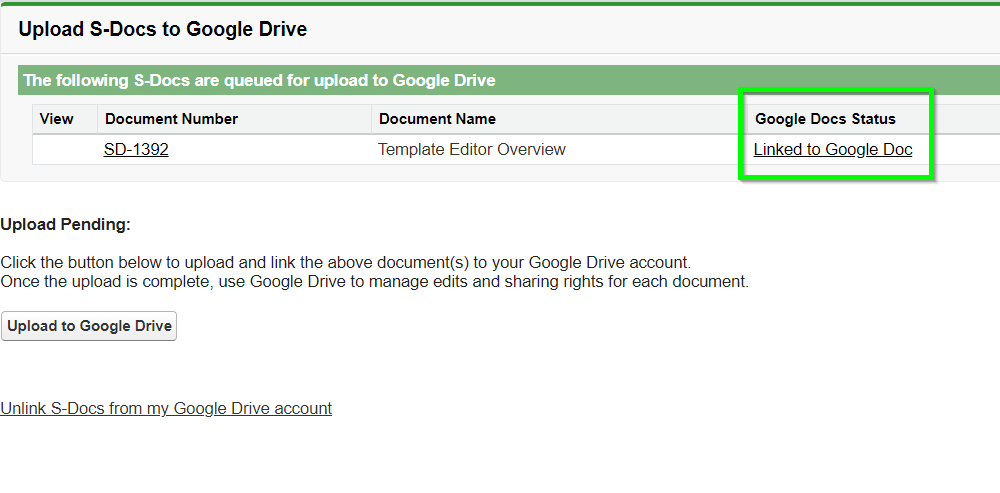
Once you click the Upload to Google Docs button, the Status field will change from “Queued” to a link. The link will open the document directly within Google Drive.

Note: For help uploading S-Docs to specific Google Drive folders, please view this article.

Opening Google Drive Docs Within Salesforce

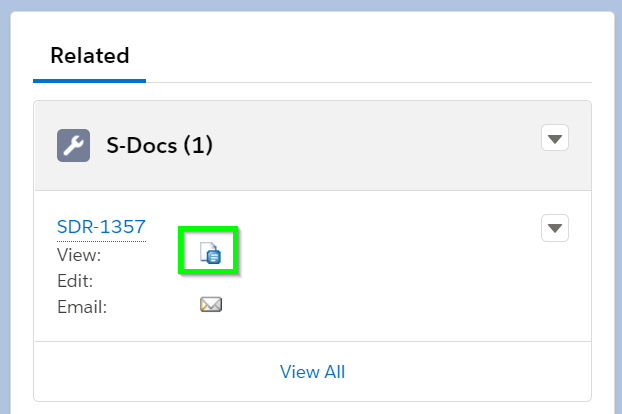
Links to documents and their icons are updated whenever a document is uploaded to Google Drive. Clicking on the link will open the document directly within Google Drive in either a new tab or new window.

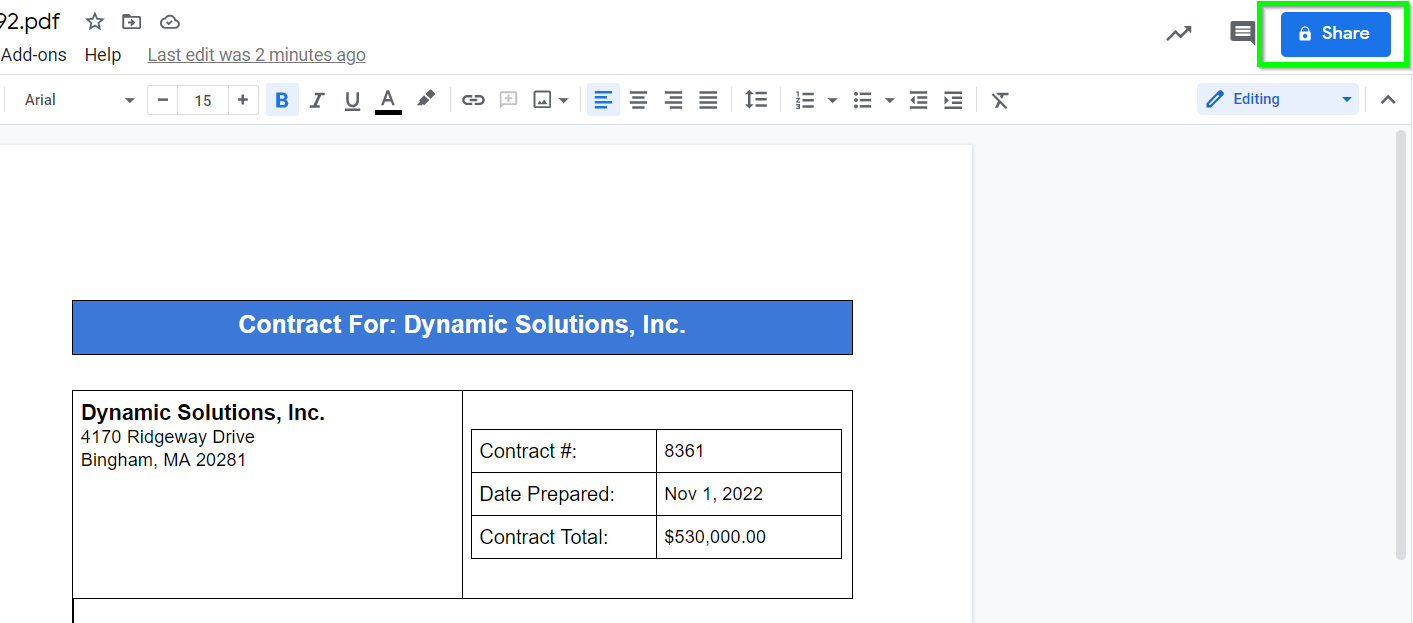
Once a document is uploaded to Google Drive, it can be moved and shared as needed by using standard Google Drive functionality.

Setting Up S-Docs & Google Drive

By Documentation, S-Docs GDI: Google Drive Integration No Comments

Introduction

S-Docs connects seamlessly with Google Drive, meaning that you can generate documents securely on the Salesforce platform and then upload them to Google Drive right away -- all without ever leaving Salesforce. This article will provide you with step-by-step instructions for configuring the S-Docs and Google Drive integration.

The S-Docs package already includes all needed components that allow it to work with Google Drive. However, your admin will need to complete the following steps to enable the feature.

Step 1: Add Remote Site Settings

The S-Docs Google Drive Integration requires that you create two entries in Salesforce’s Remote Site Settings that will allow your Salesforce org to interface with Google.

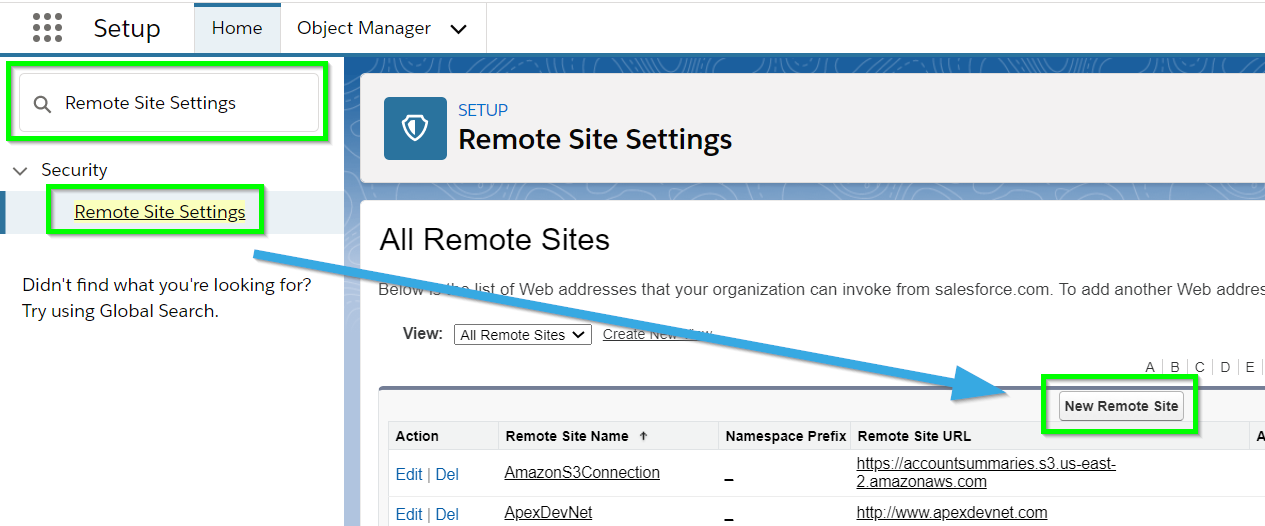
From the Setup menu, navigate to Remote Site Settings by typing "Remote Site Settings" into the Quick Find bar, then click Remote Site Settings in the dropdown menu. Click New Remote Site.

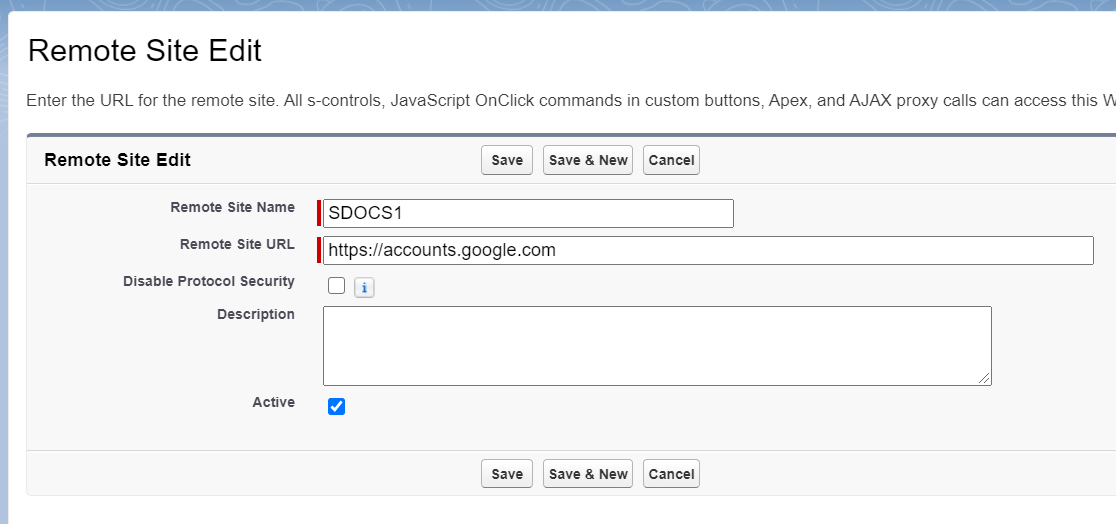
Enter the following values:

Remote Site Name: SDOCS1
Remote Site URL: https://accounts.google.com

Make sure Active is checked, and then click Save & New.

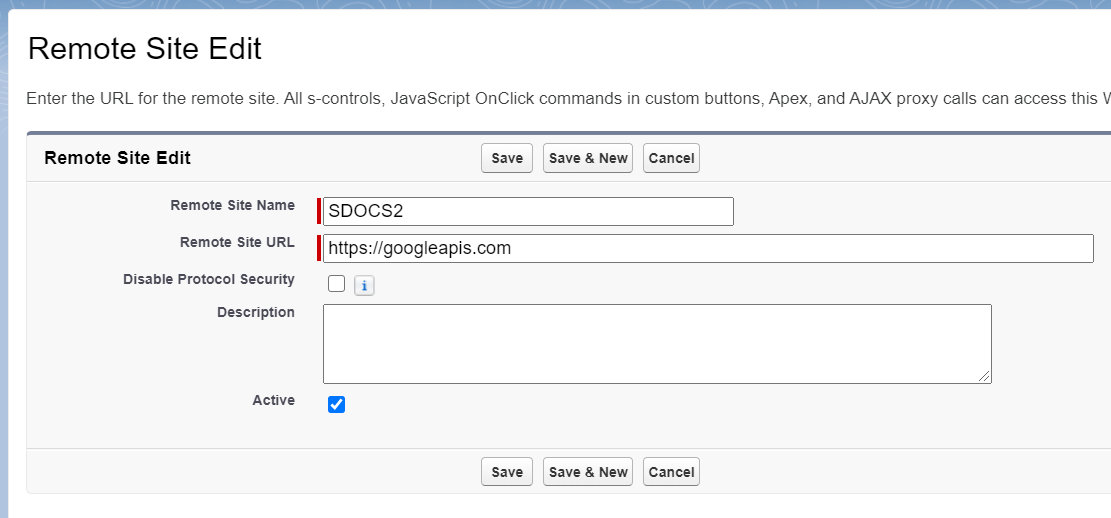
For the next site, enter the following values:

Remote Site Name: SDOCS2
Remote Site URL:
https://www.googleapis.com

Make sure Active is checked and then click Save.

Step 2: Notify S-Docs Support of API Request Domains

For the S-Docs and Google Drive integration to function properly, S-Docs needs to whitelist the domains that your API requests will be coming from. Please email support@sdocs.com with the following two domains:

1. Your org's domain

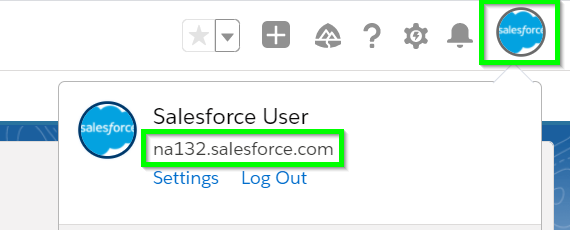
To find your domain in Lightning, click your user profile in the upper right corner and copy it from under your username. Make sure to add "https://" at the beginning.

To find your domain in Classic, navigate to the Home screen and copy it from your browser's URL bar up to the first forward slash.

2. Your Google Drive Redirect URI

To find your Google Drive Redirect URI, you need to attempt to authorize S-Docs to upload documents to Google Drive.

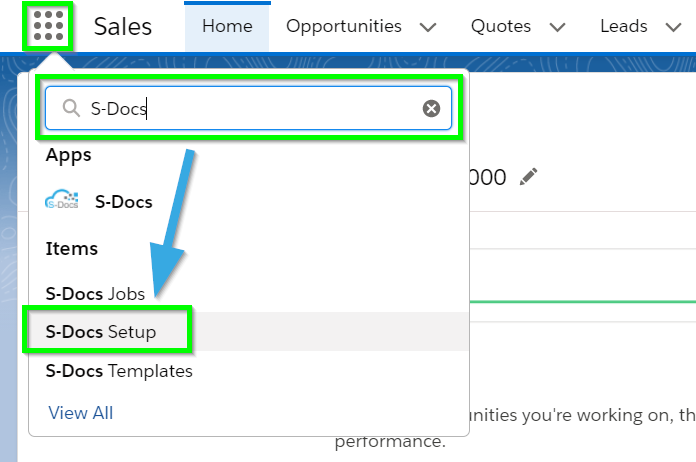
Navigate to the S-Docs Setup page by clicking the App Launcher in the upper left corner, typing "S-Docs" into the search field, then clicking S-Docs Setup.

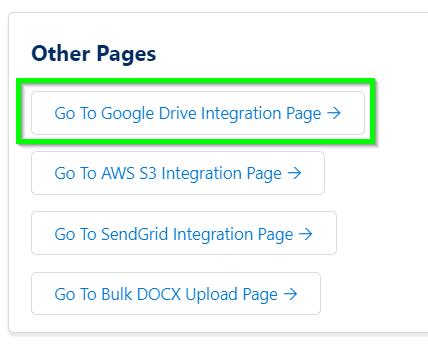
Scroll down to the Other Pages section and click Go To Google Drive Integration Page.


On the next page, click Authorize Google Drive Access.

Then, copy the Redirect URI up to the first forward slash.

Email the two URLs from this step to support@sdocs.com. S-Docs will whitelist your domains so that you can get started using Google Drive with S-Docs.

Step 3: Add Google Docs Enabled Checkbox to Template Detail Page & Activate Templates for Google Drive

Administrators are able to determine which documents are eligible for upload to Google Drive with the Google Docs Enabled checkbox. This checkbox is not visible by default, however, and must be added to the template detail page layout.

From the Setup menu, navigate to the Object Manager and find the SDoc Template object.

Navigate to the Page Layouts tab, click the dropdown arrow for the SDoc Template page layout, and click Edit.

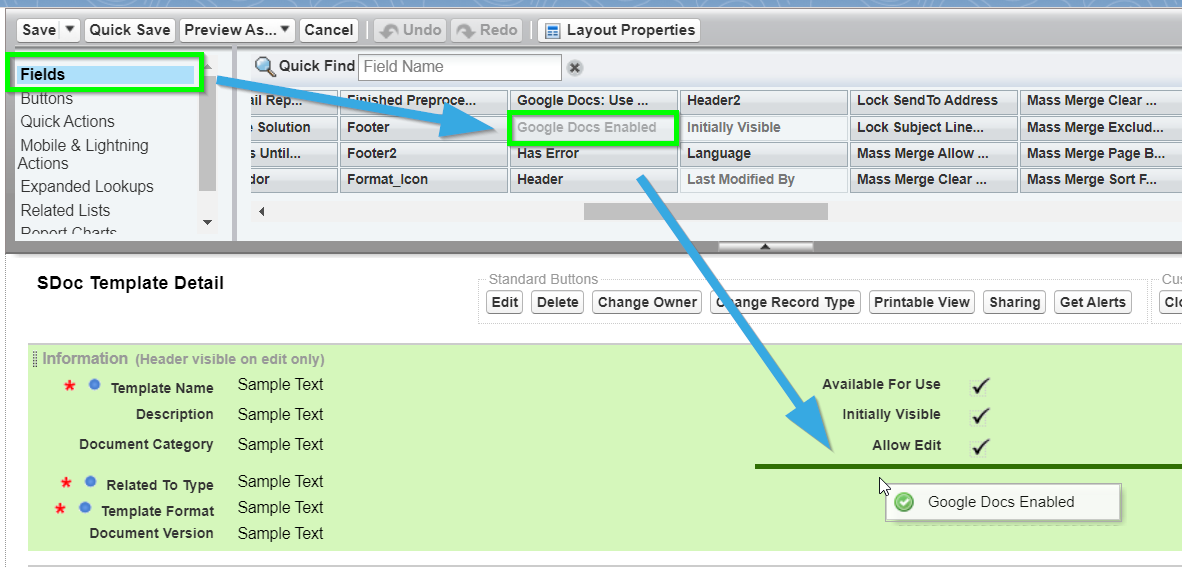
Navigate to the Fields tab, find the Google Docs Enabled field, and drag it down into the SDoc Template Detail section. Click Save.

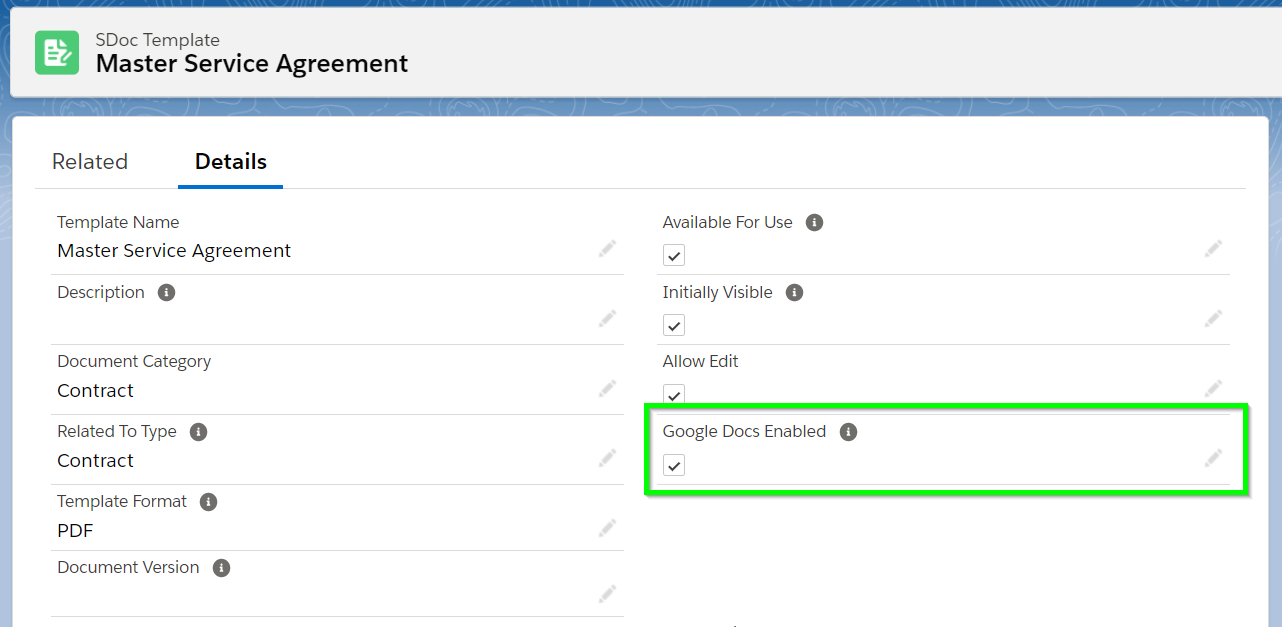
This checkbox will now appear on all template detail records. You can now check it to determine whether new documents generated with this template can be uploaded to Google.

For more information on generating and uploading S-Docs documents to Google Drive, please review our guide Using Google Drive.

Step 4 (Optional): Specify A Google Drive Foler

By default, all S-Docs uploaded to Google Drive will be stored in the user's base Google Drive folder. You can specify a different folder to upload your document to at the template level.

If your template is Google Docs enabled, the Document Options tab in the template editor will contain additional Google Drive options where this can be configured.

[1] To specify which folder documents generated using this template should be stored within, paste the folder ID into this field.

[2] Check this box to upload your document to Google Drive in its native format. By default, all documents uploaded will be converted to Google Docs. This checkbox will cause a PDF to upload as a PDF instead of a Google Doc.

Overview of S-Docs GDI

By Documentation, S-Docs GDI: Google Drive Integration No Comments

Introduction

All paid versions of S-Docs can easily integrate with Google Drive. This Google Drive Integration (GDI) allows documents created using S-Docs to be automatically uploaded to Google Drive and linked seamlessly within Salesforce.

By doing this, the docs are stored on the Google cloud where they can be shared and edited without requiring any additional software (e.g. MS Office) and can also be accessed using mobile devices. By using S-Docs GDI, your Salesforce users do not need to download a file before making their changes nor need to upload the same afterward. This ensures that everyone is working from only one copy of the document and changes are reflected real-time, eliminating the need to track and reconcile any conflicts.

Note: This article provides a broad overview of the S-Docs and Google Drive integration. For instructions on setting up the S-Docs and Google Drive integration, click here. For instructions on uploading documents to Google Drive after the integration has been set up, click here.

Google Drive Overview

Google Drive is a service that allows users to store, collaborate, and share documents in the cloud. Google Drive currently offers 15GB file storage free with the option to purchase more storage. However, it is important to note that S-Docs creates all documents in Google Drive native format. This means that these documents do not (as of this latest update) count towards your Google Drive file storage limit and therefore you can use S-Docs with Google Drive with minimal or no cost.

To learn more about Google Drive, here is a good reference:

https://docs.google.com/document/d/1ZeBmYKmywOygOHfyZI36i68W5tRjHf_OC6WqxIoHQeo/edit

Example Use Case

S-Docs GDI is useful when you have multiple users who you want to collaborate on the same document. For example, let’s say you use S-Docs to generate your standard Contract PDF, which merges your Salesforce Contract record data with your S-Docs Template. For this use case, let’s assume the Contract needs input from the VP of Sales prior to finalization. Once the user generates the Contract document, they would optionally click one button to upload that document to a shared Google Drive repository. When the VP clicks on the document link within Salesforce, rather than downloading and opening MS Word, the VP would be able to view and make changes directly to the contract using just their browser. When the document is finalized, Google allows you to export it to other formats, such as PDF, before distribution.

Intended Audience

This guide provides solutions and ideas to help organizations get the most out of S-Docs. It is intended for users already familiar with Salesforce administration and configuration techniques. Knowledge of HTML is also useful in creating the highest quality documents. We encourage you to visit our website for template samples and help.

Security Consideration

Unlike S-Docs, which works entirely within the Salesforce.com platform, using the Google Drive Integration means your documents are hosted remotely.

  • Your documents may contain sensitive data.
  • If there is a disruption in Google Drive service, your documents will not be available even if there are no issues with Salesforce.com.
  • Google Drive has its own Terms of Service concerning use and confidentially, which differ from Salesforce.com.
  • S-Docs uses OAuth2.0 to exchange user credential information between Salesforce and Google. This process requires that a user grant access to their Google Drive account.
  • Google may make future changes to its Google Drive APIs that unexpectedly render it incompatible with S-Docs. While we do not expect such a change, and would make every reasonable effort to continue to support the Google Drive service, we cannot guarantee future compatibility because of this reason.

Your security team would need to determine if this is an acceptable risk.

Allow S-Docs Jobs & API Calls to be Run as Another User

By Documentation, S-Docs Automation: Jobs & REST API No Comments

Introduction

This document is intended as an additional reference for allowing S-Docs Jobs to be run as a specified user. Click here for the complete guide to automating S-Docs with S-Docs Jobs.

Running S-Docs Jobs as any user is simple; getting Salesforce to allow this, however, is a bit more work. This document discusses how you can get Salesforce to allow you to run S-Docs Jobs as another user and configure Process Builder to run as another user. This setup uses JWT Bearer assertion flow to run as any user without preauthorization. The steps include adding remote site settings, creating a connected app, and linking the app details to S-Docs via a custom settings entry.

Video Tutorial

Step 1: Create Remote Site Settings

From the setup menu, type "Remote Site Settings" into the Quick Find bar, then click Remote Site Settings in the dropdown menu.

  1. Click New Remote Site. For Remote Site Name, enter whatever you'd like. For Remote Site URL, enter:
    • For production: https://login.salesforce.com
    • For sandbox: https://test.salesforce.com

Ensure that the Active checkbox is checked, and click Save.

  1. Click New Remote Site again. For Remote Site Name, enter whatever you'd like. For Remote Site URL, enter your Salesforce domain URL.
    Note: In Classic, you can copy your domain from your address bar, e.g. https://na1.salesforce.com or https://cs2.salesforce.com. In the URL, note that the number after na or cs will vary.
    In Lightning, you can copy your domain by clicking your user profile in the upper right corner, and copying it from under your username. Note that you need to add "https://" at the beginning.

Ensure that the Active checkbox is checked, and click Save.

  1. If you are using S-Docs with Communities with a custom domain, you should add a new remote site for your custom domain as well.

Step 2: Create a Self-Signed Certificate

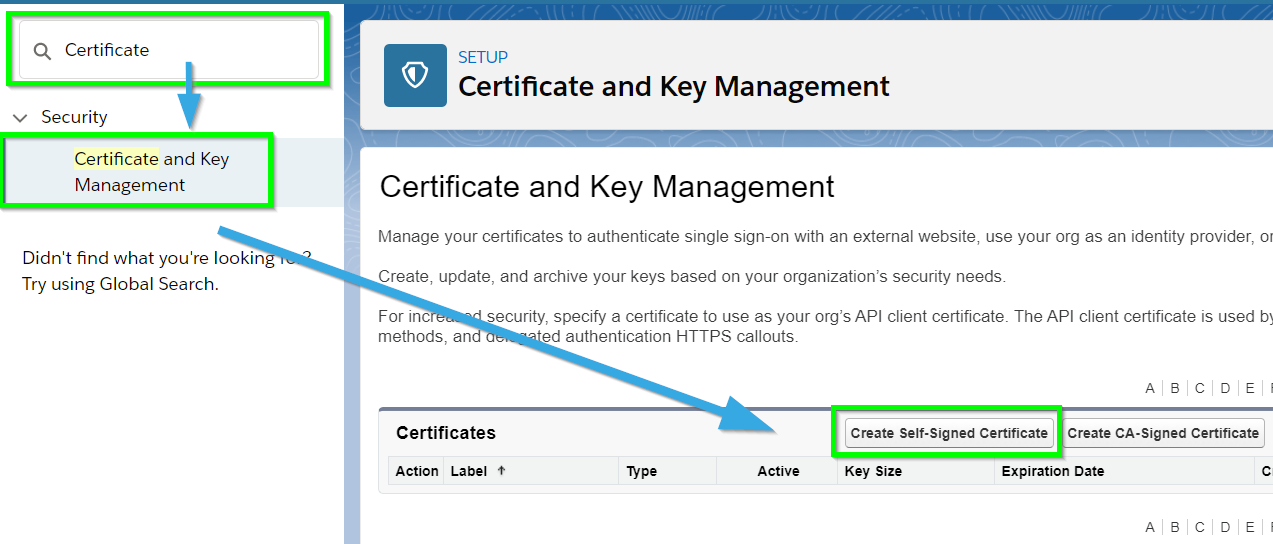
From the setup menu, type "Certificate" into the Quick Find bar, then click Certificate and Key Management in the dropdown menu. Click Create Self-Signed Certificate.

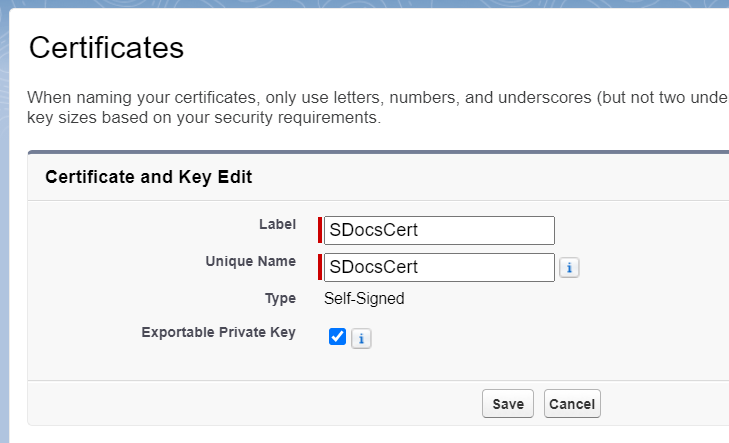
Name your certificate SDocsCert. Click Save.

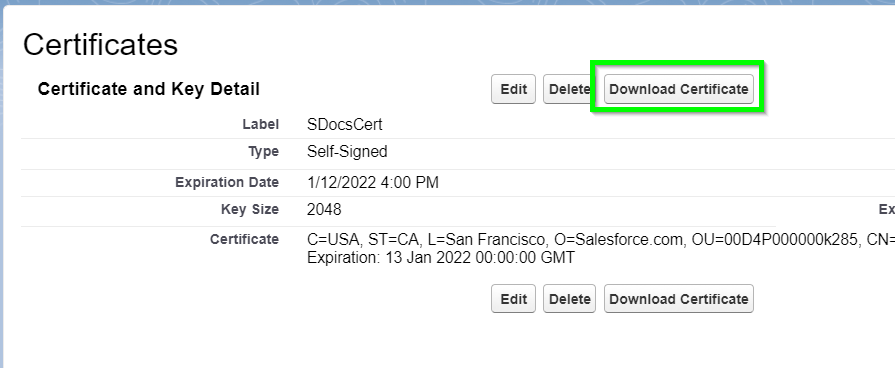
Click Download Certificate, and keep track of where the file is stored. We will use this in the next step.

Step 3: Create A New Connected App

Navigating to the Connected App creation page is a bit different in Classic and Lightning. In Lightning, type "App Manager" into the Quick Find bar in the setup menu, then click App Manager in the dropdown menu. Click New Connected App in the top right.

In Classic, type "Apps" into the Quick Find bar in the setup menu, then click Apps in the dropdown menu (under Build > Create). Scroll down to the Connected Apps section and click New.

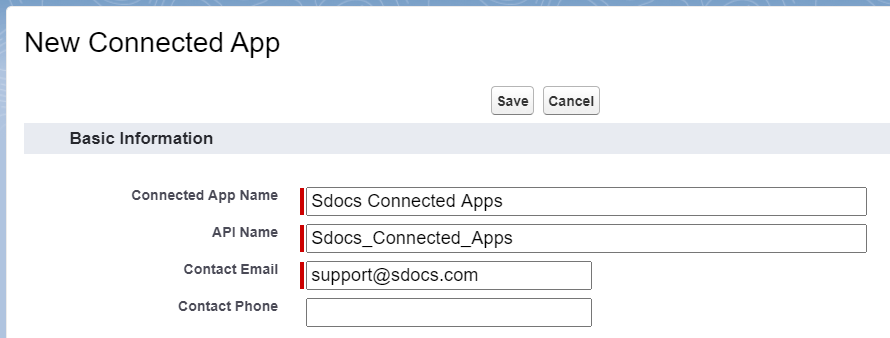
In the Basic Information section, fill in the following fields:

Connected App Name: Sdocs Connected Apps
API Name: Sdocs_Connected_Apps
Contact Email: support@sdocs.com

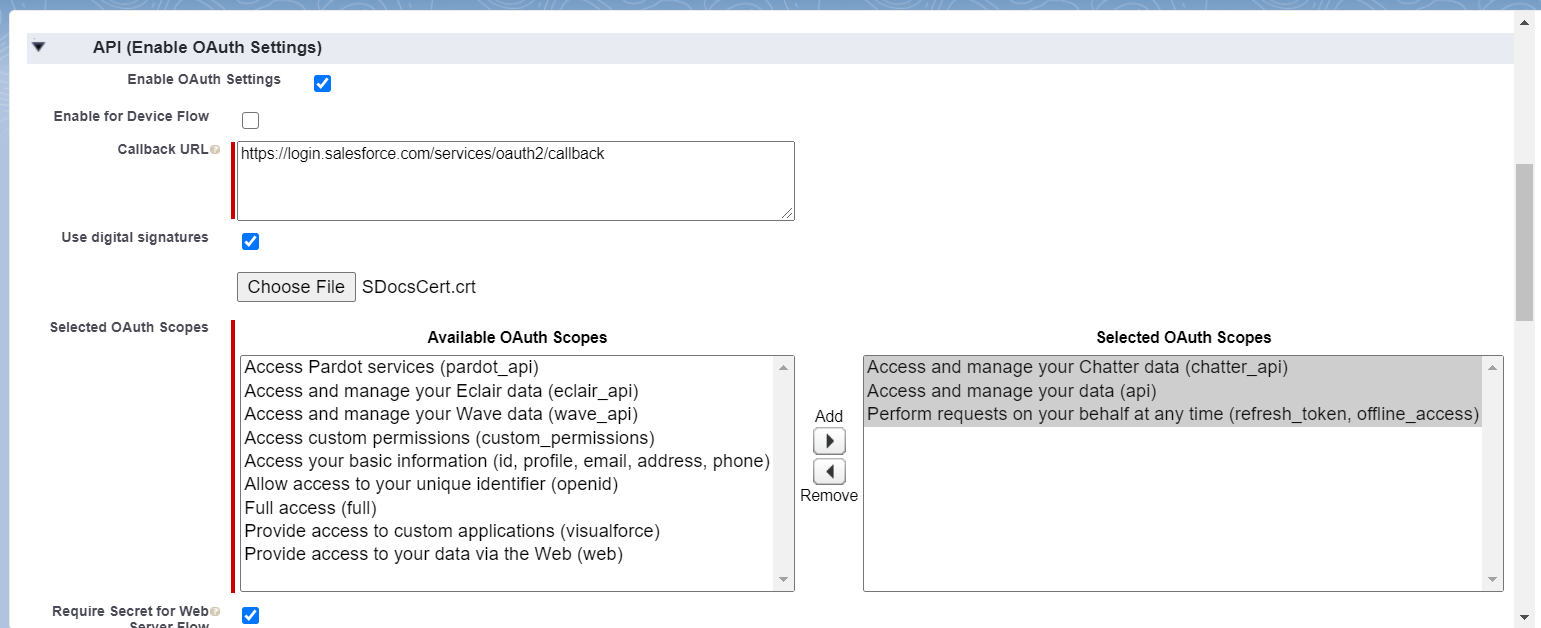
Scroll down to the API (Enable OAuth Settings) section and check Enable OAuth Settings. Then, enter one of the following URLs into the Callback URL field, depending on if you're working in a sandbox or production environment:

Production: https://login.salesforce.com/services/oauth2/callback
Sandbox: https://test.salesforce.com/services/oauth2/callback

Next, check the Use Digital Signatures checkbox and upload the self-signed certificate that you downloaded in step 2.

Then, scroll down to the Selected OAuth Scopes field. Add the following scopes to your selected scopes:

  • Perform requests on your behalf at any time
  • Access and manage your data
  • Access and manage your Chatter data

This section should look similar to the following image when you are finished:

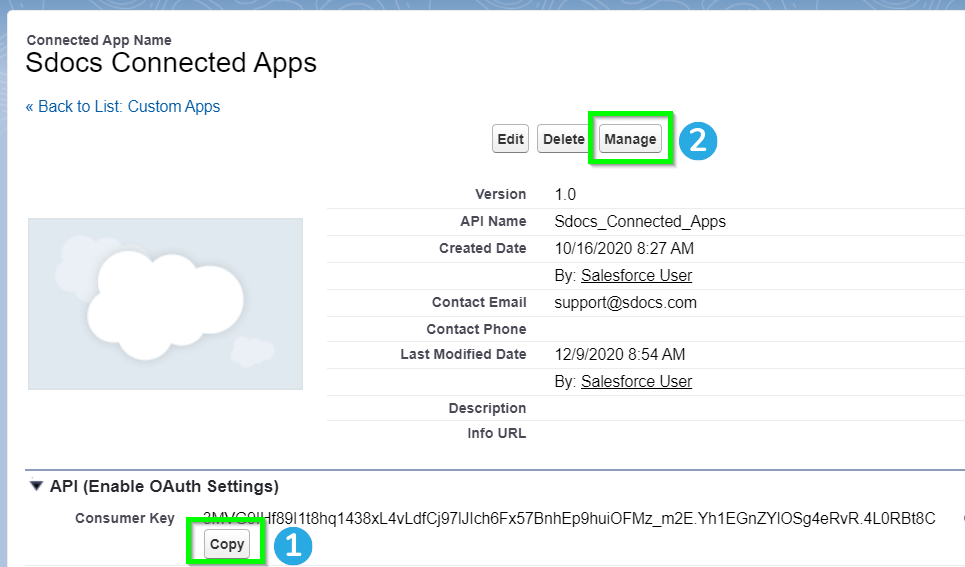
Leave the rest of the fields at their default settings, and click Save. You will be redirected to the Connected App detail page. Scroll down to the API (Enable OAuth Settings) section and click Copy next to the Consumer Key field. Paste this somewhere you can access later. You will use this key in Step 4. Then, click Manage at the top of the page.

On the next page, click Edit Policies.

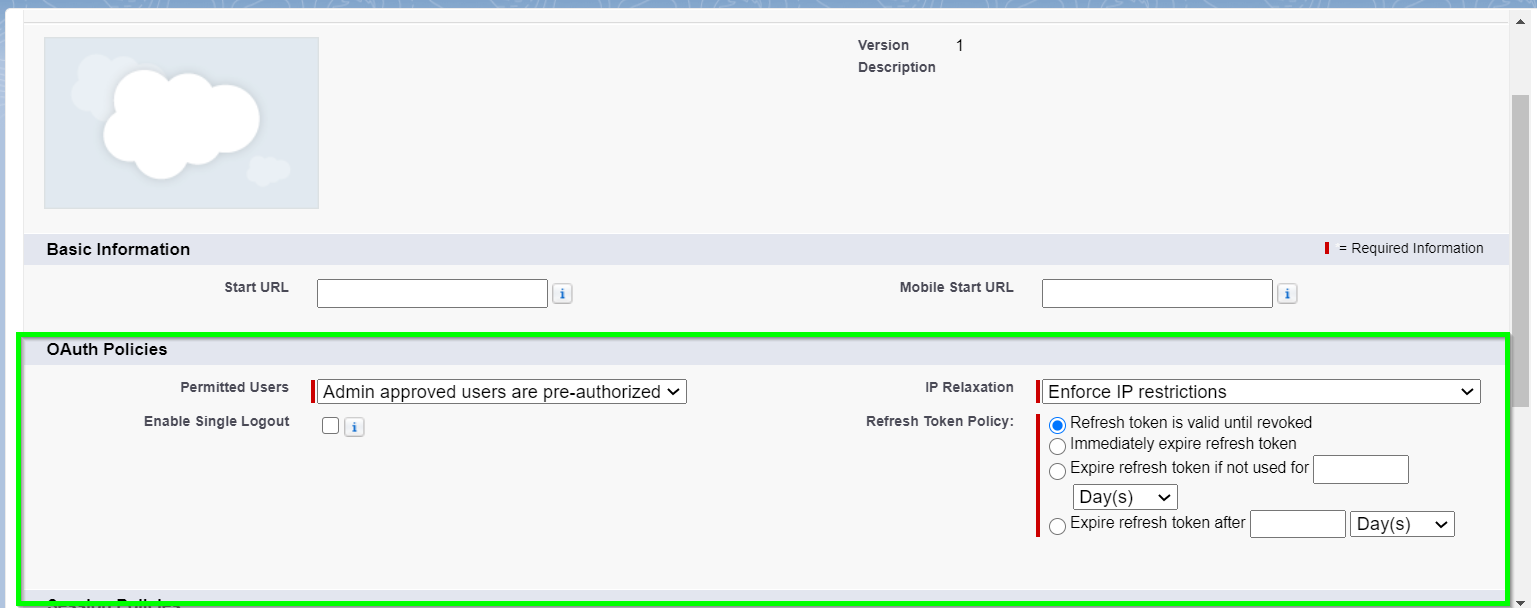
Scroll down to the OAuth Policies section. Set the Permitted Users field to Admin approved users are pre-authorized. Set the IP Relaxation field in accordance with your organization's policies. Keep the Refresh Token Policy set to Refresh token is valid until revoked. Then, click Save.

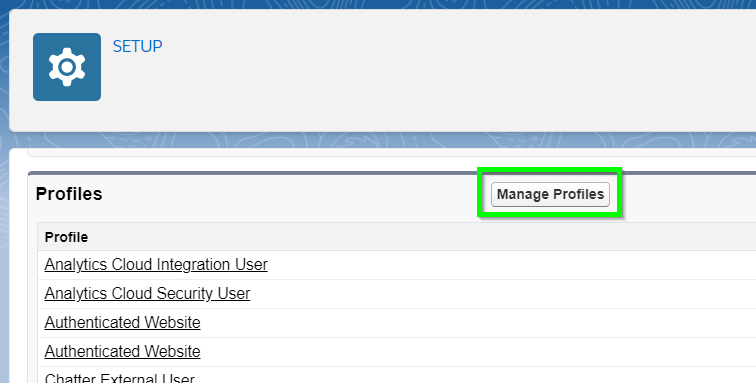
Next, scroll down to the Profiles section and click Manage Profiles.

Add all user profiles that will generate documents, or be used as the "Run As" user. Click Save.

Note: We recommend only setting system administrators to "Run As" users.

Step 4: Create A New Custom Setting Entry

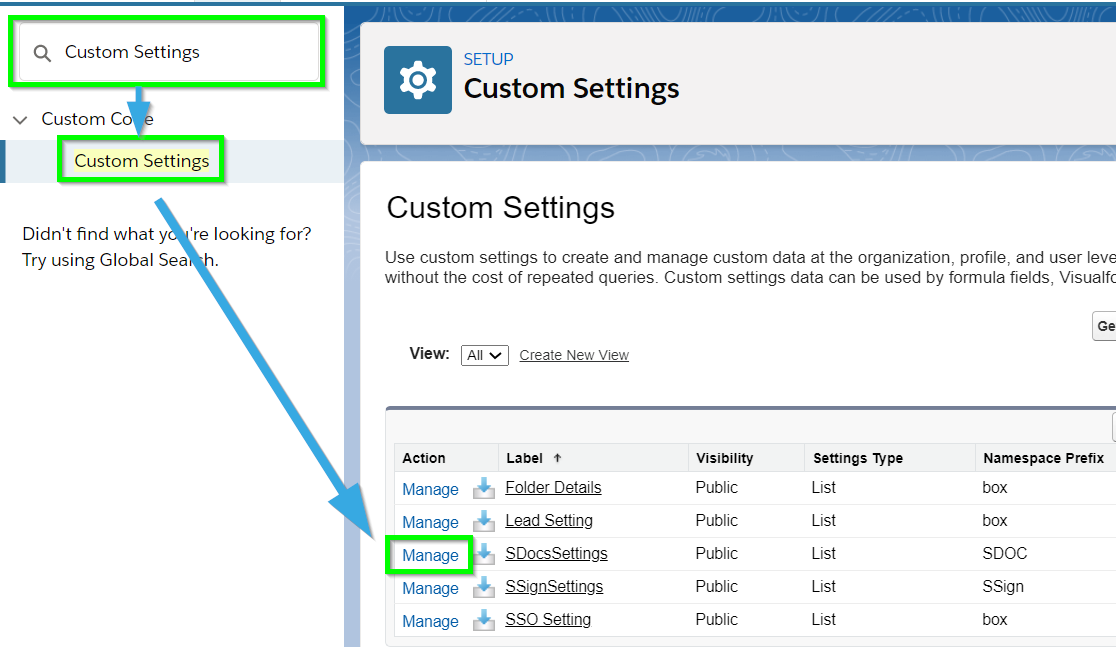
From the setup menu, type "Custom Settings" into the Quick Find bar, then click Custom Settings in the dropdown menu. Find SDocsSettings and click Manage.

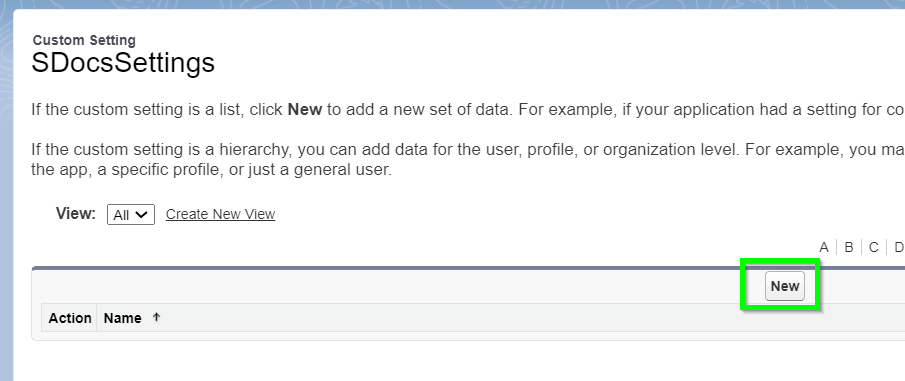
If you've created an S-DocsSettings entry in the past, you can click the Edit link next to its name to edit it now. Otherwise, click New to create a new SDocsSettings entry.

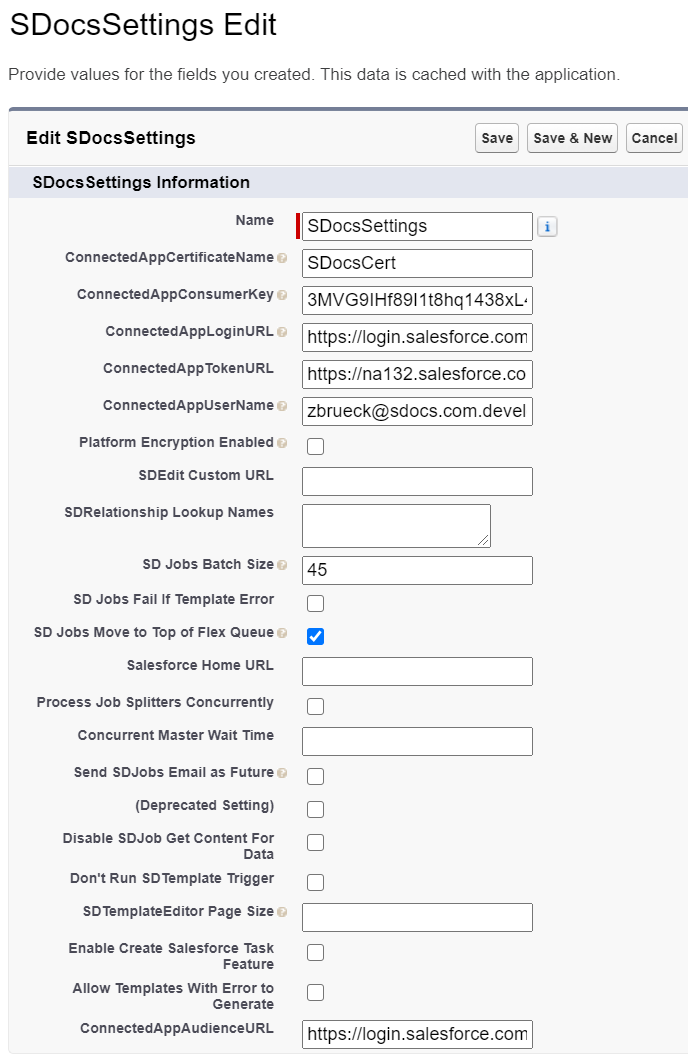
Fill in the following values:

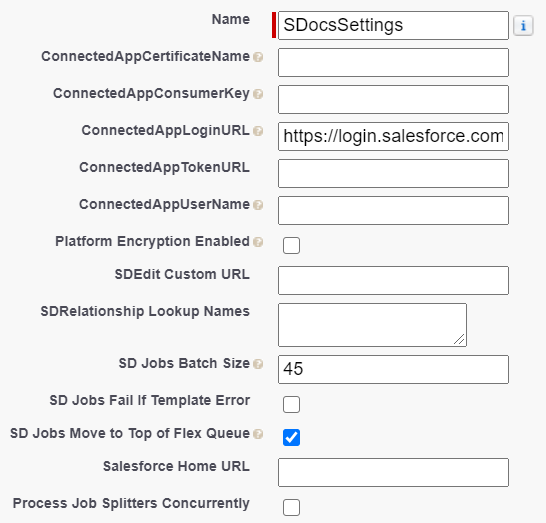
Name: SDocsSettings
ConnectedAppCertificateName: SDocsCert
ConnectedAppConsumerKey: Paste the consumer key that you copied in step 3
ConnectedAppLoginURL:
[Production]: https://login.salesforce.com
[Sandbox]: https://test.salesforce.com

Note: If you are using Salesforce Government Cloud, use your MyDomain URL instead of the URLS listed above.

ConnectedAppTokenURL: Paste your Salesforce domain URL. If you're not sure how to find it, refer to Step 1
ConnectedAppUserName: If you are configuring S-Sign e-signatures, enter a username to be used as the S-Sign Internal User (we recommend using an administrator's user name). The S-Sign Internal User will be the user which all S-Sign operations will be conducted by through the secure S-Docs Connected App.

Note: If you are using Salesforce Government Cloud, you also need to fill in the ConnectedAppAudienceURL field with one of the URLs listed below. This field sometimes populates with your MyDomain URL, which should not be used for this field. If your MyDomain URL populates this field, replace it with one of the 2 URLs listed below.

ConnectedAppAudienceURL:
[Production]: https://login.salesforce.com
[Sandbox]: https://test.salesforce.com

Your SDocsSettings entry should look similar to the following:


Click Save.

Step 5: Configure Your Salesforce Process, Apex Trigger, or Flow

The last step is to configure your Process, Apex trigger, or flow to populate the Run As User field on the S-Doc Job object . Please refer to the "Fields For Our Use Case" section in this article to learn more about S-Doc Job fields.

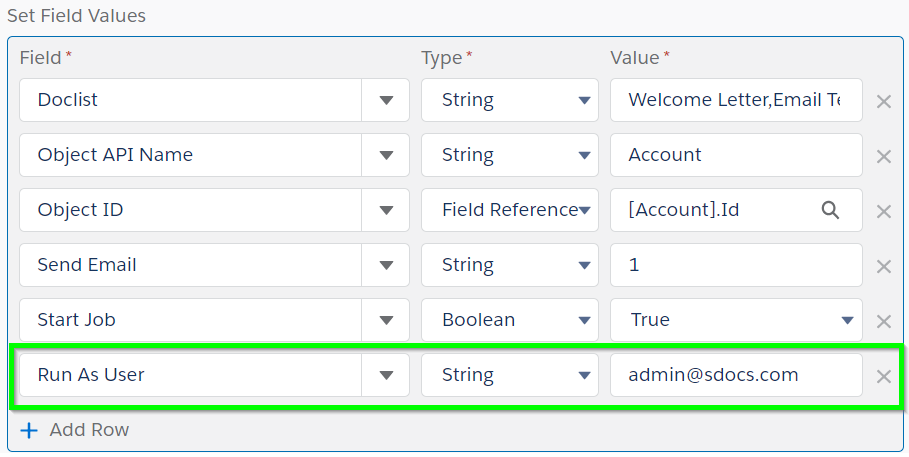
For example, if you were automating your document generation process with Process builder, you would need to add the Run As User field, set the Type to string, and enter the username of the user to be used as the running user. This is displayed in the following image:

Note: We recommend only setting system administrators to "Run As" users.

For more information on automation and S-Docs jobs, please refer to our automation guides for Salesforce Lightning or Salesforce Classic.

Upon completion, you should be able to invoke the call using any username. To verify the process, you can go to:

Setup > Administrations Setup > Monitoring > Apex Jobs.

If you require additional error handling, this should be done within your own code base.

My Self-Signed Certificate is Expiring Soon!

Several months after setting this up, you may get an email from Salesforce informing you that your self-signed certificate expired. If that is the case, you can follow the steps below to renew your certificate. We recommend doing this after hours.

1. From the setup menu, type "Certificate" into the Quick Find bar and click Certificate and Key Management in the dropdown menu.
2. Click Delete for SDocsCert.
3. Click Create Self-Signed Certificate.
4. Set Label to SDocsCert.
5. Set Unique Name to SDocsCert.
6. Click Save.
7. Click Download Certificate.

The next steps are different in Salesforce Classic and Salesforce Lightning.

For Classic:

1. From the setup menu, type "Apps" into the Quick Find bar, then click Apps (under Build > Create).
2. Scroll down to the Connected Apps section, find "Sdocs Connected Apps," and click the Edit link next to it.
3. Scroll down to Use digital signatures.
4. Click Choose File and select the previously downloaded certificate.
5. Click Save.
6 It may take several minutes for the new certificate to take affect.
7. Confirm that everything is working (test SDJobs with Mass Merge).

For Lightning:

1. From the setup menu, type "App Manager" into the Quick Find bar, then click App Manager in the dropdown menu.
2. Find the "Sdocs Connected Apps" connected app. Click the dropdown arrow on the right, and click View.
9. Click Edit at the top of the page.
11. Scroll down to Use digital signatures.
12. Click Choose File and select the previously downloaded certificate.
13. Click Save.
14. It may take several minutes for the new certificate to take affect.
15. Confirm that everything is working (test SDJobs with Mass Merge).

Troubleshooting

If you performed this setup but your S-Docs Jobs are stuck at Error - Run As User Failed, or 10%, please try the following:

  • Navigate to Setup > Custom Settings > SDocsSettings > Manage > SDocsSettings > Edit, and set ConnectedAppTokenUrl to the URL domain seen in your browser's URL bar when you're on the "home" page in Classic. Additionally, set the ConnectedAppLoginURL to one of the following:
    • Production: https://login.salesforce.com
    • Sandbox: https://test.salesforce.com
  • Navigate to Setup > Connected Apps > SDocs Connected Apps > Profiles, and verify that the profiles of the following users are added to the app's permitted profiles list:
    1. The user who inserted the job
    2. The 'Run As User'
  • Go to Setup > Remote Site Settings and verify that there are entries for the appropriate Salesforce production/sandbox URL and the customer’s home URL (Salesforce Classic). Additionally, verify that these entries are active.
  • Make sure the user's profile has the Apex REST Services permission checked.

Automation & Batch Processing Using S-Docs Jobs

By Documentation, S-Docs Automation: Jobs & REST API No Comments

Winter '20 Release Note: If you are using S-Docs below version 4.53, you may experience an "Attempt to de-reference a null object" error when interacting with various forms of automation in S-Docs. In order to fix this bug, you can create a new SDocs Settings custom settings set. To do this, type "Custom Settings" into the Quick Find / Search bar in the Setup menu, and click Custom Settings. Click SDocsSettings, then click Manage at the top of the page. From there, click New. Fill out the following information:

Name: SDocsSettings
ConnectedAppLoginURL:
Production: login.salesforce.com
Sandbox: test.salesforce.com
SD Jobs Batch Size: 45
SD Jobs Move to Top of Flex Queue:

Additionally, ensure that you have a Remote Site Setting for either login.salesforce.com (production), or test.salesforce.com (sandbox).

Introduction

If you're looking for a way to automate your document generation process--perhaps you want a document to be automatically generated and emailed when a field value has changed or a date has passed--this document will help you configure S-Docs to meet your requirements using the S-Docs Jobs object.

For example, when a user changes an opportunity stage field to “send quote,” you can configure S-Docs to generate a PDF quote along with a customized cover letter and email it to the opportunity contact. Users would not need to click on any buttons or choose any templates. Whenever the field value is changed, even from a mobile device, the process is invoked and the documents are generated and optionally emailed.

This document will show you how to use S-Docs Jobs to automate document generation in three different ways: with Salesforce Process Builder, APEX Triggers, and Visual Workflows.

If you are looking for a way to generate multiple S-Docs (in batch) from an object list view, you can accomplish this with S-Docs Jobs as well. For example, a user could select multiple records at once from a list view and send each record a custom invitation email to an event. The possibilities to further automate and distribute your documents are unlimited. Please refer to this documentation for more information about batch document generation.

Automatic Document Generation with S-Docs Jobs

An S-Docs Job is a simple, intuitive Salesforce object designed for automatically generating (and optionally emailing) documents with your custom code, Salesforce Processes, Salesforce Flows, and other integrations. We recommend you use S-Docs Jobs with Process Builder, which can do just about anything workflows can.

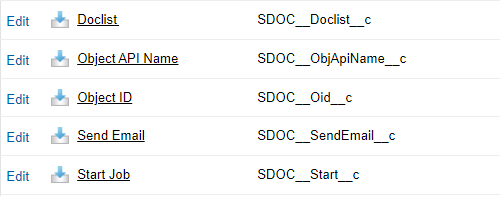
For use with your custom code, Salesforce Processes, or Salesforce Flows, the API name for S-Docs Jobs is SDOC__SDJob__c, and the API names for some of its relevant fields can be found in the following list. You'll use these fields later when configuring your document automation.

To automatically generate S-Docs with S-Docs Jobs, you'll be configuring your Salesforce Process, custom code, or Visual Workflow to do at least five things:

  1. Create an S-Docs Job record
  2. Specify the ID of the record you would like to generate these documents for
  3. Specify this record’s object API name (Opportunity, Account, etc.)
  4. Specify the name of the template you would like to use for document generation
  5. Optionally fill in the fields for emailing these documents. Finally, you will need to set the SDOC__Start__c field for this Job record to “true” in your APEX code or Salesforce flow to run this Job (i.e. to generate and optionally email the specified documents)

Before we see how to use S-Docs Jobs for automatic document generation, we’ll see what the Job records themselves look like.

Behind the Scenes of S-Docs Jobs

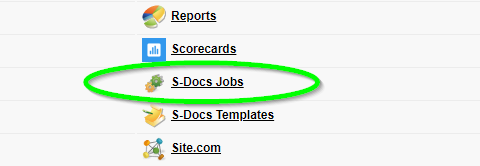
When one of the three methods (Salesforce Processes, APEX code, or Visual Workflows) creates an S-Docs Job, it is stored as an S-Docs Jobs record. To view these records, navigate to All Tabs ("+" icon), then scroll down and click S-Docs Jobs.

All S-Docs Jobs records appear here. In most (if not all) cases, we will not be creating Jobs records with the New button here; the records here should be created by your Salesforce Process, APEX triggers, Salesforce flows, etc. However, you can delete logs by opening a job record and clicking Delete (though this may also be done programmatically).


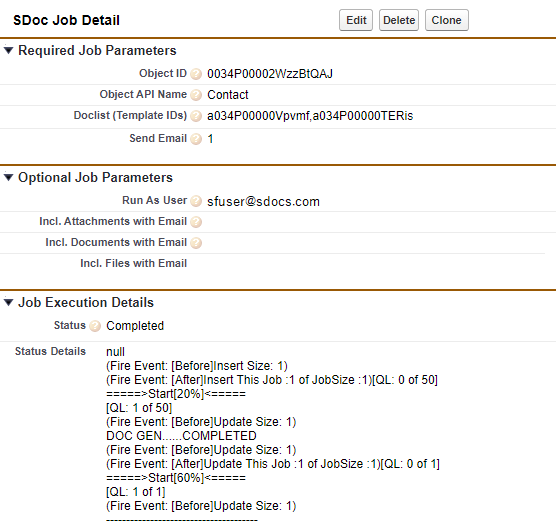
You can open a job record by clicking on the SDJob number on the left. The record will show you things like the IDs of the templates used to generate it (i.e. the Doclist), the ID of the record it generated documents for (i.e. the Object ID), and other relevant Jobs fields.


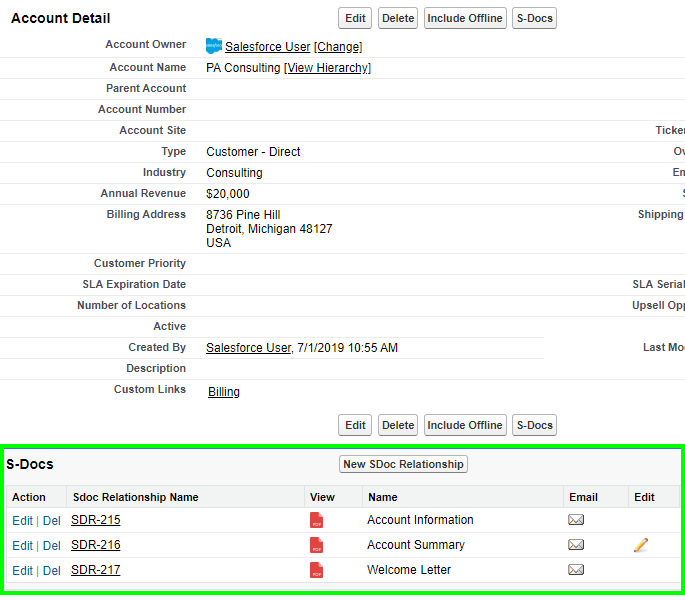
The documents the Job generated will also be included in the record. You can click on their icons under the Job Execution Details section to view them. You don't need to find the job record to view documents generated by a job, however. A related list for these documents will be automatically created on the page of the record you generated the documents for. For example, if we created an APEX trigger that would create a Job to generate three documents whenever an account record was created, we would see those three documents in that account record’s related list like so:

Note that these documents would still exist in the S-Docs related list on the account record page even if we deleted the Job that created these documents. If you wanted to delete these documents for good, you could delete them from the S-Docs related list.

Now that we’ve seen how S-Docs Jobs work behind the scenes, we can see how we might leverage their functionality with Salesforce Processes, APEX triggers, and Salesforce flows.

Use Case: Automatically Generating & Emailing a Welcome Letter Whenever an Account is Created

Consider the following use case: whenever an account is created, we would like S-Docs to generate a welcome letter for that account, and then email it to a contact associated with that account. This process can be automated in no time using S-Docs Jobs! In the three sections following this one, we will explore how to accomplish this in Process Builder, APEX triggers, and in Salesforce Flows (Visual Workflows). In all three of these scenarios, we will have to fill in the following fields in order to automate this particular case; you'll see how to use these fields once we get into each scenario.

Fields for our Use Case

SDOC__Start__c (Start Job)This will be set to ‘true’ so that the specified documents will automatically generate (and in this case, automatically email, as we have specified them to do so using the Job’s email fields) upon the creation of this particular S-Doc Job record.

SDOC__SendEmail__c (Send Email)If we set this to ‘0,’ an email will not be sent. If we set it to ‘1,’ this S-Doc Job record will email the document it generated. Thus, we will be setting this to ‘1.’

For this to work properly, our Doclist needs to include an S-Doc HTML email template. In our example, this template will use a merge field in the "Email SentTo" field (found under the Email Settings tab of the template editor) that will be dynamically populated with the appropriate contact's email address. Then, each Job record would generate a welcome letter PDF, generate an email using the HTML email template, attach the welcome letter PDF to that email, and then send that email.

SDOC__Oid__c (Object ID): This is the Object ID field, i.e. the place where we specify which object our Process/APEX Trigger/Flow should pull record IDs from. In our example, we will choose Account, since we want our process to use Account record IDs.

SDOC__ObjAPIName__c (Object API Name)This is the API name of our objects. In our example, we’re creating this trigger for new accounts, so we'll store Account in this field.

SDOC__Doclist__c (Doclist): This is the comma-delimited list of S-Docs template names that we will be using to generate our documents. Make sure there aren’t any spaces in your comma-delimited list. In our example use case, Welcome Letter is the name of our S-Docs PDF welcome letter template, and Email Template is the name of our S-Docs HTML email template. Thus, we will be using the following Doclist for our example use case Salesforce Process, APEX code, and Salesforce Flow:

Welcome Letter,Email Template

You can also use template IDs for the doclist parameter, however this is not recommended because these IDs will change between sandbox and production orgs, meaning that you will have to re-add the new template IDs into this parameter after transferring to production.

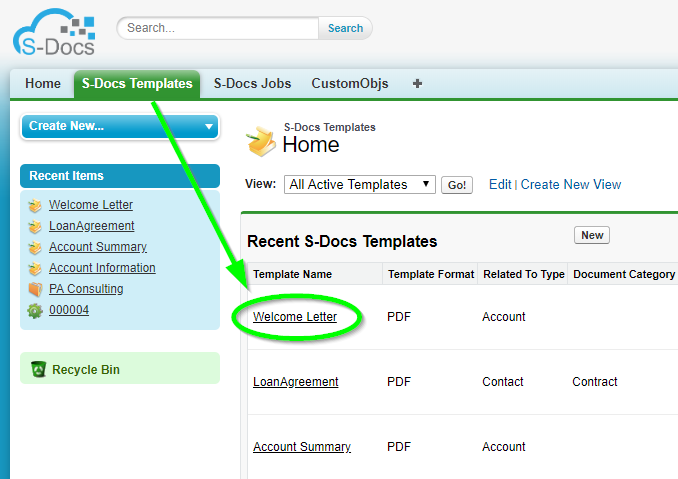
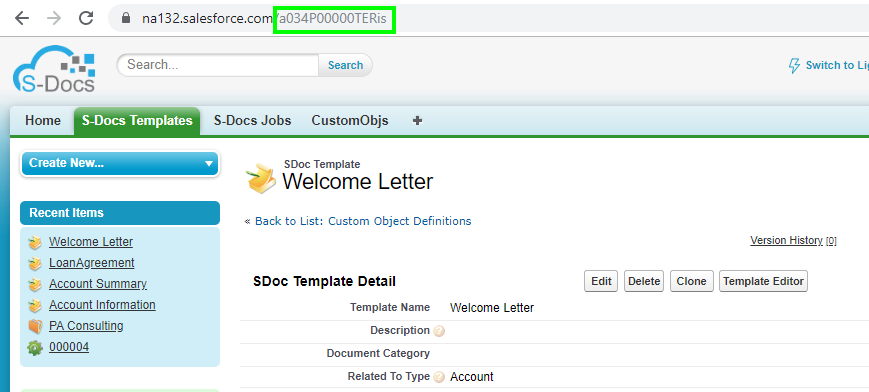
To find the template IDs for use in your Doclist field, go to the template record page for each template you're using.


The template ID can be found in the URL. You can then copy and paste this ID into your Doclist field for an S-Docs Job in your Process, APEX code, Flow, etc.

Note: If your org contains multiple templates with the same name, all of them will generate if one of them is referenced in one of your processes. In this case, you should use the template ID instead.

In the following three sections, we will see how to use S-Docs Jobs with Salesforce Processes, APEX triggers, and Salesforce Flows to automatically generate and email a welcome letter whenever an account is created.

Additional Fields

While the example use case in this article only uses 5 fields, S-Docs Jobs also support a number of other fields that you can use to further customize your process.

Email From

Email From allows you to set an org-wide email address as the From address when your S-Docs Job process includes emailing a document.

Email Params

Email Params allows you to add advanced email parameters to your process that are not available to access through standard fields on the S-Docs Job object, such as useExistingNoContactRecord=true.

Incl. Attachments with Email

Incl. Attachments with Email allows you to specify a comma-delimited list of Salesforce Attachment IDs to be included in the email sent out by the S-Docs Job.

Incl. Documents with Email

Incl. Documents with Email allows you to specify a comma-delimited list of Salesforce Document IDs to be included in the email sent out by the S-Docs Job.

Incl. Files with Email

Incl. Files with Email allows you to specify a comma-delimited list of Salesforce File IDs to be included in the email sent out by the S-Docs Job.

Include All Related Files

Include All Related Files allows you to opt to attach every file related to the base record to the email sent out by the S-Docs Job.

Using S-Docs Jobs with Process Builder

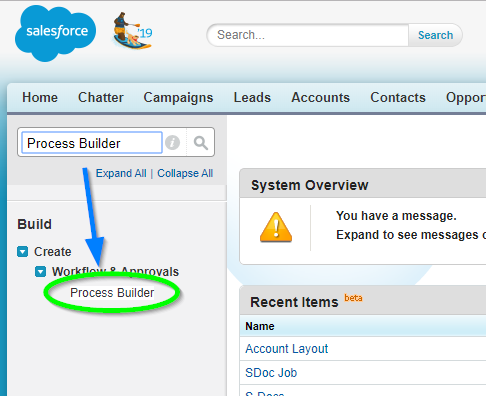
The easiest way to generate and email a welcome letter whenever an account is created is to use an S-Docs Job in a Salesforce Process. From the Setup menu, type "Process Builder" into the Quick Find / Search bar and click Process Builder.

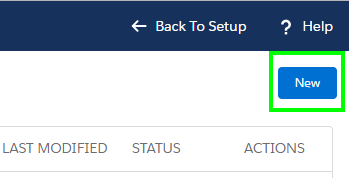
Click New in the upper right corner to create a new process.

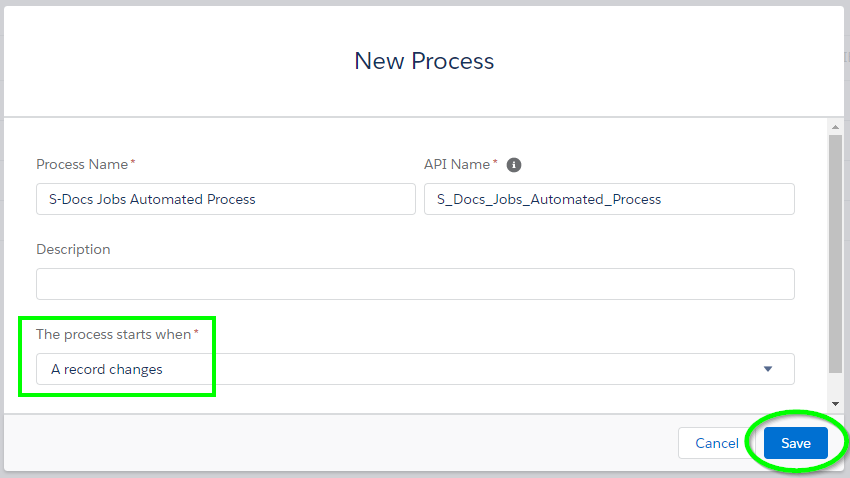
You can name the process whatever you want, then choose to have this process start when a record changes. Click Save.


Click Add Object, choose Account, and start the process only when a record is created.


Click Save. Then, click Add Criteria and set it to No Criteria, since we want our Job to execute every time a new account record is opened.

Then, click Add Action and choose Create a Record for our Action Type. For the Record Type, select SDoc Job. You may have to type it in to find it.

A Field Values menu will appear below. This is where you will add the five fields described above in the Fields for Our Use Case section. Click Add Row to add each new field.

Then, we click Save and click Activate at the top right of the screen.

All done! S-Docs will now automatically generate and email a welcome letter whenever an account is created.

Using S-Docs Jobs with APEX Triggers

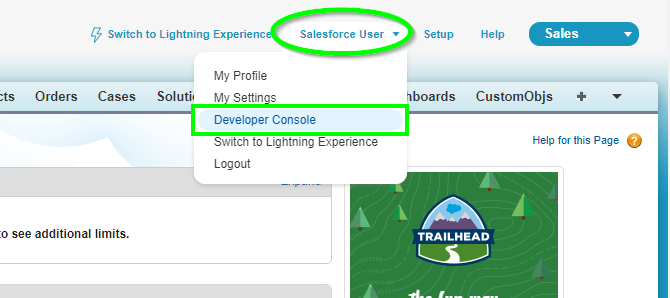
S-Docs Jobs are also simple to use with APEX triggers. To get started, click your username in the upper right corner, then click Developer Console.

Then, navigate to File > New > Apex Trigger.

You can name the trigger whatever you want, then select Account for the sObject.

You'll see the following screen.

You can delete the text here, then copy and paste the following APEX trigger into the text field.

[code lang="html"]trigger SendWelcomeLetter on Account (after insert) {
List<SDOC__SDJob__c> jobList = new List<SDOC__SDJob__c> {};
for(Account acct : Trigger.New) {
SDOC__SDJob__c job =
new SDOC__SDJob__c(SDOC__Start__c=true,
SDOC__Oid__c=acct.Id,
SDOC__ObjApiName__c='Account',
SDOC__SendEmail__c='1',
SDOC__Doclist__c='Welcome Letter,Email Template');
jobList.add(job);
}
insert jobList;
}[/code]

This simply creates a Job Object in the APEX trigger, fills in its fields as previously discussed in the Fields for our Use Case section above, and inserts each Job into our Salesforce database. Note that SDOC__SendEmail__c is a string, so its value must be specified in single quotes. SDOC__Doclist__c and SDOC__ObjApiName__c must be specified in single quotes as well.

SDOC__Oid__c, the Object ID field, is given the value acct.Id. This means that for each account record in our loop, the S-Doc Job created for this particular account record will have this account record’s ID stored in its SDOC__Oid__c field.

Click File > Save to complete your APEX Trigger!

Using S-Docs Jobs with Salesforce Flows (Visual Workflows)

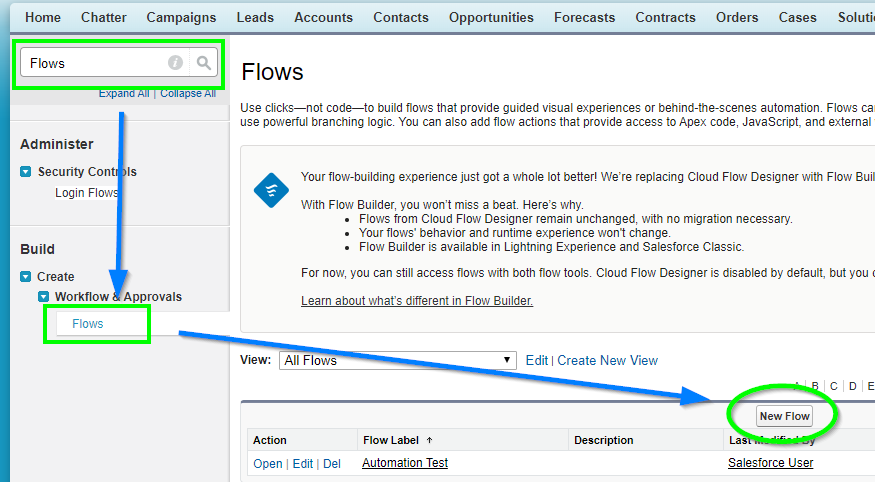
This option is a special case; say we don’t want to generate an email letter whenever an account is created anywhere in our org. Rather, we would like to generate and email a welcome letter only when an account record is created in a Salesforce Flow. Using S-Docs Jobs with Salesforce Flows is as simple as using any other object with Salesforce Flows, so this is easy to accomplish. To get to Flow Builder, type "Flows" into the QuickFind / Search bar in the Setup menu, click Flows, then click New Flow.

Create an Autolaunched Flow.

First, we need to create a new variable called “acct.” Select Manager in the Toolbox area, then click New Resource.

For the Resource Type, select Variable. Enter "acct" for the API name, and make sure the Data Type field is set to Text.

Now we need to create two Record Creates: one for an Account and one for an SDoc Job. We'll create the Record Create for an Account first. Navigate back to the Elements tab in the Toolbar, then drag Create Records into the Flow.

Insert the following information:

Label: Create Account
API Name: Create_Account
How Many Records to Create: One
How to Set the Field Records: Use separate variables, resources, and literal values
Object: Account
Field: Name
Value: New Account Example
Variable: {!acct}

Next, we need to add a Record Create for the SDoc Job. Drag Create Records into the flow again. Insert the following information:

Name: Automatically Generate and Email Welcome Letter
Label: Automatically_Generate_and_Email_Welcome_Letter
How Many Records to Create: One
How to Set the Record Fields: Use separate variables, resources, and literal values
Object: SDoc Job

Fields & Values:

SDOC__Start__c: {!$GlobalConstant.True}
SDOC__SendEmail__c: 1 (This specifies that we wish to email the document generated by this Job record (we would type in “0“ (without quotes) if we did not wish to send an email)
SDOC__Oid__c: {!acct} This variable stores the ID of the Account record created when the “Record Create” that we made for an Account executes.
SDOC__ObjApiName__c: Account
SDOC__Doclist__c: [Insert your template names here]

Once you've saved both record creates, attach them together by clicking the circle on "Create Account" and dragging the line to the circle on "Automatically Generate and Email Welcome Letter," and attach "Start" to "Create Account."

At this point, running this flow would result in an account called “New Account Example” being created, and documents for this account would automatically be generated and emailed by the S-Doc Job record created for this account.

If we wanted to, we could now start building a much larger flow involving these two Record Create boxes.

Batch Processing with S-Docs Jobs (Recommended)

S-Docs Jobs are also used to facilitate batch document processing. However, they are used behind the scenes throughout the entire process; batch processing is performed in a simple click-only interface, so you won’t have to worry about creating the Jobs themselves. This feature, in addition to the mass merge feature, is covered in detail in the S-Docs Mass Merge & Batch Document Feature documentation.

Mass Merge & Batch Document Feature

By Documentation No Comments

Introduction

When you leverage the S-Docs Mass Merge document feature, you have the power to generate a large number of documents for any object with just a few clicks. Once you enable this feature, all you have to do is select an object, select the records that you would like to generate documents for, and select the S-Docs templates for each document generated. For example, if you need to generate an account summary for every account in your Salesforce database, S-Docs can provide you with a solution in just a few simple clicks.

Additionally, the mass merge feature provides the ability to merge an entire batch of documents into a single document in a matter of seconds. As an example, if your task was to generate and print a large number of documents, you could simply perform a mass merge and print the resulting document, rather than generate a document for each record, having to download and print each one individually. When you take advantage of the S-Docs mass merge and batch documents feature, you eliminate tedious work and gain more time to focus on the bigger picture.

Video Tutorial

Preview: The Mass Merge & Batch Document Feature in Action

Before we get into the details of setting up and configuring a mass merge, we will explore this feature in action. In the following preview, we will be generating account summaries for contacts and combining the resulting batch of documents into a single printable PDF. We begin by creating a list view that lists all of our contacts with overdue accounts, and selecting all of the resulting contacts.
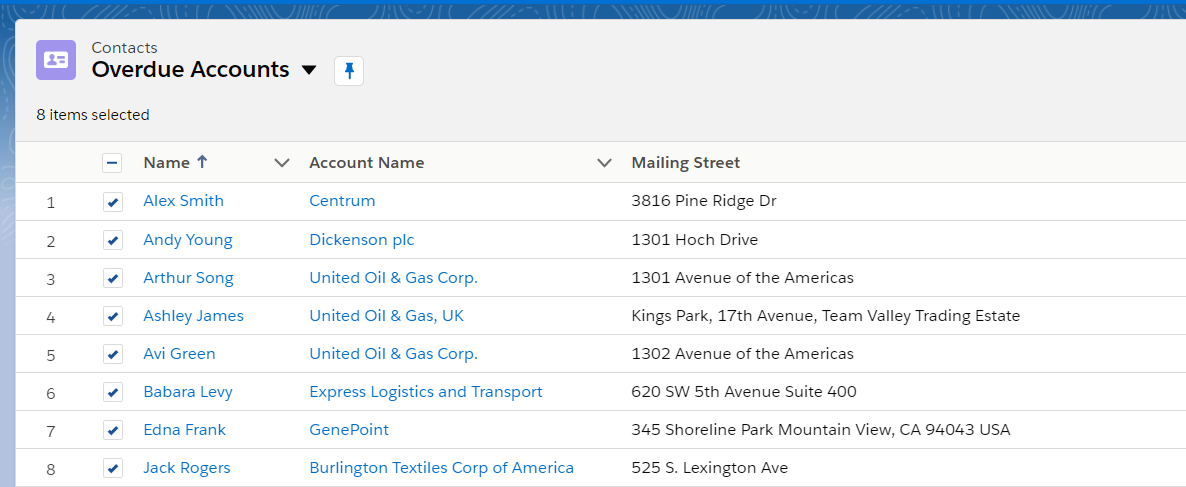
We then click the Add to Mass Merge List button at the top of the list view page to add these records to our mass merge list. We then click the View Mass Merge List button, bringing us to the mass merge page. Here, we can select up to 2 templates that we would like to use for this mass merge (note that the Combine all into single printable document button only supports the selection of one template). In this case, we'll select the Account Past Due template, then click Go To Next Step.
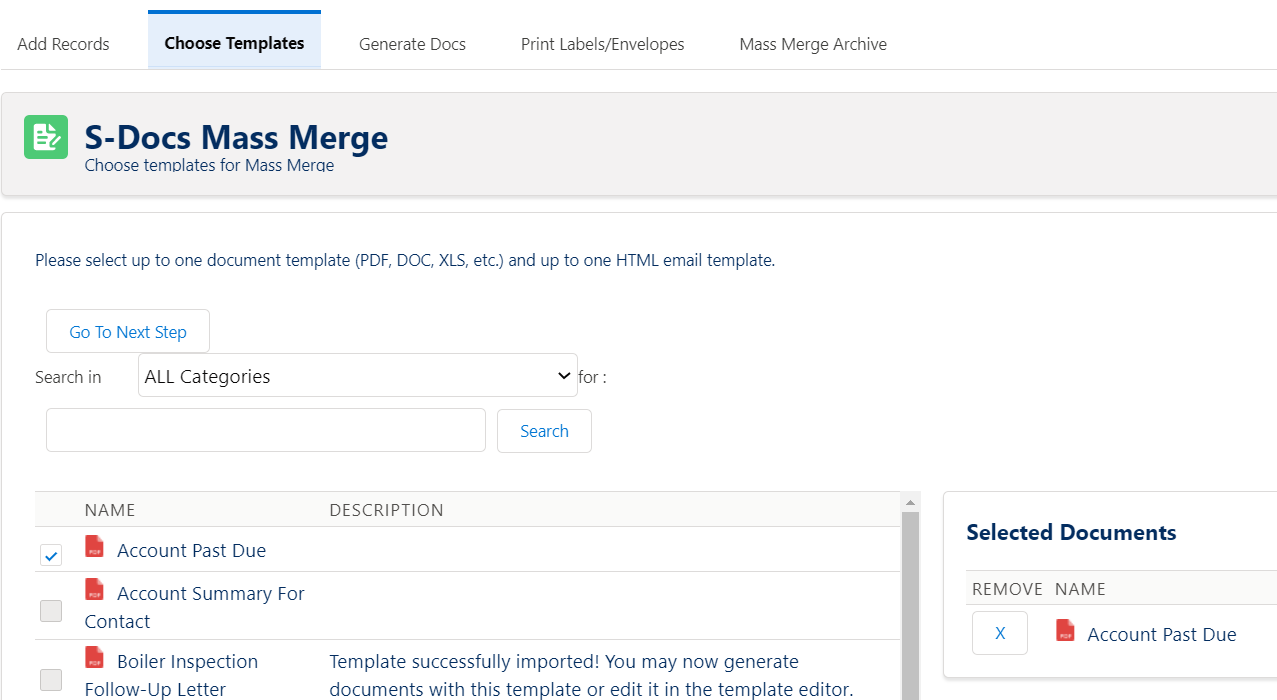
On this page, we can review all of the records that we added to the mass merge list. We've added the mailing information for each of our contacts displayed in this list, but you can add any combination of relevant fields. Once we're satisfied with the records, we can click Start Mass Merge. A unique document will generate for each record in our list.
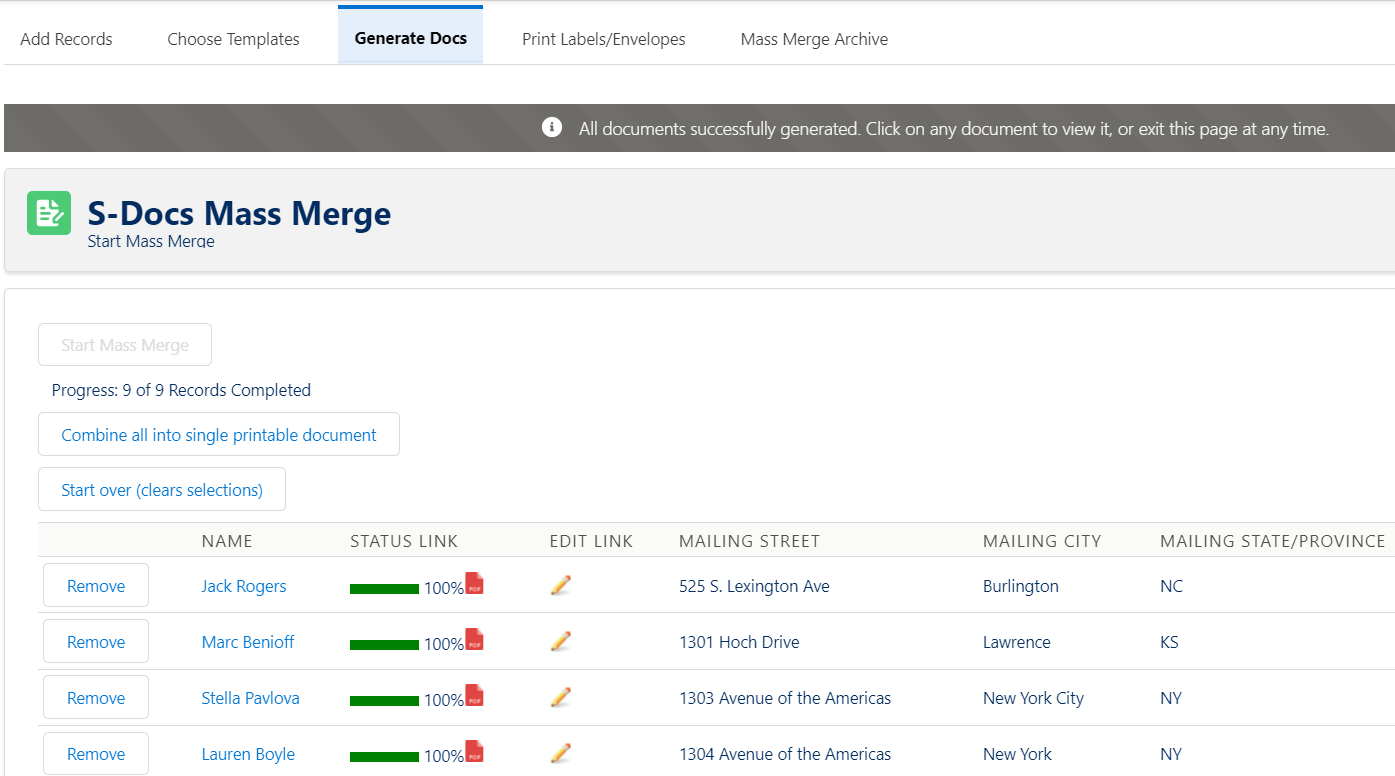
Note that there is a PDF icon next to each contact after generating the documents. A document can be downloaded by clicking on one of these icons. Each document is also attached to the record it was generated for; if we go to the contact record page for “Jack Rogers,” the documents will be included in the S-Docs related list on that page, where we can download and/or email each document whenever we’d like. Thus, we have generated a batch of documents for a group of contacts.

The pencil icon under the Edit Link column can be clicked to Live Edit any document in this list. This icon will only appear if the template you chose is Live Edit enabled.

At this point, we click the Combine all into single printable document button in order to combine all of the generated documents into a single PDF file.

We can also print mailing labels for each of our contacts. Click here for a free mailing label template. In the "Print Labels/Envelopes" tab, all S-Docs Templates with a Document Category of "Mailing Label" will be available to choose from (if your version of S-Docs is missing "Mailing Label" from the "Document Category" picklist on the S-Docs Template object, you'll need to add it to the picklist values manually). To print mailing labels, we simply select a label template and click Print Labels/Envelopes to download a single DOC containing all of the mailing labels for easy printing.

Note: Combining all of the documents in a single printable document is limited to PDF templates only; however, we can generate large numbers of documents for any output file format supported by S-Docs.

Once we download our mass merged PDF and mailing label, we print them and that’s it! We have just printed cover letters, account summaries, and mailing labels for ten contacts with overdue accounts in just a few clicks, and we can now mail these documents to the contacts in question.

In the remainder of this guide, we will be setting up the buttons, pages, and lists that will enable the mass merge and batch document features for a particular Salesforce object.

Note: You will need to have at least one template created for the object that you would like to use in your mass merge. Additionally, if you are following these steps for a contact, then you can skip to Step 4: Add Buttons to Search Layouts. This is because for contacts, the Visualforce page and the Add to Mass Merge List and View Mass Merge List buttons come prepackaged with S-Docs.

STEP 1: Setting up S-Docs Mass Merge

Setting up mass merge in S-Docs requires a Visualforce page (one for each object used in mass merge) and a single Apex class, which we've provided here.

Note that you'll only have to create the page SDMassMerge once for all the objects you are setting up mass merge on. However, you will need to set up the Visualforce page for each object you are setting up mass merge on.

Create a new Apex class. To get this page, navigate to the Setup menu and type Apex Classes into the Quick Find bar. Click Apex Classes (under Custom Code) and then click New.
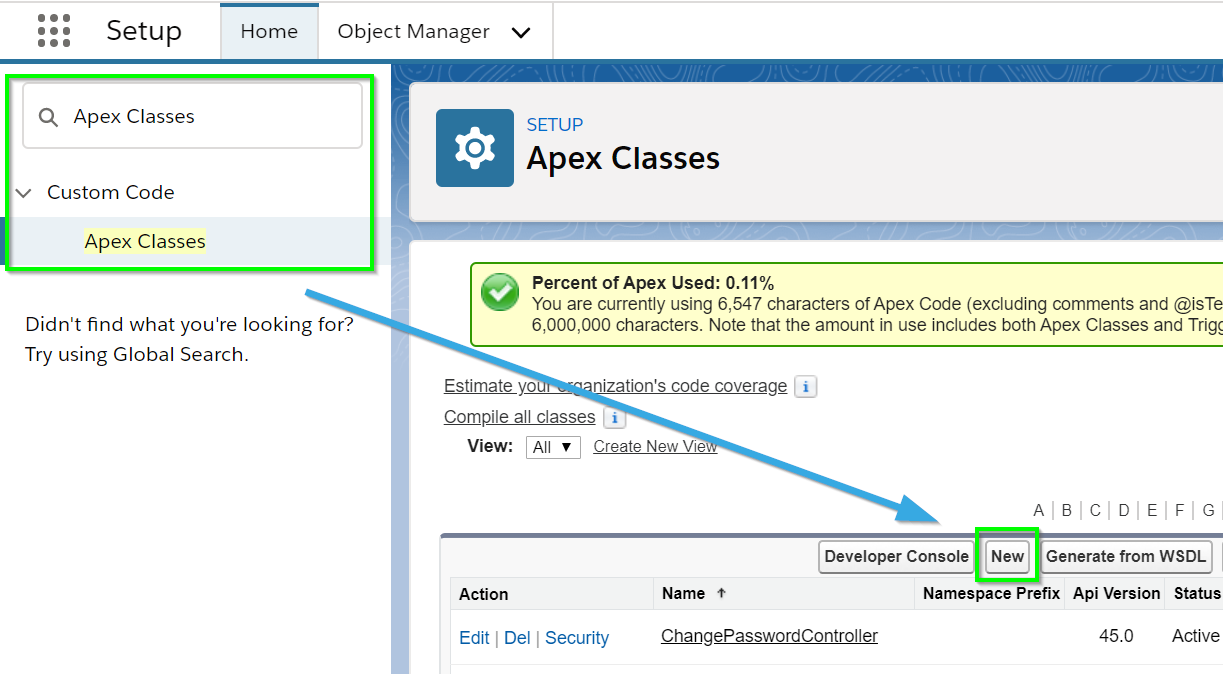
Paste in the following code (you only need to create this class once):

[code lang="html"]public class SDAddToMassMerge {
private ApexPages.StandardSetController stdSetController;

public SDAddToMassMerge(ApexPages.StandardSetController sscOther) {
stdSetController = sscOther;
}

public PageReference createMassMergeJobs() {
String objectName = ApexPages.currentPage().getParameters().get('objectName');
Boolean showHeader = ApexPages.currentPage().getParameters().get('showHeader') != 'false';

List<SDOC__SDJob__c> addToMassMerge = new List<SDOC__SDJob__c>();
List<SObject> selectedRecords = stdSetController.getSelected();
if (Test.isRunningTest()) {
selectedRecords = new List<SObject> { new Contact(LastName='Test') };
}
for (SObject selectedRecord : selectedRecords) {
SDOC__SDJob__c massMergeJob = new SDOC__SDJob__c(
SDOC__Oid__c = String.valueOf(selectedRecord.get('Id')),
SDOC__runAs__c = UserInfo.getUserName(),
SDOC__Status__c = 'Selected',
SDOC__type__c = 'Bulk Job - List View',
SDOC__objAPIName__c = objectName
);
addToMassMerge.add(massMergeJob);
}
insert addToMassMerge;

Integer batchSize = Database.countQuery(
'SELECT COUNT() FROM SDOC__SDJob__c WHERE ownerid=\''
+ String.valueOf(UserInfo.getUserId()) + '\''
+ ' AND SDOC__Type__c=\'Bulk Job - List View\''
+ ' AND SDOC__ObjApiName__c=\'' + objectName + '\''
);

PageReference massMergePage = new PageReference(
+ '/apex/SDOC__SDJobContact'
+ '?numRecordsAdded=' + String.valueOf(addToMassMerge.size())
+ '&batchSize=' + batchSize
+ '&objectName=' + objectName
+ '&showHeader=' + showHeader
+ '&sidebar=false'
+ '&tab=2'
);
return massMergePage;
}
}[/code]

Your Apex Class should look like this:
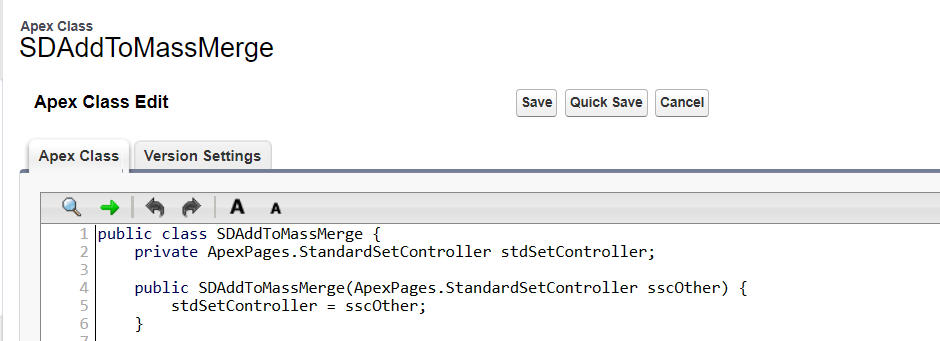
Click Save.

Next, for each object that users will perform mass merge on, you'll need to create a Visualforce page. Navigate to the Setup menu and type Visualforce Pages into the Quick Find bar. Click Visualforce Pages, then click New.
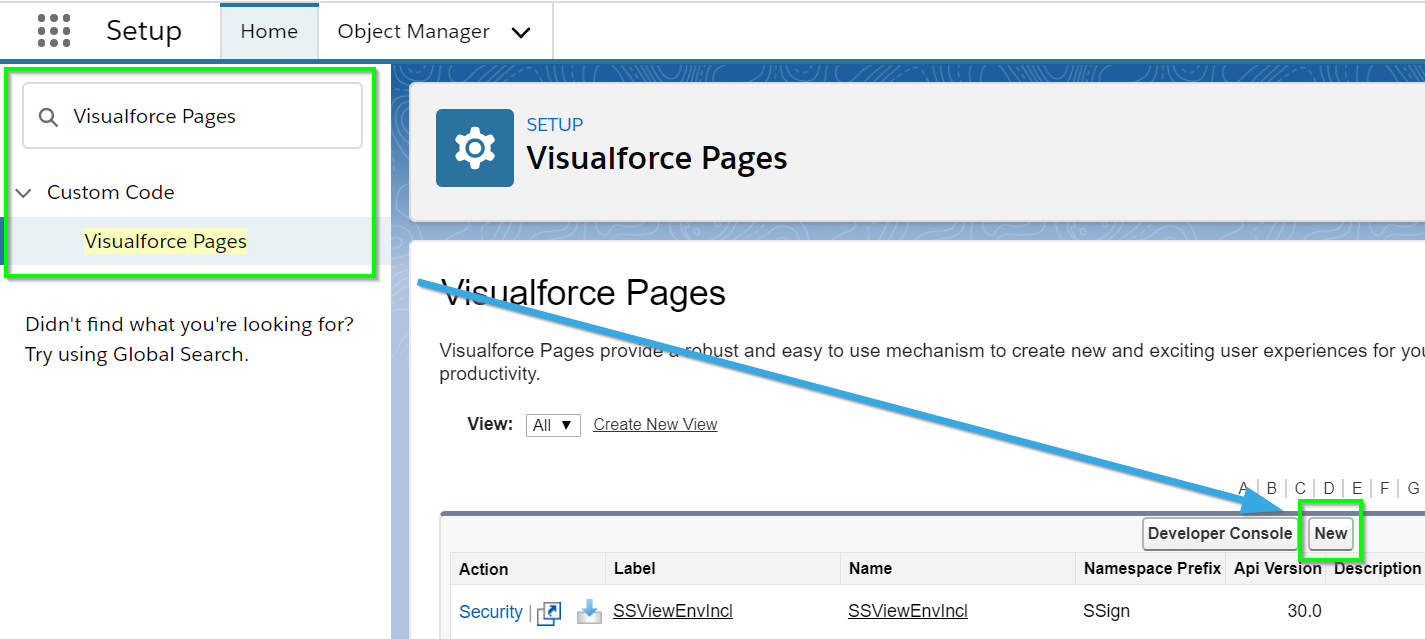
Create a new Visualforce page called SDAddToMassMergeCHANGE_TO_YOUR_OBJECT_NAME using the following code:

Note: Make sure to change OBJECTAPINAME in the first line of code to the name of your object.

[code lang="html"]<apex:page standardController="OBJECTAPINAME" showHeader="false"
extensions="SDAddToMassMerge"
recordSetVar="selected"
action="{!createMassMergeJobs}">
<div style="display:none;">
<apex:pageBlock >
<apex:pageBlockTable value="{!selected}" var="r">
<apex:column value="{!r.Id}" />
</apex:pageBlockTable>
</apex:pageBlock>
</div>
</apex:page>[/code]

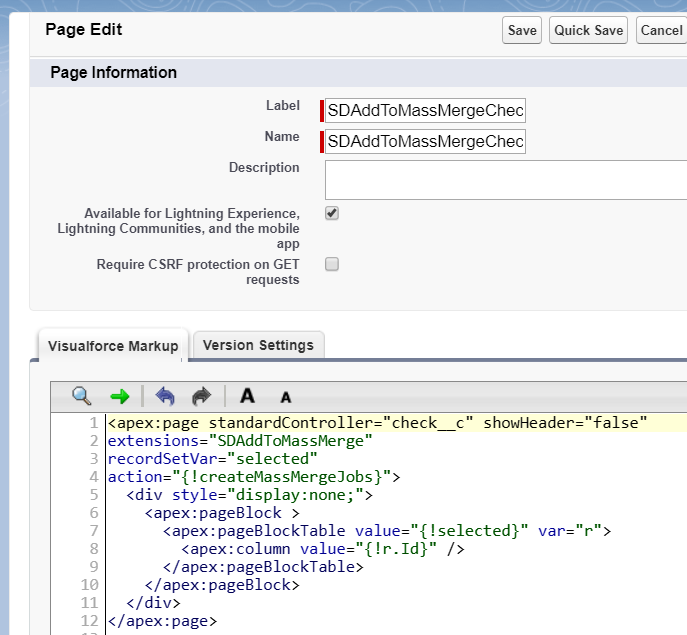
Note: When naming your Visualforce page, omit the __c if your object name contains it, as double underscores aren't allowed in VisualForce page names (but the __c does need to be included for custom objects in the code for the VisualForce page). It actually doesn't matter what the name of your page is. SDAddToMassMergeCHANGE_TO_YOUR_OBJECT_NAME is simply a naming convention intended to keep your Visualforce page collection neat and organized in case you have to create this page for several objects.

Make sure Available for Lightning Experience... is checked. For example, if your object API name is Check__c, your Visualforce Page should look like this:

If you require test coverage for the SDAddToMassMerge class, you can use the following test class (replacing all references to Opportunity with your object):

[code lang="html"]@isTest
private class SDAddToMassMergeTest {
@isTest
private static void SDAddToMassMergeTest() {
Integer numJobsToCreate = 20;
List<Opportunity> selectedOpportunities = [
SELECT Id, Name
FROM Opportunity
LIMIT :numJobsToCreate
];
ApexPages.StandardSetController ssc = new ApexPages.StandardSetController(selectedOpportunities);
ssc.setSelected(selectedOpportunities);
SDAddToMassMerge sdatmm = new SDAddToMassMerge(ssc);
String objectNameTest = '[SDAddToMassMerge Test]';
sdatmm.createMassMergeJobs();
Integer numJobsCreated = Database.countQuery(
'SELECT COUNT() '
+ 'FROM SDOC__SDJob__c '
+ 'WHERE SDOC__ObjApiName__c=\'' + objectNameTest + '\''
);
// System.assert(numJobsCreated == numJobsToCreate);
}
}[/code]

To recap:

  • Create only one Apex class
  • Create a Visualforce page for each object (and later a button for each object)

For example, after you performed these steps for 3 different objects, you would have created 3 Visualforce pages (one for each object), but just one Apex class (this class would control all 3 pages).

STEP 2: Create the "Add To Mass Merge List" button

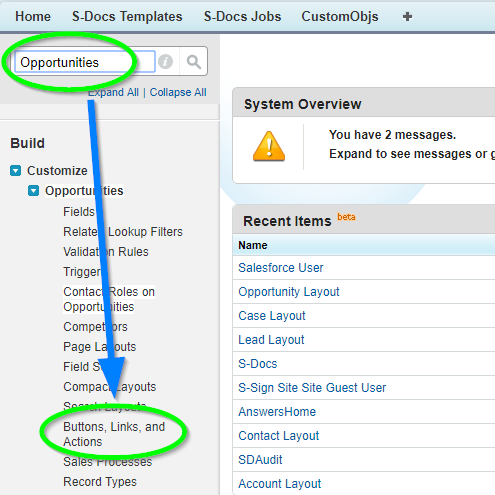
1. Now, navigate to the “Buttons, Links, and Actions” page for the Salesforce object that you would like to use in a mass merge.

In Salesforce Lightning, simply navigate to Setup > Object Manager > Your Object > Buttons, Links, and Actions > New Button or Link.

In Salesforce classic, the instructions for custom and standard objects are a bit different.

Note: If you’re performing a mass merge on a custom object, please follow the instructions for part (a). If you’re performing a mass merge on a standard object, please follow the instructions in part (b).

a.) Creating a new button for a custom object

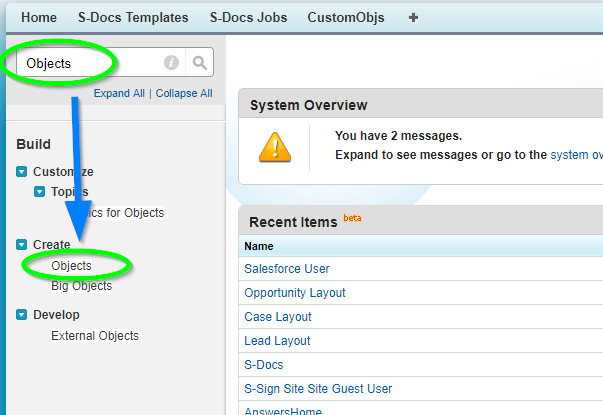
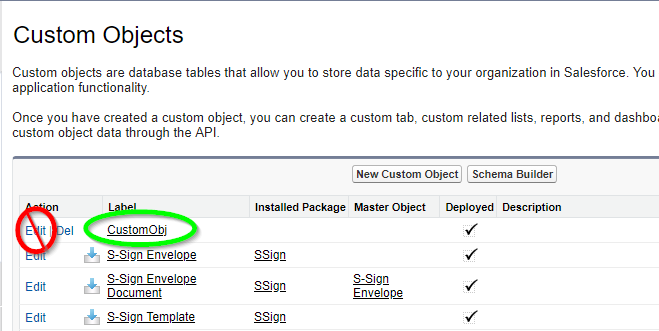
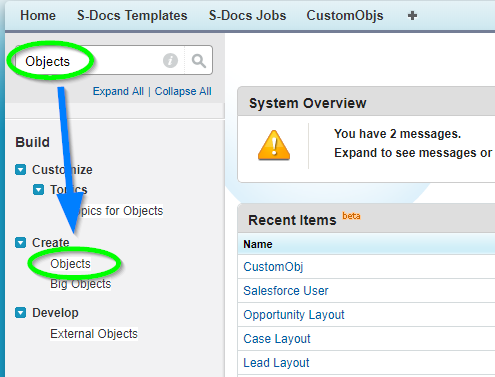
Navigate to the Setup menu and type Objects into the Quick Find bar. Click objects, then find the name of the custom object that you would like to use in a mass merge. Click the name of the object (do not click the edit button). In this example, we will be creating an Add to Mass Merge List button for the Check object, a custom object representing the data for a standard business check.
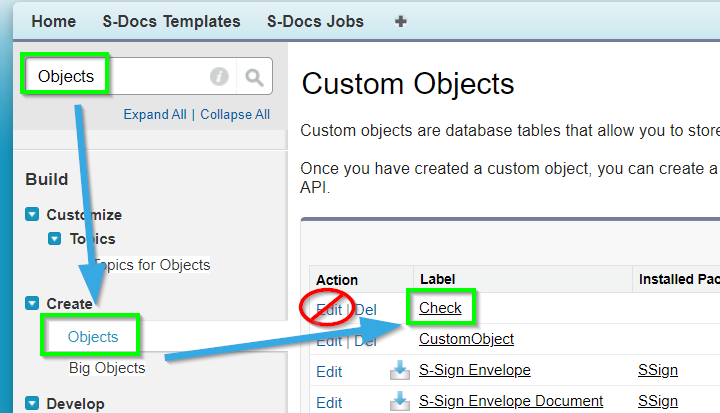
Next, a page will display for your custom object.

Take note of the API name at this point, as you will require it in later steps. The API name is often just the “Object Name” appended with __c (note the two underscores), but sometimes this is not the case, so please take note of that here. In the case of our custom Check object, we will note that our API name is Check__c.
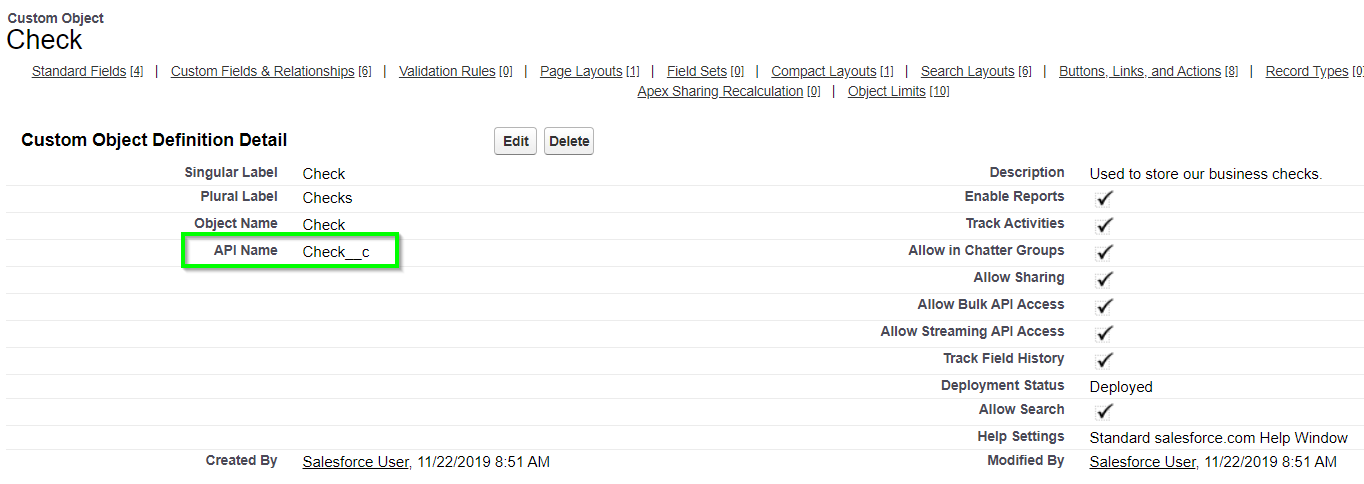
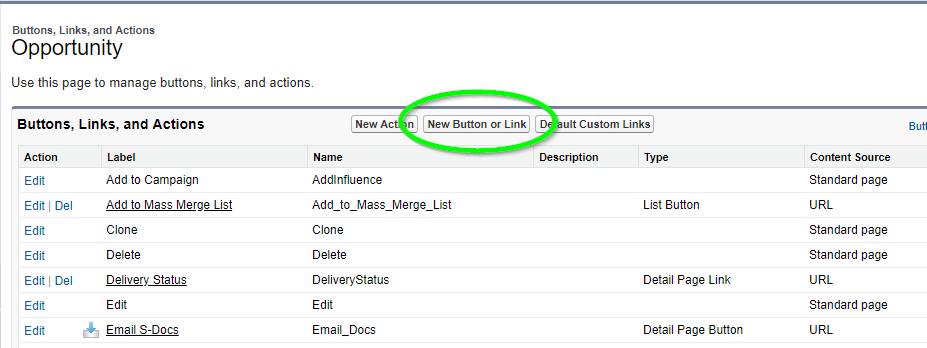
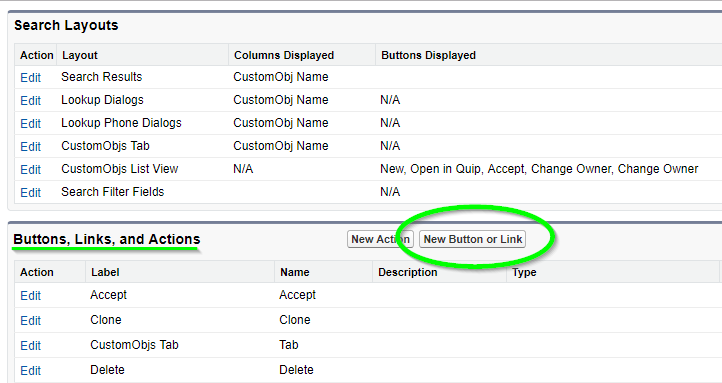
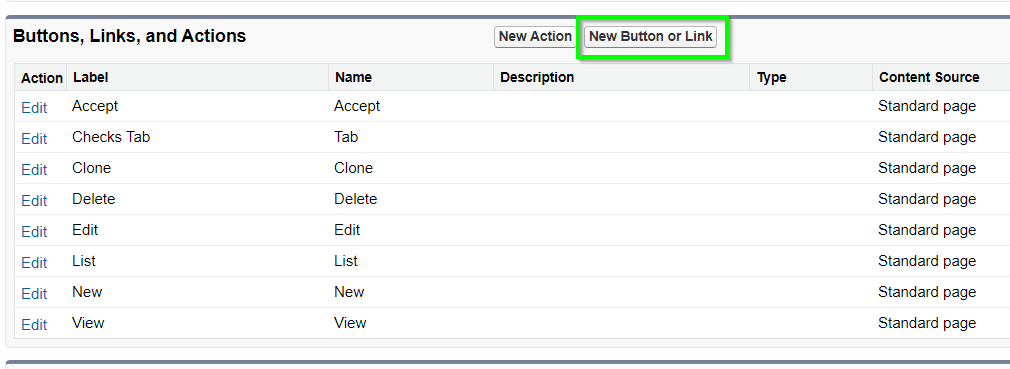
On the page for your custom object, scroll down to “Buttons, Links, and Actions” and click New Button or Link. This concludes part (a).
b.) Creating a new button for a standard object

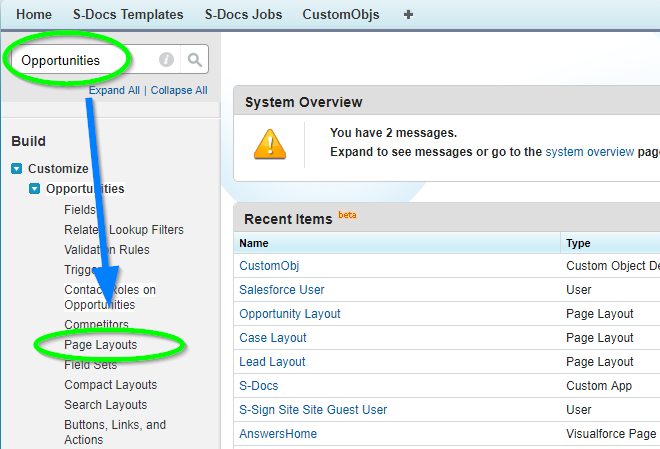
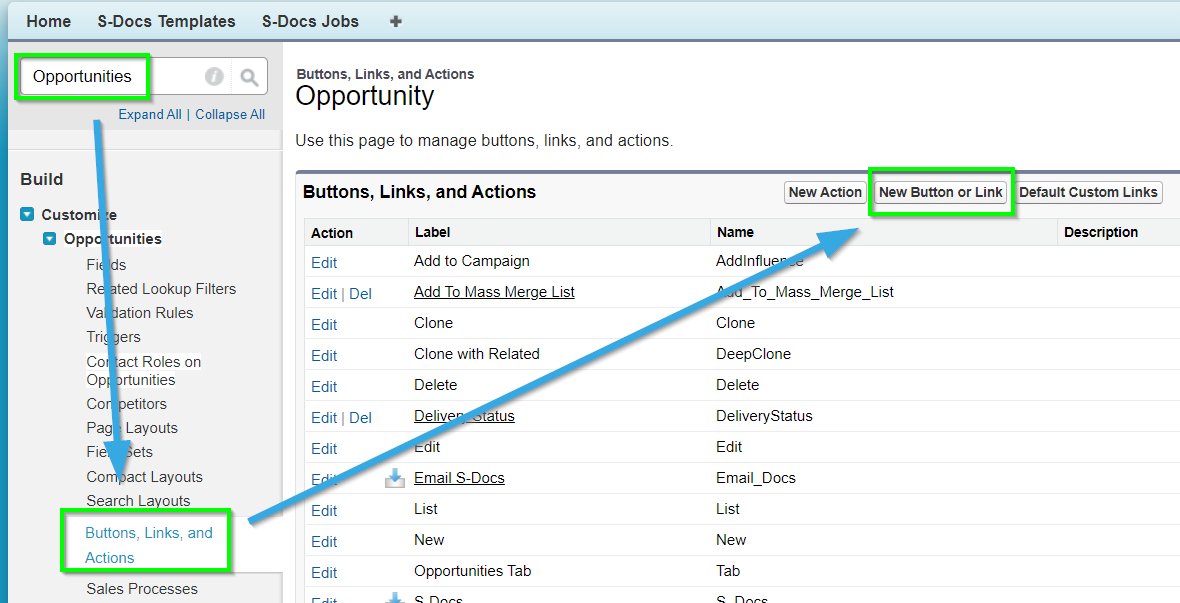
Navigate to the Setup menu and type the name of your standard object into the Quick Find bar. Find and click on Buttons, Links, and Actions in the dropdown menu. Then, click New Button or Link.
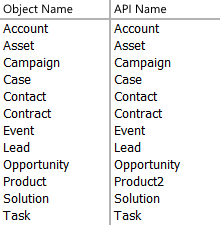
At this point, please note the API name for your standard object:
mass merge - step 1 (7)

Note that the API name is the same as the object name for all objects except for products; for a product, the API name will be Product2. This concludes part (b).

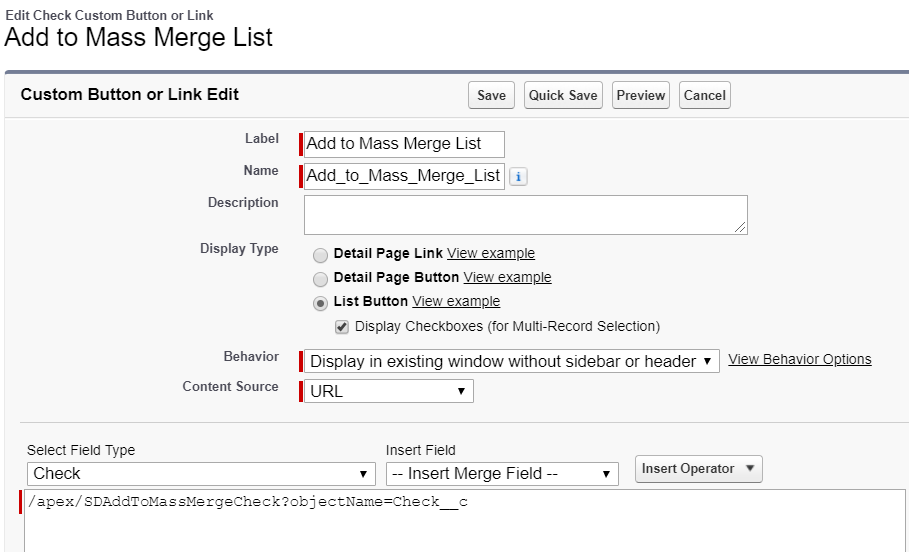
2. We will now define our button. For the fields listed on the “New Button or Link” page, please use the following:
Label: Add to Mass Merge List
Name: Add_to_Mass_Merge_List
Display type: List Button (please ensure that Display Checkboxes (for Multi-Record Selection) is checked as well)
Behavior: Display in Existing Window without Sidebar or Header
Content Source: URL
URL:

[code lang="html"]/apex/SDAddToMassMergeCHANGE_TO_YOUR_OBJECT_NAME?objectName=CHANGE_TO_YOUR_OBJECT_API_NAME[/code]

Once completed, the page should appear as follows:
Note: If your use case requires a View Mass Merge List button in addition to the Add To Mass Merge List button, you can simply repeat this step, naming the button "View Mass Merge List" instead of "Add To Mass Merge." This works because the Add To Mass Merge button redirects to the mass merge page by default.

STEP 3: Add Button to Search Layout

1. You will now need to edit the list view page for your object.

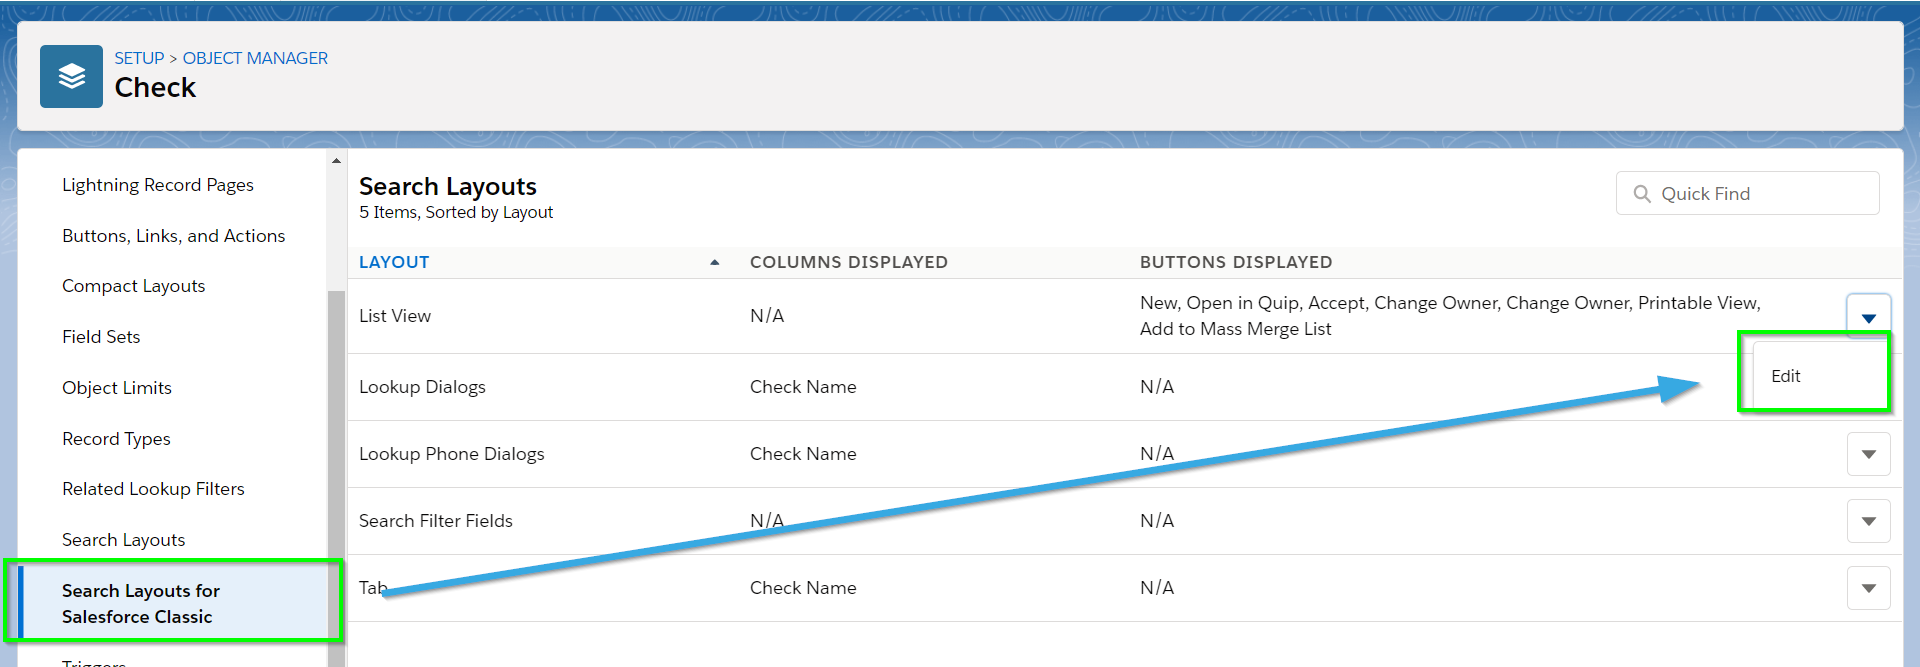
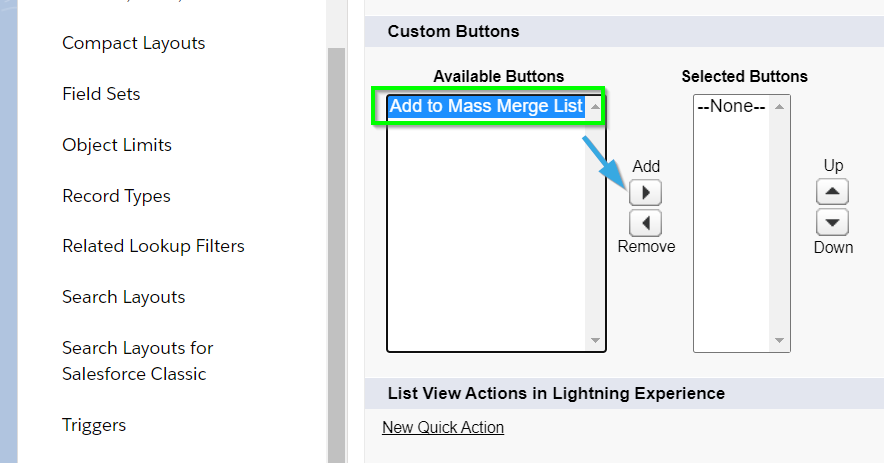
In Salesforce Lightning, simply navigate to the object manager page for your object and click Search Layout for Salesforce Classic in the sidebar. Find the List View layout and click Edit, then add the Add To Mass Merge List button to the layout.
In Salesforce classic, the instructions for custom and standard objects are a bit different.

Note: If you’re performing a mass merge on a custom object, please follow the instructions for part (a). If you’re performing a mass merge on a standard object, please follow the instructions in part (b).

a.) Adding buttons to search layouts for a custom object

Navigate to the Setup menu and type Objects into the Quick Find bar. Click Objects, then find the name of the custom object that you would like to use in a mass merge. Click the name of the object (do not click the edit button). In this example, we will be using the Check object.

Now, scroll down to the Search Layouts table. Click Edit next to the layout titled “[Object Name] List View,” where [Object Name] is the name of your object (excluding brackets).
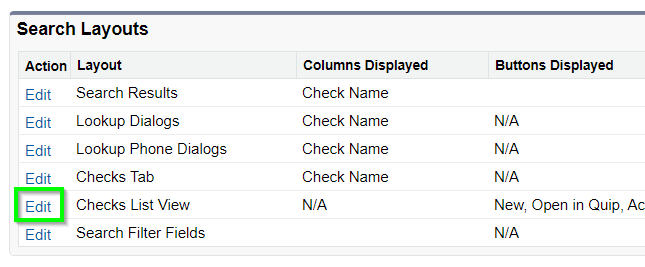
This concludes part (a).

b) Adding buttons to search layouts for a standard object

Navigate to the Setup menu and type the name of your standard object into the Quick Find bar. Find and click on Search Layouts in the dropdown menu. Then, click Edit next to the layout titled “[Object Name] List View,” where [Object Name] is the name of your object (excluding brackets).

2. Now that you’re on the Edit List View page for your Object, select Add to Mass Merge List under “Available Buttons” and click the rightward-pointing arrow below Add to add your button to “Selected Buttons.” Repeat this step for “View Mass Merge List” if you created a button for it. Click Save.
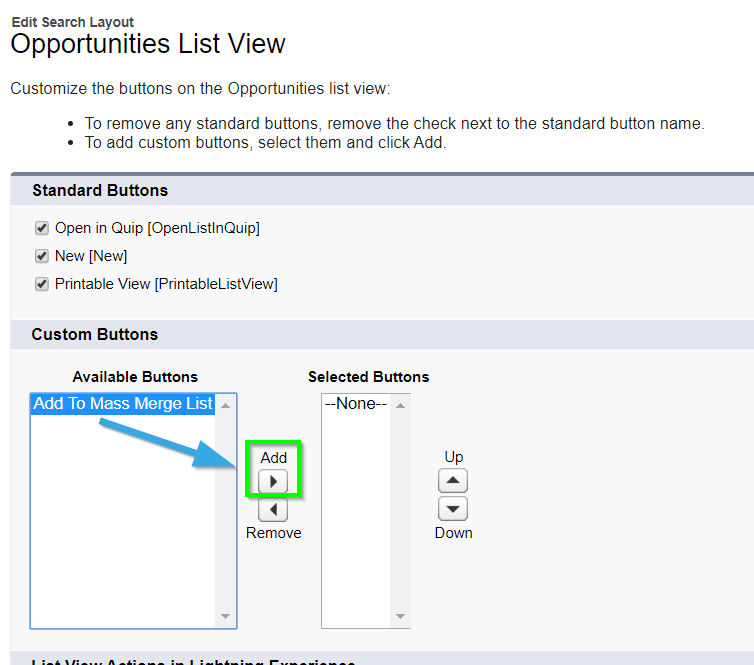
The finished page should appear as:
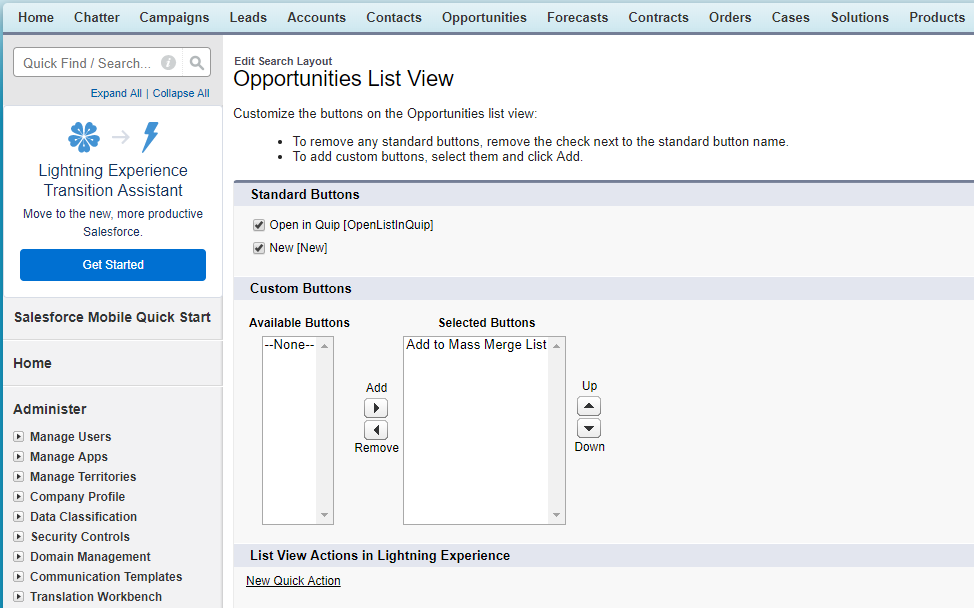
This concludes part (b).

Winter '20 Release Note: If you are using S-Docs below version 4.53, you may experience an "Attempt to de-reference a null object" error when interacting with various forms of automation in S-Docs. In order to fix this bug, you can create a new SDocs Settings custom settings set. To do this, type "Custom Settings" into the Quick Find / Search bar in the Setup menu, and click Custom Settings. Click SDocsSettings, then click Manage at the top of the page. From there, click New. Fill out the following information:
Name: SDocsSettings
ConnectedAppLoginURL:
Production: https://login.salesforce.com
Sandbox: https://test.salesforce.com
SD Jobs Batch Size: 45
SD Jobs Move to Top of Flex Queue:

Additionally, ensure that you have a Remote Site Setting for either login.salesforce.com (production), or test.salesforce.com (sandbox).

STEP 4 (Optional): Create a List View for Your Object

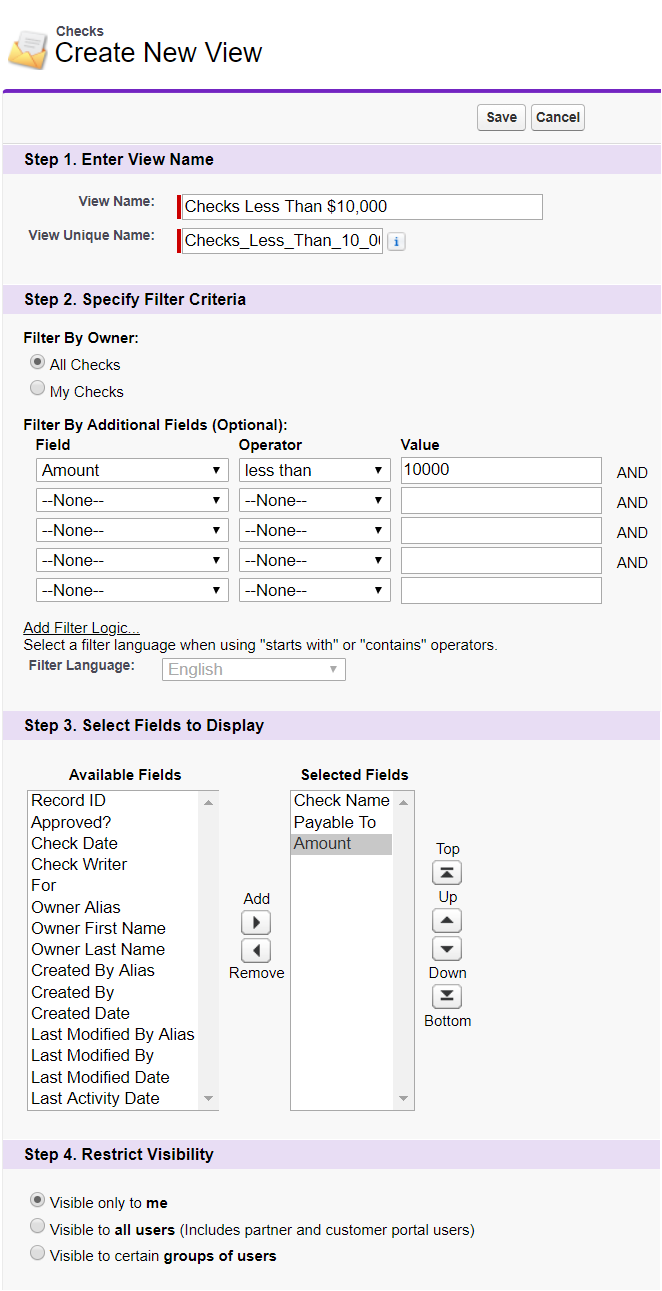
If you wish to use list views that have already been created for your object, such as the ‘All’ list view, you may skip this step. However, for the list view you select, you will have to manually filter out all the records you would not like to appear in your mass merge. This might be tedious, and if you have some kind of criteria that would greatly optimize this process (e.g. you wish to print all Checks written for amounts less than $10,000), you can follow the instructions in this step to create a list view and use filter logic to achieve such goals.

1. In Salesforce Lightning, navigate to your object's tab. In this example, we will be navigating to the tab for our Check object. Under List View Controls (represented by a cog), click New.

Enter a descriptive view name. The list API name will auto-populate.
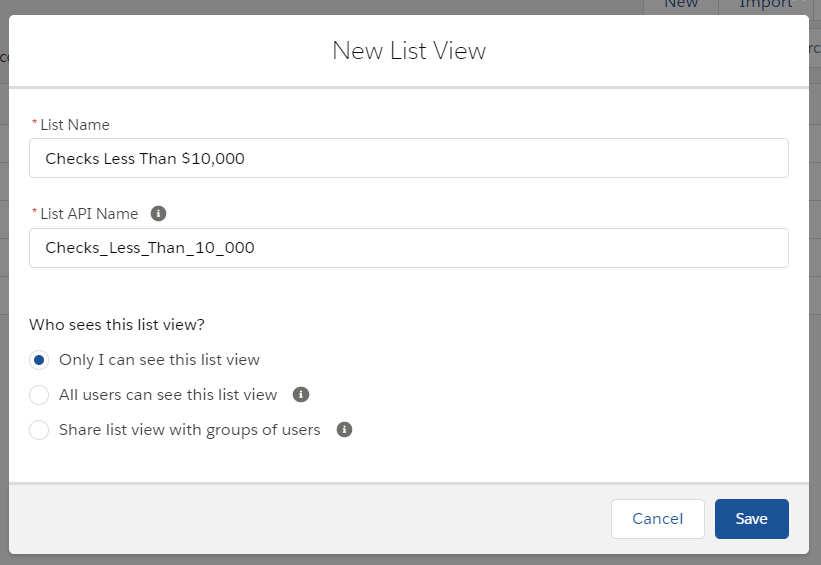
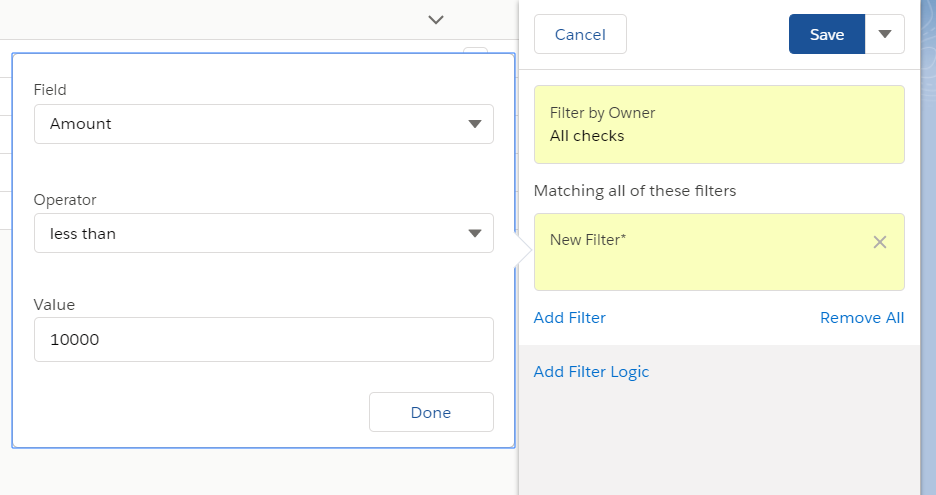
The filters menu will pop up. Change the Filter By Owner field to All Checks.

Next, click New Filter. Set the Field to Amount, the Operator to less than, and the Value to 10000. Then click Save. This means that our list will only include Checks written for amounts of less than $10,000.
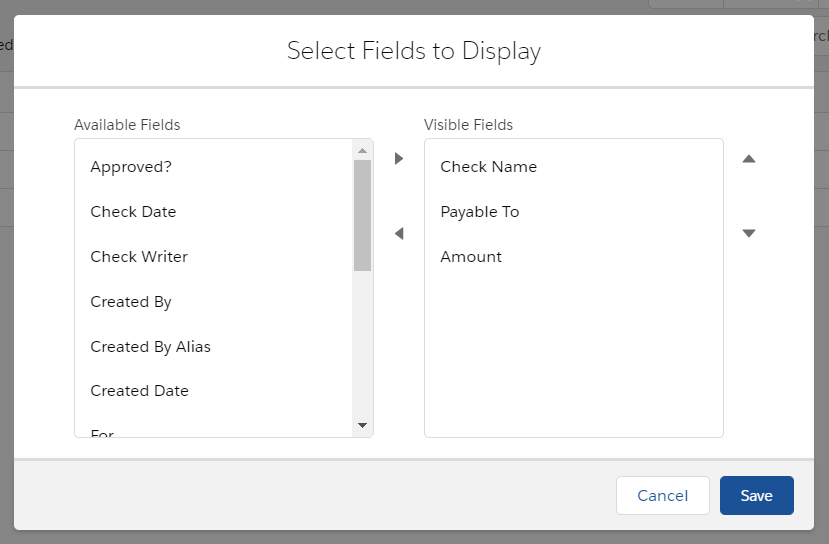
Next, click the List View Controls again, then click Select Fields To Display.
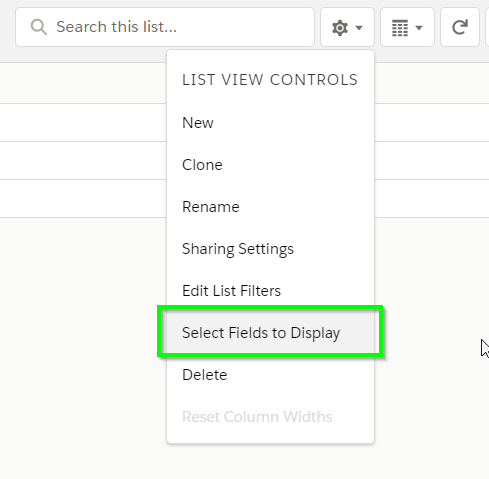
Choose your fields. In this case, we'll add Payable To and Amount.
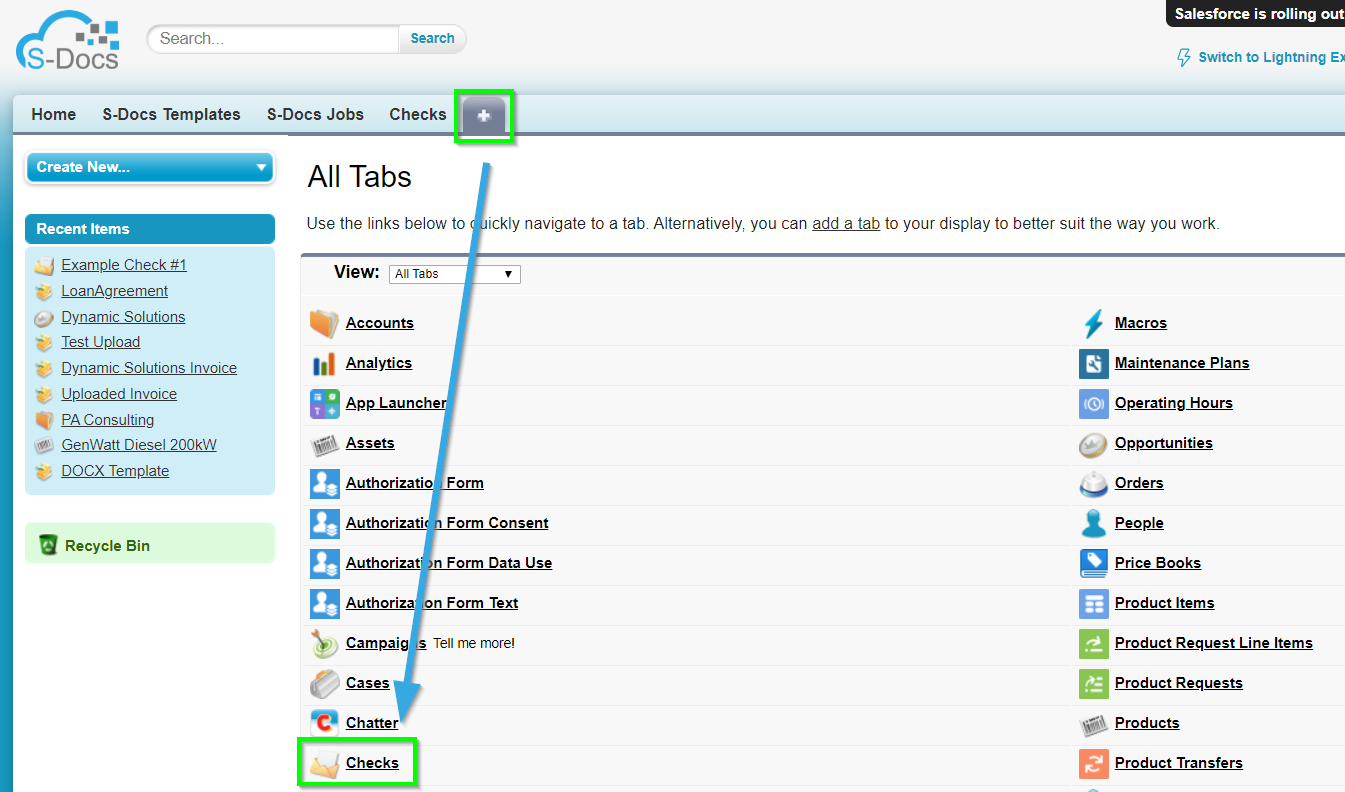
To do the same in Salesforce classic, navigate to the tab for your object. Our Check object happens to be displayed as a default tab, but if it weren’t displayed, we could click the All Tabs button ("+" symbol) and find it from there:
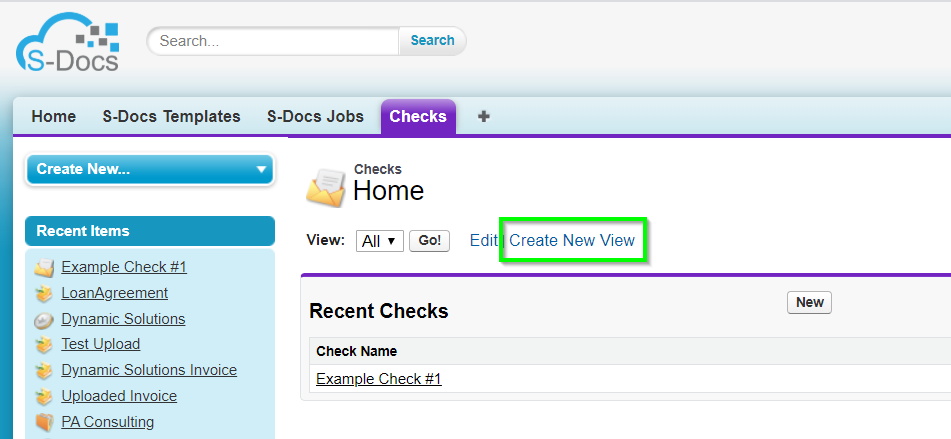
Click Create New View on our Object’s page:
On this screen, you can enter your View Name, Filters, and Fields to Display.
You will be redirected to the resulting List View. In our Check Example, our list does not contain checks 2 or 3 as their “Amount” fields are greater than or equal to $10,000. Click the checkbox on the right if you would like to select all the records to be added to the mass merge. You can also select or deselect them individually.

Note that we have our “Payable To” and “Amount” fields displayed in case we want to manually exclude a certain Payee’s check or a check of a certain dollar amount from our mass merge list. If we didn’t want to include one of these checks in our mass merge, we uncheck it. In this example, suppose that after filtering out checks with values greater than or equal to $10,000, we decided not to include the check paid to the order of Salesforce User. Since we included the “Payable To” field as a column, we don’t have to open all three records to see which one will be paid to Salesforce User; we can simply eyeball the list and uncheck the record corresponding to him. Then, this check will not appear in the resulting mass merge.

Note:We discussed a similar method in Step 2. Users can manually exclude records from their mass merge based on the fields displayed in the search layout list view as described above, or based on the fields displayed in the mass merge list described in Step 2. The latter technique is achieved by following the instructions for editing the Visualforce code in Step 2; the technique in Step 5 might be simpler to achieve.

STEP 5: Use the Mass Merge & Batch Document Feature

Before we use the mass merge and batch document feature, you should make sure that the list of S-Docs Jobs logs is clear. This isn't required, but helps keep the system clean. S-Docs Job records are created when you add records to a mass merge list; by default, they are not deleted after every mass merge. You can choose to enable this functionality in the template editor for the template that you're using with mass merge under the document options tab. Otherwise, let’s see how we can clean up the S-Docs Jobs log list manually. Navigate to the S-Docs app and click over to the S-Docs Jobs tab.

Select any jobs and click Delete Logs.

Now we can perform our mass merge. Navigate to your object and select a list view. In our Check example, we selected the list view “Checks Less Than $10,000” that we created in Step 5. Select the records that you would like to use for the mass merge and batch document feature. Then, click Add to Mass Merge List

This will bring you to the Mass Merge page. You'll begin on the Add Records tab, where you can modify the records you'd like to include in your mass merge. Note that records in your mass merge list won't be "checked" on this page; a complete list of records in the list can be viewed on the Generate Docs tab.
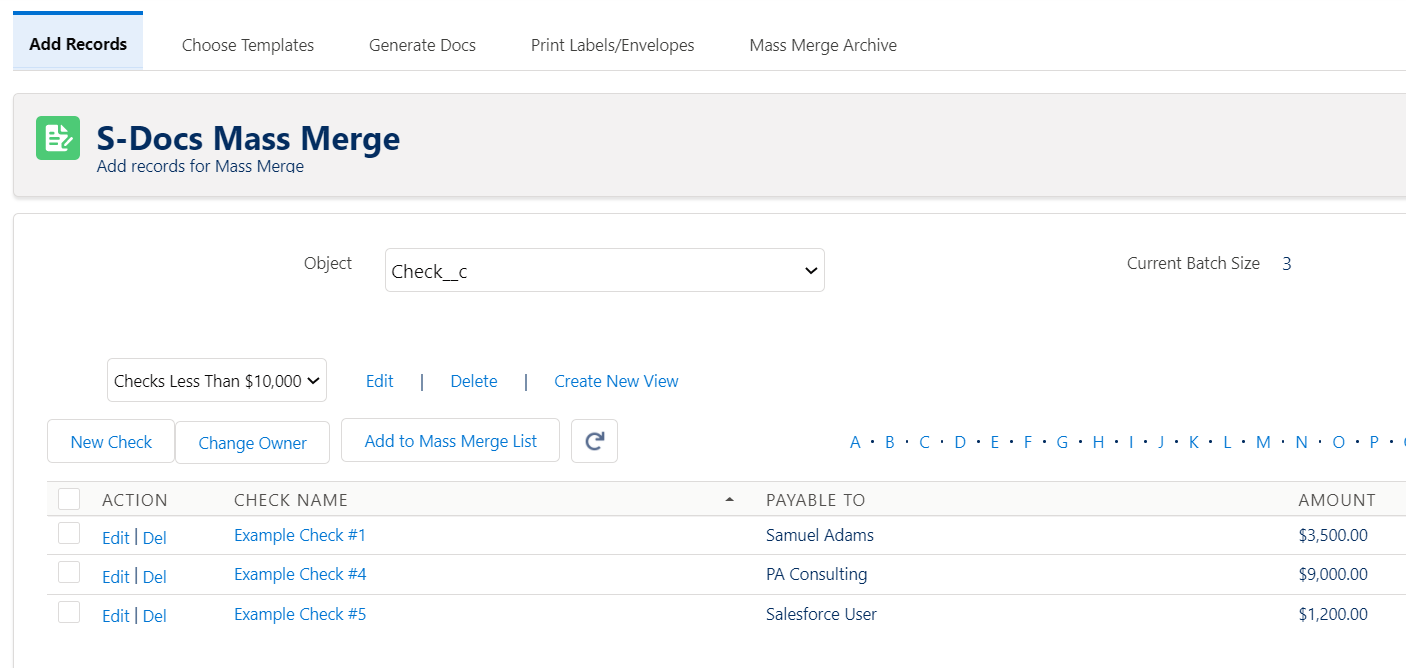
If everything looks correct, you can click over to the Choose Templates tab to choose your template.
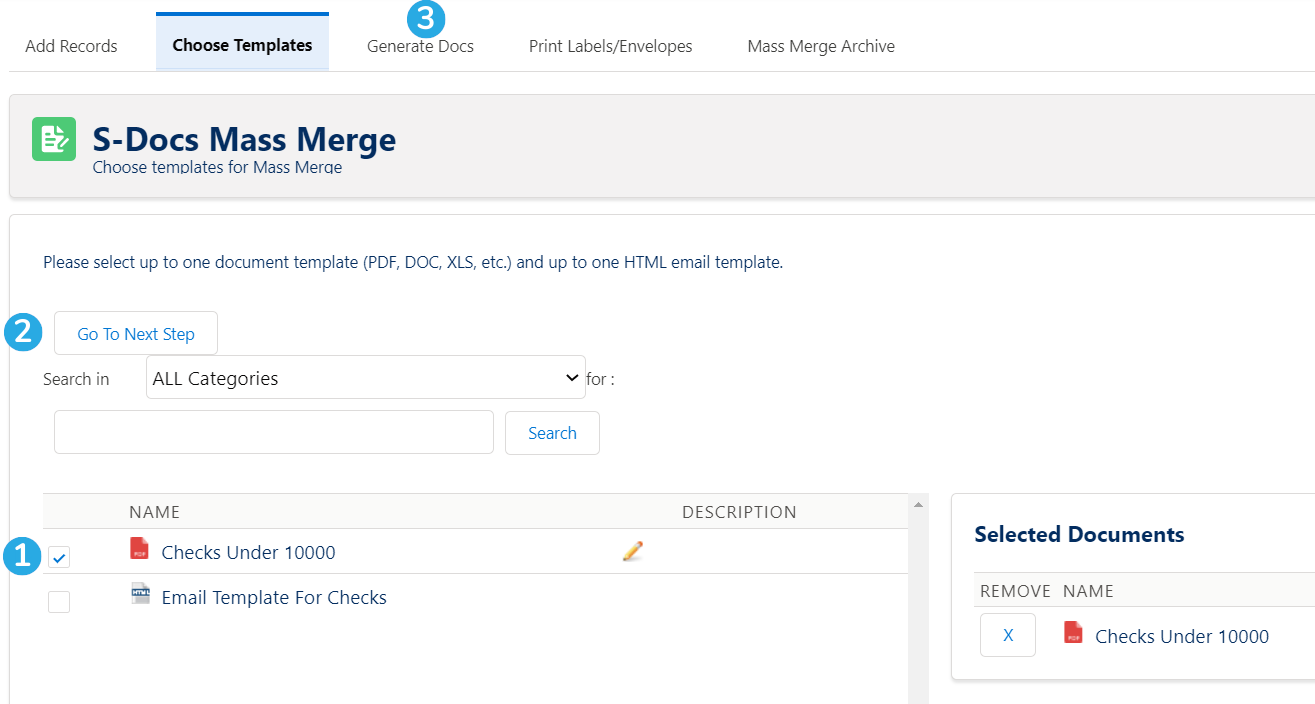
First, [1] select the template you would like to use. You can select one document template and one HTML email template. If your template list is extensive, use the tools above to filter templates by category or keyword. Then, [2] click Go To Next Step. You can also [3] click on the Generate Docs tab to go to the next step; both buttons will take you to the same place. The tabs make it convenient to jump between different steps. The Generate Docs tab will appear as follows.
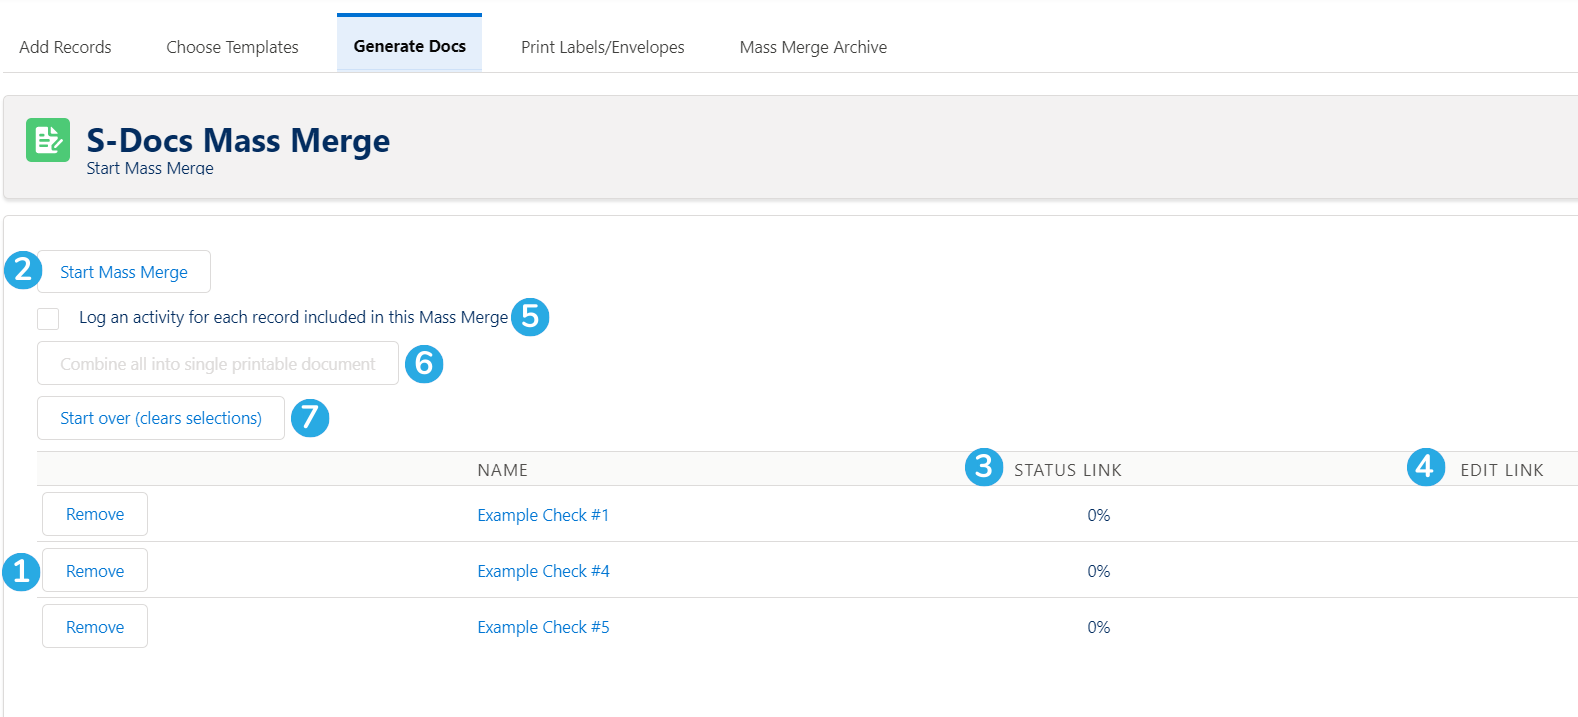
As you can see, [1] the records we selected are listed in the mass merge list. To begin the process, [2] click Start Mass Merge. When you click this button, you'll be able to [3] view the status of each document as it generates. If the template is Live Edit enabled, [4] the Edit Link column will populate with pencil icons when the documents are finished generating, allowing you to edit each one individually.

If you want to log an activity on each record, [5] check this box.

Once this mass merge is complete, [6] the Combine all into single printable document button will become available. This button is pretty self-explanatory: when you click it, all of the documents that were generated will be combined into a single consolidated document. You can configure settings for this under the document options tab in the template editor for the template that you're using with mass merge. Finally, [6] click Start over (clears selections) if you want to return to the beginning of this process.

Here's what your finished mass merge will look like.
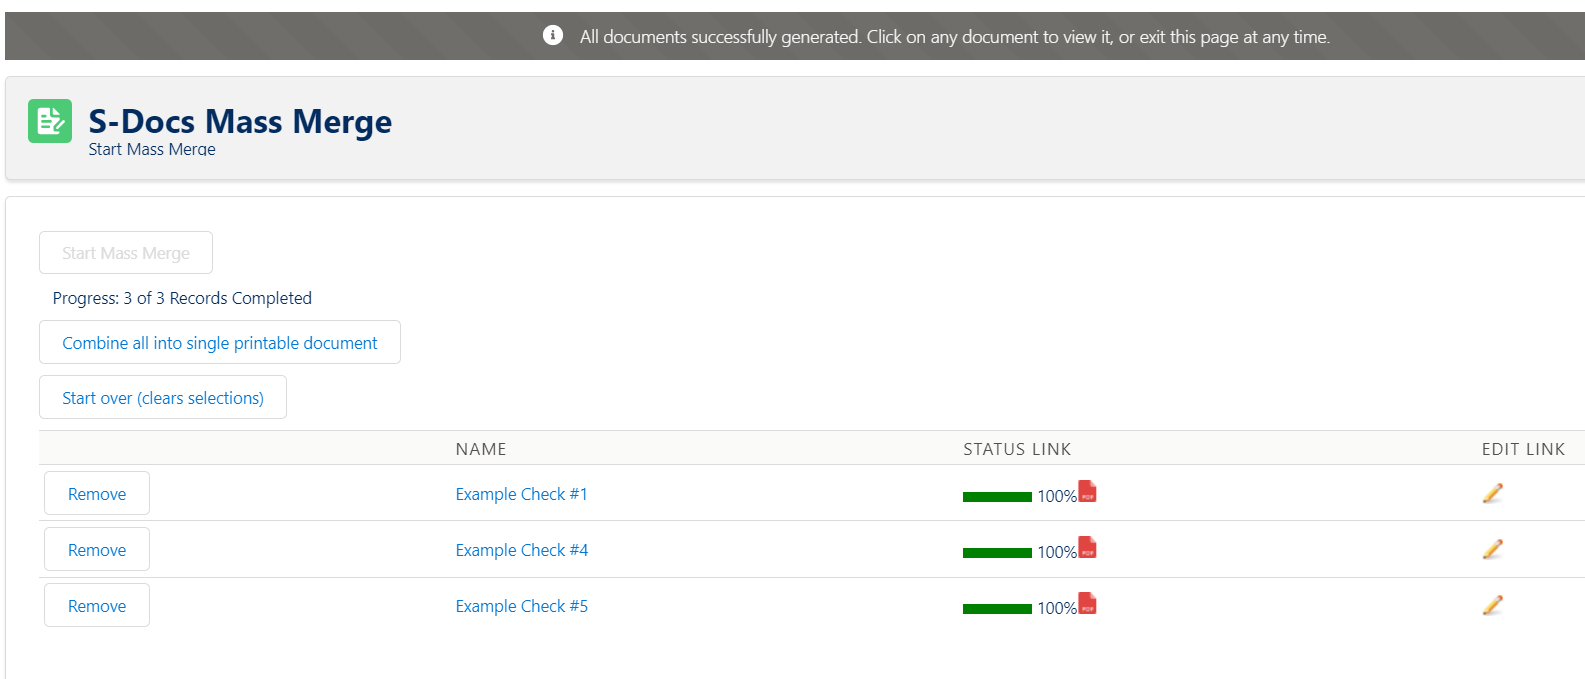
Both records have a Status Link of 100%, meaning both checks successfully generated. You can now click the PDF icon next to each one to view the documents. Additionally, the COMBINE ALL into single printable document button is no longer grayed-out. Let's click this button.

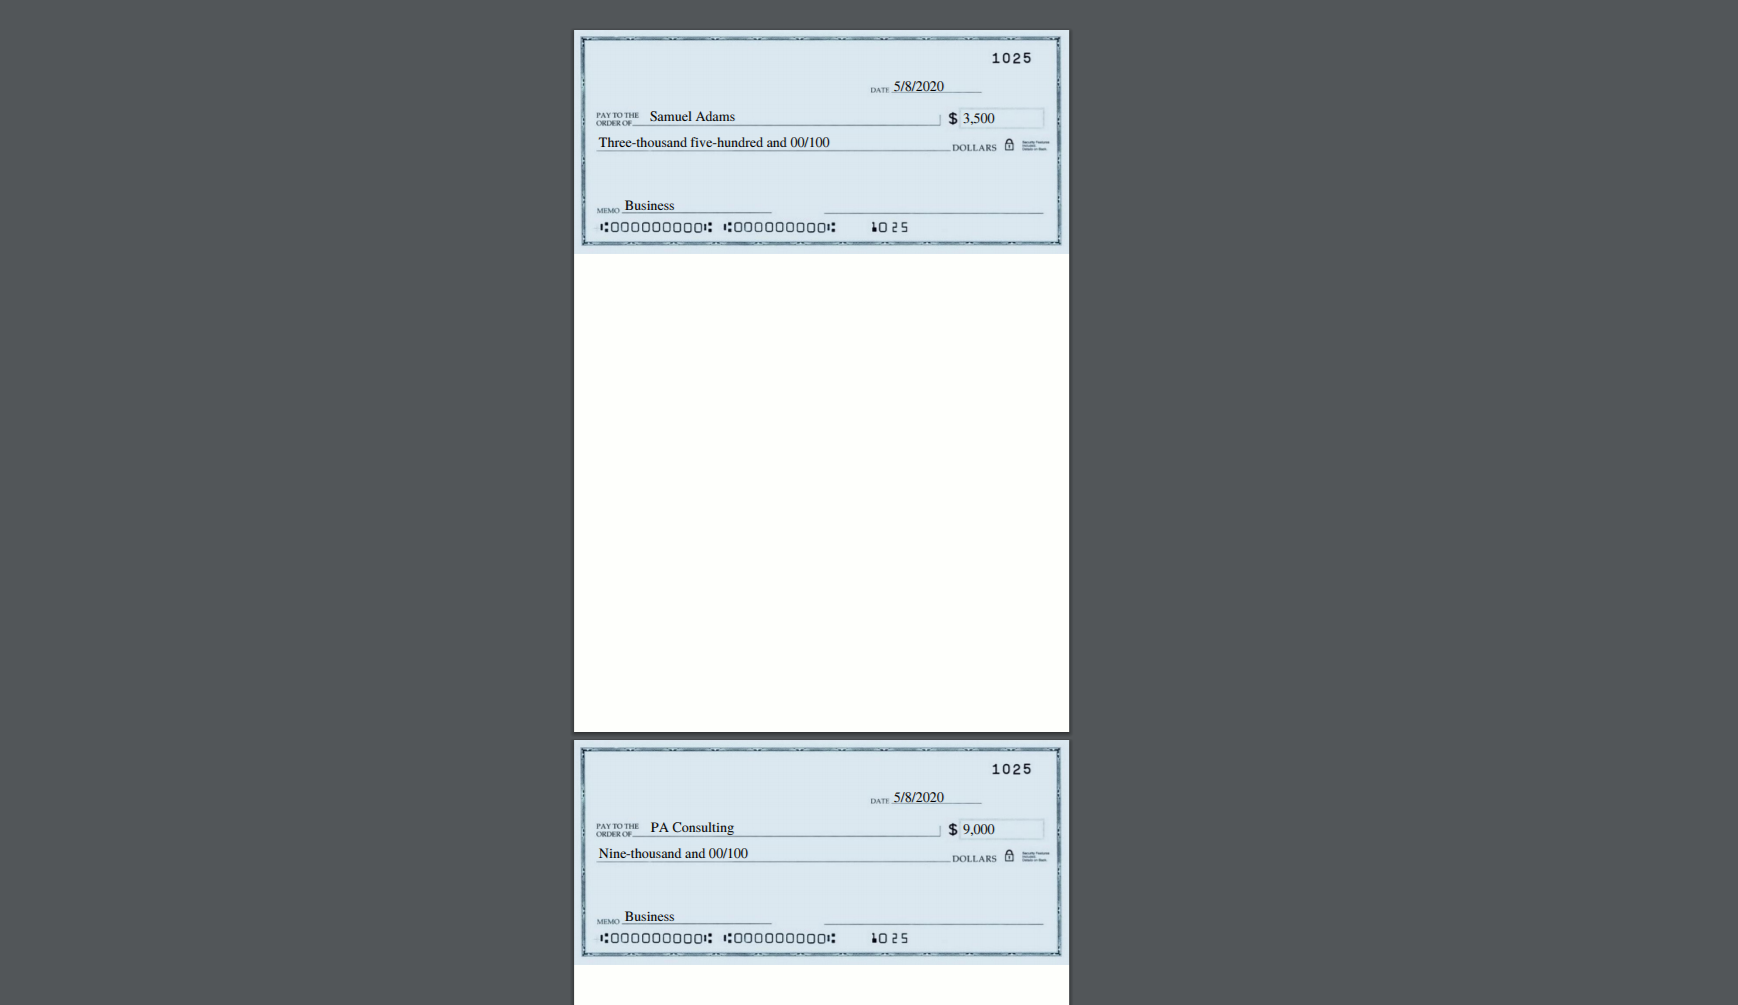
In our check example, we will open the PDF that downloaded after clicking COMBINE ALL into single printable doc. As expected, the PDF contains both of our checks, each on its own page.
Special Use Cases

Customize Mass Merge with Apex Parameters

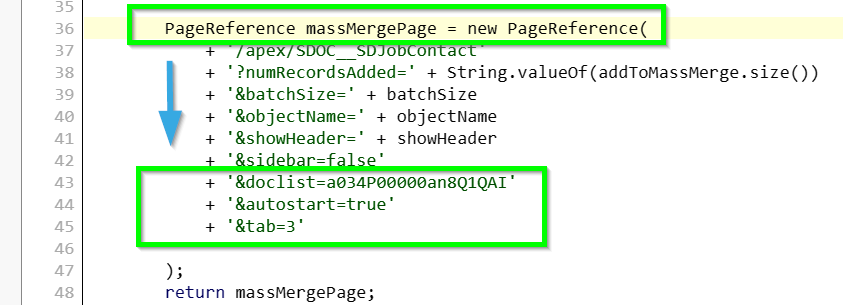
You can customize the behavior of the Add To Mass Merge List button by adding certain apex parameters to the pagereference section of your Mass Merge apex class. The table below explains the parameters. Refer to the image below the table for guidance on adding these parameters to your own mass merge class.

Parameter

Values

Function

doclist= Comma delimited list of S-Docs template IDs.
Example: '&doclist=a034P00000an8Q1QAI'

This parameter will auto-select templates to use in the mass merge.

autostart=

True to enable, false to disable (disabled by default).

This parameter will automatically start the mass merge. It must be used in conjunction with the doclist parameter.

tab= 3

This parameter will open the Mass Merge Generate Docs tab upon page load.

Generating and Emailing a Large Number of Documents

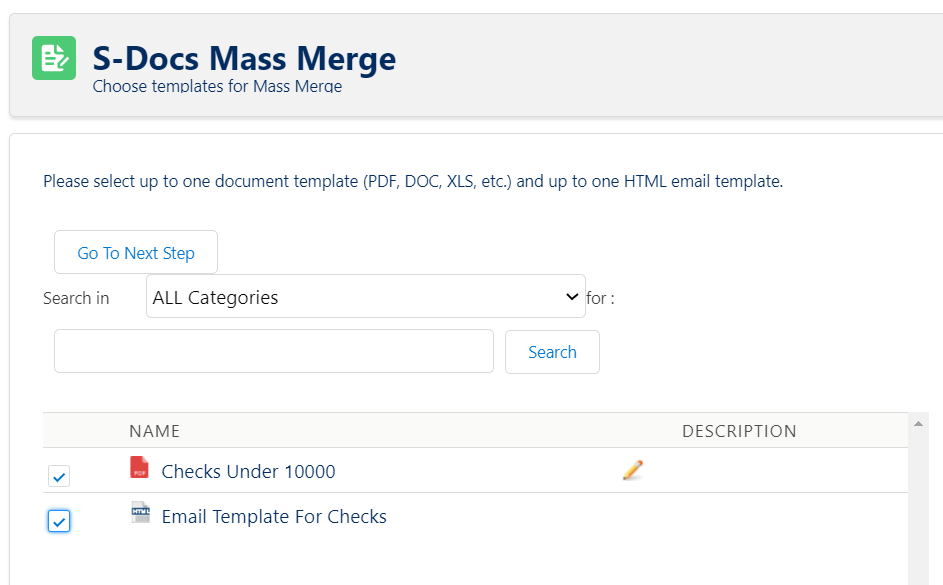
If you would like to generate and email a large number of documents, you can do so by selecting two templates in our mass merge: one template for the document you’d like to email, and another template for the email itself. Thus, to generate and email a large number of documents, all you have to do is select an S-Doc HTML email template and an S-Doc template for a PDF, Word document, etc. on our mass merge page, click Go to Next Step and then click Start Mass Merge. That’s it! S-Docs will then use the information in the HTML email template to send a personalized email to each record in our mass merge list; each of these emails will include the document that was generated for that particular record.
Generating and Printing Mailing Labels for your Mass Merge

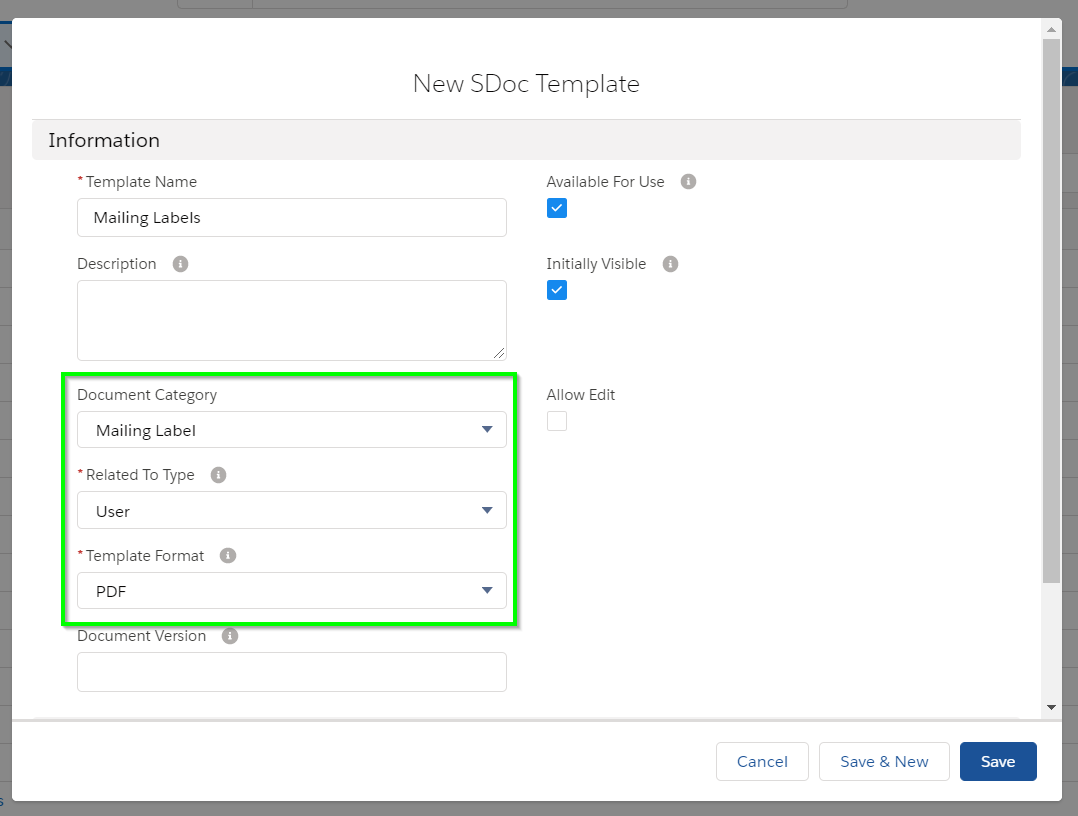
If you plan on performing a mass merge, printing the resulting PDF, and mailing out the pages, you can use S-Docs to print off mailing labels for your letters. To do so, you first have to create a new S-Docs template for your mailing label (click here for a free mailing label template). Please make sure your template has the "Document Category" field set to "Mailing Label" (if your version of S-Docs is missing "Mailing Label" from the "Document Category" picklist on the S-Docs Template object, you'll need to add it to the picklist values manually), and that your mailing label template has User as its "Related To Type" and DOC or PDF as its output type; this is because S-Docs populates the mailing label list on the mass merge page with all S-Docs templates that meet these criteria.
You can copy and paste the following mailing label template into your label template’s source editor:

[code lang="html"]<br />
<img src="data:image/gif;base64,R0lGODlhAQABAIAAAAAAAP///yH5BAEAAAAALAAAAAABAAEAAAIBRAA7" data-wp-preserve="%3Cstyle%20type%3D%22text%2Fcss%22%3Etd%20%7Bfont-family%3A%20Arial%2C%20sans-serif%3B%20font-size%3A%209pt%3B%20width%3A2.625in%3B%20height%3A1.0in%3B%20overflow%3Ahidden%3B%20white-space%3A%20nowrap%3B%7D%20%0Atable%20%7Btable-layout%3A%20fixed%3B%20overflow%3Ahidden%3B%20border-collapse%3A%20collapse%3B%20margin%3A0px%3B%20padding%3A0px%3B%20spacing%3A0px%3B%20cell-spacing%3A0px%3Bcell-padding%3A0px%3B%7D%0Adiv%20%7Boverflow%3Ahidden%3B%7D%0A%3C%2Fstyle%3E" data-mce-resize="false" data-mce-placeholder="1" class="mce-object" width="20" height="20" alt="&lt;style&gt;" title="&lt;style&gt;" />
<!--{{! <LineItemsSOQL>
<class>none</class>
<prefix>
<table>
<tr>
</prefix>
<soql>Select name, mailingstreet,mailingcity, mailingstate, mailingpostalcode from contact where id in
(select SDOC__Contact__c from SDOC__SDJob__c where ownerid = '{{!User.id}}')</soql>
<column prefix="<td><div><table><tr><td>" nullprefix="<td><div><table><tr><td>" newrow="3">name</column>
<column prefix="<br />" nullprefix="<br />">mailingstreet</column>
<column prefix="<br />" nullprefix="<br />">mailingcity</column>
<column prefix=", ">mailingstate</column>
<column prefix=" " postfix="</td></tr></table></div></td>" nullpostfix="</td></tr></table></div></td>" >mailingpostalcode</column>
<postfix>
</tr>
</table>
</postfix>
</LineItemsSOQL> }}-->[/code]

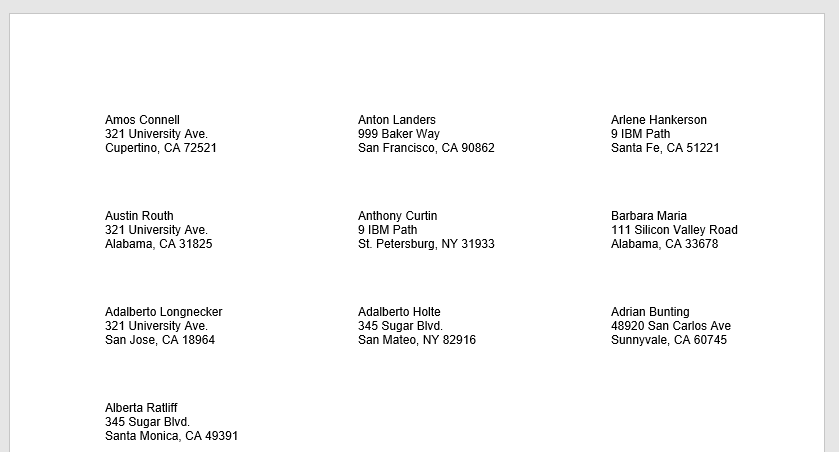
This template will print mailing labels for a list of contacts.

On the mass merge page, click over to the [1] Mailing Labels tab, [2] select your mailing label template, then [3] click Print Labels/Envelopes.

This will generate and download a printable mailing label.
mass merge - mailing (2)

Mass Merge Archive

In the Mass Merge Archive tab, you can find previously generated mass merge documents. You can click the PDF icon to view, print, or download these documents.

Automating The Mass Merge Process

If your use case involves:

  1. Selecting all records from a list view (not selecting certain records and excluding others)
  2. Combining the generated documents into a single document

You can automate this process by using a template with a special LineItemsSOQL statement that generates a component template for each record returned by the statement, in place of the Mass Merge feature.

For example, the following LineItemsSOQL statement would generate an Account Summary template for each overdue Account record.

[code lang="html"]<!--{{!<LineItemsSOQL>
<component>Account Summary</component>
<splitEvery>30</splitEvery>
<soql>SELECT Id FROM Account WHERE Overdue__c=true</soql>
</LineItemsSOQL>}}-->[/code]

Each Account Summary would be included in one single consolidated document. This template could then be used in an S-Docs Jobs workflow, or with a one click button to achieve the desired level of automation.

Note: <splitEvery> tags are used to avoid platform limitations for large numbers of records; in this case, processing will be broken up in chunks of 30 records at a time.

Click here to learn more about this feature.

Appendix

Finding the API names for Your Standard Object’s Fields

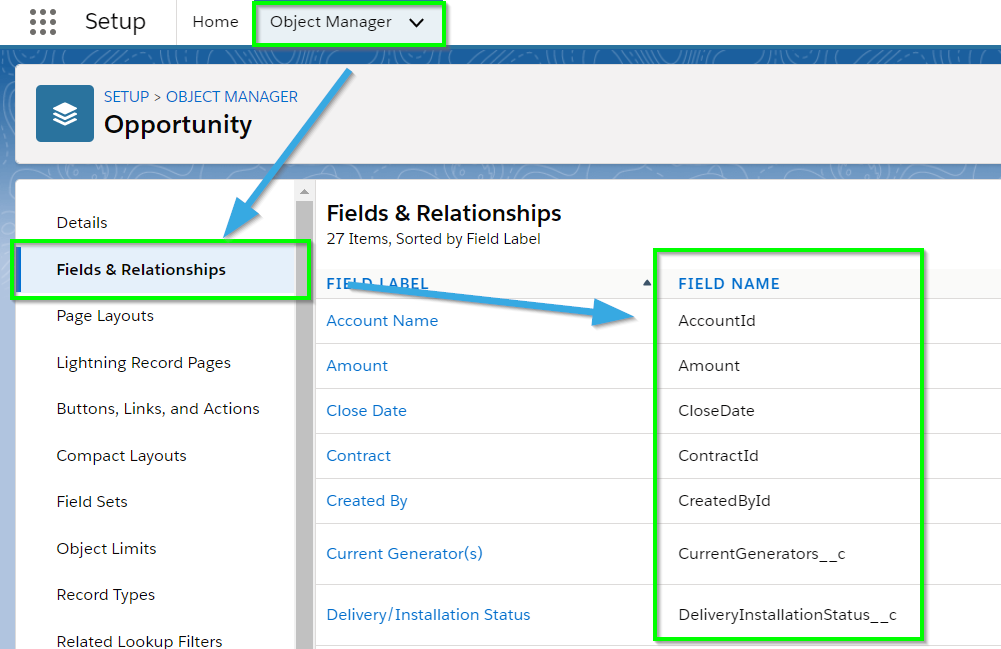
In Salesforce Lightning, navigate to the Setup Menu, then find your object in the Object Manager. Navigate to the Fields and Relationships tab. All of the field API names will be available under the Field Name column.
In Salesforce Classic, navigate to Setup > Build > Customize > YourObjectNameHere > Fields.

For standard field names, the API names are found under the Field Name column.
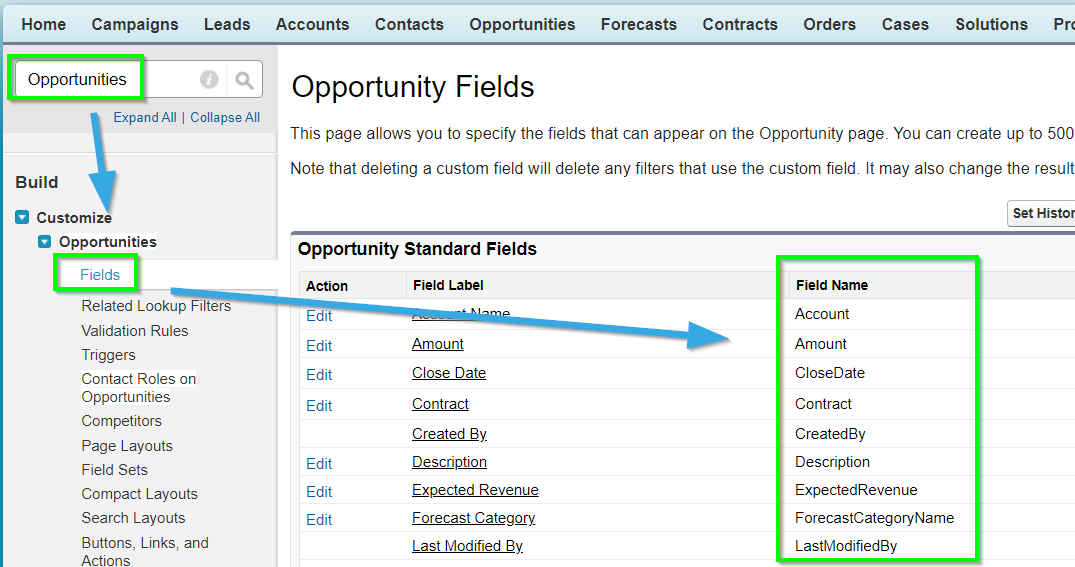
For Custom Fields, the API names are found under the “API name” column in the section below.

Finding the API names for Your Custom Object’s Fields

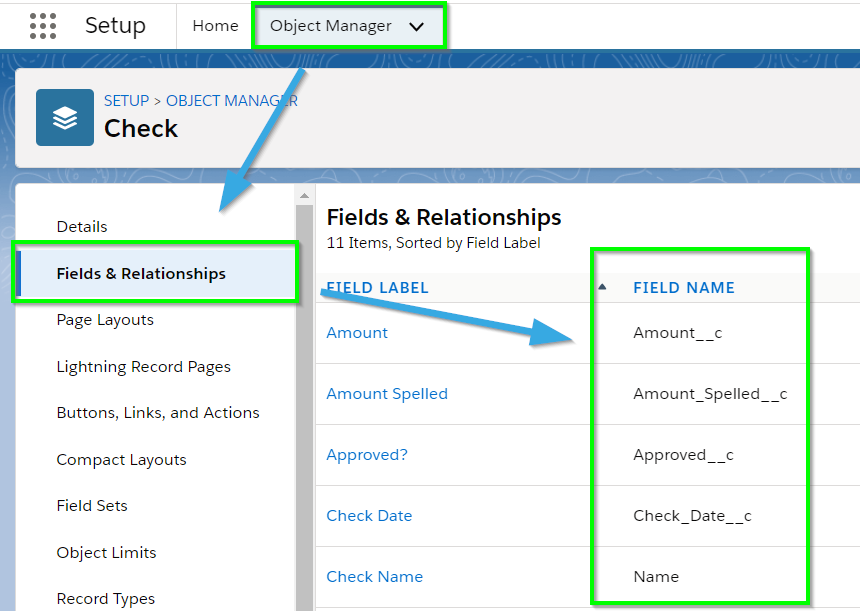
In Salesforce Lightning, navigate to the Setup Menu, then find your object in the Object Manager. Navigate to the Fields and Relationships tab. All of the field API names will be available under the Field Name column.
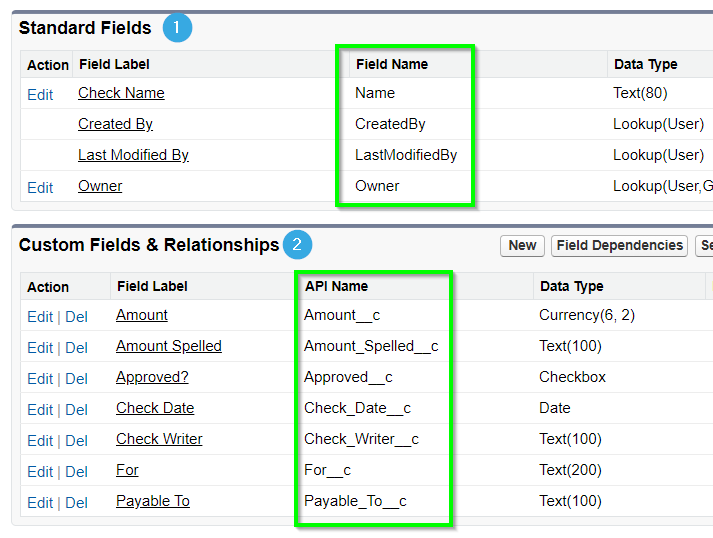
In Salesforce Classic, navigate to Setup > Build > Create > Objects and click the name of your object (do not click the Edit button).

On the page for your custom object, scroll down to the “Standard Fields” and “Custom Fields & Relationships.” The API names for [1] Standard Fields will be located under the Field Name column, and [2] the API names for Custom Fields will be located under the API name column.
Set Apex Class Access from Profiles

If users are unable to access the mass merge page, you may need to add their profile to the mass merge apex class. Click here for instructions on how to do so.
Creating your Quotes Template

By Documentation, S-Docs with Salesforce Quotes No Comments

Introduction

This is a quick overview of using S-Docs with the Salesforce Quote object. For step-by-step instructions on configuring S-Docs with the Quote object, click here.

Step 1: Create Your Quote Template

1. Navigate to the S-Docs app by clicking the App Launcher in the upper left corner and selecting S-Docs.

2. Click over to the S-Docs Templates tab, then click New to create a new template.

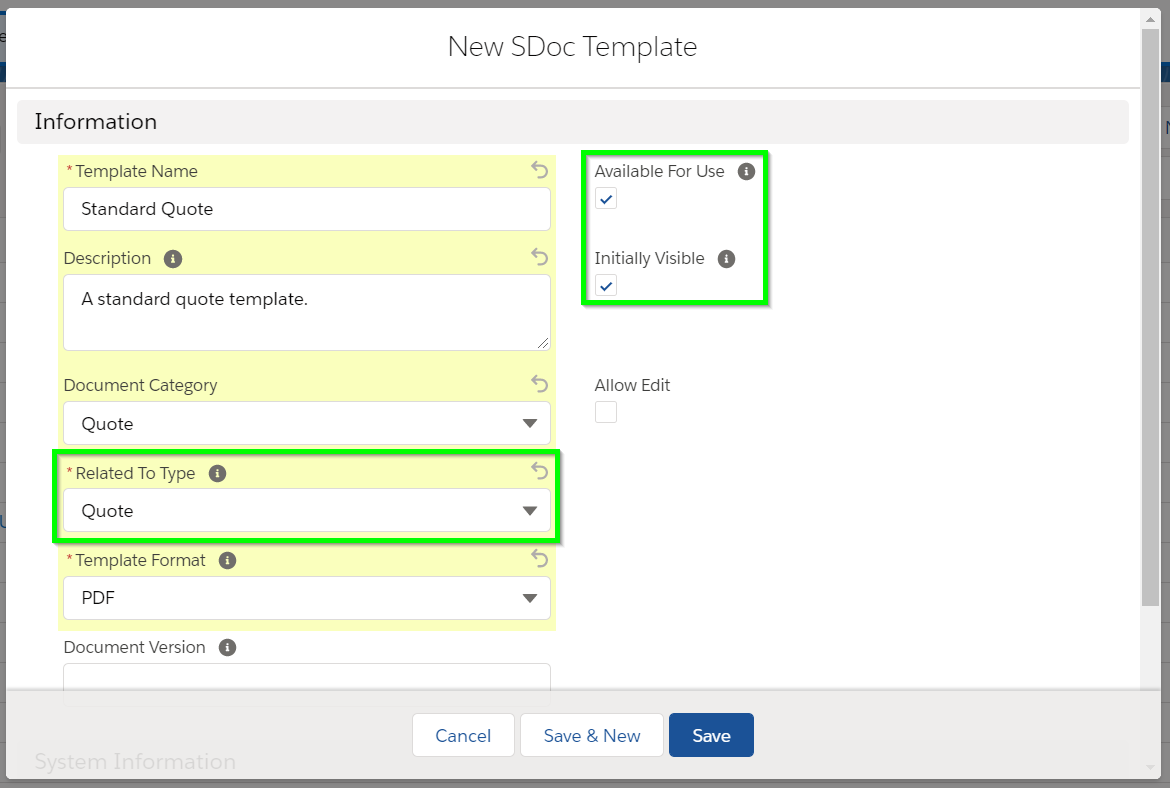
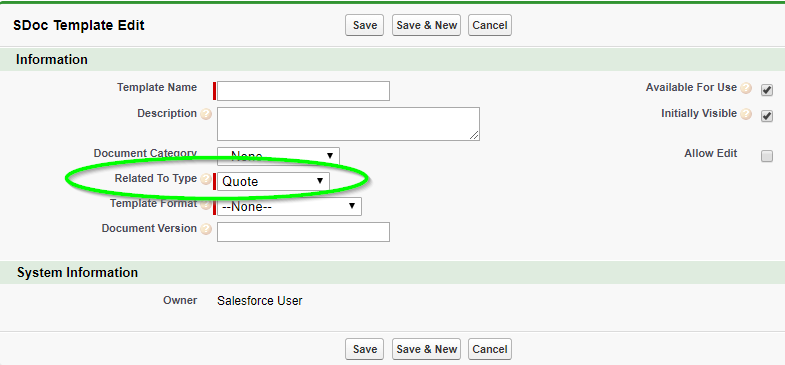
3. Create your Quote template record. Be sure to select Quote from the “related to type” picklist values. If it doesn't appear there, review the steps for configuring quotes with S-Docs. Confirm you have also checked the Available for Use and Initially Visible checkboxes.

4. Click Save. You will be redirected to the template detail page. To begin editing your quote template, navigate to the template editor by clicking the dropdown arrow in the upper right, and then clicking Template Editor.

5. Once in the editor mode, you can design your quote template.  There are several pre-made quote templates available in our Template Library that you can download and modify to meet your specifications.

You can also use and modify the template source of your quote template for even further customization options.

Step 2: Generate Your Quote

1. Once your template is saved, you can click on the S-Docs button you created and placed on your quote page layout when you configured S-Docs with the Quote object.

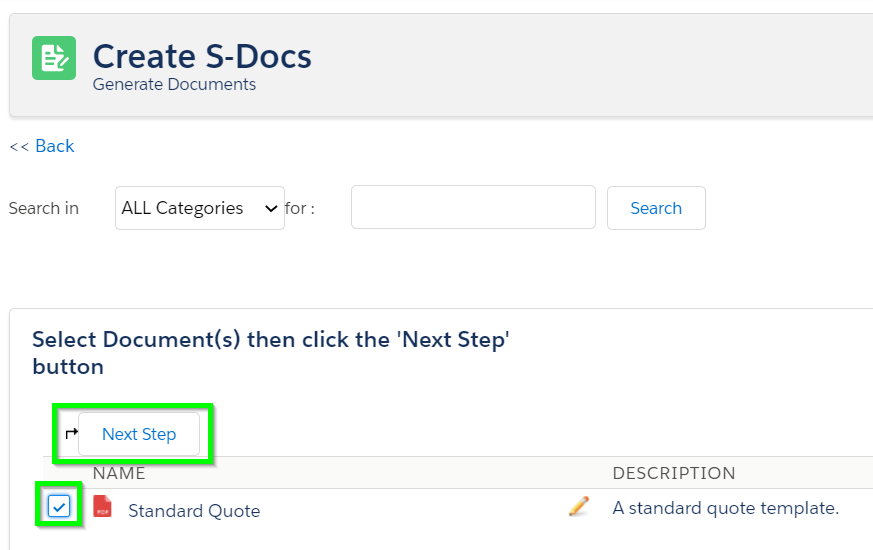
2. Select your template and click Next Step.

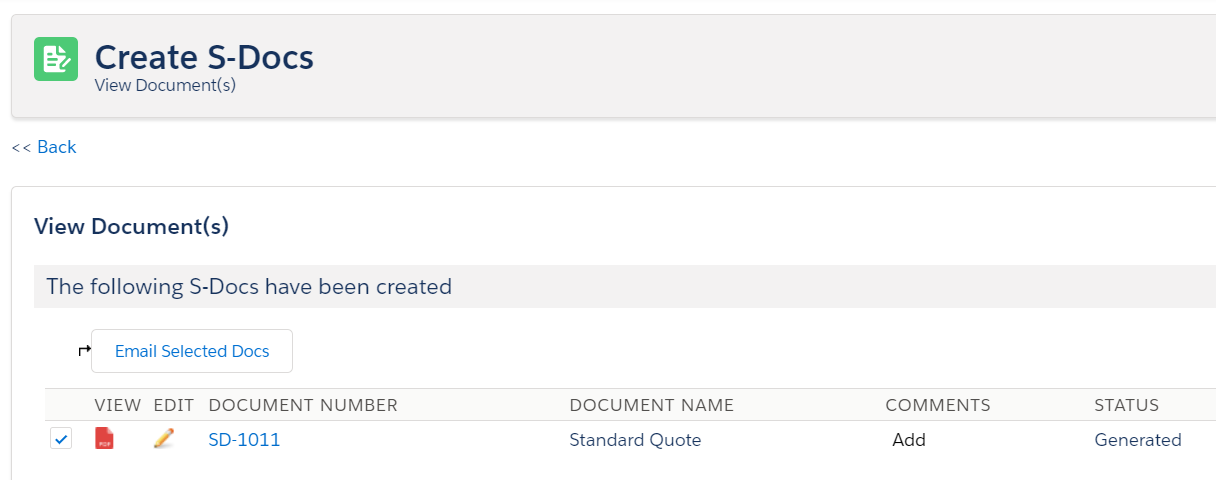
3. Once the document is generated, you can click on the PDF icon or the document number the view it, or Email Selected Docs to email your quote. That's it!

Configuring S-Docs with Salesforce Quote Object

By Documentation, S-Docs with Salesforce Quotes No Comments

Introduction to S-Docs With Salesforce Quotes

S-Docs works great with quotes, orders, and other standard objects. Not all organizations have these Salesforce features enabled, however, so they are not configured with S-Docs out-of-the-box. This document will show you how to configure S-Docs with standard objects that aren't included in the S-Docs package, using the Quote object as an example. You can follow this process with any standard objects that are not included in the S-Docs package. For a complete guide to configuring S-Docs with custom objects, visit our custom object configuration guide.

Note: The objects included in the S-Docs package are Contract, Opportunity, Account, Contact, Lead, Task, and Event.

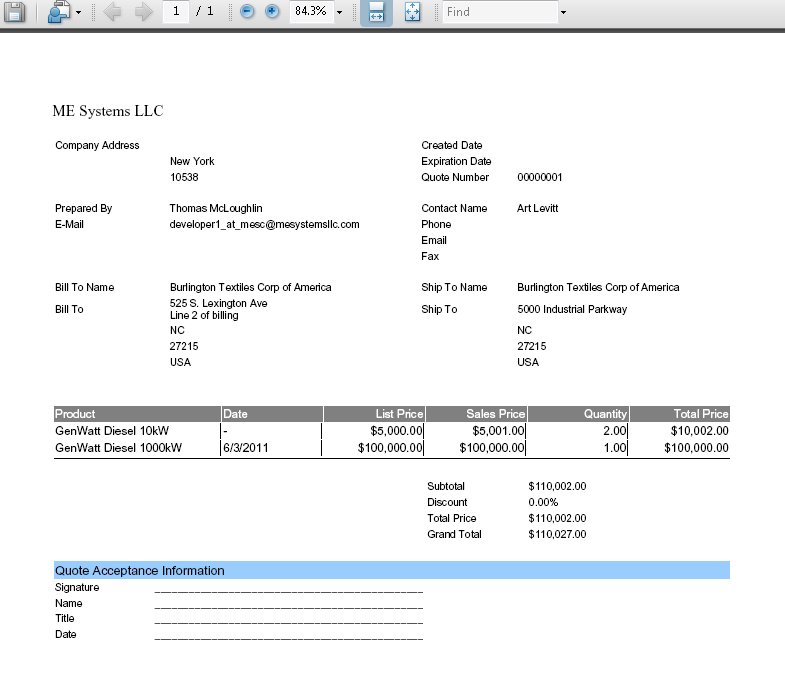
With S-Docs for Salesforce, you have much more power in generating quotes and documents that look exactly as you want them to. You can include many more related objects, filter and group your line items, format tables, include multiple logos, insert product images, insert a terms and conditions section, and then email your generated quote as a number of different file output types, including PDF and Microsoft Word.
Once you have completed these steps, you can create your quote template. We’ve provided a sample template at the bottom of this document that you can copy/paste into your template source.

Step 1: Add "Quote" to "Related to type" fields on the "SDoc Template" object:
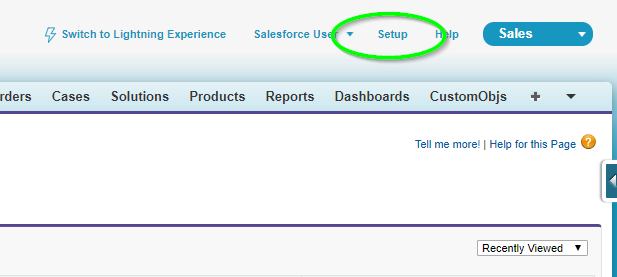
  1. Click on Setup (found on at top right corner of your Salesforce homepage).
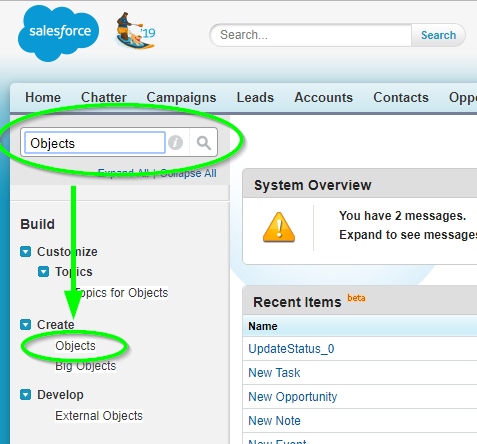
  2. Navigate to Build ➤ Create ➤ Objects by typing "Objects" into the Quick Find / Search bar on the left.
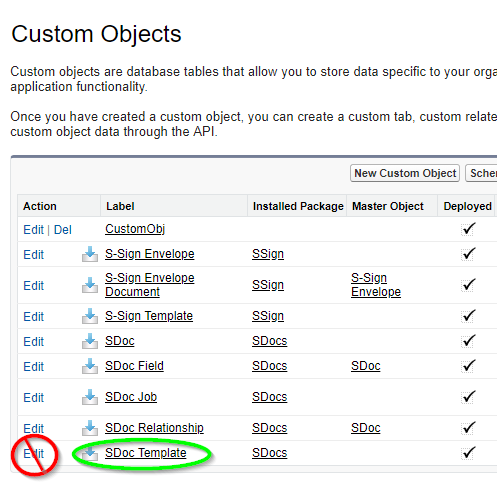
  3. Click on the SDoc Template link (not the Edit link).
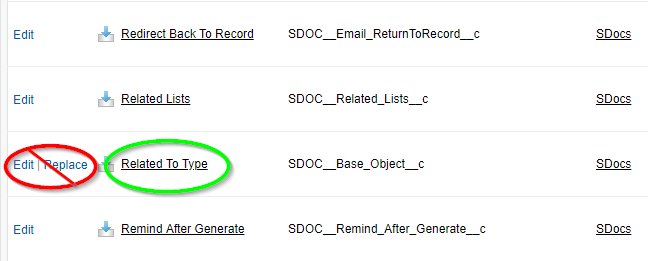
  4. Scroll down to the "Custom Fields and Relationships" section and click on the Related to Type link (not Edit or Replace).
  5. Scroll down to the "Values" section and click New.
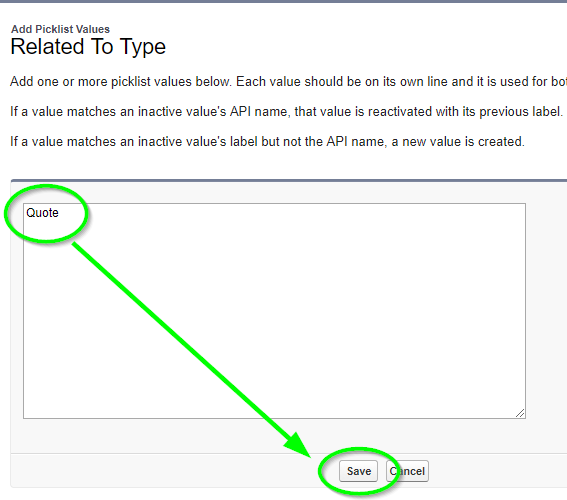
  6. Type "Quote" into the text field to add it as a picklist value, then click Save.

Step 1b: Confirm you can create a Quote template:

You should now be able to create a template and choose "Quote" from the picklist in the "Related to type" field when creating a template.

Step 2: Add the "Quote" lookup field:

This step allows you to associate the S-Doc with the Quote object, so that users can see a related list of all S-Docs created related to a quote.

  1. Navigate back to Setup ➤ Build ➤ Create ➤ Objects
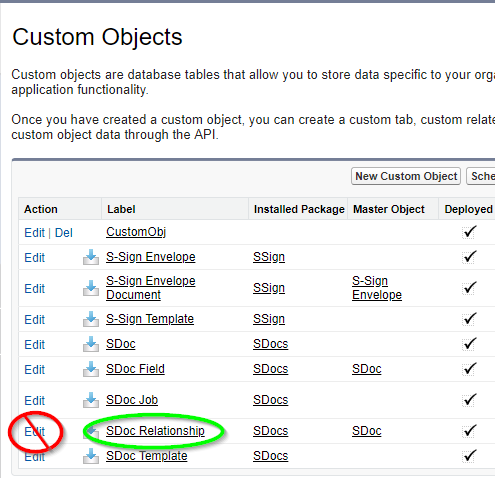
  2. Select SDoc Relationship (not Edit).
  3. Under Custom Fields and Relationships, click New.

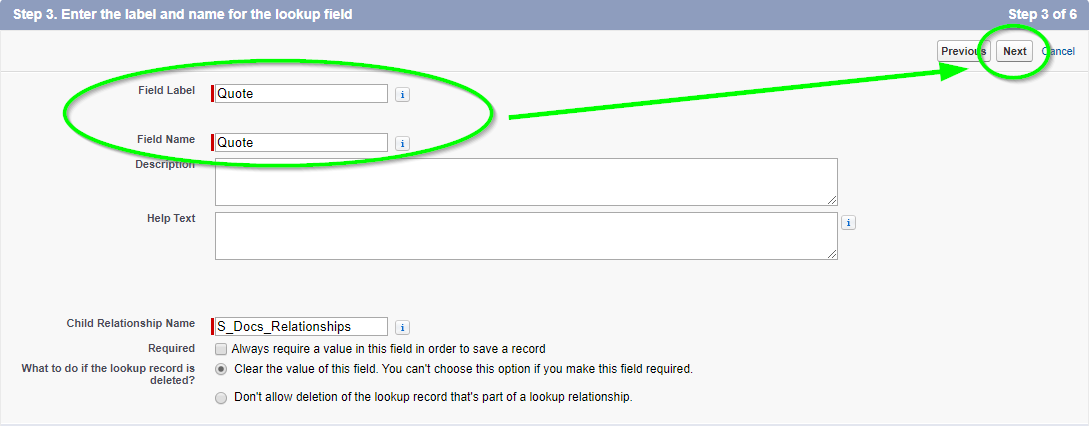
Follow the Custom Field creation steps:

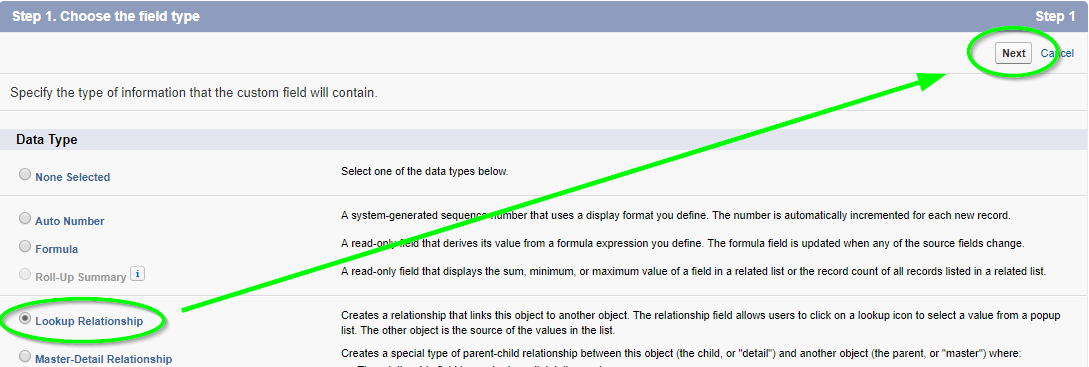
Step 1 of 6 - Pick "Lookup Relationship," then click Next.

Step 2 of 6 - Select "Quote" from picklist values, then click Next.

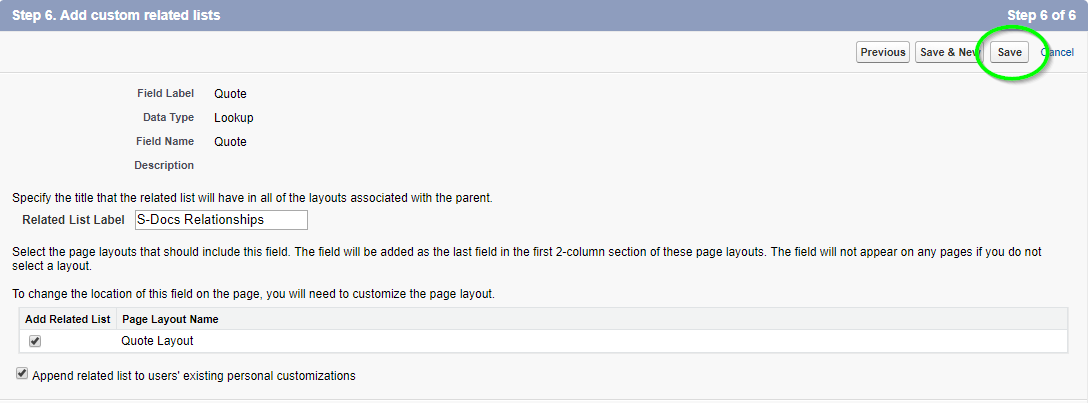
Step 3 of 6 - Field label and field name should be "Quote," then click Next.

Step 4 of 6 - Checkbox should be visible for all users.

Step 5 of 6 - Checkbox should add the field for the layout.

Step 6 of 6 - Accept default, then click Save.

Step 3: Create the S-Docs Button

Just like using S-Docs with other objects, you need to create the S-Docs button and place it on the detail record layout in order for the user to initiate creating a document.

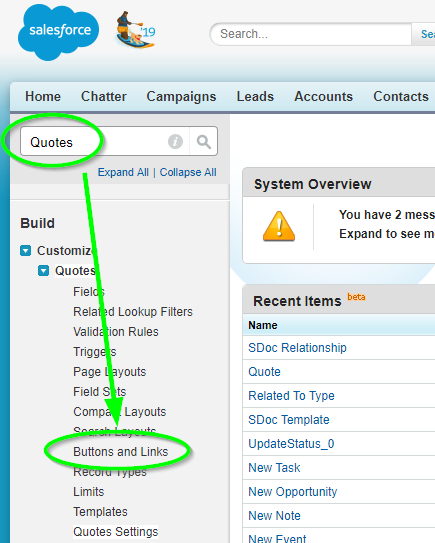
  1. Navigate to Setup ➤ Build ➤ Customize ➤ Quotes ➤ Buttons and Links.
  2. Click New Button or Link.

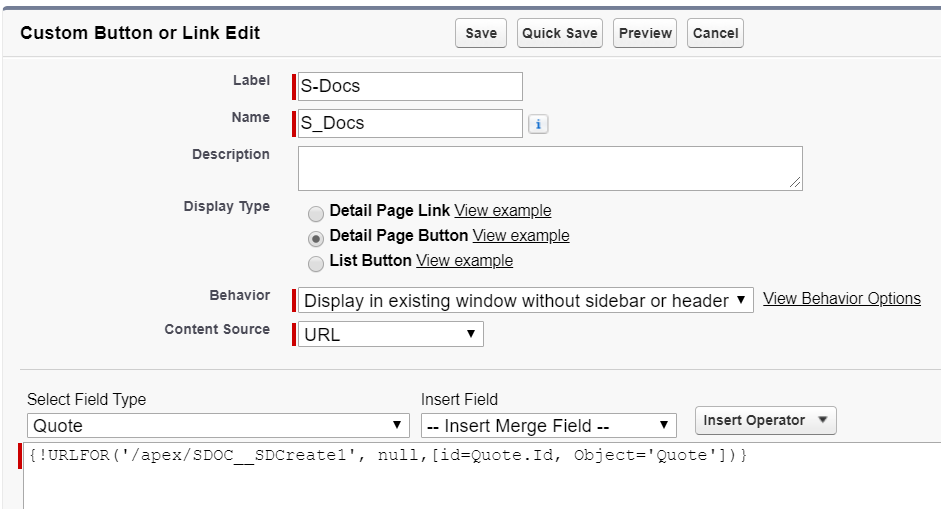
    Enter the following information for your button:
  3. Button Label: S-Docs
  4. Button Name: S_Docs
  5. Description: This option is not required.
  6. Display Type: Detail Page Button
  7. Behavior: Display in existing window without sidebar or header
  8. Content Source: URL.
  9. Use the following URL (note that double underscores are used):
    [code lang="html"]{!URLFOR('/apex/SDOC__SDCreate1', null,[id=Quote.Id, Object='Quote'])}[/code]


    Optional:
    You can have users save clicks by enabling the “One-Click” feature. Enabling this will bypass the document creation wizard. An administrator simply needs to change the button definition to include a list of pre-selected S-Docs template names that will be automatically generated. Placing this button will let users create all the documents encoded in the button without any additional interaction. The button syntax uses a parameter called “doclist,” which is followed by one or more template names to be auto-generated. Here is an example of the button syntax (replace the highlighted values with your own template names):

[code lang="html"]{!URLFOR('/apex/SDOC__SDCreate1', null,[id=Quote.Id, Object='Quote',
doclist='Template_1,Template_2'])}[/code]

For more information on the one-click and zero-click features, click here.

  • Click Save.

Step 3b: Place button on your page layout

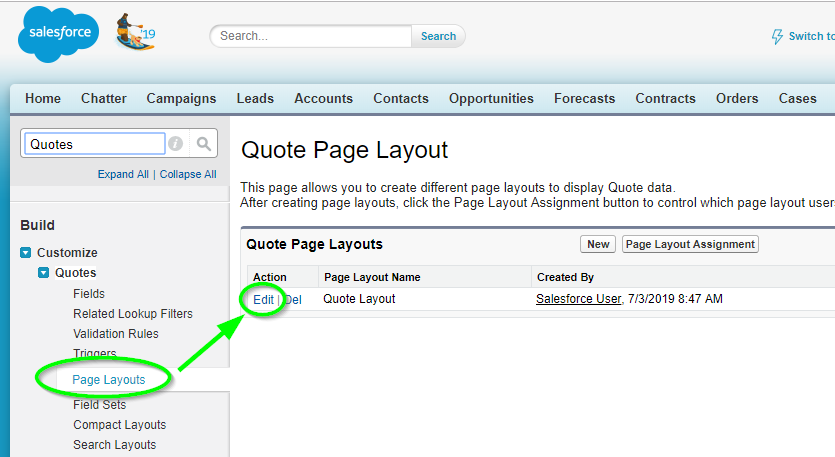
  1. Navigate to the page layout: Setup ➤ Build ➤ Customize ➤ Quotes ➤ Page Layouts, then click Edit (and repeat this for every page you'd like to add the button to).
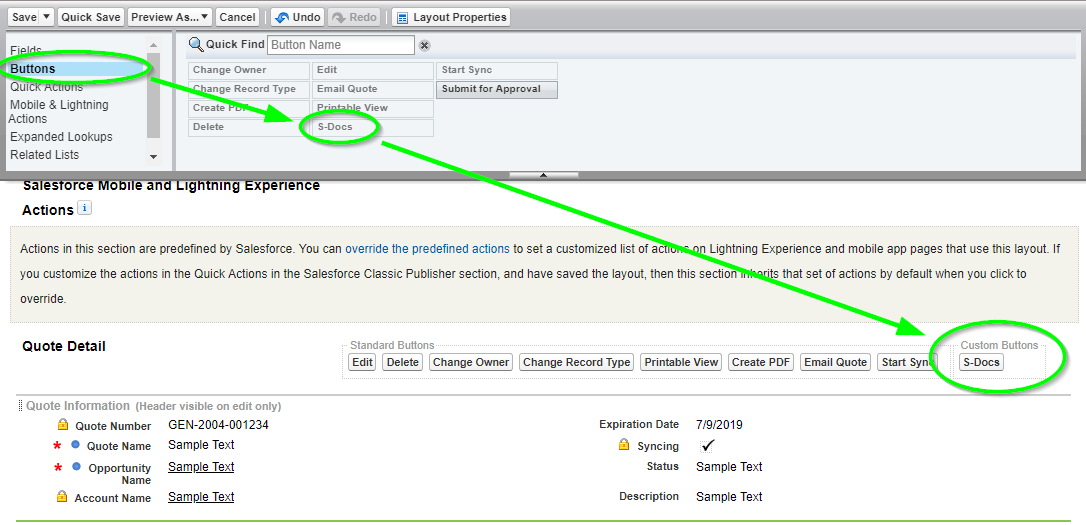
  2. Click Buttons on the top left toolbar menu to highlight and view buttons available.
  3. Click and drag the button you just created into the "Custom Buttons" section within the Quote Detail section.
  4. Once you have added the button, save the page layout and repeat steps 2-6 for any other layouts where you would like to add the button.

If you already have a quote template created, you can now open a quote record, click on the S-Docs button and create your S-Docs quote, which will be automatically be associated to the quote record.

Note: You can repeat this process for any standard object that is not included in the S-Docs package. To learn how to create S-Docs templates, click here. To learn about the S-Docs Template Editor, click here.

Sample Template

Click Here to download our sample quote template, which is also available on our Template Library.
For instructions on how to import your quote template, click here.

Using S-Docs with the Salesforce Mobile App

By Documentation No Comments

Introduction

This document will teach you how to configure S-Docs and generate your first documents with the Salesforce mobile app. Once you set up S-Docs for the Salesforce mobile app, you will be able to access the full features & functionality of S-Docs just as you can on a desktop. However, it may be beneficial for mobile clients to streamline document generation on the go. If your users typically create a few documents in the field, such as quotes or service orders, you may want to consider using the S-Docs automation features to simplify the process. This would remove the need to place an S-Docs button on the Salesforce mobile app and reduce the number of taps and potential errors or omissions.

For example, you can add a picklist on your mobile page layout with the following values: Email Quote, Email Service Order. When the user selects that value and saves the Salesforce record, an S-Doc is automatically generated and emailed from the Salesforce cloud. The user does not need to do anything else. This process can be configured without writing any code by using the Salesforce Process Builder. See the documentation here.

If you would like to leverage the full features and functionality of S-Docs on the Salesforce mobile app, it is described in this document.

Note: As of Spring '17, only S-Docs Templates with Auto-create File checked (found in the "Document Options" tab of the Template Editor) can be reliably viewed across all devices.* In the Salesforce mobile app, S-Docs Templates with Auto-create File unchecked can still be generated, emailed, etc. as usual, but cannot be reliably viewed across all mobile devices in mobile browsers or the Salesforce mobile app.

*This is because, as of Spring '17, only Salesforce Files can be reliably viewed on all devices in the Salesforce mobile app - the same may not hold true for Salesforce Attachments or other document rendering methods in Salesforce. Checking "Auto-create File" on your template will create a Salesforce File when you generate an S-Doc, so this will ensure that your document can be reliably viewed across all mobile devices in the Salesforce mobile app.

Preview: Generating Documents on the Salesforce Mobile App

Before we see to configure S-Docs for use with the Salesforce mobile app, we will first see the feature in action.

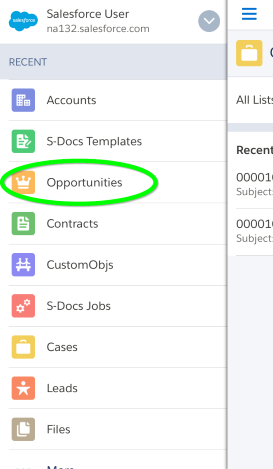
1. Select the object you created the button for.

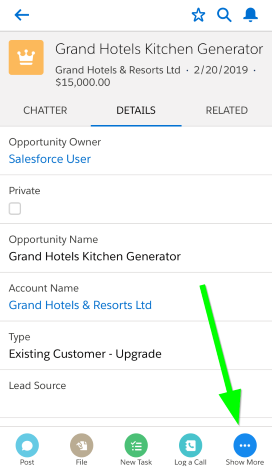
2. Select any record from this object. At the bottom of that record’s page, tap Show More.

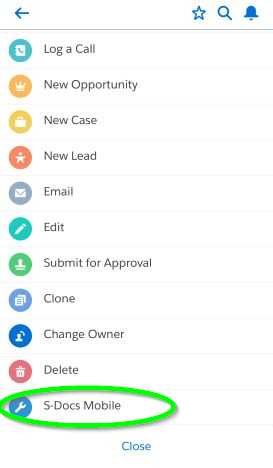
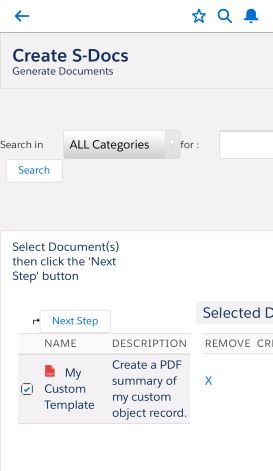
3. Scroll down and tap S-Docs Mobile.

4. Use S-Docs to generate documents just as you would on a desktop. It’s that simple!

Note: Only templates with the Auto Create Salesforce File and link to record checkbox checked (located under the Document Options tab in the template editor) can be viewed on mobile devices.

We will now discuss how to set up S-Docs for use with a particular object in the Salesforce mobile app.

Step 1: Create the S-Docs Mobile button

1. Create a new S-Docs Mobile button for a particular object. For standard objects, please follow the instructions in part (a). For custom objects, please follow the instructions in part (b).

a) Creating the Button For A Standard Object

If you are creating this button for a standard object, navigate to the Setup menu, type the name of the object into the Quick Find / Search bar, and click Buttons, Links, and Actions from the options that drop down under your object name.

Then, click New Button or Link.

This concludes part (a).

b) Creating the Button For A Custom Object

If you are creating this button for a custom object, navigate to the Setup menu, type "Objects" into the Quick Find / Search bar, then click Objects from the options that drop down under Create.

Then, click the name of your object (not the Edit button).

After you click the name of your custom object, scroll down to “Buttons, Links, and Actions” and click New Button or Link.

This concludes part (b).

2. On the “New Button or Link” page, fill in the fields as follows:

Label: S-Docs Mobile
Name: S_Docs_Mobile
Display Type: Detail Page Button
Behavior: Display in existing window without sidebar or header
Content Source: URL

Leave “Select Field Type” as the name of your object, and paste the following in the Custom Button or Link Editor:

[code lang="html"]{!URLFOR(
'/apex/SDOC__SDCreate1?id='
+ ChangeToYourObjApiName.Id
+ '&Object=ChangeToYourObjApiName'
+ '&lightningNav=true'
)}[/code]


Note: In the above URL, we see “ChangeToYourObjAPI” twice. You will need to change this to the API name of your object, which we've done and underlined in green. (Make sure there aren’t any spaces anywhere in your URL after pasting and editing.)

If you are making the button for a standard object, the API Name is the same as the object name for all objects (e.g. the API name for an opportunity is Opportunity) except for products; for products, the API name is Product2.

If you are making the button for a custom object, you can find the API name on the same page you found the “Buttons, Links, and Actions” table on in 1b.

Once you finish pasting and editing the above code, click Save.

Step 2: Add the S-Docs Mobile Button to the Page Layout

1. Navigate to the Page Layouts for your object. For standard objects, please follow the instructions in part (a). For custom objects, please follow the instructions in part (b).

a) Adding the Button to a Standard Object's Page Layout

If you are adding the button to the Page Layout for a standard object, navigate to the Setup menu, type the name of your object into the Quick Find / Search bar, then click Page Layouts from the options that drop down under your object.

Click Edit next to “YourObjectName Layout.” For Accounts and Opportunities, there is a layout called “ObjectName Layout SDoc.” Do not edit this layout; rather, edit the layout called “ObjectName Layout.” In our Opportunity example, we are editing “Opportunity Layout.”

This concludes part (a).

b) Adding the Button to a Custom Object's Page Layout

If you are adding the button to the Page Layout for a custom object, navigate again to the Setup menu, type "Objects" into the Quick Find / Search bar, then click Objects.

Then, click the name of your object (not the Edit button).

After you click the name of your custom object, scroll down to “Page Layouts” and click Edit next to “YourObjectName Layout.”

This concludes part (b).

2. Scroll down to Salesforce Mobile & Lightning Experience Actions and click override the predefined actions. Then, click Mobile & Lightning Actions in the toolbar at the top of your screen.

Now, get rid of the standard S-Docs button by clicking it and dragging it anywhere within the toolbar.

After removing the standard S-Docs button, click and drag the S-Docs Mobile button into the "Salesforce Mobile and Lightning Experience Actions" group.

The resulting page should appear as follows:

Click Save to finalize your changes. S-Docs is now enabled for use with this object in the Salesforce mobile app!

Top