All Posts By

Admin

Add line items (related lists) to your documents

By Documentation, General Solutions, S-Docs Cookbook No Comments

Use The "Insert Related List" Button

Child or related records will appear as line items in a table within your document. Since there can be zero or more child records associated to a parent record, it would not be feasible to map a child field to just one parent field. Therefore, S-Docs renders child records as rows in a table. You can control the columns displayed, or add multiple child tables to one document. The simplest way to add a related list is to use the Insert Related List button on the template editor page (for instructions on how to use this button, click here). Using this feature will allow you to easily select the related objects and columns. If needed, you can then edit the table header and styles using the template editor.

Edit The Source Code of Your Related List Table

For even greater control, you can also edit the template source code. Editing the template source will give you total control of styles and will permit you to drill down into one extra level of relationships if needed. Therefore, you can reach fields up to 4 levels removed from the base object. If fields are still further than this, consider using a formula field to make the value available to your document.

If you edit the template source for custom objects, be sure to use the correct “child relationship name” in between the ListName tags (e.g. <ListName>myRelatedObject__r</ListName>). This name does not always match the object name, as Salesforce can automatically change this value to avoid collisions, so be sure to verify this value from the custom field definition page within Salesforce.

Example: Template Source for Opportunity Line Items

In the template editor, click on the Source button, and then place the following snippet into a <table> element. You should create the first header row with column header values. Then place the LineItems tag as shown below as you would normally use a <tr> element.  When rendered, this code will be represented as a table rows <tr> within the table, and include the related list field values that you specified for columns.

The following snippet will render as a <tr> element. It should therefore be placed within your <table> element:

[code lang="html"]<!--{{! <LineItems>
<class>style8</class>
<ListName>OpportunityLineItems</ListName>
<column>PriceBookEntry.product2.Name</column>
<column>PriceBookEntry.product2.Description</column>
<column>UnitPrice</column>
<column>Quantity</column>
<column>TotalPrice</column>
</LineItems> }}-->[/code]
Be sure to include the HTML comment tags (<!-- and -->) exactly as shown in the snippet above. While the line items won’t appear on the template editors WYSIWYG view, they will render when the document is generated.

Note: Since S-Docs is a Native Force.com app, it is subject to Salesforce’s governor limits. The complexity of your objects will determine the maximum number of related lists and the maximum number of line items that you can include in your document before reaching these limits. We are continually working on improving this limit. For more information visit http://www.salesforce.com/us/developer/docs/apexcode/Content/apex_gov_limits.htm.

Change page size and orientation (landscape, legal, mailing label)

By Documentation, General Solutions, S-Docs Cookbook No Comments

Change Page Size & Orientation Using The Template Editor

To edit the dimensions and orientation of your document, navigate to the Page Settings tab in the Template Editor. There, you will find options to adjust page width, height, and margins.

Edit Page Width & Height

The page width and height settings are located on the left side of the Page Settings tab. You can choose from predefined Portrait or Landscape page layouts, which will lock the Width and Height fields, or choose Custom to edit the Width and Height fields yourself.

Edit Page Margins

The page margin settings are located on the right side of the Page Settings tab.

Edit Units Of Measurement

The Unit of Measurement settings are located on the left side of the Page Settings tab. You can choose inches, centimeters, or pixels as your unit of measurement. Choosing a new unit of measurement will automatically update all other values on this tab.

Use your own stylesheet or CSS

By Documentation, General Solutions, S-Docs Cookbook No Comments

Edit The Template Source

To add your own stylesheet or CSS to your S-Docs templates, you can edit the source of your templates. All you need to do is click on the Source button in the top left of the template editor. You can then copy your own <style></style> tags at the start of the page (be sure to use all lowercase and close your tags). In-line styles also work great and can be used throughout your template.

Discussion

Not all styles, fonts and borders render precisely in all output formats, especially PDFs. At this time, you cannot include a separate CSS file; however, you can create a separate template with a separate CSS style and insert it into your current template as a merge field. In addition, the S-Docs package does include one stylesheet file as a static resource that you can leverage.

Append Terms and Conditions To Your Contract

By Documentation, General Solutions, S-Docs Cookbook No Comments

Introduction

S-Docs allows you to easily create and append a terms and conditions page (or equivalent) to your documents using the template editor. Simply open the template detail record, click the dropdown arrow on the right, and then click on the Template Editor button.

Terms And Conditions Options

Next, add your terms and conditions in the editor field where you would like them to appear in your template. If you want to display varying terms and conditions (e.g. based on territory or product) for otherwise similar documents, you can leverage the S-Docs Render feature to add conditional logic to show/hide blocks of text. You can additionally create a separate template for your terms and conditions and insert it into this one as a merge field. This option is useful because it allows you to keep your terms and conditions in one centralized place; if you ever need to edit them, you only need to edit them once, and the changes would be reflected in all documents.

Improve Terms And Conditions Appearance

To improve how terms and conditions are rendered within your document, a page break is useful and can be easily inserted in your template by placing the cursor at the beginning of your terms section and then clicking on the page break icon (last button on the top row of the of the template editor toolbar).

Saving S-Docs As Salesforce Attachments Or Files

By Documentation, General Solutions, S-Docs Cookbook No Comments

Using The S-Docs Create Salesforce Attachment / Create Salesforce File Settings

By default, S-Docs are saved as Salesforce Attachments in the Notes & Attachments related list on your base object record each time you generate a document. To change this setting, all you have to do is open up the template editor for the template(s) you wish to edit, then open up the Document Options tab.

You can configure attachment and file settings under the Attachment & File Options section.

Create Salesforce Attachment and link to record is checked by default. This option creates Salesforce Attachments in addition to the S-Doc record each time this template is generated going forward. Checking this option again after it has been unchecked will not create attachments for previously created documents.

You can also opt to create Salesforce Files each time this template is generated. For more information on Attachment and File Options, please view the Document Options section of the Template Editor Overview.

Querying Attachments or Files Created By S-Docs

You may need to query just the Salesforce Attachments or Files that are generated by S-Docs. This can be accomplished using the Description field on the ContentVersion object. Whenever S-Docs creates a Salesforce Attachment or File, the Description field on ContentVersion is populated with the record ID of the corresponding S-Doc record (SDOC__SDoc__c).

This can be useful if, for example, you have a required custom field on the ContentVersion object. To avoid errors when S-Docs creates a Salesforce Attachment or File, you can create a trigger that populates that custom field on any Salesforce Attachment or File that S-Docs creates.

The following trigger will populate the custom required ContentVersion field Required__c for Salesforce Attachments or Files created by S-Docs:

[code lang="html"]trigger SDocsContentVersionTrigger on ContentVersion (before insert) {
for (ContentVersion cv : trigger.new) {
try {
*/ Whenever S-Docs creates a ContentVersion record related to an SDOC__SDoc__c record,
it sets the SDOC__SDoc__c record ID as the ContentVersion Description. Hence we can
check for this to determine if the ContentVersion was created by S-Docs. */
Boolean createdBySDocs = ('' + Id.valueOf(cv.Description).getSObjectType()) == 'SDOC__SDoc__c';
if (createdBySDocs) {
cv.Required__c = 'Other';
}
} catch (Exception e) {}
}
}[/code]

Attachment Discussion

There are advantages and disadvantages to using Salesforce Attachments. On one hand, attachments are more permanent, faster to view, and can be exported for archiving or for legal/compliance purposes. Attachments also aren't affected by future template changes, whereas regular S-Docs use the template record each time they are viewed.

On the other hand, the attachment record itself cannot be easily related to multiple records (you should leverage the S-Docs Relationship for this) and attachments can consume a significant amount of file storage space within Salesforce. You also cannot easily report on data located within an attachment. S-Docs lets you choose whether you want to enable attachments or not on a per-template basis. We typically recommend you keep this feature enabled.

Link one document to many objects

By Documentation, General Solutions, S-Docs Cookbook No Comments

The S-Doc Relationship Object

You can relate many records to the same S-Doc by leveraging the SDoc_Relationship__c junction object.

By default, one S-Doc record can be simultaneously related to up to 9 distinct standard Salesforce objects (Account, Asset, Case, Contact, Contract, Lead, Opportunity, Product and Solution). This can be easily expanded to more standard objects (e.g. Campaign) and custom objects by adding a lookup field to the SDoc_Relationship__c object. However, if a user wants to relate one S-Doc to multiple records of the same object type (e.g. one S-Docs Contract to two Salesforce Accounts), the user simply clicks on the New SDoc Relationship button from the S-Doc related list on the record and then relates it to the S-Doc. One additional SDoc_Relationship__c record is needed for each record of the same object type you want to relate to the same S-Doc.

You may also notice that the comments field and status field are conveniently located on the SDocs_Relationship object. S-Docs will automatically synchronize these fields among all relationships that point to the same generated document. For example, if you update the status of a Contract that is related to two different Accounts, the status will be consistent across all views.

The SDoc relationship junction object provides more power and flexibility in relating S-Docs to your Salesforce objects rather than just linking them directly.

The Additional Relationship Field

When a document is first generated, one S-Doc relationship record is automatically created and linked to the base object (the object that the template's Related To Type field is set to). In Salesforce Classic, you can also choose an additional object to automatically link documents to by setting the template's Additional Relationship field to the additional object.

Note: This functionality is not available in Salesforce Lightning. Click here for more information.

The Additional Relationship field needs to be a related object field on the template's base object. For example, you can relate a document to an Opportunity and an Account (as an Additional Relationship) because there is an Account lookup field on the Opportunity record. Likewise, you can link an S-Docs to a Contact and the Account, since there is an Account lookup field on Contact. However, you could not, for example, automatically link an S-Docs to an Account (base object) and an Opportunity (Additional Relationship) because this is a one-to-many relationship.

Note: If you don't see this field, simply modify your page layout for the SDoc Template object and add the Additional Relationships field. 

To edit the SDoc Template page layout in Salesforce Classic, navigate to an S-Docs template record and click Edit Layout.

Navigate to the Fields tab in the layout editor, find the Additional Relationships field, and drag it into the SDoc Template Detail section.

Use S-Docs with your custom object

By Documentation, General Solutions, S-Docs Cookbook No Comments

S-Docs works great with your custom objects, but there are a few configuration steps you will need to take.

Below, you will find an overview of the configuration steps. Detailed step-by-step instructions on how to configure S-Docs with your custom object are available here: Configuring S-Docs with Custom Objects.

First, you will need to add your custom object to the picklist value “Related to Type” field in the SDOC Template object. When adding your object, be sure to use your object’s API name (e.g. myObject__c) as the new picklist value. This step is critical, as it allows S-Docs templates to be associated to your custom object.

Second, you need to create an S-Docs button and place it on your custom object’s detail page. We’ve found that a Detail Page button displayed in the “existing window without sidebar or header” works great.

You should create a button link using a URL similar to the following, but replacing ‘myObject__c’ with your Custom Object API name:

{!URLFOR('/apex/SDOC__SDCreate1', null,[id=myObject__c.Id, Object='myObject__c'])}

Lastly, this step allows generated S-Docs to be associated to your custom object and further allows you to place an S-Docs related list on your custom object’s detail page layout. You simply need to add a look-up field to the SDOC Relationship object that points to your custom object.

Note: The “Field Name” of this new lookup field must match the name of your object (e.g. myObject) without the “__c.”

Discussion: When using S-Docs with custom objects, the field template designer will automatically correct and append your related object fields with a “__r.” If you are comfortable creating your templates in the source code, be sure to use the standard Salesforce conventions and dot notation and be mindful of capitalization differences.

Automating Conditional Template Selection and Generation

By Documentation, S-Docs One-Click and Zero-Click No Comments

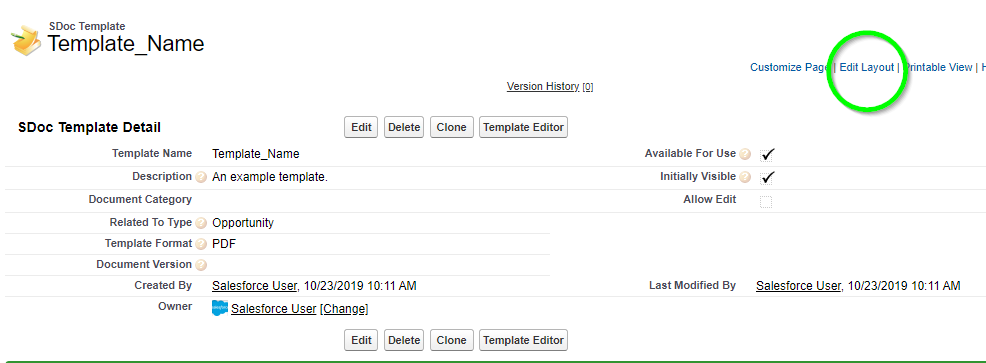
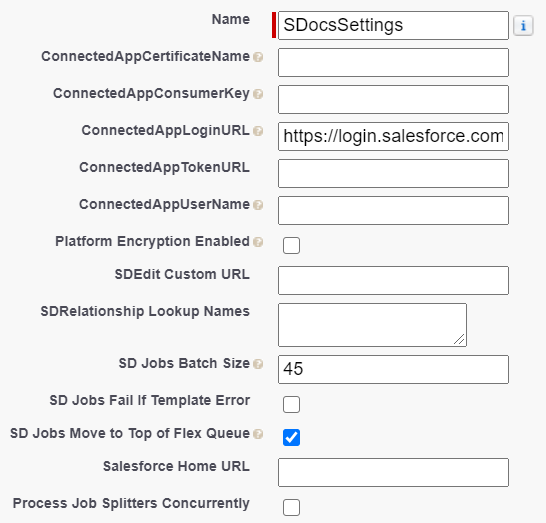
Winter '20 Release Note: If you are using S-Docs below version 4.53, you may experience an "Attempt to de-reference a null object" error when interacting with various forms of automation in S-Docs. In order to fix this bug, you can create a new SDocs Settings custom settings set. To do this, type "Custom Settings" into the Quick Find / Search bar in the Setup menu, and click Custom Settings. Click SDocsSettings, then click Manage at the top of the page. From there, click New. Fill out the following information:

Name: SDocsSettings
ConnectedAppLoginURL:
Production: login.salesforce.com
Sandbox: test.salesforce.com
SD Jobs Batch Size: 45
SD Jobs Move to Top of Flex Queue:

Additionally, ensure that you have a Remote Site Setting for either login.salesforce.com (production), or test.salesforce.com (sandbox).

Note: This guide builds on automation features discussed in the one-click and zero-click guide (Automation Options Improving Efficiency and Compliance).

Introduction

With the use of Salesforce logic in the S-Docs button URL, you have an endless amount of possibilities for automating template selection and generation. You can easily modify the standard S-Docs button code so that when users click the button, S-Docs will automatically select or generate certain documents depending on the values in a record’s fields.

For example, suppose that we have multiple templates for a letter sent to contacts, and that this letter will vary depending on what a given contact’s department is. If the variation is small, we could handle this using render statements. But suppose these were completely different letters requiring completely different templates, and we don’t want to require our sales team to memorize the contact’s department, click the S-Docs button on the contact record’s page, and then have to click the appropriate letter template prior to document generation. We’d rather have a user in our org just click S-Docs and be immediately taken to their templates.

We can accomplish this by editing an object’s existing S-Docs button, or creating a new button if you’d like users to have the option of using the normal S-Docs button in case they need to manually select templates. In this case, we’ll go with the first choice, and simply edit our existing S-Docs button.

Using The Doclist Parameter

In the following sections, we will be automatically selecting documents with the doclist Apex parameter. To use this, we simply append the following to our S-Docs button code:

doclist='YourTemplateNameHere1,YourTemplateNameHere2,YourTemplateNameHere3…'

Note: If you have multiple templates with the same name, they will all generate if one of them is referenced by this parameter.

You can also use template IDs for the doclist parameter, however this is not recommended because these IDs will change between sandbox and production orgs, meaning that you will have to re-add the new template IDs into this parameter after transferring to production.

The doclist can include as many S-Doc templates as you’d like. If you just append the doclist parameter, templates will be automatically selected and generated. If you would like your S-Docs templates to be automatically selected, but not automatically generated, you can append oneclick='false' to your S-Docs button code as well, as this parameter modulates the doclist parameter. For a full list of button parameters, please visit our Apex Parameter documentation.

Two Outcomes: True or False (IF Function)

Let’s suppose that members of every department except finance gets letters derived from the same template, and the finance department gets letters derived from a different, special template. This means that we have two outcomes to consider in our automatic template selection: the contact is in the finance department, or the contact is in some other department. So, we handle this with the doclist Apex parameter and an IF function that determines the templates to be included in the doclist. The button URL would look like this:

[code lang="html"]{!URLFOR('/apex/SDOC__SDCreate1', null,[id=Contact.Id, Object='Contact',
doclist=IF(Contact.department=='Finance', 'Finance_Letter', 'All_Depts_Letter')])}[/code]

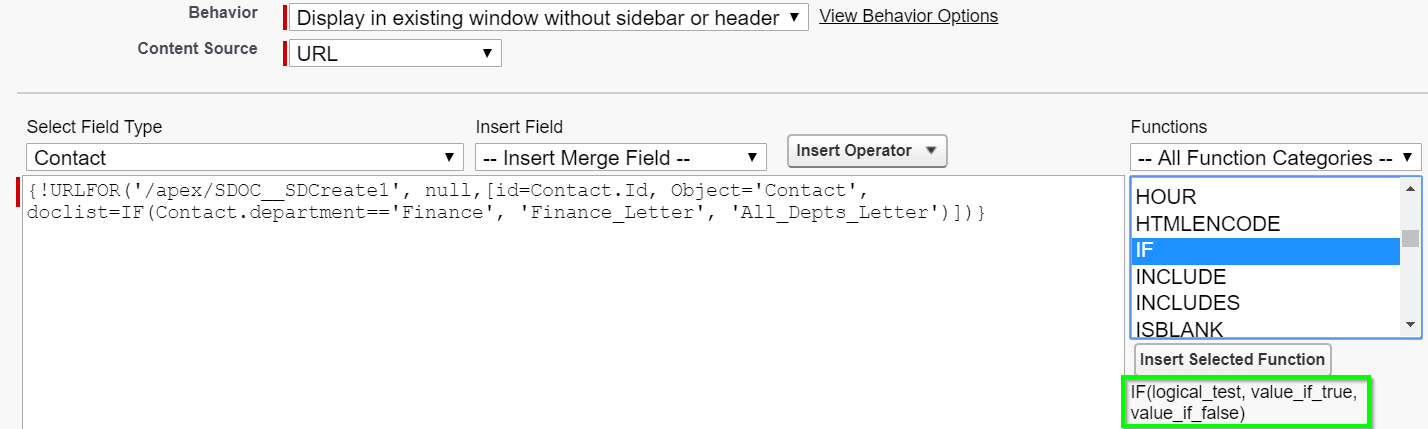
We see that if the contact’s department is “Finance,” then the template will be "Finance_Letter," which happens to be the S-Docs template for our special finance department letter. However, if the contact’s department is not “Finance,” then the doclist parameter will be "All_Depts_Letter," which is the template for our letter for all other departments.

More Than Two Outcomes (CASE Function)

Now suppose that members of technology departments will also receive a totally different letter. This means we can’t use an IF function, as we now have three outcomes; the contact could be in the finance department, the technology department, or in some other department. This means we’ll have to use the CASE function instead. The button URL would look like this:

[code lang="html"]{!URLFOR('/apex/SDOC__SDCreate1', null,[id=Contact.Id, Object='Contact',
doclist=CASE(Contact.department, 'Finance', 'Finance_Letter', 'Technology', 'Technology_Letter', 'All_Depts_Letter')])}[/code]

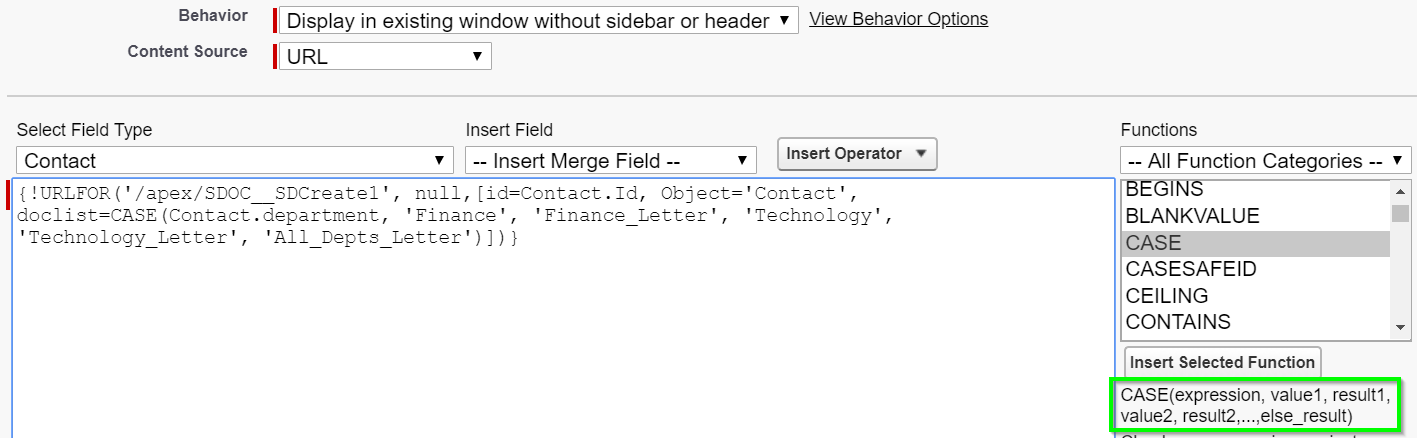
We see that the finance department will get their own letter, the technology department their own letter, and since else_result is “All_Depts_Letter," all other departments will receive letters derived from the same template.

Building a Doclist with Multiple Functions

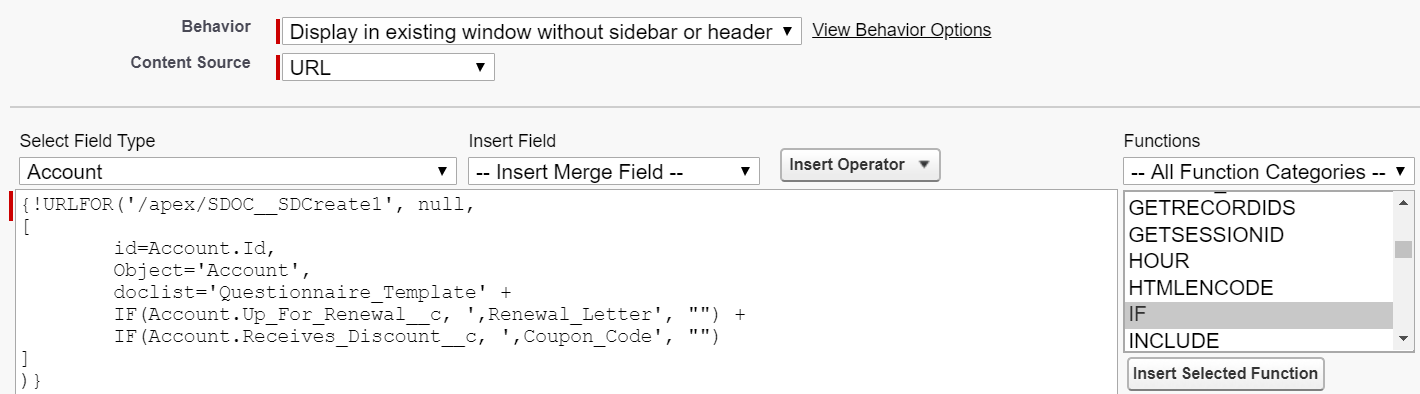
Now, suppose that we’d like to send an account’s primary contact a questionnaire regarding how much they like our product. Additionally, suppose we have two true/false fields: Up_For_Renewal__c and Receives_Discount__c, which respectively denote whether the account is up for renewal and whether the account is eligible for a discount. We’re sending the account’s primary contact the questionnaire no matter what, and depending on the status of the other two fields, we may or may not send a letter informing them that they are up for renewal, and possibly some kind of coupon code or voucher if they are eligible for a discount. Let’s say the questionnaire template is named "Questionnaire_Template," the up-for-renewal template is named "Renewal_Letter," and the coupon code template is named "Coupon_Code."

Then, we could accomplish this with the following button URL:

[code lang="html"]{!URLFOR('/apex/SDOC__SDCreate1', null,
[
id=Account.Id,
Object='Account',
doclist='Questionnaire_Template' +
IF(Account.Up_For_Renewal__c, ',Renewal_Letter', "") +
IF(Account.Receives_Discount__c, ',Coupon_Code', "")
]
)}[/code]

Since we’re sending the questionnaire no matter what, its template name is at the front of the doclist outside of the IF function. Then, we have two IF functions that will return a template (each of which is preceded by a comma, since our doclist must be comma-delimited without spaces) if their respective fields are true. So, if Up_For_Renewal__c and Receives_Discount__c are both true, our resulting doclist will be:
Questionnaire_Template,Renewal_Letter,Coupon_Code.

If  Up_For_Renewal__c is false and Receives_Discount__c is true, our resulting doclist will be:
Questionnaire_Template,Coupon_Code.

If both of these fields are false, our resulting doclist will be:
Questionnaire_Template.

In the last case, this is because value_if_false for our two IF functions is an empty string (specified as two quotation marks with nothing between them). Don’t worry about the additional commas; S-Docs will ignore these and just generate the document with the template name Questionnaire_Template. We could place commas inside of our code’s quotation marks such that they would always yield clean-looking doclists. However, this might take a bit more thought and work to write, and could be more prone to mistakes (or you might think the opposite; it’s a matter of personal preference). No one’s really looking at the resulting doclist after your IF functions evaluate; it’s just used internally by S-Docs to find which templates to use. So, you don’t need to worry about what your doclist evaluates either, as long as the logic is correct and there is at least one comma between each template name whenever the doclist evaluates.

Nested IF Functions

Our code’s structure in the previous example is very useful in plenty of cases. However, it might not make sense to send an account a coupon code along with the questionnaire if they aren’t up for renewal. We might want to send that coupon code only if they’re up for renewal. We can accomplish this using a nested IF function:

[code lang="html"]{!URLFOR('/apex/SDOC__SDCreate1', null,
[
id=Account.Id,
Object='Account',
doclist='Questionnaire_Template' +
IF(Account.Up_For_Renewal__c, ',Renewal_Letter' +
IF(Account.Receives_Discount__c, ',Coupon_Code', ""), "")
]
)}[/code]

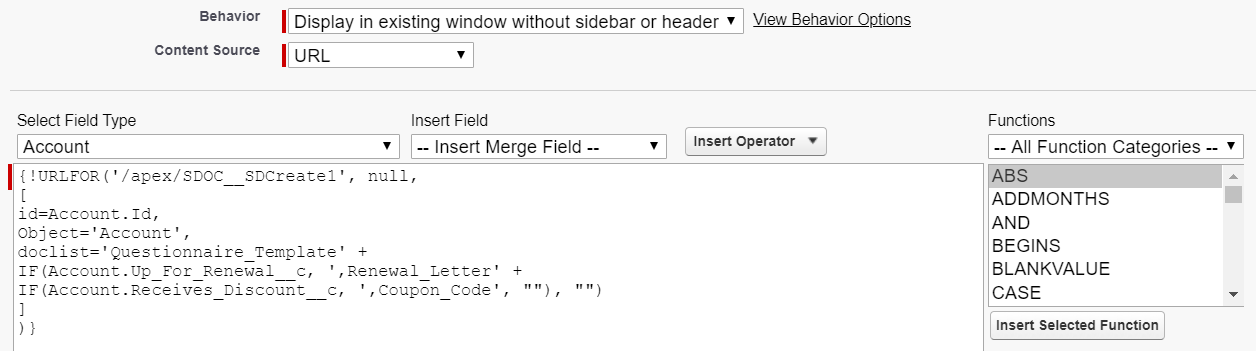
Let’s take this statement apart. Our questionnaire’s template name, Questionnaire_Template, will be on our doclist no matter what. Now, what happens if Account.Up_For_Renewal__c is true? First, note that we included a comma at the end Renewal_Letter; this comma is inside the string, since we don’t want to confuse our IF function with extra commas laying outside the string. We then followed this string with an ampersand (i.e. the concatenation operator) and a nested IF function. Whatever the nested IF function returns will be concatenated to the end of the following string: Renewal_Letter.

So, if Account.Up_For_Renewal__c is true, and Account.Receives_Discount__c is false, our resulting doclist will be:
Questionnaire_Template,Renewal_Letter.

Then, if Account.Up_For_Renewal__c and Account.Receives_Discount__c are both true, our resulting doclist will be:
Questionnaire_Template,Renewal_Letter,Coupon_Code.

And finally, if Account.Up_For_Renewal__c is false and Account.Receives_Discount__c is true, our resulting doclist will be:
Questionnaire_Template.

In other words, accounts will receive just the questionnaire if they aren’t up for renewal, even if they are eligible for the discount. No need to jump the gun on that coupon code!

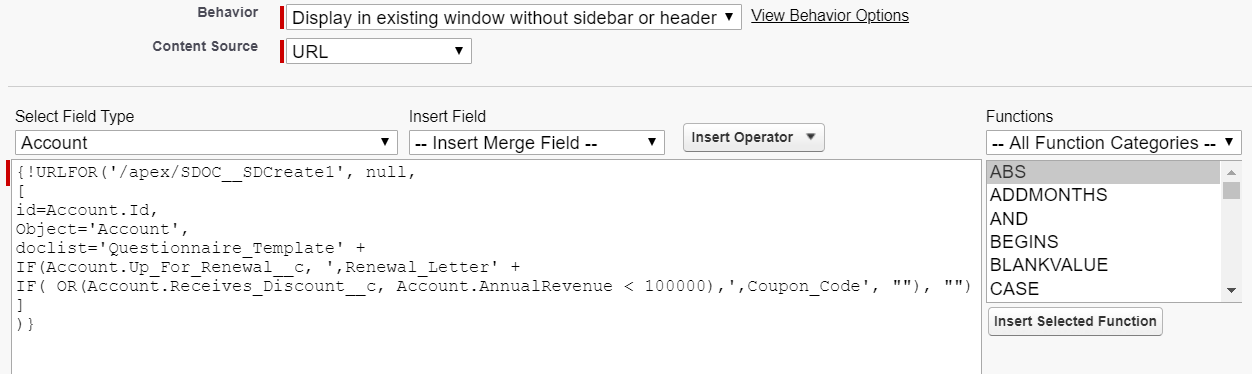
Using AND/OR Functions

AND/OR functions can be used with the doclist parameter as well. For example, say we become big fans of small business and decide to create a promotional period in which accounts with annual revenues less than $100,000 will also receive a coupon code, even if Account.Receives_Discount__c is false. To accomplish this, we can place an OR function inside of our IF function:

[code lang="html"]{!URLFOR('/apex/SDOC__SDCreate1', null,
[
id=Account.Id,
Object='Account',
doclist='Questionnaire_Template' +
IF(Account.Up_For_Renewal__c, ',Renewal_Letter' +
IF( OR(Account.Receives_Discount__c, Account.AnnualRevenue < 100000),',Coupon_Code', ""), "")
]
)}[/code]

Automation Options: Improving Efficiency and Compliance

By Documentation, S-Docs One-Click and Zero-Click No Comments

Winter '20 Release Note

If you are using S-Docs below version 4.53, you may experience an "Attempt to de-reference a null object" error when interacting with various forms of automation in S-Docs. In order to fix this bug, you can create a new SDocs Settings custom settings set. To do this, type "Custom Settings" into the Quick Find / Search bar in the Setup menu, and click Custom Settings. Click SDocsSettings, then click Manage at the top of the page. From there, click New. Fill out the following information:

Name: SDocsSettings
ConnectedAppLoginURL:
Production: login.salesforce.com
Sandbox: test.salesforce.com
SD Jobs Batch Size: 45
SD Jobs Move to Top of Flex Queue:

Additionally, ensure that you have a Remote Site Setting for either login.salesforce.com (production), or test.salesforce.com (sandbox).

FEATURE OVERVIEW

S-Docs is a powerful tool that allows you to generate and email documents natively on the Salesforce platform. By default, the user experience is very flexible. However, this flexibility means that the user makes all decisions during the document generation and distribution process, which takes time. As an administrator, you may want to automate the process to gain efficiency (to reduce time and clicks), reduce errors (by pre-selecting correct templates based on data) and to ensure compliance (to enforce business rules). S-Docs provides a one-click and zero-click feature described in this document to ensure you can tailor the user experience to meet your business requirements.

The document automation process can be considered a spectrum from maximum flexibility to maximum automation. The out-of-box behavior of S-Docs provides maximum user flexibility. In this use case, the user chooses the document(s), along with the default email template. They decide whether to include additional attachments, determine email recipients, and then finally decide if they want to print or email the generated document(s).

With S-Docs, you can achieve complete automation – meaning an event or field change could drive a fully automated document generation and distribution process, even when the user is not logged into Salesforce! For example, an account status changed to “closed” could generate a win-back email and special offer without any user involvement. Or, a case status change to “Ready for Proposal” could generate a proposal and send it to the client. You can see that there is a huge opportunity to improve your business process. As an administrator, you determine what level of automation is appropriate for your organization to meet your requirements. This document explains how S-Docs can be used to achieve those results.

S-DOCS AUTOMATION SPECTRUM

Maximum Flexibility [Most clicks]                                                          Maximum Automation [Least clicks]
OPTION 1 OPTION 2 OPTION 3 OPTION 4 OPTION 5 OPTION 6
Default S-Docs Behavior Pre-select “One Click” One-Click + Email Prep One-Click + Email Send “Zero-Click”
User chooses every aspect of doc generation, attachments, and email options. You can add filter rules to help selection process. Saves one step to filtering by selecting the default document(s) based on data such as language or product type. User can override pre-selected  docs as needed. Documents along with email cover letter are generated with a single click. User can then choose to print, return to record or proceed to email. One-click leads to fully populated email page with all attachments, default email message and recipients completed. User can verify email and make edits as needed before sending. One-click, document(s) are generated and emailed. Screen returns to the record detail page without any further user input. User cannot change document or messaging. A Field change, or workflow sets off a trigger that generates and optionally emails the document(s). This is fully automated and ideal for mobile devices.

CONFIGURATIONS

The following options provide you with edits to the S-Docs button that you can use to increase automation. To get to the button edit page, navigate to the Setup menu and click Object Manager. Click the name of your object.

Then, navigate to the Buttons, Links, and Actions tab. Find the S-Docs button, click the arrow on the right, and click Edit.

Note: The S-Docs button comes prepackaged for the following standard objects: Contract, Opportunity, Account, Contact, Lead, Task, and Event. Because of this, the button will be managed and therefore unable to be edited for these objects. You will need to create a new S-Docs button (and replace the old button on the object's page layout) to make edits.

OPTION 1: Default Behavior & Adding Template Filters

S-Docs default behavior allows a user to choose any document(s) to generate along with any email template. The user can then decide to print or email the document. If emailed, the user can attach additional files, add recipients and customize the email message before it is sent. While this provides for maximum flexibility, it also requires the greatest amount of user interaction (clicks).

You can reduce template searching by optionally providing an initial search filter to the template list. When the user clicks on the S-Docs button, a subset of templates can be displayed to help them find the most likely one needed. This is done by using a search filter and/or category filter, as in the button URL. But keep in mind, the Salesforce user will still need to click the checkbox next to the template and then click the “Next" button to continue. If you want the box checked for them, you need to move to Option 2. Option 1 is useful when you have many templates and want to simply help the user by providing the likely choice. Users can still search for and use other templates as needed.

The first example below shows the button syntax where the templates are initially filtered based on a dynamic field value such as the language preference of the client. Using the “searchfilter” parameter below will automatically display only templates that have a “Name” or “Description” field that contains the value of the searchfilter parameter.

Button or Link URL:

[code lang="html"]{!URLFOR('/apex/SDOC__SDCreate1', null,[id=Opportunity.Id, Object='Opportunity',
searchfilter=Opportunity.ContactLanguage__c])}[/code]

Similarly, you can filter based on the value of the template’s “category” field. In this example, only templates with a category of “Contract” will be displayed by default. Button or Link URL:

[code lang="html"]{!URLFOR('/apex/SDOC__SDCreate1', null,[id=Opportunity.Id, Object='Opportunity',
categoryfilter='Contract'])}[/code]

Note:You can use both searchfilter and categoryfilter parameters together within the same button. When doing so, both conditions need to be met for the related templates to appear (i.e. they are joined by an “AND” condition).
Note 2:
If you want to restrict access to templates based on user or profile, you can easily implement this using Salesforce’s sharing model feature. You would need to change the SDTemplate object to a private sharing model and then configure your sharing rules based on your business requirements.

Option 2: Pre-select Templates:

This option will save users an additional click by automatically pre-selecting (filtering and checking off) the document to be generated. The user can still remove the pre-selected template and choose their own if they wish to override the default selection. The user will then need to click on the Next Step button to generate the document. This option is useful when you have business rules that can identify the correct template in the majority of use cases, but still allows the user to override the default selection if needed.

This automation is achieved by passing the template’s name into a URL parameter called “doclist.” This parameter can contain multiple template names, but they must be separated by a comma. Additionally, the oneclick parameter needs to be set to false. This tells the S-Docs engine to stop for further input. Note that if there are multiple templates with the same name in your org, all of them will generate if one of them is referenced by this parameter.

Note: You can also use template IDs for the doclist parameter, however this is not recommended because these IDs will change between sandbox and production orgs, meaning that you will have to re-add the new template IDs into this parameter after transferring to production.

S-Docs Button or link URL:

[code lang="html"]{!URLFOR('/apex/SDOC__SDCreate1', null,[id=Opportunity.Id, Object='Opportunity',
doclist='Template_1,Template_2',
oneclick='false'])}[/code]

The doclist parameter can also be dynamically set using Salesforce functions within the button like “IF” or “CASE.” This button will choose the correct document and email template based on a field value. S-Docs Button or link URL:

[code lang="html"]{!URLFOR('/apex/SDOC__SDCreate1', null,[id=Contact.Id, Object='Contact',
doclist=IF(Contact.Department=='Finance', 'Finance_Template', 'All_Other_Depts_Template')])}[/code]

Option 3: One-Click Generation

The “one-click” builds on Option 2 but takes it one step further – the document(s) are generated without the user selecting any templates. Once the user clicks the S-Docs button, they will go directly to the list of newly generated documents. From there, they can then decide to view, print, email or return to the original Salesforce record. This option achieves one-click generation while still allowing the user to determine next steps.

One-click configuration is a similar URL to option 2, but should NOT contain the “oneclick='false'” parameter. Only the doclist parameter (which contains a comma delimited list of documents) is needed.

S-Docs Button or link URL:

[code lang="html"]{!URLFOR('/apex/SDOC__SDCreate1', null,[id=Opportunity.Id, Object='Opportunity',
doclist='Template_1,Template_2'])}[/code]

Option 4: One-Click + Email Prep

The “one-click” builds on Option 3 but again goes one step further – by pushing the user and documents to an email screen. To effectively use this option, one of the templates in the doclist should be of type “HTML.” This HTML template will comprise the default email body and can set the default subject line and recipients for the outbound email being prepared.

Any other S-Docs templates that are included in the doclist will be automatically added as attachments. This option is appropriate where you want to give the user the opportunity to “eyeball” the email and make any small changes prior to sending. You can leverage the advanced features of the S-Docs Template to default all email values and lock down fields where you want to restrict the users. One-click is configured with a “prepemail='1'” parameter in the S-Docs button URL. Only the doclist parameter (which contains a comma delimited list of template names) and prepemail parameters are needed. Again, when using this feature, one of the templates in the doclist should have an output type of “HTML” that will set the default email body. S-Docs Button or link URL:

[code lang="html"]{!URLFOR('/apex/SDOC__SDCreate1', null,[id=Opportunity.Id, Object='Opportunity',
doclist='Email_Template,Template_1',
prepemail='1'])}[/code]

Option 5: One-Click + Email Send

This option will create the document and email it according to the parameters in the button and the configuration of the S-Docs templates included in the doclist parameter. This MUST contain an HTML template as one of the doclist parameters, and that template MUST contain at least a default “To” address, subject line and email body. Without this set, it will not be a valid email. The users will return to the original record detail page once complete. This is a useful option when you want complete control of the messaging but still allow the user to control when the message is generated.

S-Docs Button or link URL:

[code lang="html"]{!URLFOR('/apex/SDOC__SDCreate1', null,[id=Opportunity.Id, Object='Opportunity',
doclist='Email_Template,Template_1',
sendemail='1'])}[/code]

You can include additional email attachments to your outbound email by specifying the document ID or attachment ID parameters. Keep in mind that these records need to exist within Salesforce prior to the document generation process so their IDs can be included in the URL. Attachments use the parameter “aid=”  followed by a comma delimited list of Salesforce IDs corresponding to attachment records. Salesforce documents use the parameter “did=” and the list of Salesforce IDs for the document record. S-Docs Button or link URL with additional attachments from attachment related list and documents tab:

[code lang="html"]{!URLFOR('/apex/SDOC__SDCreate1', null,[id=Opportunity.Id, Object='Opportunity'
doclist='Email_Template,Template_1',
aid='00PG0000006neU1',
did='015G0000001gbu9,015G0000002qtXw',
sendemail='1'])}[/code]

Option 6: Zero Click

This option can create documents and emails from the Salesforce platform whenever a field is set to a particular value. You can therefore use workflow rules to update a field value, which in turn can generate and optionally email documents through S-Docs. This option is ideal for behind-the-scenes document generation and distribution. It is also ideal for mobile devices, since it is a field change that runs a process without further user interaction. For example, you can easily add a custom picklist field on a mobile page layout. The user simply changes the value and saves the record. All document processing is handled post-save on the Salesforce platform. You can also do this without even prompting the user through workflow rules!

This integration uses the S-Docs Jobs Object in conjunction with the Salesforce Process Builder, Visual Workflows, or APEX triggers. You can learn how to use S-Docs Jobs for zero-click automation by reading this documentation.

Conditional logic within a template

By Documentation No Comments

Feature Overview

S-Docs Render is a powerful feature that permits sections (or blocks) of text and data to display in your generated document only when a condition is met. This provides a mechanism to create a single template that can dynamically show and hide portions of the document based on conditional logic.

While you can also achieve simple dynamic rendering within your S-Docs templates by only using Salesforce formula fields (without the S-Docs Render feature), this approach has limitations and can be difficult to scale.

To address these limitations, S-Docs provides two levels of Rendering: Basic Render and Advanced Render.

The Basic Render feature can be used to show or hide a block of your S-Docs template based on a single condition. We suggest this approach first because it is simple and can meet most requirements.

For more complex requirements where advanced logic is needed, the S-Docs Advanced Render feature can be leveraged. The Advanced Render feature uses Salesforce APEX syntax to evaluate complex and compound logical statements.

Conditional Logic With Salesforce Formula Fields

You can achieve simple rendering using only Salesforce formula fields. This technique works by using a formula field which returns either text or a blank value based on the conditional logic you set in the formula. That formula field is then simply merged into your S-Docs template just like any other merged field. While this is simple, you may reach the upper size limits of the formula field if you want to show large blocks of text.

For example, dynamically inserting "Terms and Conditions" in your document based on another field value should not be done with a formula field. Moreover, having text and logic split between your template and formula is not a good practice, as this becomes difficult to maintain.

Lastly, if you have many conditions in multiple S-Docs templates, this approach is not practical because it will require too many formula fields to be created. We therefore suggest this approach for only the simplest cases, or where the formula field already exists for other purposes. For example, if you already have a field called "Delivery Charge" and you want it to display "No Charge" for "Gold" tier customers, you may use a formula field like the one below:

[code lang="html"]IF( Tier__c="Gold", "No Charge", Fee__c)[/code]

Conditional Logic With The S-Docs Render Feature: Basic Usage

The S-Docs Render feature provides a mechanism to dynamically show or hide information without having to create additional templates for every use case. You add a render statement into your S-Docs template, and if it evaluates to TRUE, then the entire block (up to the closing ENDRENDER tag) is included; otherwise it is omitted. To use the S-Docs Render feature, you can insert the syntax yourself, or click the Insert Conditional Logic button. This document will focus on editing render syntax yourself.

We'll begin with an example. You may want to display an additional paragraph in your document if the client lives in California. Here is a snippet that you would add to your S-Docs template where you want the text to appear:

[code lang="html"]<!--RENDER='{{!Account.BillingState}}'== 'CA' -->
This is additional information that only pertains to our clients who have a billing address in California
<!--ENDRENDER-->[/code]

The basic S-Docs render feature supports eight basic comparators (==, !=,  >, <, >=, <=, CONTAINS and NOT CONTAINS).

Note: If any fields in your render statement contain words and have a field type anything other than a basic string type (rich text, textarea, longtext, function, etc.) you will need to add the  merge field attribute render. For example, if your merge field looked like this: {{!MyTestField}}
The field with the attribute added would look like this: {{!MyTestField render}} Within a render statement, it would look like this:
<!--RENDER= '{{!MyTestField render}}' == 'Test' -->{{!Opportunity.closedate M/d/yyyy}}<!--ENDRENDER-->
Note that this attribute should only be added to merge fields within render tags (e.g. enclosed by <!-- and -->). In the above example, the attribute  is not added to the {{!Opportunity.closedate M/d/yyyy}} because this merge field is outside of the render tags.
Additionally, note that the Insert RENDER button will not add this attribute automatically. This functionality was added in version 4.48

Render is also useful to determine if a value is empty or NULL. In the example below, we can create two render blocks. Since the value can only be null or NOT null, we are assured that only one of the render blocks below will be included in the final document output:

[code lang="html"]<!--RENDER='{{!Contact.Phone}}'== 'NULL' -->
No Phone Number on recode. Please update.
<!--ENDRENDER-->
<!--RENDER='{{!Contact.Phone}}'!= 'NULL' -->
We have the following phone number: {{!contact.phone}}
<!--ENDRENDER-->[/code]

Finally, render can be used to assess if something is true or false (Boolean fields). Much like the example above, we can create two render blocks- one for true and one for false- and only one of the render blocks will be included in the final document output. If the user selects the true checkbox the document will only render for true and vice versa.

[code lang="html"]<!--RENDER='{{!Contact.Checkbox__c}}'== 'True' -->
This checkbox is checked.
<!--ENDRENDER-->
<!--RENDER='{{!Contact.Checkbox__c}}' == 'False' -->
This checkbox is unchecked.
<!--ENDRENDER-->[/code]

Basic Render and Nested Render Statements

S-Docs provides for 4 levels of nesting render statements. This allows you to place conditions within other conditions. Using nested render statements can also be leveraged to achieve compound logic as shown in the example below:

[code lang="html"]<!--RENDER='{{!Contact.Phone}}'== 'NULL' -->
We don't have a primary phone number
<!--RENDER1='{{!Contact.OtherPhone}}'== 'NULL' -->
<!--RENDER2='{{!Contact.homephone}}'== 'NULL' -->
and there are no alternate phone numbers available
<!--ENDRENDER2-->
<!--ENDRENDER1-->
<!--RENDER1='{{!Contact.fax}}'!= 'NULL' -->
but, there is a fax number: {{!contact.fax}}
<!--ENDRENDER1-->
for this contact!
<!--ENDRENDER-->[/code]

There is no limit on the number of render statements you place within other render statements, however you are limited to nesting them to a maximum of 4 levels deep. Note in the example above that you can have multiple "Render1" tags within the same parent "Render" tag. However, you must change the render tag name whenever you are nesting a render within another render statement. When doing this, you must change the name of the nested render tag to "RENDER1" "RENDER2" or "RENDER3" and this name must be different than any of its parent tags.

Note: Nested render statements cannot skip levels. In other words, RENDER2 cannot come after RENDER; you must follow the RENDER > RENDER1 > RENDER2 > RENDER3 format.
Note 2: Whenever using the S-Docs Render feature, all of your RENDER and ENDRENDER tags must be properly paired and terminated.
Note 3: HTML tags must either fully enclose or be fully enclosed by RENDER and ENDRENDER statements. For example, a <table> tag cannot open outside of a render statement and close inside of one.

Basic Render Without Nesting

S-Docs also uses AND (&&) and OR (||)  in the RENDER statement, so you don't have to nest. A RENDER statement using AND (&&) can be leveraged to achieve logic as shown in the example below:

[code lang="html"]<!--RENDER=('{{!Contact.Phone}}' == '4150000000' && '{{!Contact.fax}}' != '4150000000') -->
We have the defined primary phone number, (415)000-0000, and a fax number that is different than the primary phone number
<!--ENDRENDER-->[/code]

Similarly, OR (||) can be used as shown in the example below:

[code lang="html"]<!--RENDER=('{{!Account.billingstate}}' == 'CA' || '{{!Account.shippingState}}' == 'CA') -->
Either the billing address or shipping address is in California
<!--ENDRENDER-->[/code]

AND (&&) and OR (||) can be used concatenate multiple statements. For example:

[code lang="html"]<!--RENDER=('{{!Contact.Phone}}' == '4150000000' && '{{!Contact.fax}}' != '4150000000') || ('{{!Contact.Phone}}' != '4150000000' && '{{!Contact.fax}}' == '[undefined]') -->
We have either a defined primary phone number, (415)000-0000, and a fax number that is different than the primary phone number, OR a primary phone number, (415)000-0000, and an undefined fax number
<!--ENDRENDER-->[/code]

A similar method using the Runtime Prompt can also show a prompt by letting the user choose to include or to not include the block of text.

'CONTAINS' and 'NOT CONTAINS' Statements

In addition to checking for a string with boolean functions, you can use 'CONTAINS' or 'NOT CONTAINS' to look for a specific string. For example, a statement with 'CONTAINS' would look like:

[code lang="html"]<!--RENDER='{{!Contact.Name}}' CONTAINS 'Tim' -->
Checking for the substring/contact name 'Tim'
<!--ENDRENDER-->[/code]

And a statement with 'NOT CONTAINS' would look like:

[code lang="html"]<!--RENDER='{{!Contact.Name}}' NOT CONTAINS 'Tim' -->
Checking for a substring/contact name other than 'Tim'
<!--ENDRENDER-->[/code]

Top