All Posts By

Admin

Customizing Your Related List Layout

By Documentation, General Solutions, S-Docs Cookbook No Comments

Remove Related List Table Formatting

Sometimes the standard S-Docs related list doesn't result in the right layout of data for your use case. In this event, you can use <class>none</class> instead of <class>tableXXX</class> to remove all the HTML that S-Docs automatically inserts into the table. You'll have to delete the table markup that was inserted around your related list as well. However, you don't need to do any of the previous steps manually; if you check the Insert related list without table markup checkbox in the "Format Data Columns" tab of the "Insert Related List" window, your list will be inserted as the following:
[code lang="html"]<!–{{! <LineItems>
<class>none<class>
<ListName>OpportunityLineItems</ListName>
<column>PriceBookEntry.product2.Name</column>
<column>PriceBookEntry.product2.Description</column>
<column>UnitPrice</column>
<column>Quantity</column>
<column>TotalPrice</column>
</LineItems> }}–>[/code]

Add Row Numbers to Your Table

If you'd like to display a number for each row in your related list table, you can insert the rownum column by adding the following to your related list statement:
[code lang="html"]<column>rownum</column>[/code]
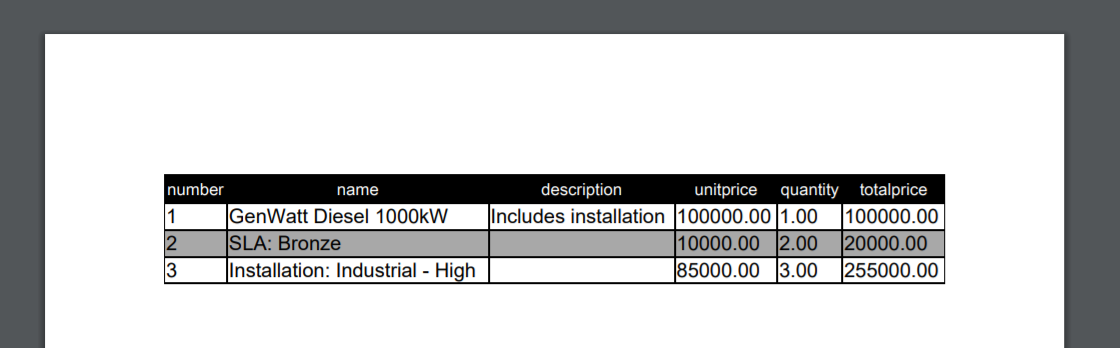
For example, a related list statement that looks like this:
[code lang="html"]<lineitems>
<class>table646</class>
<listname>opportunitylineitems</listname>
<column>rownum</column>
<column>PricebookEntry.Product2.name</column>
<column>PricebookEntry.Product2.description</column>
<column>unitprice</column>
<column>quantity</column>
<column>totalprice</column>
</lineitems>
}}-->[/code]
Would output a table that looks like this:

Offset The Starting Row Number

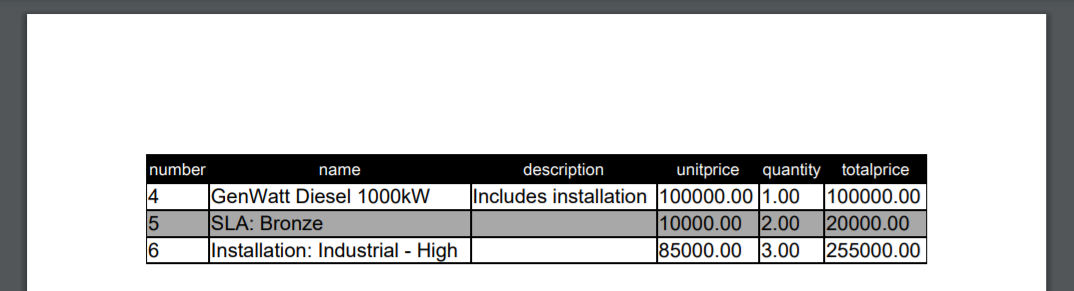
If you'd like your table's row numbers to begin at a number other than 1, you can use the startIndex related list column attribute to specify a number that should be added to the first row. For example, if your related list statement looked like this:
[code lang="html"]<lineitems>
<class>table646</class>
<listname>opportunitylineitems</listname>
<column startIndex="3">rownum</column>
<column>PricebookEntry.Product2.name</column>
<column>PricebookEntry.Product2.description</column>
<column>unitprice</column>
<column>quantity</column>
<column>totalprice</column>
</lineitems>
}}-->[/code]
Your table would look like this:

You can also use the mergenext related list column attribute to merge the row number into another column. Please visit our advanced template features article to read more about mergenext and other column attributes.

Build A Custom Table

Then, you can use the column prefix and postfix attributes to insert the HTML tags and build the table yourself (you may modify the HTML outside of the related list comment as well):

[code lang="html"]<table>
<tbody>
<!--{{! <LineItems>
<class>none<class>
<ListName>OpportunityLineItems</ListName>
<column prefix="<tr><td>" postfix="</td>">PriceBookEntry.product2.Name</column>
<column prefix="<td>" postfix="<br />">PriceBookEntry.product2.Description</column>
<column postfix="</td>">UnitPrice</column>
<column prefix="<td>" postfix="</td>">Quantity</column>
<column prefix="<td>" postfix="</td></tr>">TotalPrice</column>
</LineItems> }}-->
</tbody>
</table>[/code]
The above related list is now equivalent to the following related list (i.e. the kind of related list S-Docs inserts by default):
[code lang="html"]<table>
<tbody>
<!--{{! <LineItems>
<class>table251<class>
<ListName>OpportunityLineItems</ListName>
<column>PriceBookEntry.product2.Name</column>
<column>PriceBookEntry.product2.Description</column>
<column>UnitPrice</column>
<column>Quantity</column>
<column>TotalPrice</column>
</LineItems> }}-->
</tbody>
</table>[/code]
This technique provides plenty of flexibility in table formatting. For example, if you wanted PriceBookEntry.product2.Name and PriceBookEntry.product2.Description to appear in the same table cell, you would use:

[code lang="html"]<table>
<tbody>
<!--{{! <LineItems>
<class>none<class>
<ListName>OpportunityLineItems</ListName>
<column prefix="<tr><td>" postfix="</td>">PriceBookEntry.product2.Name</column>
<column prefix="<td>" postfix="</td>">PriceBookEntry.product2.Description</column>
<column prefix="<td>" postfix="</td>">UnitPrice</column>
<column prefix="<td>" postfix="</td>">Quantity</column>
<column prefix="<td>" postfix="</td></tr>">TotalPrice</column>
</LineItems> }}-->
</tbody>
</table>[/code]
Finally, if you wanted to insert table headers and add CSS styling, you would use something like the following:
[code lang="html"]<style>
#myCustomTable { border: none }
.nameAndDescriptionCell { border: 1px solid black; }
</style>

<table id="myCustomTable">
<thead>
<th>Name &amp; Description</th>
<th>Unit Price</th>
<th>Quantity</th>
<th>Total Price</th>
</thead>
<tbody>
<!--{{! <LineItems>
<class>none<class>
<ListName>OpportunityLineItems</ListName>
<column prefix="<tr><td class='nameAndDescriptionCell'>" postfix="</td>">PriceBookEntry.product2.Name</column>
<column prefix="<td>" postfix="<br />">PriceBookEntry.product2.Description</column>
<column postfix="</td>">UnitPrice</column>
<column prefix="<td>" postfix="</td>">Quantity</column>
<column prefix="<td>" postfix="</td></tr>">TotalPrice</column>
</LineItems> }}-->
</tbody>
</table>[/code]

Alternate Customization Option

Using <class>none</class> to remove your related list table formatting works great if you only need your data to be displayed as a comma-delimited list, or in a custom table that you build yourself. However, if you need to format your related list data in an entirely new way, you can also generate a template component that formats your data and then merges it into your final document. Click here to read more about this feature.

Create S-Docs Email Templates

By Documentation, General Solutions, S-Docs Cookbook No Comments

Introduction

Before emailing an S-Docs document, you can choose an S-Docs HTML email template to automatically fill out the email body, subject line, and To/CC/BCC fields. This document will explain how to create S-Docs HTML email templates in the template editor. For a more in-depth explanation on how to create your first S-Docs template, click here.

Create The Email Template

To create an S-Docs email template, simply create a new S-Docs template and choose HTML as the Template Format.

Creating an S-Docs HTML email template

In the template editor, enter the contents of the email body. You can use merge fields, SOQL queries, custom HTML code, etc. as you would in any other template.

Configure Email Settings For The Template

The Email Settings tab contains options for controlling the behavior when this template is emailed. There are four sections in this tab: Email Subject SettingsEmail Recipient SettingsEmail Sender Settings, and Other Email Settings.

Note: If a user is generating multiple documents with different email restrictions, the most restrictive settings are applied to the document set generated.

Note: If you use merge fields in this tab, make sure to use only one set of brackets instead of two. For example, use {!Contact.Email} instead of {{!Contact.Email}}.

Email Subject Settings

[1] Optionally enter an email subject. You can use static text or merge fields (make sure to use single braces as opposed to double).

[2] Check this box to lock the Subject field to the end-user. If you leave the Subject field blank when this box is checked, the entire Subject field will be hidden on the S-Docs email page.

[3] Check this box to require end-users to enter an email subject before emailing this document.

Email Recipient Settings

[1] Optionally set the ToCC, or BCC email fields. You can use static text or merge fields (make sure to use single braces as opposed to double).

[2] Lock the ToCC, or BCC fields so that end-users cannot edit them. Note that if you leave the To field blank when you lock it, this template will not be able to be emailed. Click here to learn more about restricting templates from being emailed. If you leave the CC or BCC fields blank when you lock them, these fields will be hidden on the S-Docs email page.

Email Sender Settings

[1] Choose to send this document from the email address of the logged in user, or from one of your Org-Wide email addresses.

[2] Check this box to restrict the email From field to an org-wide email address. This prevents this document from being sent as the logged in user.

[3] Check this box to allow the end-user to pick from a list of your Org-Wide email addresses to send this document from.

[4] Check this box to allow users to use their Salesforce Email Signature in email body templates. You can insert the {{{!UserSignature}}} special merge field to reference the generating user's email signature once this box is checked.

Other Email Settings

[1] Enter a comma-delimited list of email domains to restrict users from emailing this document to anyone outside of those domains. Example: sdocs.com,trailhead.edu

[2] Check this box to prevent the end-user from modifying the email body when sending this document.

Generate The Email Template

To use your new email template when you're emailing S-Docs, simply select this template in addition to any other S-Doc you'd like to attach to the email.

Note: If you have specified a default email address, subject line, etc. in the Email Settings Tab when editing your HTML template, and another default email address, subject line, etc. in the Email Settings tab of another template (say a DOC or a PDF) that you are attaching to this email, S-Docs will ignore the email info in the non-HTML template(s) and only use the email info specified in the HTML email template.

Generate the docs by clicking Next Step, then click Email Selected Docs.

This opens up the S-Docs email page. As you can see below, S-Docs used the HTML email template to create a custom email to send to the specified contact, and attached the other document (the PDF) to the email. On this page, you can choose email recipients using the Contact Quick Pick or Contact/User Lookup field. Learn more about these features here. Alternatively, if you know the email addresses of the people you’d like to send the document(s) to, you can just type them into the To, CC, and BCC fields.

You can also type in a subject line, add additional attachments, and make edits to the email body.

That's all there is to it!

Email Failure Troubleshooting

By default, S-Docs links outbound emails to the contact record with a matching email address; Salesforce requires this linkage. If you try to send an email to an email address that is not listed under any Contact record in your org, S-Docs will attempt to link it to a single dummy contact record called "No Contact Record." This contact record is created automatically by the S-Docs package to handle this linkage, and is immediately deleted once the email is sent.

If your org has implemented validation rules that require additional contact fields to be completed, then the S-Docs package will not be able to create this contact record. In this case, there are two main options.

Option 1 (Recommended)

Create a before insert, before update Apex trigger on the Contact object that automatically changes the fields on the No Contact Record that S-Docs creates so that your validation rules are not triggered. For example, the trigger might look like this if your validation rules prevent the contact field "This_Cannot_Be_Null__c" from being null:

trigger ContactFirstName on Contact (before insert, before update) {
    for (Contact c : trigger.new) {
        if (c.LastName == 'No Contact Record') {
            c.This_Cannot_Be_Null__c = 'some non-null value';
        }
    }
}

With this option, S-Docs will be able to create and delete the No Contact Record, and the email will be sent and logged in Activity History on the base object record.

If you require test coverage for your No Contact trigger, you can use the following test class:

Class Name: NoContactTestClass

@isTest
private class NoContactTestClass {    @isTest
    public static void noContactTest() {
    	Test.startTest();
        Contact testContact = new Contact();
        testContact.LastName = 'No Contact Record';
        insert testContact;
        Test.stopTest();
    }}

Option 2

Create the S-Docs No Contact Record manually with all of the fields filled in that are required by your validation rules. The fields that S-Docs requires should be filled in as follows:
First Name: Not Required. We recommend writing S-Docs to avoid confusion.
Last Name: No Contact Record
Email Address: this.email@is.invalid
You then need to add the following parameter to the end of your S-Docs button: &useExistingNoContactRecord=true
Note: This option is not recommended, as the email will not be logged in Activity History on the base object record.

Sandbox Deliverability

If you are testing S-Docs in a sandbox org and emails are not being delivered, you should check Setup > Email Administration > Deliverability, and check that "Access to Send Email" is set to "All email." By default, Salesforce turns off outbound email access when a sandbox is created to reduce the risk of inadvertently sending emails to contacts during development and testing. Be aware that this change effects the entire sandbox and not just S-Docs.

Configure a Multiple-Page Table to Repeat its Header on Each Page

By Documentation, General Solutions, S-Docs Cookbook No Comments

Introduction

Multi-page tables might not look as clean as you'd like on your first attempt. If a row in your table is split in half between two pages, you can fix this by simply using the CSS attribute "page-break-inside: avoid" in your table, e.g.
[code lang="html"]<table style="page-break-inside: avoid"> ... *your table contents here* </table>[/code]

The above technique, while cleanly distributing the table rows between pages, does not repeat the header of the table on the new page. This is fine for most use cases, but if you'd like a table header to be repeated at the beginning of each page, a bit more configuration is required.

Edit Your Table's CSS

To accomplish this, you'll need to make the following changes to your related list's CSS attributes:

1) Add the following to the end of the CSS attributes in table.table734{ ... }
[code lang="html"]sd:repeatheader;border-spacing:0; border-width: 0[/code]

Example

[code lang="html"]table.table734 {border:solid black 1px; border-collapse:collapse; border-spacing:0px;font-family:Arial,Helvetica,sans-serif; font-size:10pt; width:100%;}[/code]

should become

[code lang="html"]table.table734 {border:solid black 1px; border-collapse:collapse; border-spacing:0px;font-family:Arial,Helvetica,sans-serif; font-size:10pt; width:100%; sd:repeatheader;border-spacing:0; border-width: 0; }[/code]

Note: In all of these steps, it's key that the CSS you add is always added to the end so that it overrides the originally-set border widths.

2) In .table734col0, find the border-width Z and append the following to the end of .table734col0's CSS.
(example included in step 3)
[code lang="html"]border-width: 0 Zpx Zpx Zpx;[/code]

3) In .table734colY (where Y > 0), find its border width Z as specified in its "border" attribute and append the following to the end of .table734colY's CSS:
[code lang="html"]border-width: 0 Zpx Zpx 0;[/code]

For example, if we have pre-existing CSS:
[code lang="html"].table734col0{border:solid red 3px;text-align:left;}
.table734col1{border:solid red 3px;text-align:left;}
.table734col2{border:solid red 3px;text-align:left;}[/code]

This would become the following after steps (2) & (3):
[code lang="html"].table734col0{border:solid red 3px;text-align:left;border-width:0 3px 3px 3px;}
.table734col1{border:solid red 3px;text-align:left;border-width:0 3px 3px 0;}
.table734col2{border:solid red 3px;text-align:left;border-width:0 3px 3px 0;}[/code]

4) In .table734header, find its border width Z as specified in its "border" attribute and append the following to the end of .table734header's CSS:
[code lang="html"]border-width: Zpx Zpx Zpx 0;[/code]
For example, if we have:
[code lang="html"].table734header{border: solid red 3px;}[/code]

We would change it to:
[code lang="html"].table734header{border: solid red 3px; border-width: 3px 3px 3px 0;}[/code]

Then, find the first th or td cell between the <THEAD></THEAD> tags and add the following:
[code lang="html"]style="border-width: Zpx Zpx Zpx Zpx;"[/code]
So, if we have:

[code lang="html"].table734header{border: solid red 3px;}[/code]

and

[code lang="html"]<thead>
<th class="table734header">h1</th>
<th class="table734header">h2</th>
<th class="table734header">h3</th>
</thead>[/code]

We would change it to

[code lang="html"]<thead>
<th style="border-width: 3px 3px 3px 3px;" class="table734header">h1</th>
<th class="table734header">h2</th>
<th class="table734header">h3</th>
</thead>[/code]

Troubleshooting

If sd:repeatheader does not repeat the header across pages, please make sure you're on the latest version. 

If you're on the latest version and sd:repeatheader does not repeat the header across pages, please make sure that your <th></th> tags are between <thead></thead> tags and the rest of your table rows/columns are between <tbody></tbody> tags. You may need to update the code inserted by the Insert Related List tool.

Import Word Templates into S-Docs (HTML, PDF, DOC, etc.)

By Documentation, General Solutions, S-Docs Cookbook No Comments
Update: Refer to this documentation for the DOCX feature. The below solution is relevant for non-DOCX formatted documents.

Using The "Paste From Word" Button

The source code of S-Docs templates is written in HTML, but Microsoft Word documents are not saved as HTML. Does that mean we have to re-create all of our existing Word templates from scratch in the S-Docs template editor? Nope! You can still import existing Word templates into S-Docs by leveraging the Paste From Word button in the S-Docs template editor.

The process is simple:

1. Open your existing template in Microsoft Word.

2. Select everything in your document in Microsoft Word (Ctrl+A) and copy the contents to your clipboard (Ctrl+C).

3. In your S-Docs template, click the Paste from Word button.

4. Paste the contents of your clipboard into the dialog box that appears, then click OK.

5. Click Save in the S-Docs template editor to save your new template.

At this point, you will need to place merged fields, related lists, etc. in the appropriate locations of your new S-Docs template if you did not include them within your Word document.

Troubleshooting

If your word document has lots of complex formatting, this may not carry over perfectly into the S-Docs template editor, even if you use the Paste From Word option. Here are a few considerations to take into account.

Headers & Footers

If your Word document has headers and footers, you will need to copy these separately and paste them into the corresponding header and footer tabs in the S-Docs template editor (you can use the Paste From Word button in these tabs as well).

Checkboxes

Depending on how your checkboxes were formatted in Word, they may show up as red flag anchors within the S-Docs template editor, or they may not show up at all.

In this case, you will need to remove the original checkboxes in the template editor and replace them with one of three methods for displaying checkboxes within S-Docs templates.

Images

If your Word document has images, they will not transfer to the S-Docs template editor properly. If you word document looked like this:

The image will not appear in the template editor, and the source will look something like this:

To make your images display properly, you will need to replace the image source code with image code that S-Docs accepts. Using CTRL + F and searching for "<img" in the template source will help you find all instances of images in your template so that you can replace them.

Windowtext

Templates pasted from word often use windowtext to reference color, which will not work if your template output is something other than DOC (such as PDF).

It's recommended to run a find & replace for any instances of windowtext to the desired color. For example, the above example could be changed to:

border: 1.0pt solid black;

Endif

If your template contains Endif tags like this:

You need to remove them. You may need to make adjustments after this based on the contents of the template.

Fonts

If your template output is PDF, fonts carried over from your Word template will default to Times New Roman when the document is generated if they are not supported by PDFs. Make sure to change the fonts used in your document to ones that are supported by PDFs. Keep in mind that sizes vary between fonts, and you may need to adjust the font size when converting your font to one that is PDF-supported.

Table text fonts will usually be defined in <span> tags at the table cell level when copied over, meaning the source of your template will look something like this:

As you can see, the font style is repeated for each table cell. When replacing these fonts with PDF-supported fonts, it is recommended to move the font definition to the <table> tag level, rather than repeat it for each table cell.

Column Alignment

Table column alignment will occasionally shift when complex tables are copied from Word documents. You can use the template source to adjust this alignment. Keep in mind that table columns may look aligned in the template editor, but not in the output document. It is recommended to generate a preview document to ensure that your table columns are properly aligned.

Component Templates: Insert a Template Into Another Template as a Merge Field

By Documentation, General Solutions, S-Docs Cookbook No Comments

Introduction

Organizations often have multiple templates containing identical sections. For example, you might have to include a terms and conditions section in several different templates. The most straightforward way of accomplishing this is simply copying the terms and conditions section and pasting it into all of your templates. Of course, this is not a maintainable solution; if you put the section in 10 different templates, every time you make an edit you’ll have to edit 10 different templates!

If you need to consolidate a component that is used in a variety of templates, consider the following solution: create a template for this component, and simply include that template as a merge field similar to {{{{!YourTemplateNameHere}}}} wherever you need it in your other templates.

With this solution, we can easily insert a template into as many templates as we’d like, and only have to edit one template if we need to edit the inserted section. Additionally, we wouldn’t have to worry about complicating the structure of the template where our insertion template is used; we can insert an incredibly complex template into another in just one line.

Create A Component Template

Now, let’s see how we can use the same terms and conditions section across several different templates. First, we create a template called “Terms and Conditions,” and set the Template Format to "Component." Templates with a Template Format of "Component" will not show up as available templates when users are generating documents, because they cannot be generated by themselves -- instead, they'll be available to insert into other templates when you click the Insert Field button, under the Other Templates tab.

Note: Some versions of S-Docs do not have "Component" as an allowed value in the Template Format picklist; nonetheless, you can add "Component" to the set of picklist values yourself by navigating to Setup > Object Manager > SDoc Template > Fields & Relationships > Template Format > Values  > New.

Here is the template body for our terms and conditions template:

Note: Component templates support <nullprefix>, <nullpostfix>, <allprefix>, and <allpostfix> tags.

We will be inserting this template into the following template for an invoice:

Note that the invoice template has different “Related to Type” and “Template Format” fields than the component template. The “Related to Type” and “Template Format” fields of the terms and condition template are irrelevant; they have no effect, and this template can be inserted into any other template regardless of the values of these fields. This is also true for all of the other fields on our component template record; the invoice’s fields will be used, and the terms and conditions fields will be ignored. Thus, we can choose arbitrary fields for our terms and conditions template and insert this template into any other kind of template.

Open the template editor for the invoice template, place the cursor where you'd like your terms and conditions to appear, and click Insert Field.

Navigate to the Other Templates tab, select the name of the terms and conditions template, and click Insert to insert the component as a merge field where your cursor was, or click Copy to Clipboard to copy the component merge field syntax and manually paste it into the template.

Note: Any template with a Template Format set to "Component" will show up in this list, regardless of its Related To Type object, as long as the Available for Use and Initially Visible checkboxes are checked for the component.

As you can see, the component merge field was added to our document.

Now, when we generate an invoice PDF for an opportunity, the result will include our terms and conditions inserted right where we had specified:

We could’ve inserted this anywhere in the template; we could even insert it between the “INVOICE 3-2-1” header and the related list by inserting the {{{{!Terms and Conditions}}}} field in that location. Of course, in this example, it makes more sense to put it at the very bottom.

If we wanted to include the terms and conditions in other templates, we could insert the {{{{!Terms and Conditions}}}} field into those templates as well.

Using Template Formats Other Than "Component"

Any S-Docs Template can be included in another template as a component, regardless of template format. However, templates with a Template Format other than "Component" will not be available in the Other Templates tab within the Insert Field menu; you will have to write the merge field syntax for those templates manually.

In addition, templates that don't have a Template Format of "Component" will show up to users as standalone documents that can be generated by themselves, unless you uncheck the Available for Use and Initially Visible checkboxes.

Using Your Salesforce Email Signature in S-Docs

By Documentation, General Solutions, S-Docs Cookbook No Comments

Referencing Your Salesforce Email Signature In S-Docs Templates

Automatically inserting users’ Salesforce email signatures in S-Docs is a great way to keep their S-Docs emails consistent with all of their other emails. Simply insert {{!UserSignature}} (if your signature does not contain any images) or {{{!UserSignature}}} (if your signature contains an image) into your S-Docs template, and you’re done! When a user generates this document, the document will display his or her Salesforce email signature.

Setting Your Salesforce Email Signature

To set your Salesforce email signature, navigate to:

YourUserNameHere > My Settings > Email > My Email Settings.

Then, fill in the appropriate fields. If you would like to include an image in your email signature, make sure you include it as an HTML image tag, as shown in the following example:

Cookbook - SF Email Signature (1)

Additionally, on the page for your image record (found in your documents tab), you will need to make sure that the Externally Available checkbox is checked.

Merge Shipping and Billing Contacts Into Documents At Runtime

By Documentation, General Solutions, S-Docs Cookbook No Comments

Introduction

Documents like invoices, packing slips, quotes, and contracts often need to include different points of contact for shipping and billing purposes. To accomplish this, S-Docs supports three different types of special contact merge fields in templates that use Opportunity or Account as their base object: Shipping contacts, billing contacts, and generic record contacts. When users generate documents that include at least one special contact merge field from one of these categories, they will be prompted to select one contact for each category included (shipping, billing, or record) whose information will be merged into the document. This article will explain how to use and configure these merge fields.

Include Shipping, Billing, & Record Contact Info

The following shipping, billing, and generic record contact merge fields can be included in your templates:

[code lang="html" highlight="1,9,17"]SHIPPING CONTACT MERGE FIELDS:
Shipping Contact Full Name: {{!PICKLIST.shippingContact.name}}
Shipping Contact First Name: {{!PICKLIST.shippingContact.firstname}}
Shipping Contact Last Name: {{!PICKLIST.shippingContact.lastname}}
Shipping Contact Email: {{!PICKLIST.shippingContact.email}}
Shipping Contact Phone: {{!PICKLIST.shippingContact.phone}}
Shipping Contact Title: {{!PICKLIST.shippingContact.title}}

BILLING CONTACT MERGE FIELDS:
Billing Contact Full Name: {{!PICKLIST.billingContact.name}}
Billing Contact First Name: {{!PICKLIST.billingContact.firstname}}
Billing Contact Last Name: {{!PICKLIST.billingContact.lastname}}
Billing Contact Email: {{!PICKLIST.billingContact.email}}
Billing Contact Phone: {{!PICKLIST.billingContact.phone}}
Billing Contact Title: {{!PICKLIST.billingContact.title}}

RECORD CONTACT MERGE FIELDS:
Record Contact Full Name: {{!PICKLIST.recordContact.name}}
Record Contact First Name: {{!PICKLIST.recordContact.firstname}}
Record Contact Last Name: {{!PICKLIST.recordContact.lastname}}
Record Contact Email: {{!PICKLIST.recordContact.email}}
Record Contact Phone: {{!PICKLIST.recordContact.phone}}
Record Contact Title: {{!PICKLIST.recordContact.title}}[/code]

Note: These merge fields can only be used in templates with the Related To Type field set to Opportunity or Account.

When users generate a document containing any of these special contact merge fields, they will be prompted to select contacts from a picklist before completing the document generation process. Fields from the chosen contact records will populate the corresponding merge fields in the document.

Note: These fields can also be used in signer profiles for S-Sign e-signature requests. Click here to learn more.

Let's take a look at this example Opportunity invoice template with shipping and billing sections.

We included three special contact merge fields for the shipping contact (highlighted in green) and three special contact merge fields for the billing contact (highlighted in blue). We also included two special contact merge fields for an alternative contact (highlighted in orange). When a user selects this template and clicks Next Step, they will be prompted with the following screen:

Since we included all three types of special contact merge fields, [1] one contact selection section appears for each type. To select a contact, users can [2] click the spyglass icon to look up any contact record available in their org. They can also [3] use the Contact Quick Pick to select from a list of all contacts related to the base record that the document was generated from. This list can be modified to include additional contacts as well; see configuration steps below.

Once a contact is selected for one of the contact types, their information will appear within that section.

[4] The shipping and billing contact selection sections also include the related account's shipping and billing addresses. Once all contacts have been selected, [5] clicking Generate Doc will complete the document generation process.

As you can see, the contact information was merged into the document:

Add Additional Contacts to the Contact Quick Pick

The Contact Quick Pick picklist allows users to easily choose any contact records related to the base record. You can also include contacts from additional objects, such as junction objects, within this picklist. This is configured at the template level.

To include additional objects, navigate to the template editor for the appropriate template, and then click over to the Advanced Options tab.

In the Advanced Options tab, scroll down to the Configure Contact Lookup section.

[1] The picklist lists each object whose contacts can be added to the Contact Quick Pick picklist. You can select multiple objects within this list. You can additionally extend objects with custom fields.

[2] If you would like to limit which contacts show up in this list, you can input a WHERE clause (omitting the WHERE) that dictates which contacts should appear in this list. Note that this query will affect the contact picker for special contact merge fields and the S-Docs Email page.

Access other fields not visible from the Insert Field Picker button

By Documentation, General Solutions, S-Docs Cookbook No Comments

In This Article:

  1. Use Dot Notation
  2. Discussion

Use Dot Notation

The Insert Field button in the template editor will allow you to easily insert fields from related objects. However, S-Docs can access related fields using standard “dot” notation that can reach fields up to 5 relationships removed if you manually edit the template source.

For example, you could include the following in your template:
[code lang="html"]{{!Opportunity.Account.ParentAccount.Owner.Name}}[/code]

Note: Due to Salesforce’s governor limits, S-Docs may not validate after the second “dot.” This means users will not receive any warning messages (during document creation) that a referenced field is invalid. If you find yourself needing to extend to this level, be sure to use the correct relationship name and notation. If you choose to map fields manually and do not correctly specify objects and fields, the user may receive a system error during document creation.

Discussion

If you find yourself needing to extend to a far removed field value, we recommend creating a formula field on the base object. In the example above, you could easily add a formula field on the Opportunity labeled PAowner_name__c and set its value to the field referenced above. Then, you could use this field in your S-Docs template.

Using S-Docs Direct SOQL Feature for Related List

By Documentation, General Solutions, S-Docs Cookbook No Comments

When Is Direct SOQL Useful?

The S-Docs Direct SOQL feature is a valuable option when your standard related list option still does not meet your requirements.

The following are use cases where Direct SOQL may useful:

  1. The related list you want to include is not related to (no linked relationships exist) your underlying record. The underlying record is the value in the "related to type" field on the template record. For example, if you wanted to include a related list of similar Accounts (perhaps in the same industry) in your Account document.
  2. You have more than 100 records in the related list that you want to merge into your document. Direct SOQL is able to work with more records before hitting any governor limits.
  3. You want your related list to refresh with the latest data every time the S-Doc is VIEWED from the S-Docs related list. This is a critical distinction, as the document can change over time without being regenerated. If you want a point-in-time snapshot, you should also use the “additionally save an attachment” feature.
  4. You want to use very specific or advanced SOQL statements that may include features such as aggregates.
  5. You want to include the same related object multiple times in your template but have each occurrence use a different filter criteria or display different columns. While you can use the groupby in the standard related list feature to break a table by a data column, you have more control with Direct SOQL.

Direct SOQL key differences

  1. Uses <LineItemsSOQL>  instead of <LineItems>.
  2. The <listname>  should be set to the object API name, not the relationship name. This means that you should use Opportunity, not Opportunities, or OpportunityLineItem not OpportunityLineItems, or for custom objects you should use CustomObj__c not CustomObj__r.
  3. Direct SOQL data is not saved with the S-Doc snapshot record. This means that each time the s-doc is viewed within Salesforce, it is regenerated and therefore it executes the query and retrieves the latest data. If you email your document or save it as an attachment, then that document is unaltered because it is saved as a physical PDF or Word file. However, if you click on the View button within the S-Docs related list, the related list data is queried again, and may have changed since the document was originally generated. Therefore, we strongly recommend you check auto create salesforce attachment in the template editor in order to keep a hard copy of your document.

Using Direct SOQL

Open your template in the editor and then click on the Source button. You will need to add a section similar to the example below. Place it where you want the related list table of data to be inserted.

[code lang="html"]<table>
<tr><td>stage</td><td>name</td><td>Acct</td><td>amount</td></tr>
<!--{{! <LineItemsSOQL>
<class>table1</class>
<ListName>Opportunity</ListName>
<column>stagename</column>
<column>name</column>
<column>account.name</column>
<column format-number="##,###" prefix="$">amount</column>
<where>stagename in ('Prospecting','Closed') and amount>90000 </where>
<groupby>stagename</groupby>
<orderby>stagename, amount desc</orderby>
</LineItemsSOQL> }}-->
</table>[/code]
You can use this snippet above with any template because it runs as an independent SOQL query that returns the same data set regardless of the template used. The example above shows how you could select all opportunities that match a particular criteria (opportunity stage name and amount) and would include the retrieved records into a 4-column table within your document.

In this example, the query runs irrespective of your base record (that you used to generate the S-Doc from) or whether your base record is linked to these opportunities returned in the query or not. The SOQL query also runs under the users permissions and therefore does not violate any sharing rules.

If you want to limit the related list items to only those records linked to your specific record, then you would need to expand the  <where> condition and specify that those line items have a lookup value equal to your specific record ID. For example, if you want to include only opportunities linked to your account record you would need to include a condition to filter Opportunity.AccountID value equal to your record Account.ID. Obviously, there needs to be some linked relationship field for this to work. To do this in the template, you need to specifically use the syntax '{!ObjectID}' that is dynamically replacing the record's Salesforce ID value. In our example, you would add the following: <where>AccountId='{!ObjectID15}'</where>

Advanced SOQL

If you want even more control, you can type the exact SOQL statement you want executed by adding a <SOQL>  tag.

Adding the following into your template source (this example assumes your base object is opportunity) will sum your quantity and totals per product and return just one line by leveraging SOQL aggregate functionality to remove duplicates. You will note how the <SOQL>  statement is used with an alias, and then matched to the columns.
[code lang="html"]<table border="0" class="table1" width="100%">
<tbody>
<tr>
<td class="table1header">
Product</td>
<td class="table1header">
Quantity</td>
<td align="right" class="table1header">
Total Price</td>
</tr>
<!--{{! <LineItemsSOQL>
<class>table1</class>
<ListName>quotelineitem</ListName>
<soql>Select PricebookEntry.product2.name, sum(o.TotalPrice)tp, sum(o.Quantity)tq, o.PricebookEntryId From OpportunityLineItem o where opportunityid='{{!ObjectID15}}' group by pricebookentryid, PricebookEntry.product2.name</soql>
<column>Name</column>
<column format-number="#,###" prefix="$">tq</column>
<column format-number="#,###.##" prefix="$">tp</column>
</LineItemsSOQL> }}-->
</tbody>
</table>[/code]
The results from the SOQL query will be matched to the column names. Here we used aliases tp and tq that mapped to columns. You don't need to map all columns. If you use this option, you need to correctly create the SOQL query to include required where, group by and order by syntax.

If you want to display data without the table formatting, you can specify <class>none</class>. This will remove all table, row and cell formatting and will return just the data. Here is an example that will return just names delimited by a comma.
[code lang="html"]<td> Account Team Members:
<!--{{! <LineItemsSOQL>
<class>none</class>
<soql>
select user.name from accountteammember where accountid='{{!account.id}}'
</soql>
<column postfix=", ">user.name</column>
</LineItemsSOQL> }}-->
</td>[/code]
However, consider the event in which the SOQL query returns no records for a certain document; we wouldn’t want “The Account Team Members are:” to be displayed when there aren’t any account team members! To solve this, we can use the prefix and postfix tags. Text placed between these tags will not render if no SOQL queries are returned. Use prefix tags for text that precedes the SOQL queries, and use postfix tags for text that follows the SOQL queries. Consider the following simple example:
[code lang="html"]<!--{{! <LineItemsSOQL>
<prefix>The Account Team Members are: </prefix>
<class>none</class>
<soql>
SELECT user.name FROM accountteammember WHERE accountid='{{!account.id}}'
</soql>
<column postfix=", ">user.name</column>
<postfix>. Please see page 3 for their contact information.</postfix>
</lineitemsSOQL> }}-->[/code]
Now, consider the following use case: we would like to prompt users to take note of a tracking number after a shipping confirmation. However, if they do not have a tracking number, we do not want to tell them to take note of a non-existent tracking number:
[code lang="html"]<p>Your order has been shipped.</p>
<!--{{! <LineItemsSOQL>
<class>none</class>
<prefix>
<p><span style="font-family:arial,helvetica,sans-serif;">
Please take note of your tracking number:
</prefix>
<soql>SELECT (SELECT id FROM opportunitylineitems WHERE PricebookEntry.Product2.productcode like '%ITG' limit 1)
FROM opportunity WHERE id='{{!ObjectID15}}' AND id IN (SELECT opportunityid FROM opportunitylineitem WHERE opportunityid='{{!ObjectID15}}' AND PricebookEntry.Product2.productcode like '%ITL') LIMIT 1
</soql>
<column prefix="<span style='display:none'>" postfix="</span>">sub.opportunitylineitems.id</column>
<postfix>
. Please use our order-tracking service to track your order.</p><p><span style="font-family:arial,helvetica,sans-serif;">
</span>
</p>
</postfix>
</LineItemsSOQL> }}-->
<p>Thank you for your business.</p>[/code]
In the above template, the customer will see “Your order has been shipped” and “Thank you for your business” even if they don’t have a tracking number, since these are entirely outside the LineItemsSOQL tags. “Please take note of your tracking number:” will appear before the tracking number and “Please visit our order-tracking website to track your order” will appear after the tracking number if the customer has a tracking number, and these two statements will not appear if the customer does not have a tracking number.

We also see that the text between the postfix tag begins with a period and a space, and ends with a closing paragraph tag but does not begin with one. This is because the opening paragraph tag is at the very beginning of the prefix. This means that the prefix, SOQL return statement, and the postfix will all appear in the same paragraph. Then, since the postfix begins with a period and a space, there will be a period and a space between the tracking number and “Please visit our order-tracking website to track your order,” since they are in the same paragraph. Thus, if the tracking number is 098726928, the resulting document will appear like so:

Your order has been shipped.
Please take note of the following tracking number: 098726928. Please use our order-tracking service to track your order.
Thank you for your business.

Similarly, if there is no tracking number, the resulting document will be:

Your order has been shipped.
Thank you for your business.

S-Docs also supports complex SOQL statements with sub-queries. You can include a related list of child record, along with its child records. You do this by including a standard SOQL subquery, and a column name that begin with “sub.” to indicate sub query data. Note that only one sub query is allowed here. Additionally, subquery items need to appear after all parent columns are processed; the capability to insert them in between parent columns is not supported. Here is an example that selects the chatter feed for a record along with the feed comments for each chatter record:
[code lang="html"]<table align="left" class="table641">
<tbody><!--{{!
<lineitemsSOQL><class>table641</class>
<listname>feeds</listname>
<soql>
SELECT createdby.name, Body, createddate,
(SELECT createdby.name, createddate,CommentBody FROM FeedComments)
FROM FeedItem WHERE ParentId = '{{!ObjectID15}}'
ORDER BY createddate desc</soql>
<column header="Created By">createdby.name</column>
<column header="Date" format-date="M/d/yy HH:mm">createdDate</column>
<column newrow="true" colspan="2" type="rtf">body</column>
<column header="Comments">sub.FeedComments.createdby.name</column>
<column header="" format-date="M/d/yy HH:mm"> sub.FeedComments.createdDate</column>
<column newrow="true" colspan="2">sub.FeedComments.CommentBody</column>
</lineitemsSOQL>
}}-->
</tbody>
</table>[/code]
The output below shows each chatter feed record (white background), along with the feed comments (subquery records with gray background).

table-sdocs

Final note: All SOQL runs as the running user. This prevents any user from viewing any information that they are not entitled to through Salesforce permissions (object level, record level and field level).

Filtering, sorting and grouping your related list

By Documentation, General Solutions, S-Docs Cookbook No Comments

Table Styling Options

There are many advanced features you can leverage to enhance how your related list items are rendered.

To use these, you would need to edit your template source. The example below shows a combination of advanced features including:

  • Leverage CSS to control table styles such as borders, alternate background colors on rows, and change width and alignment text within columns.
  • Format numbers and add prefixes to column values.
  • Use a <where> clause to filter records, and <limit> to control set size.
  • Use <orderby> to sort by particular column(s).
  • Use <groupby> to “break” the table for different sets of values.
  • Use <groupbyheader> to specify repeating column names.
  • Use <groupbysum> to insert running subtotals of each group.

[code lang="html"]<style type="text/css">
table.table1 {border:solid black 1px;border-collapse: collapse;border-spacing:0px;font-family: verdana; font-size: 10pt; width:100% }
.table1header {text-align:center;font-weight:bold;border:solid black 1px;}
.table1footer {text-align:right;font-weight:bold;border:solid black 0px;}
.table1col0 {font-weight:bold;text-align:left; border:solid black 1px;}
.table1col1 {text-align:left; width:20%;border:solid black 1px;}
.table1col2{text-align:left; width:40%;border:solid black 1px;}
.table1col3{text-align:right;width:10%;border:solid black 1px;}
.table1col4,.table1col5{text-align:right;width:15%;border:solid black 1px;}
.table1RowEven{ background-color:#fff; }
.table1RowOdd{ background-color:#eee; }
</style>
... your template HTML here...
<table class="table1">
<!--{{!
<LineItems>
<class>table1</class>
<ListName>opportunitylineitems</ListName>
<column>PricebookEntry.Product2.family</column>
<column>PricebookEntry.name</column>
<column>PricebookEntry.product2id</column>
<column format-number="#,###" postfix="/Per Unit">quantity</column>
<column format-number="#.###,##" postfix="€">unitprice</column>
<column format-number="#,###.##" prefix="$">totalprice</column>
<where>PricebookEntry.name != null</where>
<orderby>PricebookEntry.Product2.family</orderby>
<groupby type="newtable">PricebookEntry.Product2.family</groupby>
<groupbyheader position="after-group">Product Name,Product Description,Qty,Unit Price,Total Price</groupbyheader>
<groupbysum position="footer" format-number="#,###" prefix=" Subtotal $">totalprice</groupbysum>
<limit>100</limit>
</LineItems>
}}-->
</table>[/code]

Using Components

If you need to format your related list data in an entirely new way (e.g. structure it in any way you like outside of a table), you can also include a template component that formats your data and then merges it into your final document. Click here to read more about this feature.

Top