All Posts By

Admin

Embedding Google Charts into your document

By Documentation, S-Docs Cookbook, Using Images No Comments

Introduction

Leveraging Google Charts API provides a great way to include dynamic charts in your S-Docs.
You can find more information on Google charts here: http://code.google.com/apis/chart/

Create A Remote Site Setting:

This functionality requires an entry in Salesforce's Remote Site Settings.

  1. Click Your Name > Setup > Security Controls > Remote Site Settings.
  2. Click New Remote Site button.
  3. Set the Remote Site Name field to SDOCS3.
  4. Set the Remote Site URL field to http://chart.apis.google.com
  5. Make sure Active is checked and then click the Save button.

Google Chart Examples

Here are a few examples of Google charts:

Google-charts

The charts work by passing the Salesforce data to the Google API, which in turn dynamically builds and returns the chart as a PNG image.

Security Note: Unlike S-Docs, which works entirely within the Salesforce.com platform, Google charts are hosted remotely. Depending on the chart, your data is passed from Salesforce to Google. Your security team would need to determine if this is an acceptable practice.

Images are rendered by using one URL request per chart. For example, you can manipulate the values in the following URL to render a different pie chart:
[code lang="html"]http://chart.apis.google.com/chart?cht=p3&chd=t:60,40&chs=250x100&chl=Jan|Feb[/code]
The link above will return the following image:

example-chart

As you may begin to see, using Google Charts API is all about creating these URLs where you pass in the data points, legends and chart options. Depending on the chart, some of these URLs can be long and a bit complex.

Option 1: Use Formula Fields For Your Google Charts

Rather than building complex logic within S-Docs to create these URLs, we again leverage Salesforce formula fields to do the heavy lifting.

Here is a great tutorial from Salesforce on how to create Google Charts using a formula field:

http://wiki.developerforce.com/index.php/Using_Formulas_and_Google_Charts_to_Visualize_Data

The above tutorial will walk through how to build the following formula field to display a Won/Loss pie chart:

[code lang="html"]IMAGE("http://chart.apis.google.com/chart?cht=p3&chd=t:" & Text(Won__c/(Won__c + Lost__c)) & "," &
Text(Lost__c/(Won__c + Lost__c)) & "&chs=275x100&chf=bg,s,F3F3EC&chl=Won|Lost&chco=5555ff", "chart text")[/code]
Then, we simply drop this formula field into our S-Doc template (be sure to check Contains Rich Text box).

Option 2: Use The Google Chart API URL In Your S-Docs Template

While more complex, another approach is to build the Google Chart API URL in your S-Doc Template and then mix in field values. This may offer you greater control. Using syntax similar to the following, you could add the image, where ChartLegend__c would just contain the value “Jan|Feb.”
[code lang="html"]lt#img src= quot#http://chart.apis.google.com/chart?cht=p3&chd=t:60,40&chs=250x100&chl=
{{!MyObject__c.ChartLegend__c}}quot# /gt#[/code]

Improving performance on pages with many Google charts:

The Google documentation offers a good performance tip if you plan to embed 5 or more charts. By appending a 1-9 before the “chart.apis.google.com,” you can have the browser load the charts simultaneously. For example:

  • http://0.chart.apis.google.com/chart?cht=...
  • http://1.chart.apis.google.com/chart?cht=...
  • http://2.chart.apis.google.com/chart?cht=...
Note: S-Docs does not support the Google Visualization API.

Adding Dynamic Images into Templates

By Documentation, S-Docs Cookbook, Using Images No Comments

Introduction

While you can insert static images into your templates, S-Docs can also insert dynamic images. For example, say you want to create a letter that includes an image of the representative’s signature at the bottom of a page. Or similarly, you may want to include an image of your product on a Product Specifications PDF. Rather than cloning the same template many times (once for each unique image), you would rather have just one template that dynamically includes the right image. You can accomplish this in several ways.

Option 1: Use a rich text field

This is perhaps the easiest method. You first upload your image into a standard Salesforce rich text field on your record detail page. Then, open the template in which you want to add the image, click on the Template Editor button, click on the Insert Field button, select the rich text field, click on the Contains Rich Text checkbox, and finally click on the Insert button. Your documents will now render the rich text content for that record wherever you placed this field.

Note: This option is only available for PDF documents. If your rich text contains many items or elements, it may not render precisely. This is because Salesforce uses a rich-text editor that auto-formats rich text content and this formatting cannot be overridden through a source editor. It is a better practice to use the S-Docs editor to control document layout rather than inserting a complex rich-text field into a template. By doing so, you also maintain template formatting in a central location (the S-Docs template) versus fragmented design elements located in rich text fields throughout individual records.

Option 2: Use a standard text field that contains the entire image markup

You can also use a standard Salesforce text field whose value contains the complete image element tag that you want to include. Each record would potentially contain a different link that corresponds to the applicable image.

For example, set the value of a ProductImage__c field on a Product record to:
[code lang="html"]PRODUCT IMAGE:<br><img scr=”/host/Product123Image.png” />[/code]
Then, using the S-Docs template editor, click on the Insert Field button, select the field, and then be sure to click on the Contains Rich Text checkbox.

This is a simple approach but has limited usage. It is useful for images such as representative signatures, where they are centrally controlled by an administrator, they do not change frequently, and the user would not normally need to view them in the Salesforce user interface along with the record. Since this is a text field, if you were to include this field on a page layout, it would not render as an image – users would only see the text shown above when viewing the record detail in the Salesforce UI. Therefore, it would not be appropriate for end-users who upload their own images frequently (e.g. a scanned photograph of a damage claim) or wanted to view the actual image in Salesforce within the record detail page.

Option 3: Use a formula field to display an image

Building on option 2, you can leverage a Salesforce formula field to create the image path and also display the image within the Salesforce record detail. You would then drop the formula field into your S-Docs template with the Contains Rich Text option checked (as described in the previous option). The formula field would contain something similar to the following:
[code lang="html"]IMAGE("/CompanyIntranet/Products”+ myObject__c.ProductID__c + “.png")[/code]
This option requires some planning so that the image field name can be programmatically derived.

Option 4: Build an image URL within the S-Docs template

This is a combination of options 2 and 3, but would not require a formula field. You can use a record’s existing field value to help build the correct image path, but you create the full path value within the S-Docs template, not in the Salesforce field.

For example, to include a dynamic product image or agent's signature, you can use something similar to the following in your document template source:
[code lang="html"]lt#img src=quot#http://intranet/{{!Product2.ProductPath__c}}.png quot# /gt#
lt#img src=quot#{{!Opportunity.Owner.SignatureURL__c}}quot# /gt#[/code]
The field value should be a URL that points to either an image in your Salesforce documents folder or an external image hosted on the public internet. In the second example, the field should contain the entire path including the ‘http://’ prefix.

Since the image path is text (not markup) it should only be surrounded by double curly braces, as shown above. The special notation for  <, >, and quotes, using lt#, gt#, quot# respectively, is used to instruct S-Docs that this markup needs to be evaluated rather than rendered literally. Having this flexibility gives you total control of how you want a field interpreted within the S-Docs template.

In order to compensate for relative URLs (e.g src=“/servlets/…”) that Salesforce automatically generates, S-Docs will automatically replace the relative path with the complete path, including the correct Salesforce.com instance (e.g. src=”https://na1.salesforce.com/servlets/...”). Doing this ensures your embedded images render correctly when viewed by others. If you wish to override this behavior and use a relative URL, you should specify the path to include the “http” (e.g. src=”http://servlet/”).

Discussion

Once you have inserted a marked-up field into your template, you will notice three sets of braces that surround your field, for example:
[code lang="html"]{{{!Product2.ProductImage__c}}}[/code]
The extra pair of curly braces instructs S-Docs to interpret this field rather than just displaying the stored value. Without this, S-Docs would not know whether a field containing the value “<img src=“//host/Product123Image.png” />”  should be displayed as the text quoted or substituted with the actual image when rendered. Whenever you add a field using the template editor and click on the Contains Rich Text checkbox, S-Docs will evaluate the value regardless of the actual Salesforce field type (Rich Text or otherwise).

If images outside of Salesforce are used in the S-Docs template directly, or dynamically through a merged image field, you must whitelist the URL domain (using Setup > Remote Site Settings) to avoid broken image icons in the PDF.

Embedding static images into your document

By Documentation, S-Docs Cookbook, Using Images No Comments

Embed Static Images Using Code

To embed static images, like a company logo, in your documents, you can use an image tag similar to the following in your S-Docs template source.

[code lang="html"]<image src="http://publicsite/imagename.png" />[/code]

This may be the simplest approach if you are emailing HTML content or wish to embed an image pixel for email tracking. However, keep in mind that if this image is not stored in your Salesforce org or if the host server is not under your control, the linked image may change and therefore is not guaranteed to work.

Embed Background Images/Watermark

A background image or watermark can be added to your document by including the following CSS styling with your image URL.

[code lang="html"]<style type="text/css">body{ background-image: url("https://background.image.url"); background-attachment:fixed; background-position: center; background-repeat:no-repeat;background-size:400px; } </style>[/code]

Note: The background image/watermark will be the same for every page of the document. For different images on different pages, you can use the DOCX document format.

Embed Static Images That Are Stored As Salesforce Documents

You can also embed images that are stored as Salesforce documents.

[1] Use the Add Image button on the template editor toolbar to open a menu for adding images into S-Docs.
[2] Click Browse Server to search and add the desired image from your Salesforce documents folder.

If you intend to send a document externally that requires access to the image at view-time (e.g. an email template), be sure that the Salesforce document record, which contains the image, is set for public visibility and copy the image's full URL: 1. Check the Externally Available Image box to make the image visible on the public internet. 2. Right click the image itself and copy its full URL. In Google Chrome, you would right click the image and click Copy image address. In Firefox, you would right click the image and click Copy image location. In Internet Explorer, you would right click the image and click Properties, and then copy the URL from the "Address (URL)" field in the following pop-up window.

Embedding Static Images (2)

You can now add this image into your template by clicking the Add Image button icon in the template editor and pasting the URL you copied into the URL field of the "Image Properties" window.

Embed Static Resources As Images

You can also embed static resources as images within your S-Docs templates using the following code:

[code lang="html"]<img src="/resource/STATIC_RESOURCE_API_NAME/PATH_TO_IMAGE" />[/code]

For example, your static resource reference might look like this:

[code lang="html"]<img src="/resource/Pckg__Pckg_Images/FolderInTheResourceZipFile/the_image.png" />[/code]

Embed Static Images In DOC Templates

For DOC templates, in order to ensure that your images are scaled correctly in the final generated document, it is important to check Embed Images in the Page Settings tab of the template editor.

Additionally, the image source should be in this format (using the style attribute):

[code lang="html"]<img src="..." style="height: ...px; width: ...px;" />[/code]

Rather than this format:

[code lang="html"]<img src="..." height="..." width="..." />.[/code]

Note the difference in the height and width. If you use the second example, the images will show up as tiny squares in the generated document.
Finally, the user must click Enable Editing in Microsoft Word for images to download in the generated document.

Note: For images that you need to have externally available, note that the Browse Server button will use the local path rather than the full path, and your image will not be available externally (even if Externally Available Image is checked).
If you want this image to be visible externally (such as including it in an email sent to your customers), you must append the base URL to the beginning of the local path in the source code; e.g. if the Browse Server button uses this path: /servlet/servlet.ImageServer?id=01536000001T3ZE&id=00D36000000v29C&lastMod=147065920900), you must add https://na30.salesforce.com to the beginning to make the image externally available.

You can also forgo using the Browse Server button and use the full path from Classic view rather than the local path (e.g. use: https://na30.salesforce.com/servlet/servlet.ImageServer?id=01536000001T3ZE&oid=00D36000000v29C&lastMod=147065920900 rather than: /servlet/servlet.ImageServer?id=01536000001T3ZE&id=00D36000000v29C&lastMod=147065920900) when referencing the image in your S-Docs template. This is why we copied the image's full URL and pasted it into the "URL" field of the "Image Properties" window in the steps above.

Moving S-Docs Templates from Sandbox to Production

By Best Practices, Documentation, S-Docs Cookbook No Comments

Video Tutorial

Import Templates With The S-Docs Template Migrator

Moving S-Docs templates from your Salesforce sandbox org to your Salesforce production org is easy with the S-Docs Template Migrator. The Template Migrator will generate a .zip file of templates that can be imported into any org of your choosing. If your template contains attachments (such as DOCX templates), those will be included as well. If any of your templates are S-Sign enabled, the S-Sign data will also be preserved. Let's take a look at how this works.

Note: S-Docs 4.210 or higher is required to use the S-Docs template migrator. S-Sign version 2.78 or higher is required to migrate S-Sign templates.

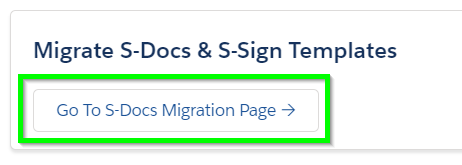
If you are using S-Docs 4.381+, navigate to the S-Docs template migrator by clicking the App Launcher, typing "S-Docs," and clicking S-Docs Setup in the dropdown menu. Scroll down to the Migrate S-Docs & S-Sign Templates section and click Go To S-Docs Migration Page.

If you are using a version of S-Docs below 4.381, navigate to the template migrator by appending the following after "salesforce.com" in your browser:

[code lang="html"]/apex/SDOC__SDMigrate[/code]

You'll be presented with this screen.

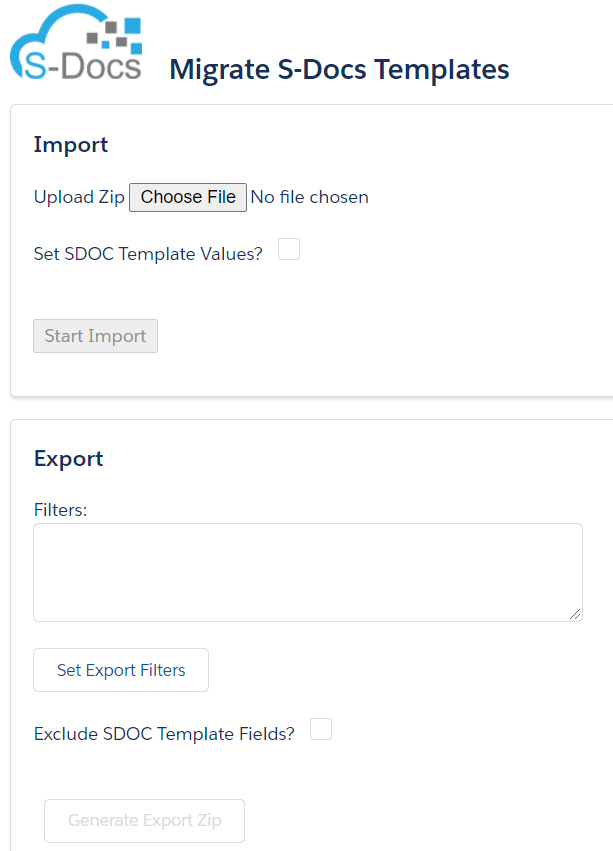
This page has two sections: Import and Export. We'll look at Export first.

Export Templates

The template Export section appears as follows:

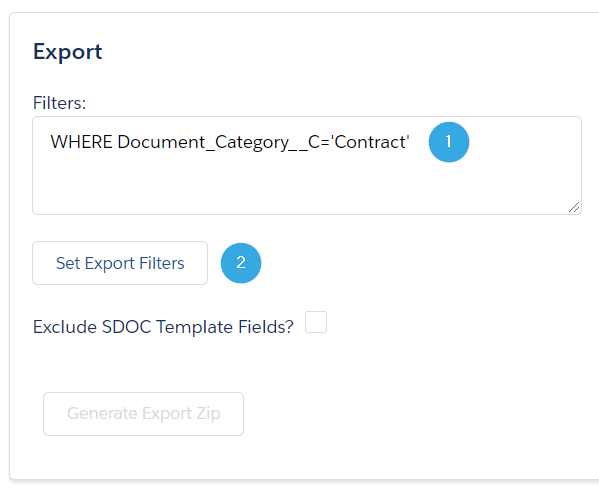
To generate a list of templates to export, begin by [1] setting filters for which templates should be included. Filters need to be written using SOQL syntax. The example above uses the following filter:

[code lang="html"]WHERE Document_Category__c='Contract'[/code]

This will generate a list of all templates with the Document Category field set to "Contract." [2] Click Set Export Filters to generate a list of all templates that meet the filter criteria.


Example Export Filters

The following table provides different SOQL filter syntax and what the template migrator will return. This list is not exhaustive and is only intended to provide samples of acceptable syntax.

Filter Output
WHERE Name LIKE '%Master Service Agreement%' All templates that contain 'Master Service Agreement' in the Template Name field.
WHERE Name='Quote' OR Name='Business Proposal' All templates with a Template Name of "Quote" or "Business Proposal.'
WHERE Base_Object__c='Opportunity' ORDER BY CreatedDate DESC LIMIT 5 The 5 most recently created templates with a Related To Type field set to "Opportunity."
WHERE Name IN ('Invoice','Standard Invoice','Invoice - By Product') All templates with a Template Name equal to exactly "Invoice," "Standard Invoice," or "Invoice - By Product."
Note: If you do not specify any filters, clicking Set Export Filters will generate a list of every S-Docs template in your org.
Note 2: To find a list of field API names for the SDoc Template Object, navigate to Setup > Object Manager > SDoc Template > Fields & Relationships. Note that most fields are preceded by the SDOC__ namespace prefix; be sure to omit this prefix when including fields in your filter.

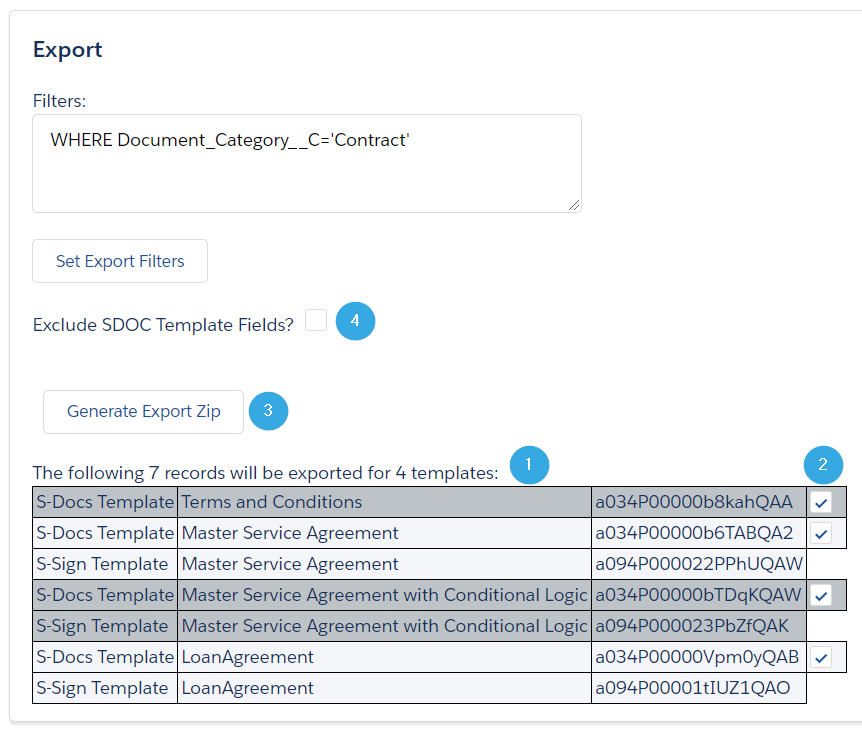
After clicking Set Export Filters, every template that meets your filter criteria will be [1] added to the table at the bottom of the page. This table displays the Template Type, Template Name, and Template ID fields. If your S-Docs template is S-Sign enabled, a separate S-Sign template will be included with it; when you import these templates into a production org, they will be recombined into a single template. You can [2] use the checkboxes on the right to manually include or exclude certain templates from your export.

[3] Click Generate Export Zip to generate a .zip file that contains all of your templates. If you'd like to exclude data from individual template fields from being carried over, you can [4] check the Exclude SDOC Template Fields? box. This will open up a new menu.

Exclude SDOC Template Fields

The Exclude SDOC Template Fields menu appears as follows:

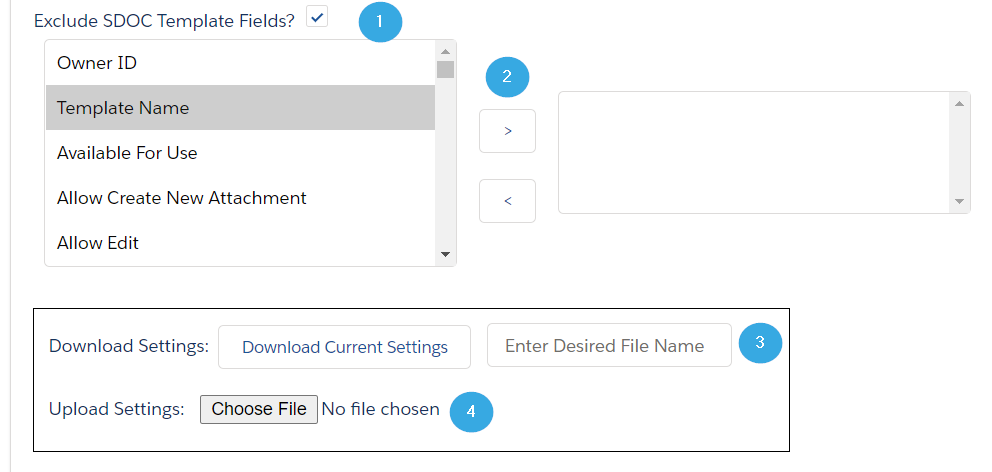
To exclude data from individual fields in your template export, [1] select the field on the left and [2] use the arrow keys to add it to the exclusion list on the right. If you select Template Name, for example, all of your templates will be imported into your production org without names.

If you want to preserve these settings (i.e. you want to exclude the same fields every time you export templates), you can [3] enter a file name and click Download Current Settings to download the settings as a .txt file. When you need to export templates again, you can [4] select Choose File and upload the .txt settings file.

Note: The Download Current Settings button will also save any filters that you used to generate your list of templates for export.
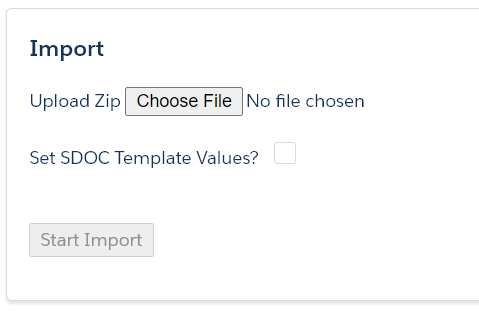
Import Templates

The template Import section appears as follows:

Click Choose File to select an exported .zip file of S-Docs templates.

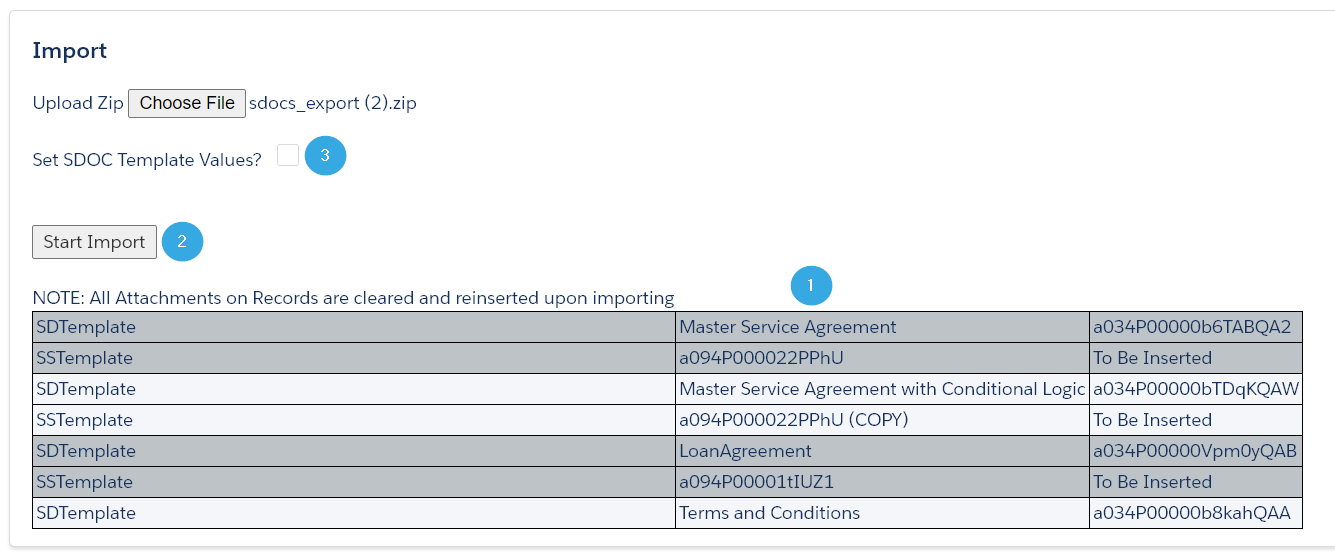
When you upload your template file, [1] each template will be added to the template table at the bottom of the Import section. Just like in the Export section, you can view the Template Type, Template Name, and Template ID fields. [2] Click Start Import to import your templates. You can also [3] set certain field values for your templates before importing them by checking the Set SDOC Template Values? checkbox. This will open up a new menu.

Set SDOC Template Values

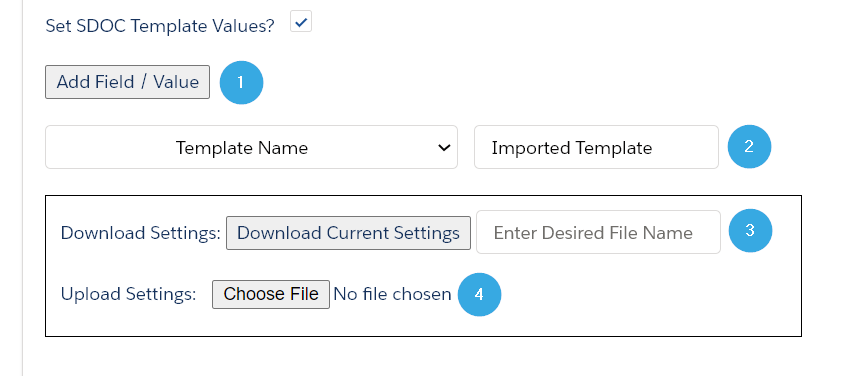
To begin, [1] click Add Field/Value. [2] A picklist of template fields will appear underneath, along with a text field where you can set the field data. In the example above, the Template Name field of each imported template will be changed to "Imported Template." Click Add Field/Value again to set additional fields.

Note: Set Boolean fields (such as Allow Edit) using True or False.

If you want to preserve these settings (i.e. you want to set the same field values every time you import templates), you can [3] enter a file name and click Download Current Settings to download the settings as a .txt file. When you need to import templates again, you can [4] select Choose File and upload the .txt settings file.

After your import is complete, a success message will appear under the Start Import button.

Template Migrator Considerations

  1. If you're migrating PDF-Upload templates that were created prior to S-Docs version 4.210, you'll need to convert any images that are present in them to Attachments. Previous versions of S-Docs stored these images as Documents, but the template migrator will only be able to export and import PDF-Upload templates that store images as Attachments. To convert older PDF-Upload templates, append the following URL after "Salesforce.com" in your browser:
    /apex/SDOC__SDMigrate?convertPDFPageImages=true
    This will add a Convert PDF Page Images button to the template migrator that will convert all PDF-Upload images to Attachments for you.
  2. The template migrator uses a field called Org_Agnostic_ID__c that doesn't change when it's migrated across orgs. This allows the template migrator to update a template that already exists in the production org when migrating the corresponding template from the sandbox org, rather than re-inserting the template and ending up with duplicates in the production org. If you've previously transferred templates using a utility other than this one (e.g. Data Loader), the templates you migrated will not have an Org-Agnostic ID in the production org, and hence won't be updated when you upload an export that includes the corresponding templates from another org; rather, the templates in the export will just be inserted and you'll end up with duplicates. In this case, you can delete all of the templates from the production org, then perform an import using this tool.

Import Templates Individually

If you created only a few (i.e. less than 15) S-Docs templates in your sandbox that you would like to move to your production org, you can import each template individually.

Import Templates Using Data Loader

You can also use the Salesforce Data Loader to import a large number of templates, although this method is not recommended -- the S-Docs template migrator is best practice for importing or exporting a large number of templates. If you want to use data loader, follow the steps below:

  1. Using DataLoader, export all SDoc Template records and fields from your sandbox org.
  2. Edit the resultant CSV and perform the following:
    1. Remove the row with NAME = "License Key"
    2. Remove all ID field columns (ID, CREATEDBYID, LASTMODIFIEDBYID, OWNERID, SDOC__Component_IDs__c, SDOC__Preview_Id__c, and SDOC__Master_Template__c)
    3. Remove all Date field columns (CREATEDBYDATE, LASTMODIFIEDDAE, LASTACTIVITYDATE, SYSTEMMODSTAMP, etc.)
    4. Remove all ENCODE field columns (SDOC__Template_XML_Encode__c, SDOC__Template_XML_Encode10__c, SDOC__Template_XML_Encode2__c, SDOC__Template_XML_Encode3__c, SDOC__Template_XML_Encode4__c, SDOC__Template_XML_Encode5__c, SDOC__Template_XML_Encode6__c, SDOC__Template_XML_Encode7__c, SDOC__Template_XML_Encode8__c, SDOC__Template_XML_Encode9__c, SDOC__Terms_XML_Encode__c)
    5. Remove all formula (SDOC__Format_Icon__c, SDOC__Restore_Link__c)
  3. Save as import CSV.
  4. Using DataLoader, insert the import CSV file from Step 3 into SDoc Template on your production org.
  5. Open Developer Console on your production org. Insert and execute the following in an Execute Anonymous window:
    [code lang="html"]update [SELECT Id FROM SDOC__SDTemplate__c WHERE Name != 'License Key' ORDER BY SDOC__Template_Format__c];[/code]

    Note: If you have more than 100 templates you may need to add LIMIT 100 OFFSET 0 to the SELECT statement and execute the update multiple times, incrementing the OFFSET value by 100 each time until all templates have been updated.

Discussion

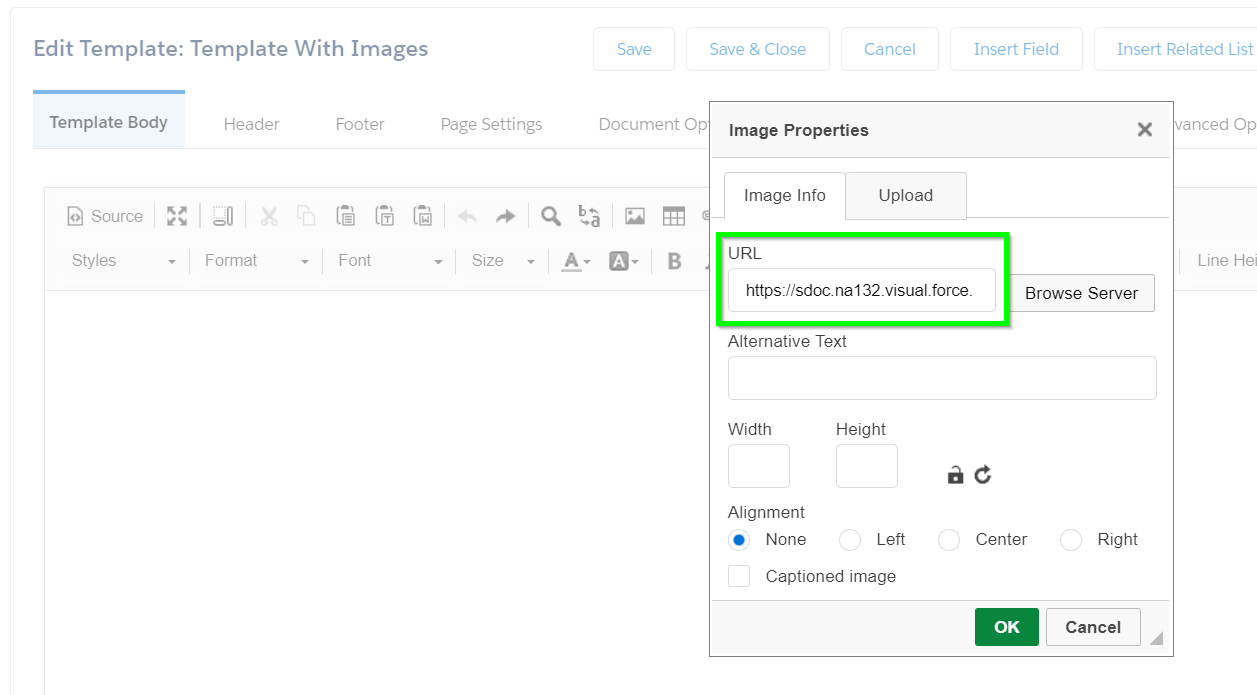
If your templates make references to data (images, related lists, etc.) in your sandbox, these references still might work in your production instance. This is because templates in production are still able to use data from sandboxes. This is undesirable behavior; if you change/delete your sandbox, or change/delete certain data in your sandbox, then these references will no longer work.

We recommend pointing image references in your sandbox templates directly to image URLs in your production org. If you do this, you won't need to update any of your images once you move your sandbox templates into your production org.

We strongly recommend that you recreate all other types of sandbox data in your production org. After importing your templates into your production org from your sandbox, you can then proceed to update your templates to reference the data in your production org, rather than the data in your sandbox org.

Choosing between PDF, HTML, DOC, DOCX, or XLS formats

By Best Practices, Documentation, S-Docs Cookbook No Comments

Introduction

There are a multitude of different output types that S-Docs templates support. This document will go through five common ones and explain when to choose each one.

Some document formats are better suited for certain document types. For example, PDFs typically work best for contracts since you do not expect users or clients to edit them after generating (although S-Doc PDFs can be edited if the "Allow Edit" feature is enabled). As an administrator, you should select the right format based on how you expect the document to be viewed, used and distributed.

You must select one output format for each template. If you want to give your users control of the format, you can simply clone your template several times and save each version with a different output format. If all the versions are made active, the user could then choose the template with their desired output format.

PDF

PDF documents created with S-Docs are self-contained. By this, we mean that the complete content is stored within the document rather than using links that retrieve content when the document is opened. Therefore, internet connectivity is not needed to view any embedded images and using relative links do not pose a problem. Since the PDF is viewed using a Reader, the output is very consistent and predictable even across mobile clients. Although S-Docs allows you to choose whether or not your users can edit documents (including PDFs) after they have been generated, if you keep this option disabled, editing PDFs can be difficult, meaning it is a good choice when you do not want the user to edit the document after it has been generated. Therefore, this output is well suited for documents like quotes, contracts, or product information sheets.

However, rendering in PDF does have some design considerations. Specifically, not all fonts are supported, nor are all CSS styles. To get the desired result, you may need additional editing time or are afforded some leeway on the final output.

If you have existing company PDFs that you would like to use with S-Docs, you can leverage the PDF-Upload feature to upload your documents and drag and drop merge fields onto them. However, uploaded PDFs have certain limitations; namely, they do not support related lists.

To work around PDF-Upload limitations, you can convert your existing PDF to HTML so that it can be saved as an S-Docs template. Adobe provides free automatic conversion tools that can be found here: http://www.adobe.com/products/acrobat/access_onlinetools.html. You may need to edit the template after conversion in order to make it appear as the original.

DOC & DOCX

The DOC and DOCX formats are often the best choice for rendering form letters, especially when the message needs to be tailored for each document, such as customer service letters or meeting follow-ups. These formats are often used when there is a need to uniquely edit or personalize each document after it has been created.

Although both templates are output as Microsoft Word files, DOC templates are configured and edited within the S-Docs template editor, while DOCX templates are configured and edited within Microsoft Word and then uploaded to the S-Docs template editor.

DOC Templates

DOC templates are great if your document is very large or needs to include a lot of data-driven formatting. Since they're built and edited within the S-Docs template editor, there's a lot more flexibility when it comes to things like custom related list tables.

When you generate DOC templates, S-Docs uses the template definition you provide to create a new DOC file. You don’t need to configure a connector, plug-in, or any macros. This means you cannot use an existing DOC file (however, you can use the Paste From Word button to copy content from an existing DOC file into the template editor). After generating the document, the user can then leverage all the features of MS Word to further tailor the content of each message.

The following special S-Docs syntax can be used to insert a table of contents in your DOC template:

##TOCSTART## and ##TOCEND##

DOCX Templates

DOCX templates are built entirely within Microsoft Word and then uploaded to S-Docs. They're great for documents with a lot of non-data-driven formatting, since you can leverage the full feature functionality of Microsoft Word to easily insert tables, tables of contents, and other elements. The DOCX format is useful for users who are already proficient in Microsoft Word.

S-Docs elements like merge fields, related lists, and conditional logic can be included in your DOCX templates as well -- users simply need to copy syntax from the S-Docs template editor and paste it into their Microsoft Word document within square brackets.

Please refer to this documentation for important information regarding DOCX syntax and generation.

For templates with complex, data-driven formatting requirements, the DOC type should be used instead of DOCX, since more complex formatting is only supported within the S-Docs template editor.

XLS

For large related lists, you may want to render your document using the XLS file type. After a user creates the S-Doc, they can update the spreadsheet as usual.

Note: Similar to how S-Docs generates a DOC document, S-Docs does not populate an existing XLS file with data, but rather generates a new XLS file. This means that you do not need to create and share a template XLS file. All definitions and formulas should be defined in either Salesforce formula fields, or alternatively, using the S-Docs template editor. If you have existing XLS documents you want to use with S-Docs, you will need to save them as HTML and use the HTML output as the basis for your S-Docs template. You may need to remove some special formatting Microsoft automatically adds to the document that prevents non-Microsoft browsers from rendering the document correctly. There are also tools available online for converting Excel to HTML.

Tip

Since it is often difficult to predict a particular cell location that your S-Docs field will render to in MS Excel, and since many formulas require cell locations, it is often easier to create formulas using a two step process. First, you create your fields and render the document without any formulas. Then, once you have identified all your target cell locations, you can add your excel formulas using the S-Docs Template Editor.For example, typing the following text into the S-Docs template editor will sum the values of the contents of rows 4 through 8 in Column A.

=SUM(A4:A8)

You can also use a VLookup function to help locate values you want to update with Salesforce data. Here is a useful resource for creating Excel formulas: http://www.mrexcel.com/archive/Formulas/index.html

HTML

HTML is the most flexible of the output formats. HTML docs can even contain editable text areas. This is the format of choice if you wish to send an in-line document via email. However, you should note that images are retrieved when the document is viewed. For this reason, we do not consider the document "self-contained." This means users not only need to be connected to the internet to view your document appropriately, but also to have access to the embedded images. While embedded images can be useful for tracking, rendering consistent HTML on a variety of devices, browsers and email clients can also be challenging.

Note: If a user emails an HTML S-Doc during the last step of generation, S-Docs will automatically include the document in-line as HTML in the email body.

Using Images

If you are looking to embed images into your S-Doc, check out these guides on how to embed dynamic images or static images in your document.

Using S-Docs with Salesforce Chatter

By Best Practices, Documentation, S-Docs Cookbook No Comments

Introduction

Since S-Docs is a Native Force.com app, it integrates seamlessly with Salesforce Chatter.  Enabling Chatter on S-Docs will allow users to comment (Chatter) on specific S-Docs, and notify any user ‘following’ an S-Doc of changes. For general information on how to configure Chatter, please start with this Salesforce tutorial.

S-Docs uses a junction object (S-Docs Relationships) to relate generated S-Docs to your Salesforce records. When enabling S-Docs for Chatter, we recommend enabling the Chatter feed on the S-Docs Relationship object, not on the S-Doc object itself.

Enable Feed Tracking For The S-Doc Relationship Object

First, navigate to Build > Customize > Chatter > Chatter Settings and make sure the Chatter feature is enabled for your org. Next, navigate to Build > Customize > Chatter > Feed  Tracking. From here, select the “SDOC Relationship” object, as shown below:

Then, check Enable Feed Tracking to be able to select fields to track. Typically, customers will want to track just the “Status” and “Comment” fields, as these are the fields that are most meaningful to track. If you integrate S-Docs with an electronic signature solution like S-Sign, users could be notified via the Chatter feed that documents have been executed by the customer.

Create A Hyperlink On The S-Docs Related List

Now that you have Chatter enabled and Feed Tracking set, you will need to make one additional change. You will need to create a hyperlink on the S-Docs related list that can take the user to the S-Docs Relationship record detail page. This is the only page where users can click on the Follow button located on the Chatter toolbar.

Background: By default, there is no such hyperlink on the S-Docs related list, and this was done intentionally. While the S-Docs related list includes a column labeled “Document Number,” this field is a plain text field (not a hyperlink). If this field were a hyperlink, the user might expect this to open the S-Docs itself – not the S-Docs Relationship record. To eliminate any confusion, the hyperlink was intentionally removed.

However, for Chatter, we do need to get to the S-Docs Relationship record in order to allow users to click on the Chatter Follow button. Unfortunately, the first column in the related list (“Edit” link) won’t work either. While this link does take the user to the S-Docs Relationships page, it is rendered in edit mode, and the Chatter toolbar does not render for records in edit mode. So, you will need to add a new column to your S-Docs related list view that will take the user to the S-Docs Relationships record detail page.

While you might first consider using the Relationship ID field as an easier approach, this ID value would display the S-Doc Relationship ID, not the S-Doc ID, which again may confuse users. A formula field rendered as a hyperlink is the best solution. Since each org will have its own preference on how this related list column should appear, we have not included this formula field in the core S-Docs package, but rather leave it up to the Salesforce Admins to implement.

You will need to create this hyperlink using a custom formula field on the SDOC_Relationship__c object. You will then add this field to the related list view.

By using the formula below, you could include a new column that replaces “Document Number” with the same value but is a hyperlink to the S-Doc Relationship record. (For comparison only, both columns are included in the related list shown below.)

sdocs

Related List Columns

The table below describes the intended behavior we are seeking:

Column Click Action
Column 1 (Edit link) Open S-Docs Relationship record in edit mode. User can add/edit comments or change S-Doc status.
Column 3 (Excel icon) Opens the actual S-Doc in new window (e.g. launches MS Excel).
Column 5 (S-Doc Link) Opens S-Doc Relationship detail in same window. Users could then click on the “Follow” icon from the Chatter toolbar.

The example below uses an alternative link. The following formula will create a “Set Chatter Prefs” link field that you then add to the related list layout.
[code lang="html"]HYPERLINK('/'+ Id , “Set Chatter Prefs”, "_self" )[/code]
sdocs

Once you’ve added the link to the relationship object, the user simple opens the record and then clicks on the follow icon.

sdocs2

Updating templates without affecting previously created documents

By Best Practices, Documentation, S-Docs Cookbook No Comments

The S-Docs Solution Diagram

It is important to understand that once a template has been used to create the first "real" document, you should refrain from making ANY updates to the template. This is because the S-Docs template record is used both during document creation AND during each subsequent view of an S-Doc. Each S-Doc stores the template used to create it. If you attempt to open an S-Doc where the template used to create it has been deleted, you will receive an error. The diagram below illustrates this relationship.

solution-diagram

Use The "Auto Create Salesforce Attachment" Option

To edit templates without affecting previously created documents, you can use the Auto Create Salesforce Attachment and link to record option (found under the "Document Options" tab in the template editor, this feature is enabled by default). This feature creates an attachment each time a document is generated and stores it in the "Notes and Attachments" related list on the base object. Attachments allow you to store a copy of the document that cannot be affected by template changes and do not require the S-Docs template record to view. This is particularly useful for orgs that are restricted to 2 templates, have a need to change templates often, and still require past documents to remain unaffected by future template changes.

Cloning Templates

If you don't use the Auto Create Salesforce Attachment feature and want to make changes after you have completed your design work, it will affect how PREVIOUSLY generated documents are rendered. Therefore, if you need to make changes, you should CLONE the template and make modifications to the newly cloned record.

You then uncheck Available for use and Initially Visible on the original template to ensure no new document can be created using it.

Previously generated documents will continue to use the original template (therefore rendering unchanged), and new documents will use the newly activated template.

Create a Document for Each Record in a Related List

By Documentation, General Solutions, S-Docs Cookbook No Comments

Introduction

There are plenty of times where a user might want to generate documents for each item in one of the related lists on the current record they're viewing. For example, the user may want to click a button on an Opportunity Record that sends an email to each Contact Role related to that Opportunity, or the user might want to click a button on an Account record that generates an Opportunity Summary for each Opportunity record related to that Account. Setting up this feature is as simple as copying and pasting the following code into your org.

Note: You can also generate a single document with information merged in from each record in a related list that can be formatted in any way you'd like. This feature utilizes S-Docs component templates. Click here to read more about this feature.

Step 1: Create Apex Class

Head over to Setup > Build > Develop > Apex Classes > New and copy/paste the following code into your new Apex class, then click Save.
[code lang="html"]public class SDRelatedListDocumentsController {
private final String TYPE_FILTER;
public String parentId {get;set;}
public Boolean allowEmail {get;set;}
public Boolean allowCombineAll {get;set;}
public Boolean emailedDocuments {get;set;}
public String objSortFieldOrderbyDirection {get;set;}
public Map<Id, SObject> childRecordMap {get;set;}
public SDRelatedListDocumentsController() {
parentId = ApexPages.currentPage().getParameters().get('parentId');
TYPE_FILTER = 'Related List Document - ' + parentId;
}
public List<SDJobWrapper> sdocJobWrappers {
get {
List<SDJobWrapper> sdjwList = new List<SDJobWrapper>();
List<SDOC__SDJob__c> relatedListDocJobs = [
SELECT SDOC__Status_Link__c, SDOC__Oid__c,
SDOC__SDoc1__r.Id, SDOC__SDoc1__r.SDOC__Attachment_Name__c
FROM SDOC__SDJob__c
WHERE OwnerId=:UserInfo.getUserId()
AND SDOC__Type__c=:TYPE_FILTER
];
for (SDOC__SDJob__c sdj : relatedListDocJobs) {
sdjwList.add(
new SDJobWrapper(
sdj, childRecordMap.get(sdj.SDOC__Oid__c)
)
);
}
return sdjwList;
}
set;
}
public class SDJobWrapper {
public SDOC__SDJob__c job {get;set;}
public SObject obj {get;set;}
public SDJobWrapper(SDOC__SDJob__c job, SObject obj) {
this.job = job;
this.obj = obj;
}
}
public void createSDocJobs() {
delete [SELECT Id FROM SDOC__SDJob__c WHERE OwnerId=:UserInfo.getUserId() AND SDOC__Type__c=:TYPE_FILTER AND (SDOC__Status__c = 'Completed' OR SDOC__Status__c = 'Error')];
List<SDOC__SDJob__c> sdJobs = new List<SDOC__SDJob__c>();
childRecordMap = new Map<Id, SObject>();
emailedDocuments = false;
String childObjName = ApexPages.currentPage().getParameters().get('childObjName').toLowerCase();
String lookupFieldName = ApexPages.currentPage().getParameters().get('lookupFieldName');
String doclist = ApexPages.currentPage().getParameters().get('doclist');
String allowCombineAllParam = ApexPages.currentPage().getParameters().get('allowCombineAll');
allowCombineAll = allowCombineAllParam == 'true' || allowCombineAllParam == '1';
String templateBaseObject; String fieldPrefix;
if (childObjName == 'opportunitycontactrole' ||
childObjName == 'accountcontactrelation') {
templateBaseObject = 'Contact';
fieldPrefix = 'Contact.';
} else {
templateBaseObject = childObjName;
fieldPrefix = '';
}
lookupFieldName = lookupFieldName.toLowercase();
lookupFieldName = lookupFieldName.replace('__c', '__r');
if (lookupFieldName.endsWith('id')) {
lookupFieldName = lookupFieldName.substring(0, lookupFieldName.length() - 2);
}
String childrenQuery
= 'SELECT ' + fieldPrefix + 'Name, ' + fieldPrefix + 'Id '
+ ' FROM ' + childObjName
+ ' WHERE ' + lookupFieldName + '.Id =\'' + parentId + '\' ';
String additionalFilters = ApexPages.currentPage().getParameters().get('additionalFilters');
if (additionalFilters != null) childrenQuery += additionalFilters;
objSortFieldOrderbyDirection = ' ASC';
String objSortFields = ApexPages.currentPage().getParameters().get('objSortFields');
if (objSortFields != null) {
if (objSortFields.contains(' DESC')) objSortFieldOrderbyDirection = 'DESC';
objSortFields = objSortFields.remove(' DESC').remove('ASC').deleteWhitespace();
}
for (SObject child : Database.query(childrenQuery)) {
String oid;
if (childObjName == 'opportunitycontactrole' ||
childObjName == 'accountcontactrelation') {
oid = String.valueOf(child.getSObject('Contact').get('Id'));
childRecordMap.put(oid, child.getSObject('Contact'));
} else {
oid = child.Id;
childRecordMap.put(oid, child);
}
SDOC__SDJob__c sdj =
new SDOC__SDJob__c(
SDOC__Start__c=true,
SDOC__Oid__c=oid,
SDOC__ObjApiName__c=templateBaseObject,
SDOC__SendEmail__c='0',
SDOC__Doclist__c=doclist,
SDOC__Type__c=TYPE_FILTER,
SDOC__ObjSortValFieldsForSDoc__c=objSortFields
);
sdJobs.add(sdj);
}

insert sdJobs;
}
public Boolean jobsAreCompleted {
get {
Integer totalNumJobs = Database.countQuery(
'SELECT COUNT()'
+ ' FROM SDOC__SDJob__c'
+ ' WHERE OwnerId = \'' + UserInfo.getUserId() + '\''
+ ' AND SDOC__Type__c=\'' + TYPE_FILTER + '\''
+ ' AND SDOC__Status__c'
+ ' IN(\'Selected\',\'0\',\'10\',\'20\',\'40\',\'60\','
+ '\'80\',\'90\',\'95\',\'Queued\',\'Completed\',\'Error\')'
);
Integer completedSize = Database.countQuery(
'SELECT COUNT()'
+ ' FROM SDOC__SDJob__c'
+ ' WHERE OwnerId = \'' + UserInfo.getUserId() + '\''
+ ' AND SDOC__Type__c=\'' + TYPE_FILTER + '\''
+ ' AND SDOC__Status__c = \'Completed\''
);
return (completedSize + getErrorSize() == totalNumJobs) && totalNumJobs > 0;
}
set;
}
public Integer getErrorSize() {
return Database.countQuery(
'SELECT COUNT()'
+ ' FROM SDOC__SDJob__c'
+ ' WHERE OwnerId = \'' + UserInfo.getUserId() + '\''
+ ' AND SDOC__Type__c = \'' + TYPE_FILTER + '\''
+ ' AND SDOC__Status__c = \'Error\''
);
}
public PageReference returnToParentRecord() {
return new PageReference('/' + parentId);
}
public PageReference emailDocuments() {
if (!emailedDocuments) {
emailedDocuments = true;
String aid = ApexPages.currentPage().getParameters().get('aid');
String did = ApexPages.currentPage().getParameters().get('did');
PageReference emailPage = new PageReference('/apex/SDOC__SDEmail');
emailPage.setRedirect(true);
if (aid != null && aid != '') {
emailPage.getParameters().put('aid', aid);
}
if (did != null && did != '') {
emailPage.getParameters().put('did', did);
}
/* EMAIL SECTION A */
/* Emails each document individually on a per-record basis.
This occurs in the background, so the email body can't be edited in this case. */
for (SDJobWrapper sdjw : sdocJobWrappers) {
emailPage.getParameters().put('SDId', sdjw.job.SDOC__SDoc1__r.Id);
if (!Test.isRunningTest()) {
emailPage.getContent();
}
}
/* EMAIL SECTION B */
/* UNCOMMENT THIS SECTION and COMMENT OUT EMAIL SECTION A
if you want to include all documents in a single email and have
the user be redirected to the email page (where they can edit the email body)
when they click the email button. */
/*String sdocIds = '';
for (SDJobWrapper sdjw : sdocJobWrappers) {
sdocIds += sdjw.job.SDOC__SDoc1__r.Id + ',';
}
sdocIds = sdocIds.substring(0, sdocIds.length() - 1); // remove last comma
emailPage.getParameters().put('SDId', sdocIds);
return emailPage;*/
}
return null;
}
private String combineAllType = ApexPages.currentPage().getParameters().get('combineAll');
private String combinedDocUrl;
public void combineIntoSingleDocument() {
if (combineAllType == null) return;
throwExceptionIfErrors();
combineAllType = combineAllType.toLowerCase();
List<String> sdocIds = new List<String>();
for (SDJobWrapper sdjw : sdocJobWrappers) sdocIds.add(sdjw.job.SDOC__SDoc1__r.Id);
if (Test.isRunningTest()) sdocIds.add(ApexPages.currentPage().getParameters().get('testSDocId'));
String filters = 'WHERE OwnerId=\'' + UserInfo.getUserId() + '\' AND Id IN (\'' + String.join(sdocIds, '\',\'') + '\')';
List<String> orderBys = new List<String>();
if (objSortValExistsOnSDoc()) orderBys.add(' SDOC__ObjSortVal__c ' + objSortFieldOrderbyDirection + ' ');
String sdocSortFields = ApexPages.currentPage().getParameters().get('sdocSortFields');
if (sdocSortFields != null) orderBys.add(sdocSortFields);
if (!orderBys.isEmpty()) filters += ' ORDER BY ' + String.join(orderBys, ',');
if (!Test.isRunningTest()) combinedDocUrl = new List<String>( SDOC.SDJobTemplateController.combineSDocs(filters, 'PDF') )[0];
}
public void finishCombineAll() {
if (combineAllType == 'file' || combineAllType == 'attachment') {
String filename; Blob filebody;
if (Test.isRunningTest()) {
filename = 'test.txt';
filebody = Blob.valueOf('test');
} else {
filename = sdocJobWrappers[0].job.SDOC__SDoc1__r.SDOC__Attachment_Name__c;
filebody = new PageReference(combinedDocUrl).getContent();
}
// &combineall=true,file,attachment&autoRedirect=record
if (combineAllType == 'file') {
insert new ContentVersion(
Title=filename,
PathOnClient=filename,
VersionData=filebody,
FirstPublishLocationId=parentId
);
} else if (combineAllType == 'attachment') {
insert new Attachment(
Name=filename,
Body=filebody,
ParentId=parentId
);
}
}
}
private Boolean doFinishRedirect = false;
public void redirectIfComplete() {
if (!jobsAreCompleted) return;
combineIntoSingleDocument();
doFinishRedirect = true;
}
public PageReference finishRedirect() {
if (!doFinishRedirect) return null;
// PageReference.getContent() must be done in a separate transaction,
// hence splitting up redirectIfComplete and finishRedirect
finishCombineAll();
String autoRedirect = ApexPages.currentPage().getParameters().get('autoRedirect');
if (autoRedirect == null) return null;
throwExceptionIfErrors();
autoRedirect = autoRedirect.toLowerCase();
if (autoRedirect == 'record') return returnToParentRecord();
else if (autoRedirect == 'combineall') return new PageReference(combinedDocUrl);
else if (autoRedirect == 'email') return emailDocuments();
else if (autoRedirect == 'email,record') { emailDocuments(); return returnToParentRecord(); }
return null;
}
public Boolean objSortValExistsOnSDoc() {
return Schema.getGlobalDescribe().get('SDOC__SDoc__c').getDescribe().fields.getMap().get('SDOC__ObjSortVal__c') != null;
}
public void throwExceptionIfErrors() {
if (getErrorSize() > 0) throw new SDException('Error: one or more S-Docs Jobs failed');
}
public class SDException extends Exception {}
}[/code]

Step 2: Create Visualforce Page

Head over to Setup > Build > Develop > Visualforce Pages > New and copy/paste the following code into your new Visualforce Page. Name the page SDRelatedListDocuments (i.e. enter this value into both the "Label" and "Name" fields), then click Save.
[code lang="html"]<apex:page controller="SDRelatedListDocumentsController" action="{!createSDocJobs}" tabStyle="SDOC__SDTemplate__c" lightningStylesheets="true">
<apex:form >
<apex:sectionHeader title="Create S-Docs" subtitle="Generating Document(s)"/>
&lt;&lt; <apex:commandLink action="{!returnToParentRecord}">Return to record</apex:commandLink>
<br />
<br />
<apex:actionPoller action="{!redirectIfComplete}" interval="5" reRender="job_table" oncomplete="finishRedirect();" />
<apex:actionFunction action="{!finishRedirect}" name="finishRedirect" reRender="job_table" />
<div style="width: 700px;">
<apex:pageBlock id="job_table" >
<script type="text/javascript">
function displaySuccessfulEmailMsg() {
document.getElementById('email_msg').innerHtml
= "Successfully emailed documents.";
}
</script>
<apex:commandButton value="Email Documents" action="{!emailDocuments}"
disabled="{!NOT(jobsAreCompleted) || emailedDocuments}"
oncomplete="alert('Successfully emailed documents.');"
rendered="{!allowEmail}" reRender="" />
<apex:pageBlockTable value="{!sdocJobWrappers}" var="ow">
<apex:column headerValue="Name">
<a href="/{!ow['obj.Id']}" target="_blank">{!ow['obj.Name']}</a>
</apex:column>
<apex:column headerValue="Status" value="{!ow['job.SDOC__Status_Link__c']}"
style="width: 150px;" />
</apex:pageBlockTable>
</apex:pageBlock>
</div>
</apex:form>
</apex:page>[/code]

Step 3: Create Record Detail Button(s)

For each object that requires this functionality, you'll need to create a button similar to the following example created for emailing a document to each Contact Role related to an Opportunity.
[code lang="html"]{!URLFOR('/apex/SDRelatedListDocuments', null,
[
parentId=Opportunity.Id,
childObjName='OpportunityContactRole',
lookupFieldName='Opportunity',
doclist='a0K1M000000C7XO',
allowEmail='1',
aid='a0B1O000000TGNB',
did='a0V2L000000LJAH',
combineALL='file',
autoRedirect='record',
sdocSortFields='SDOC__SDTemplate__R.Name',
objSortFields='Contact.LastName'
]
)}[/code]
Here's what each query parameter denotes:
parentId: The ID of the record that users will see this button on. For example, if your users will click a button on the Opportunity record detail page that creates and emails a document for each Contact Role, this value should be {!Opportunity.Id}.
childObjName: The API name of the object type of the records in the related list. For example, if your users will click a button on the Opportunity record detail page that creates and emails a document for each Contact Role, this value should be OpportunityContactRole.
lookupFieldName: The API name of the field relating the related list object to the parent object that the user will see this button on. For example, if your users will click a button on the Opportunity record detail page that creates and emails a document for each Contact Role, this value should be Opportunity because a Contact Role record is related to its parent Opportunity record via a lookup field with API name Opportunity (e.g. if you wanted to query the IDs of all the Opportunities related to some Opportunity Contact Role with ID aXM1F000000N7XL, you would run the query SELECT Opportunity.Id FROM OpportunityContactRole WHERE Id='aXM1F000000N7XL' - notice how the Opportunity ID is accessed from the Opportunity Contact Role record through a lookup field with API name "Opportunity").
doclist: A comma-delimited list of S-Docs Template names or IDs that will be used to generate the related list documents. These S-Docs Template records should have the Related To Type set to the object of the related list records, rather than the object of the parent records. For example, if your users will click a button on the Account record detail page that creates a document for each Opportunity, this should be Opportunity, rather than Account. Going back to our Opportunity Contact Roles case is a bit more interesting: if your users will click a button on the Opportunity record detail page that creates and emails a document for each Contact Role, this shouldn't be Opportunity, of course, but it also shouldn't be OpportunityContactRole as you might have expected; rather, it should be Contact, since OpportunityContactRole is really just a relationship record linking a Contact (where the real meat of the Opportunity Contact Role data lies) to an Opportunity.
allowEmail (optional): Set this to 1 if you want to allow the user to email the generated documents. Set this to 0 or omit it altogether if you don't want to allow the user to email the generated documents.
aid (optional): A comma-delimited list of the Salesforce Attachments that you would like to attach to each email (note that emails can only be sent out if you set allowEmail to 1).
did (optional):
 A comma-delimited list of the Salesforce Documents that you would like to attach to each email (note that emails can only be sent out if you set allowEmail to 1).
sdocSortFields (optional): Field (or fields) on the S-Doc or S-Docs Template object to sort the documents by. In the example above, this sorts by template name.
objSortFields (optional): Field (or fields) on the base object to sort the documents by. In the example above, this sorts by Contact Last Name.
combineAll=[true|file|attachment] (optional): If this is set to true, all documents will be combined into a single PDF that can be saved as either a file or attachment.

Note: The combineall functionality will throw an error if you're not on S-Docs version 2.944 or above.

autoRedirect=[record|combineall|email|email,record] (optional): This parameter will automatically redirect you depending on which of the four values you input. Record will redirect you back to the record you started on. Combineall will take you to the combined PDF document if you've set the comebineall parameter to true. Email will take you to the email page so you can edit the email fields before sending your documents. Email,record will automatically email the documents and redirect you back to the record you started on.

Step 4: Create Test Class

Head over to Setup > Build > Develop > Apex Classes > New and copy/paste the following code into your new Apex class, then click Save.
[code lang="html"]@isTest
private class SDRelatedListDocumentsTest {
@isTest
private static void testSDRelatedListDocuments() {
Account acct = new Account(Name='test');
insert acct;
Opportunity opp = new Opportunity(Name='test', AccountId=acct.Id, StageName='Closed', CloseDate=Date.today());
insert opp;

Test.setCurrentPage(Page.SDRelatedListDocuments);
ApexPages.currentPage().getParameters().put('parentId', String.valueOf(acct.Id));
ApexPages.currentPage().getParameters().put('childObjName', 'Opportunity');
ApexPages.currentPage().getParameters().put('lookupFieldName', 'Account');
ApexPages.currentPage().getParameters().put('doclist', '');
ApexPages.currentPage().getParameters().put('sendEmail', '0');
ApexPages.currentPage().getParameters().put('combineAll', 'file');

SDRelatedListDocumentsController sdrldc = new SDRelatedListDocumentsController();
sdrldc.createSDocJobs();
Boolean tmp = sdrldc.jobsAreCompleted;
sdrldc.returnToParentRecord();
sdrldc.emailDocuments();
sdrldc.combineIntoSingleDocument();
sdrldc.finishCombineAll();
sdrldc.redirectIfComplete();
sdrldc.finishRedirect();
}
}[/code]

Writing a Query That Returns Distinct Records

By Documentation, General Solutions, S-Docs Cookbook No Comments

Return Distinct Records With LineItemsSOQL

Say you have a LineItemsSOQL table with a query on the Opportunity object that returns a few fields from its parent Account in your template:
[code lang="html"]<!--{{!
<lineitemsSOQL>
<class>table123</class>
<soql>
SELECT Account.Name, Account.Industry, Account.Type
FROM Opportunity
</soql>
<column>Account.Name</column>
<column>Account.Industry</column>
<column>Account.Type</column>
</lineitemsSOQL>
}}-->[/code]
This is fine if you don't mind the fields from a particular Account showing up in several of your table rows (e.g. your query returns 3 Opportunities that are all linked to the same Account). However, what if your use case required that you only display the fields for each particular Account just once in your table, even if your query returns multiple Opportunities linked to that Account? To accomplish this, you would change your LineItemsSOQL code to the following:
[code lang="html"]<!--{{!
<lineitemsSOQL>
<class>table123</class>
<soql>
SELECT Count_DISTINCT(ID) cid, Account.Name, Account.Industry, Account.Type
FROM Opportunity
GROUP BY Account.Name, Account.Industry, Account.Type
</soql>
<column>Name</column>
<column>Industry</column>
<column>Type</column>
</lineitemsSOQL>
}}-->[/code]

Note the following differences:

1) COUNT_DISTINCT(Id) cid is included in the query.
2) The fields in the query are repeated after a GROUP BY statement.
3) The column fields are no longer prepended with "Account." This is because this query doesn't return objects corresponding to Opportunity records (which would require traversing up to the Account's field's via "Account.") as it would if COUNT_DISTINCT were not included. Rather, it returns objects corresponding to Account records.

Return Distinct Records With The Named Query Feature

This behavior is also supported with the named query feature. Typically when you query a field through a lookup field (e.g. Contact__r.Name) with the named query feature, you'd prepend the name of the field with the name of the lookup object (e.g. {{!myQuery.Contact__r.Name}}). However, when using named queries with an aggregate function (such as COUNT_DISTINCT), you should omit the name of the lookup object (e.g. use {{!myQuery.Name}} rather than {{!myQuery.Contact__r.Name}} to reference Contact__r.Name) for the same reason listed in (3). For example:
[code lang="html"]<!--{{!
<lineitemsSOQL>
<class>none</class>
<queryname>myDistinctQuery</queryname>
<soql>
SELECT Count_DISTINCT(ID) cid, Account.Name, Account.Industry, Account.Type
FROM Opportunity
GROUP BY Account.Name, Account.Industry, Account.Type
LIMIT 1
</soql>
</lineitemsSOQL>
}}-->

{{!myDistinctQuery.cid}} <br />
{{!myDistinctQuery.Name}} <br />
{{!myDistinctQuery.Type}} <br />[/code]

Return Distinct Records Per Field Value

If you would like your LineItemsSOQL statement to only return one record per field value, you can do so using <distinct> tags.

For example, let's say the following Product records are related to an Opportunity:

Product Product Code Total Price
GenWatt Diesel 1000kW GC1060 $100,000.00
Installation: Industrial - High IN7080 $255,000.00
SLA: Bronze SL9020
$20,000.00

Note that GenWatt Diesel 1000kW appears twice. Adding <distinct>productcode</distinct> to your LineItemsSOQL statement will return this record only once, since the product code is the same. In other words, this related list statement:
[code lang="html"]<style type="text/css">table { border: collapse; }
table, tr, td, th { border: 1px solid black; }
th { font-weight: bold; }
</style>
<strong>Unique Products From This Opportunity</strong>
<table cellpadding="4" cellspacing="0">
<thead>
<tr>
<th>Name</th>
<th>Quantity</th>
<th>List Price</th>
<th>Total Price</th>
<th>Product Code</th>
</tr>
</thead>
<tbody><!--{{!
<LineItemsSOQL>
<class>table151</class>
<listname>opportunitylineitem</listname>
<soql>
SELECT name, quantity, listprice, totalprice, productcode
FROM opportunitylineitem
WHERE opportunityid='{{!Opportunity.id}}'
</soql>
<distinct>productcode</distinct>
<column>name</column>
<column>quantity</column>
<column>listprice</column>
<column>totalprice</column>
<column>productcode</column>
</LineItemsSOQL>
}}-->
</tbody>
</table>[/code]
Would output the following table:

You can also use the sum attribute in your <distinct> tags to sum specified columns in records that are considered duplicates based on your <distinct> field, and roll the results up in each column. For example, you could modify the <distinct> tags from the example above like so:
[code lang="html"]<distinct sum="quantity,listprice,totalprice">productcode</distinct>[/code]
This would output the following table, with the quantity, list price, and total price of the duplicate product summed.

Insert SOQL Query Data as Merge Fields with the Named Query Feature

By Documentation, General Solutions, S-Docs Cookbook No Comments

The Named Query Feature: Assigning SOQL Queries To Merge Fields

In S-Docs, related lists and direct SOQL lists have a massive amount of flexibility in how they are displayed when you leverage advanced template features, such as using HTML table markup in your related list's prefix and postfix attributes. However, there are rare occasions where this flexibility just might not cut it, as well as times where you might just want to use our direct SOQL feature to query fields from just a single object, and then use these fields over and over again in your template. Simply copying and pasting your direct SOQL code over and over is a messy, difficult-to-maintain solution that might even cause performance issues. However, there's no need to distress in times like these, because the S-Docs named query feature's got your back:

[code lang="html" highlight="25,30,35,39"]<!--{{!<LineItemsSOQL>
<class>none</class>
<queryname>myQuery1</queryname>
<soql>
SELECT quantity, listprice, totalprice, productcode
FROM opportunitylineitem
WHERE opportunity.id='{{!opportunity.id}}'
AND description='A Unique Description'
LIMIT 1
</soql>
</LineItemsSOQL>}}-->

<!--{{!<LineItemsSOQL>
<class>none</class>
<queryname>myQuery2</queryname>
<soql>
SELECT quantity, listprice, totalprice, productcode
FROM opportunitylineitem
WHERE opportunity.id='{{!opportunity.id}}'
AND description='Another Unique Description'
LIMIT 1
</soql>
</LineItemsSOQL>}}-->

Data for opportunity line item with description "A Unique Description":
Quantity - {{!myQuery1.quantity}}
List Price - ${{!myQuery1.listprice #,###.##}}}
Total Price - ${{!myQuery1.totalprice #,###.##}}}

Data for opportunity line item with description "Another Unique Description":
Quantity - {{!myQuery2.quantity}}
List Price - ${{!myQuery2.listprice #,###.##}}
Total Price - ${{!myQuery2.totalprice #,###.##}}}

Product codes of products ordered:
{{!myQuery1.productcode}}
{{!myQuery2.productcode}}

And let's just put the quantities and product codes here again, just because we can:
{{!myQuery1.quantity}} | {{!myQuery1.productcode}}
{{!myQuery2.quantity}} | {{!myQuery2.productcode}}[/code]
If you were to use the above code as your template source, then when you generated an S-Doc, the result would look something like the following:

Data for opportunity line item with description "A Unique Description": Quantity - 100 List Price - $20.00 Total Price - $2,000.00 Data for opportunity line item with description "Another Unique Description": Quantity - 300 List Price - $40 Total Price - $12,000.00 Product codes of products ordered: GC1050 GC1140 And let's just put the quantities and product codes here again, just because we can: 100 | GC1050 300 | GC1140

Notice how the LineItemsSOQL statements themselves don't display any results like you'd normally expect; when S-Docs sees that you used the named query feature in a LineItemsSOQL statement, it knows to hide the data that would normally be there, and instead opens the door to reference the data elsewhere as merge fields in your document.

On a technical note, we know in advance that each item we've queried in this example will only return a single result - you can assume that in our imaginary database, we only have one opportunity line item with description "A Unique Description" and only one opportunity line item with description "Another Unique Description."

You can additionally create named queries that return multiple records. You can filter them and access different records like so: {{!myQuery.Name filter="1" offset="2"}}. This would return the third record in the list that matches the criteria defined in filter 1.

[code lang="html"]<!--{{!<LineItemsSOQL>
<class>none</class>
<queryname>myQuery</queryname>
<filter id="1">StageName='Closed' AND Name LIKE '%Test%'</filter>
<filter id="2">StageName!='Closed' AND (NOT Name LIKE '%Test%')</filter>
<soql>SELECT Name, StageName FROM Opportunity</soql>
</LineItemsSOQL>}}-->{{!myQuery.Name}}<br />
{{!myQuery.Name filter="1" offset="1"}}<br />
{{!myQuery.Name filter="2" offset="2"}}<br />
{{!myQuery.Name filter="1" offset="3"}}<br />[/code]
Note that the filters use SOQL filter syntax, not S-Docs RENDER syntax. Each filter is added to the base query you defined between the <soql> tags, and one query is run per filter. For example, two queries will be run in the above sample since two <filter>'s are defined.

Aggregate Queries

The named query feature also supports aggregate queries, such as COUNT and SUM. To reference an aggregate function result in a merge field, you would simply use the field alias corresponding to that aggregate function result. For example:

[code lang="html"]<!--{{!
<lineitemsSOQL>
<class>none</class>
<queryname>numAccounts</queryname>
<soql>SELECT COUNT(id) cid, SUM(Amount)asum FROM Opportunity</soql>
</lineitemsSOQL>
}}-->

This org has {{!numAccounts.cid}} Opportunities with a total Amount of ${{!numAccounts.asum #,###.##}}.[/code]
By now, you've probably noticed that what's great about this feature is that you only have to run one query per child record to be able to use a given child record's fields like you would any ordinary merge field; the fields support attributes like format-number, and the fields can be used over and over again wherever you'd like in the document.

*Note: This feature was previously called the Queryname feature.
Top