All Posts By

Admin

Preview Documents Within the Template Editor

By Developer's Guide, Documentation No Comments

In This Article:

  1. Enabling Template Previews

As you build an S-Docs template, you'll likely want to generate a document using that template several times in order to see how each change you make appears in an actual generated document. You can streamline this process by using the Template Preview feature.

Enabling Template Previews

To use this feature, navigate to the Advanced Options tab of the template editor and find the Preview Settings section. This section has a single field titled Preview ID. When you fill in the Preview ID field with the ID of a test record, a button titled Save & Preview will appear at the top of this page.

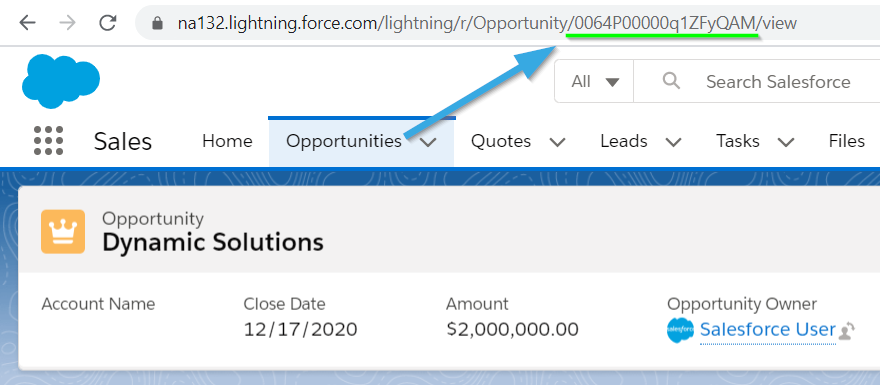
Record IDs can be found in the URL when you're viewing the record.

You can click the Save & Preview button in the template editor to generate and view a test document for the Account record with the ID you provided.

When you click "Save & Preview", a new tab will open in which a document is generated and automatically opened for previewing. This saves you even more time throughout your template development process.

Integrating with Adobe eSign

By Documentation No Comments

In This Article:

  1. Basic Adobe Sign Integration
S-Docs supports integration with Adobe eSign. Here are the steps needed to integrate S-Docs with Adobe eSign:

1) Create your Template.

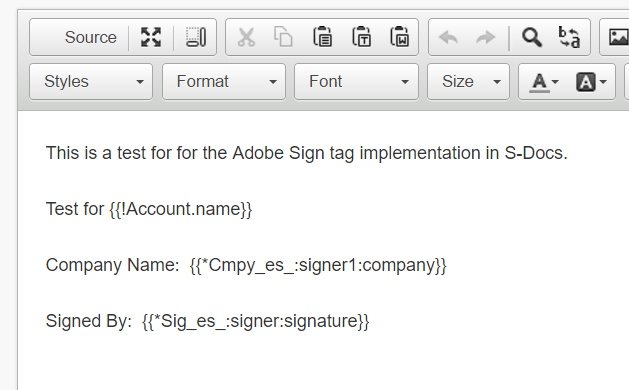
2) Insert the appropriate Adobe Sign Text Tags in your template at the appropriate places, for example:

Please visit this page for specific tag format and description.

3) Email the document generated in S-Docs to your Adobe Sign recipient.

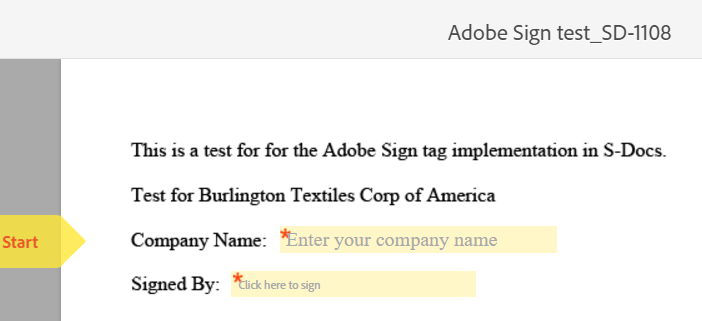
4) Your recipient then opens your email, downloads the attached document, and then opens that document in Adobe Sign in order to fill and sign. Your recipient should see something similar to the following when they open the document in Adobe Sign:

Integrating S-Docs with DocuSign

By Documentation No Comments

S-Docs supports a variety of integrations with DocuSign. Since integrations may vary from org to org depending on the use case, this document aims to provide the base knowledge and resources required to develop your own custom integration.

Use Anchor Tags In Your S-Docs Template

To use DocuSign with S-Docs, you can use anchor tags in your S-Docs template (see: https://help.salesforce.com/s/articleView?id=sf.cpq_docusign_anchors_concept.htm&type=5), generate the document, and then manually send it through DocuSign as you would any other documents.

Use DocuSign API

Alternative to manually sending the document, you can develop an integration to send the document automatically. Setting up automated integrations require using DocuSign's API, which you can learn about more at: https://developers.docusign.com/docs/

Example

Here is a brief overview of how you might integrate S-Docs with DocuSign:
1) Create a process in Process Builder to generate the document, and then set a flag.
2) Create an Apex trigger, based on the flag, to grab the generated doc attachment and send the attachment to the Docusign API: https://www.docusign.com/developer-center/api-overview
3) Use the DocuSign API to send the document to be signed.

Upload Templates From Microsoft Word With The DOCX Feature

By Documentation No Comments

Introduction

S-Docs provides users the opportunity to efficiently upload .docx files through the DOCX feature. This feature allows you to:

  1. Easily import pre-existing Microsoft Word templates that you don't want to rebuild from scratch in the Template Editor
  2. Leverage Microsoft Word features like Restricted Editing, Table of Contents, and Redlining
  3. Create complex and beautiful templates without any knowledge of HTML

You can watch the following tutorial video to learn how to upload DOCX templates into S-Docs, use DOCX templates as S-Docs components, and use bulk upload with DOCX. You can also refer to the written instructions below for a general guide to uploading DOCX templates and using the correct merge field syntax.

Tutorial Video

Generating DOCX Documents via S-Docs

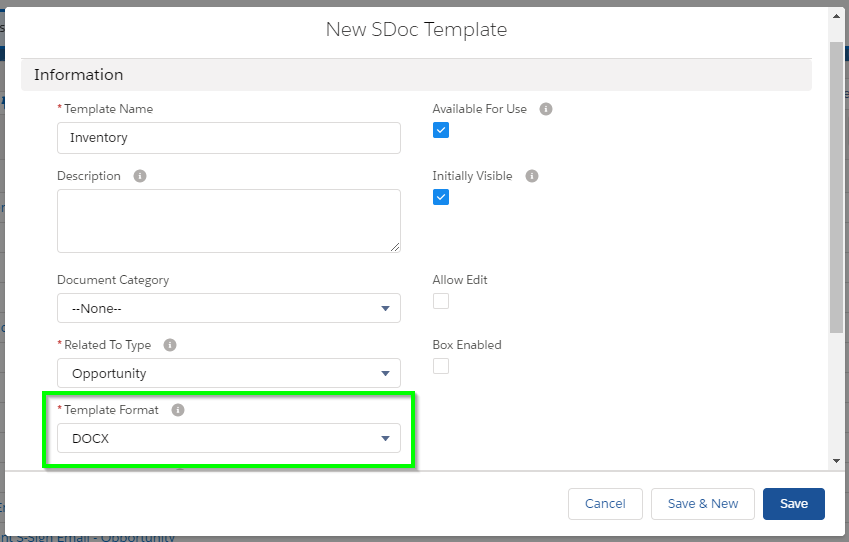
Using .docx files with Microsoft Word is incredibly advantageous if you’re trying to increase your documentation generation.  Let’s start by creating a new S-Docs template. Click on the Template Format drop-down menu and choose DOCX. Click Save.

Next, head to the template editor like you would with other templates. Normally, you would be able to make changes to the source code here, but with the DOCX upload feature, all you have to do is upload the .docx template file that you’ve already created!

Let's start by putting a merge field into our template. From the template detail page, click the Template Editor button.


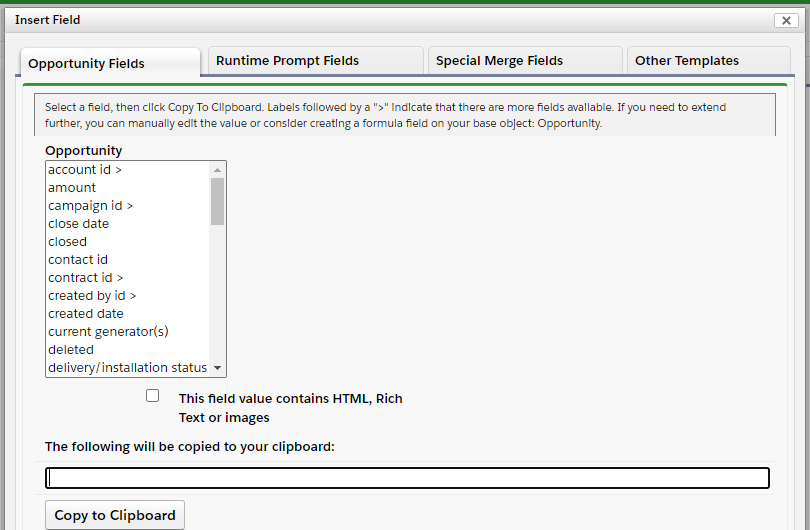
Then, click Insert Field and select a merge field.

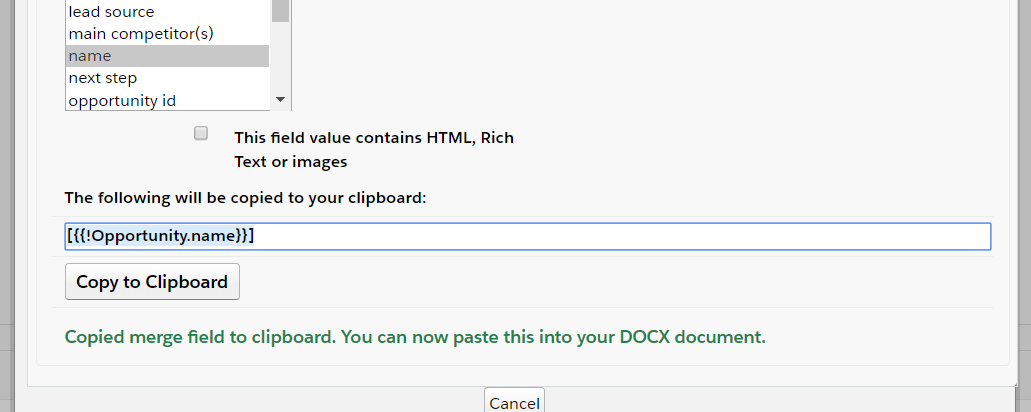
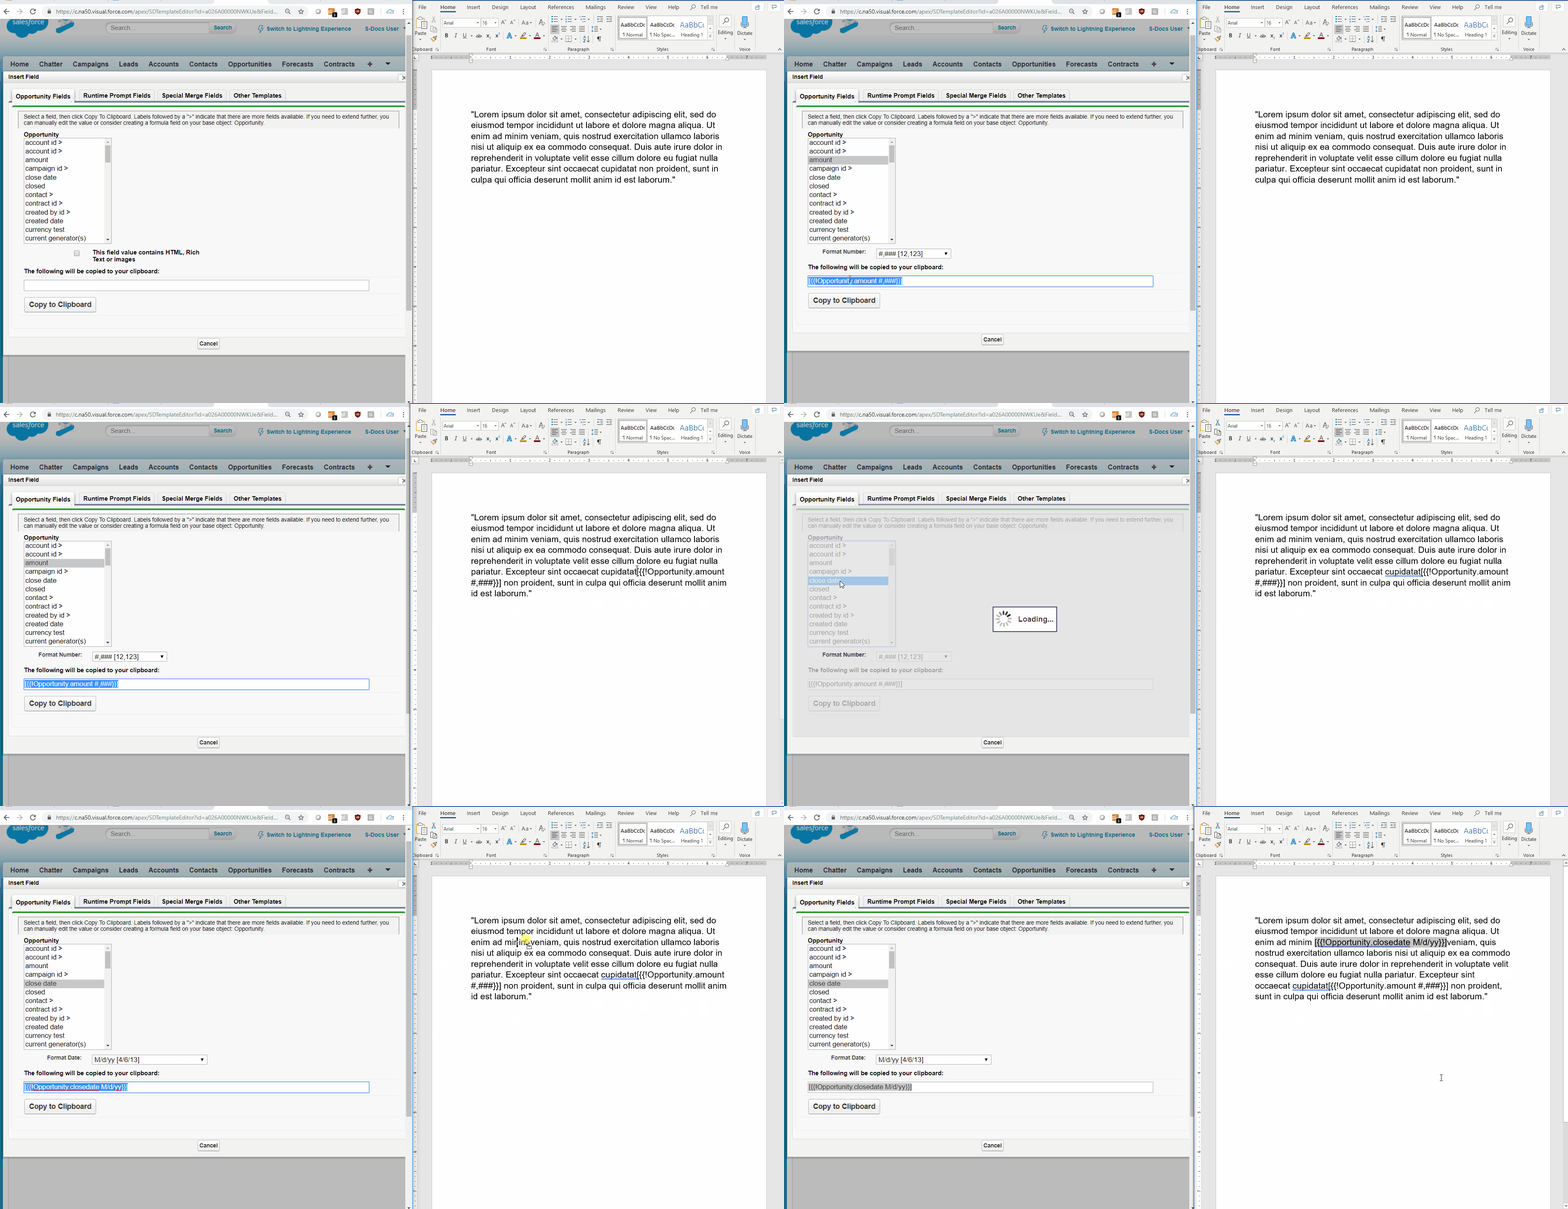
Rather than inserting the field into the typical source code editor, you will click the Copy to Clipboard button and paste it into your Word document where desired.

Once you’ve pasted the merge field in your Word document, return to the template editor. The screen should look like this:

Select "Choose File" and upload the Word document you have been working with. After selecting the file, you will see a message indicating that your file is uploading. In a matter of seconds, your template will successfully upload.

Congratulations! You can now generate your DOCX documents using your created S-Docs template.

Note: The best workflow to build DOCX documents is to have your browser and Word open side-by-side. In addition to using copy and paste, you can also drag-and-drop merge fields into your DOCX document without having to switch between windows.

Uploading Bulk DOCX Templates

You can create a large number of DOCX templates at one time using the Bulk DOCX Upload feature. The Bulk DOCX Upload page can be accessed through the S-Docs Setup page.

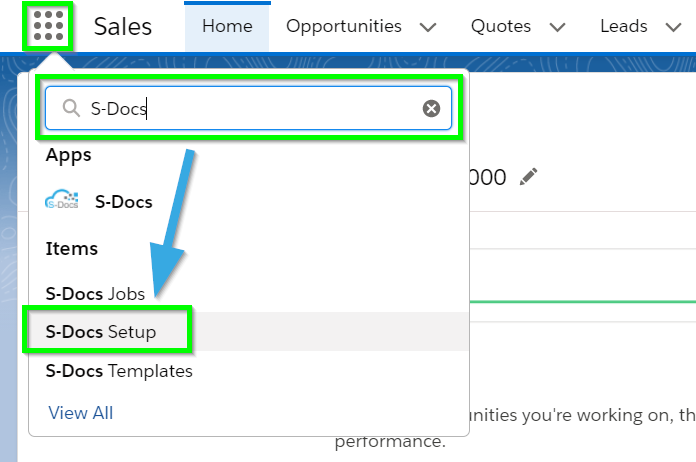
To navigate to the S-Docs Setup page, click the App Launcher in the upper left corner, type "S-Docs" into the search field, then click S-Docs Setup.

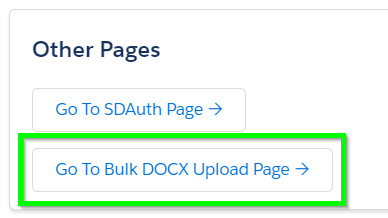
Scroll down to the Other Pages section and click Go to Bulk DOCX Upload Page.

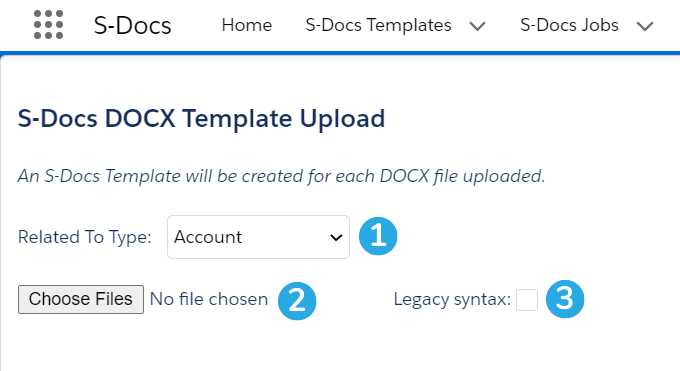
The Bulk DOCX Upload page appears as follows:

[1] To begin, choose the object that your templates will be related to.
[2] Next, click Choose Files to select as many DOCX templates as you'd like. Each file chosen will create an S-Docs template.
[3] Check the Legacy syntax checkbox if you're using the older DOCX syntax, which is no longer supported.

Syntax

Since first launching our DOCX feature, we have updated the syntax. The old syntax is still available when the “Legacy Upload” checkbox is checked on the DOCX file upload page, but no longer supported.

General DOCX Syntax

Note: DOCX syntax also applies to PPTX and XLSX documents.

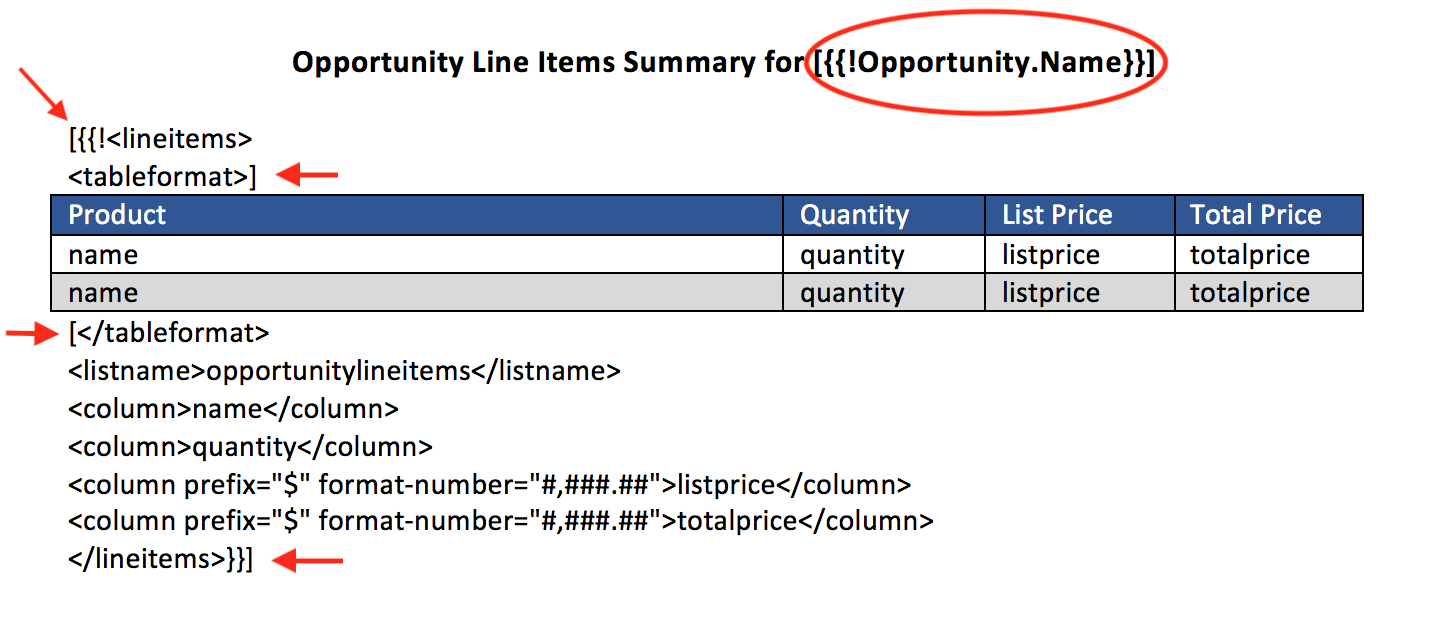
As part of the update, brackets are now required around all S-Docs syntax in DOCX templates, which results in a better output of your template.

[code lang="html"][{{!<lineitems>
<tableformat>]

//Your Table Here

[</tableformat>
<listname>opportunitylineitems</listname>
<column>name</column>
<column>quantity></column>
<column prefix="$" format-number="#,###.##">listprice</column>
<column prefix="$" format-number="#,###.##">totalprice</column>
</lineitems>}}][/code]

Render Statements

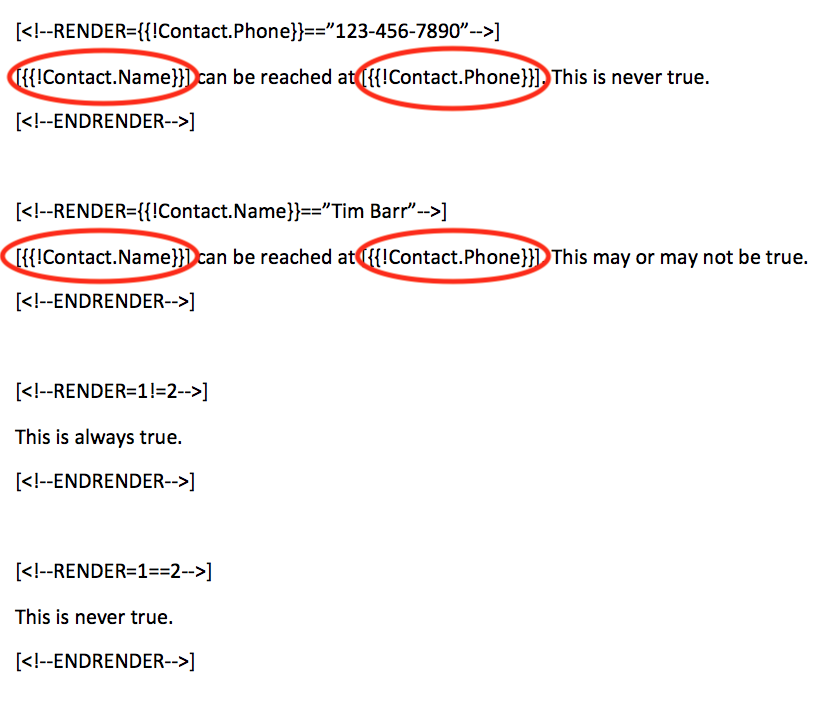
If you’re importing a DOCX template that uses render statements, you will need to use brackets there too.

[code lang="html"][<!--RENDER={{!Contact.Phone}}=="123-456-7890"-->]
[{{!Contact.Name}}] can be reached at [{{!Contact.Phone}}]. This is never true.
[<!--ENDRENDER-->]
[<!--RENDER={{!Contact.Name}}=="Tim Barr"-->]
[{{!Contact.Name}}] can be reached at [{{!Contact.Phone}}]. This may or may not be true.
[<!--ENDRENDER-->]
[<!--RENDER=1!=2-->]
This is always true.
[<!--ENDRENDER-->]
[<!--RENDER=1==2-->]
This is never true.
[<!--ENDRENDER-->][/code]

Note: You cannot have RENDERS on the same line as the LINEITEMS block.

Named Queries

If you're using named queries in your DOCX template, you'll need to convert them to the DOCX format. If your named query looked like this:

[code lang="html"]<!--{{!<LineItemsSOQL>
...
</LineItemsSOQL>}}-->
{{!myQuery1.fieldname}}[/code]

You'd need to update it to this syntax:

[code lang="html"][{{!<LineItemsSOQL>
...
</LineItemsSOQL>}}]
[{{!myQuery1.fieldname}}][/code]

Note: DOCX templates support the named query filter and offset features. Please visit the named query article linked above for more information about these features.

Rich Text Images

You can display images stored in rich text fields by surrounding the merge field in three curly braces instead of two, as shown below.

[code lang="html"][{{{!Object.FieldName}}}][/code]

To adjust the image dimensions, navigate to the Document Options tab of the template editor, scroll down to the Other Options section, and input your desired dimensions into the Rich Text Image Dimensions field, as shown below.

Note: This field governs the size of all images merged into your DOCX template from rich text fields.

Rich Text Font

Fonts and font sizes are not pulled from Salesforce rich text fields into your DOCX document - they will simply match Microsoft Word's "Normal" style. If you want your document to display the font from your rich text field, you can either change Microsoft Word's "Normal" style to match the desired font/font size, or use the font-family and font-size merge field attributes. For example, if your rich text field is written in Arial font at size 12, your merge field might look like this:

[code lang="html"][{{!Object.FieldName font-family="Arial" font-size="12"}}][/code]


Automatically Create Salesforce File & Link to Record Upon Document Generation

By Documentation No Comments

To stay aligned with Salesforce's move away from Attachments and towards Files, S-Docs allows you to automatically create a File for a given template and link it to a record whenever you generate an S-Doc for that template. You still have the ability to use Attachments, but we recommend making the move to Files now.

1) Add the Files related list to the applicable page layouts.

2) Enable Files permission on regular and community profiles, as applicable, so that users can see the files.

3) Edit the Object Permissions on the applicable User and Community User Profiles
a) On the S-Docs object Edit, verify/check both boxes for the File ID field, and Save.
b) On the S-Docs Templates object Edit, verify/check both boxes for the Auto Create File field, and Save.

4) Edit all applicable templates:
a) uncheck Auto-create Attachment on the Template Detail
b) Select Template Editor, go to the Document Options tab -
i) uncheck the "Auto Create Salesforce Attachment" checkbox
ii) check "Auto-Create File"

Note. On newer versions of S-Docs, the "Auto-create Attachment" checkbox can be found in the "Document Options" tab of the template editor. On older versions, this checkbox will appear on the S-Docs Template record detail page.

Import a Template into S-Docs

By Documentation No Comments
Note: If you're a newer user, you'll need to configure S-Docs for use in your org in order to generate documents with any templates that you've created. For detailed instructions on setting up S-Docs, please click here.

Create A New S-Docs Template

Importing a template into S-Docs is quick and easy. Once you have downloaded a PDF template from the S-Docs template library or exported one of your own templates (see "Export Template" in the "Advanced Options" tab of the template editor), you can follow steps below to import it into your org:

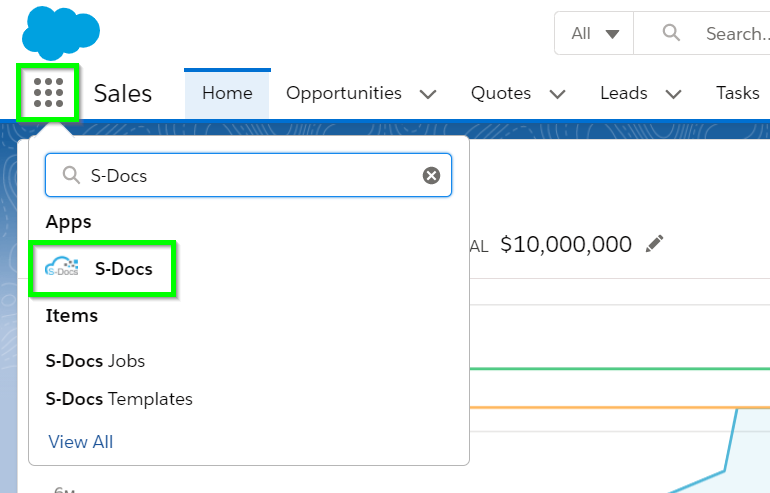
1) First, navigate to the S-Docs app by clicking on the App Launcher in the upper left corner and typing "S-Docs" into the search field.

Navigate to the S-Docs Templates tab and click New to create a new template.

3) Name the template whatever you'd like and click Save (the fields specified here don't matter as they will be overwritten upon import).

Import Your Template

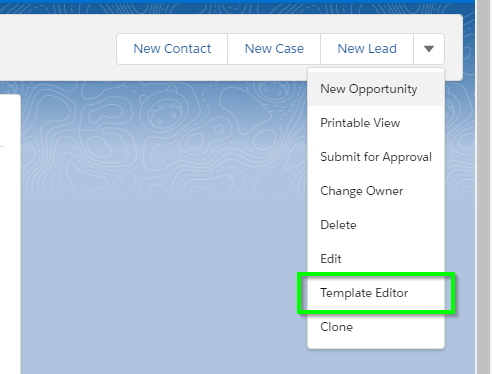
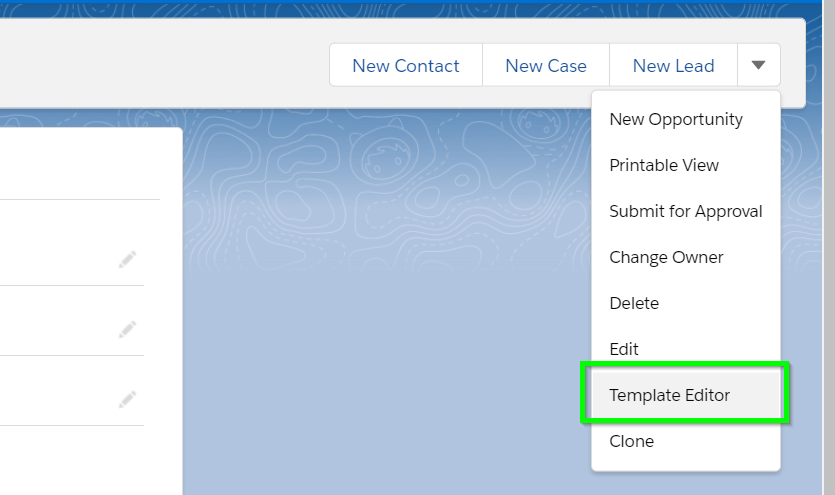
4) Now that you've created a new template, navigate to the template detail page and open the S-Docs template editor by clicking the Template Editor button (under the dropdown arrow on the right side of the page).


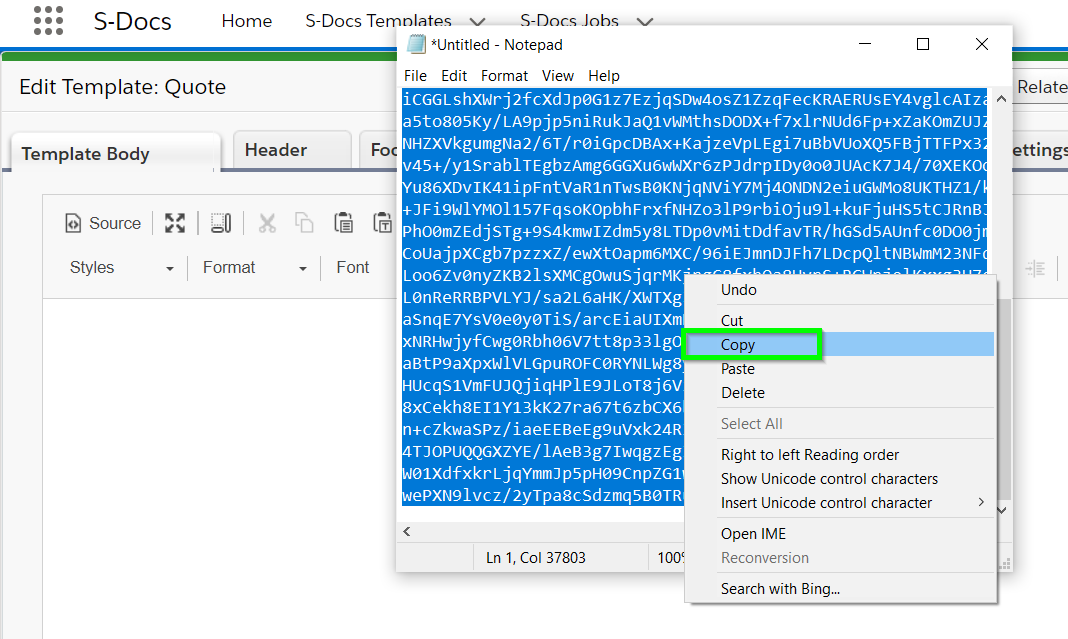
5) Copy and paste the contents of your recently downloaded template data into "Template Body" tab of the S-Docs Template Editor.

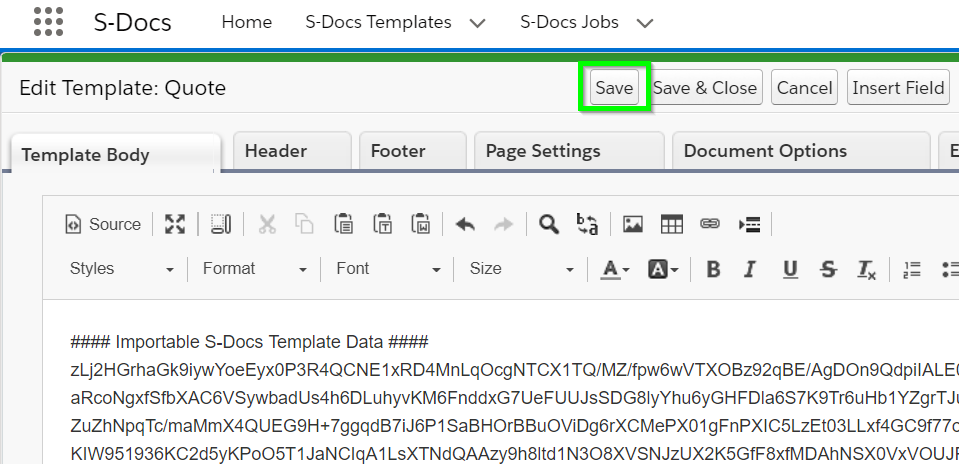
6) Once you have pasted your recently downloaded template source into the S-Docs template editor, click Save and S-Docs will decode the data and populate your template fields.


That's it! Your template has been successfully imported into S-Docs. When you click Save, you will be redirected to the S-Docs Template record detail page. All of the original fields will be overridden, and the description will say "Template successfully imported! You may now generate documents with this template or edit it in the template editor." Let's click the Template Editor button to see how our imported template turned out.


Beautiful, isn't it?

S-Sign Quick Install & Config Guide – Salesforce Lightning

By Documentation, S-Sign No Comments

Introduction

Welcome to S-Sign, a 100% native e-signature solution for Salesforce. This guide details the steps you need to take to install and configure S-Sign in your org so that you can get started with secure e-signatures. S-Sign leverages Salesforce Sites and the secure Connected App feature, which you'll learn how to set up in this guide.

To view this same guide for Salesforce Classic, click here.

Note: This article makes several references to your S-Sign Internal User. Your S-Sign Internal User is any licensed Salesforce user of your choosing. S-Sign operations that require internal data access will be conducted through this user's profile using the secure S-Docs Connected App. We recommend choosing a Salesforce Administrator.

Tutorial Video

Watch the following tutorial video or follow the instructions below to install and configure S-Sign in your org.

Install S-Sign

Unlike S-Docs, S-Sign is not available on the AppExchange. Contact S-Docs Sales to obtain an installation link for the latest version of S-Sign. Make sure to select "Install for All Users." We recommend testing in a sandbox environment before installing in your production org.

You may need to update S-Docs if you're running an older version.

Pro Tip

Try to keep as few tabs open as possible during this configuration process. This will help prevent settings confirmed in one tab from being negated by another open tab.

Head over to Installed Packages by typing "installed" into the Quick Find / Search bar in Setup to ensure that S-Sign has downloaded correctly and that your version numbers are up to date.
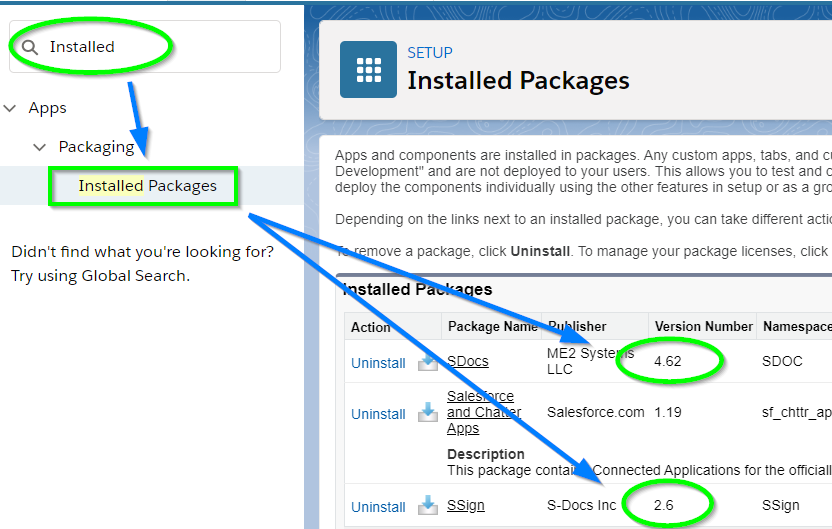
We recommend assigning the S-Sign User or Administrator permission sets to yourself and users who will be interacting with S-Sign. Learn more about S-Sign permission sets here.

Note: If you are using S-Sign version 2.1 or above, your org needs to have the Quote object enabled for S-Sign to work properly. To view instructions on how to enable Quotes for your org, click here.

Configuring S-Sign

Config Step 1: Create Remote Site Settings

S-Sign uses SendGrid, an email service, to send out verification emails to signers in order to confirm the signer's identity. This bypasses any email limitations you may run into in your Salesforce org, ensuring that your e-signature requests will always send. To allow S-Sign to tell SendGrid when to send out a verification email, you must create a Remote Site Setting within Salesforce that whitelists SendGrid's API domain (i.e. allows S-Sign to communicate with SendGrid).

To do this, simply click the Setup cog in the upper right hand corner, type "Remote" in the Quick Find / Search bar, and click Remote Site Settings from the options that drop down. Then, click New Remote Site.
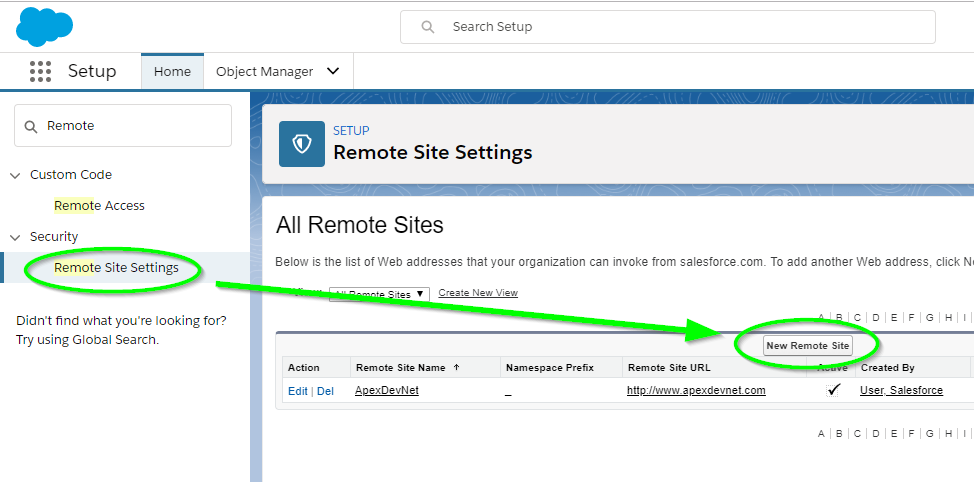
Fill in the following fields for your new remote site:

Remote Site Name: SSign_Email_Verification_Site
URL: https://api.sendgrid.com

Ensure that the Active checkbox is checked. You can leave everything else as it is.
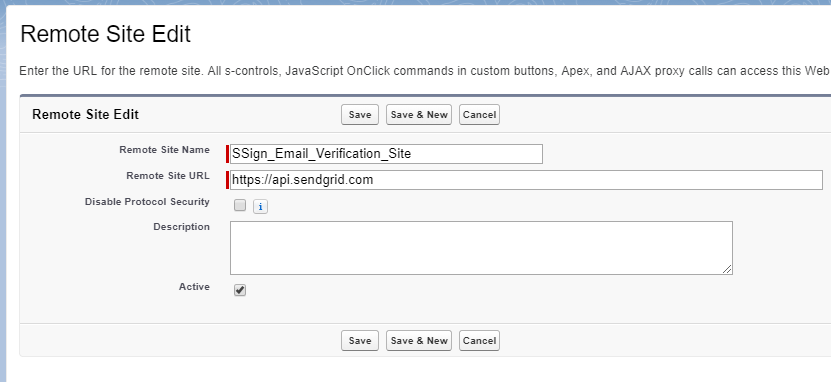
Next, create a new remote site for the Salesforce login URL if you don't have one already set up.

For Production Org:
Remote Site Name: Salesforce_Production

Remote Site URL: https://login.salesforce.com

For Sandbox Org:
Remote Site Name: Salesforce_Sandbox

Remote Site URL: https://test.salesforce.com

Finally, create a third remote site for your Salesforce domain.

Remote Site Name: Enter anything you'd like
Remote Site URL: Enter your Salesforce domain.

Note: You can copy your domain by clicking your user profile in the upper right corner, and copying it from under your username. Note that you need to add "https://" at the beginning.

If you are using S-Sign with communities, you should create a remote site for your custom domain as well.

Config Step 2: Create a Site to Capture External Users' Signatures

Like S-Docs, S-Sign is native to the Salesforce platform. This means that all signers must sign within Salesforce, even if they do not have a Salesforce account. To accomplish this, we'll set up a Site in our org that will display your document(s) and allow users to sign them.

Start by again clicking the Setup cog, then type Sites into the Quick Find search bar and [1] click Sites from the options that drop down. [2] Register a Force.com Domain from this page if you don't have one already. Then, [3] click the New button on the "Sites" list to create a new Site.
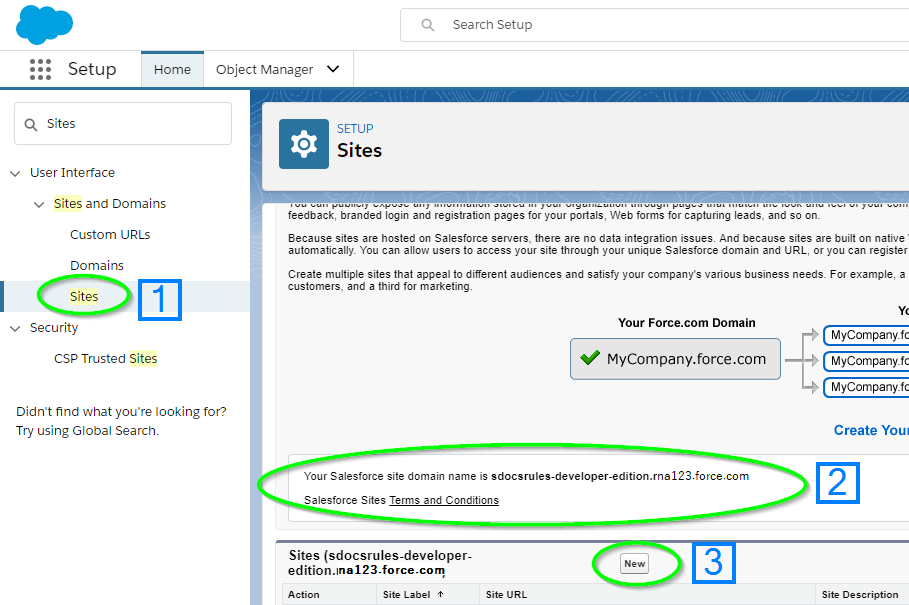
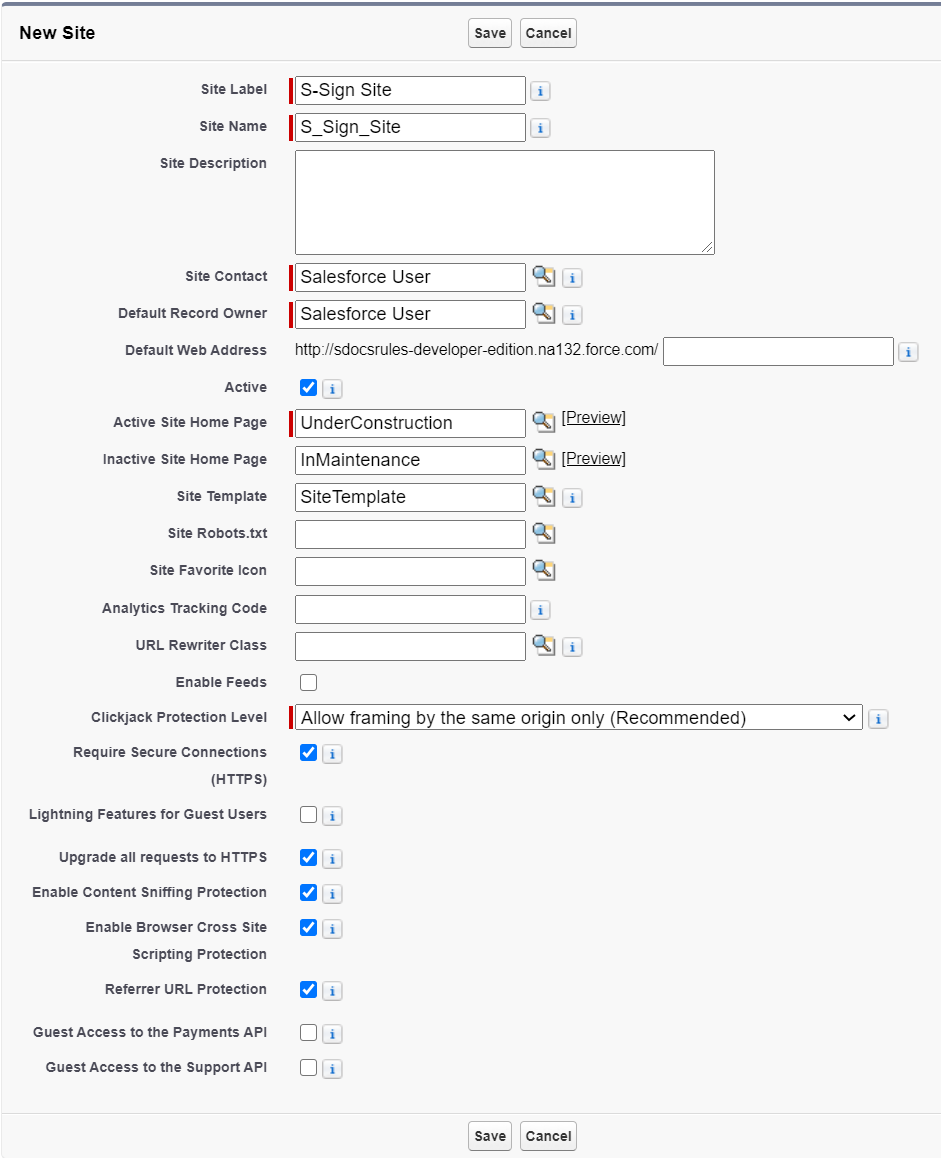
Fill in the following fields for your Site:

  • Site Label: S-Sign Site
  • Site Name: S_Sign_Site
  • Site Contact: This is the user responsible for receiving site-related communications from the site visitors and Salesforce.com. By default, it is set to the user creating the Site.
  • Default Web Address: You can append something to the end of your domain, but it is not necessary.
  • Active: Make sure this is checked so that the site is active.
  • Active Site Homepage: You can choose anything you want for this, but we recommend setting it to "Under Construction." This won't be visible to anyone.

Finally, ensure that you uncheck the Lightning Features for Guest Users checkbox. This is to conform to S-Sign's security standards.

You can choose whatever you'd like for the rest of the fields or leave them at the default settings.

Click Save.
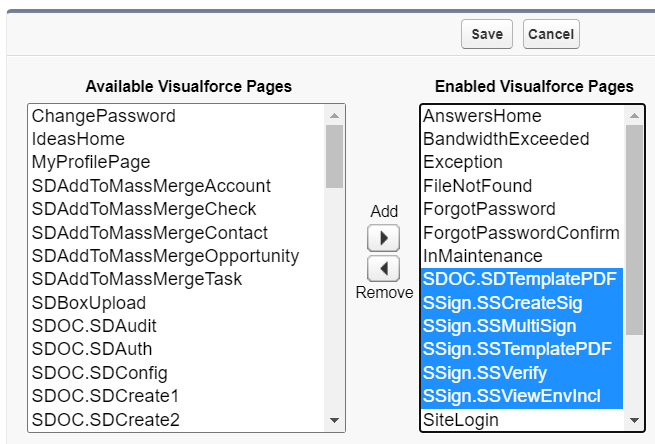
Once you click Save, you should be redirected to the Site Detail Page. The only thing left to do for this step is to add a few Visualforce pages to our site. Scroll down to the "Site Visualforce Pages" list on the Site Detail Page and click Edit.

Add the pages SDOC.SDTemplateHTML, SSign.SSMultiSign, SSign.SSCreateSig, SSign.SSTemplatePDF, SSign.SSVerify, and SSign.SSViewEnvIncl. Then, click Save. You've now completed this step!

Create Sharing Rules

Note: If you are using S-Sign version 2.178+, please skip this step and move on to Step 3.

If you are using S-Sign version 2.110-2.177, you need to create a Sharing Rule on the S-Sign Envelope and SDoc Template objects. First, navigate to Setup > Sharing Settings, and choose your object. You will need to repeat this step for both objects.
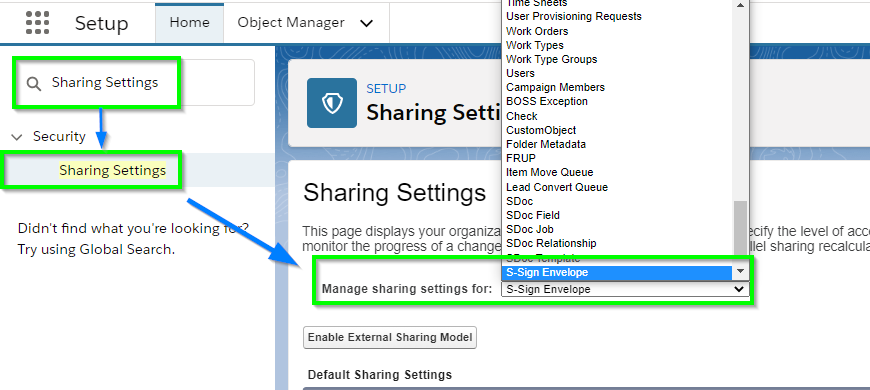
Click New to create a new sharing rule.

Enter the following settings:
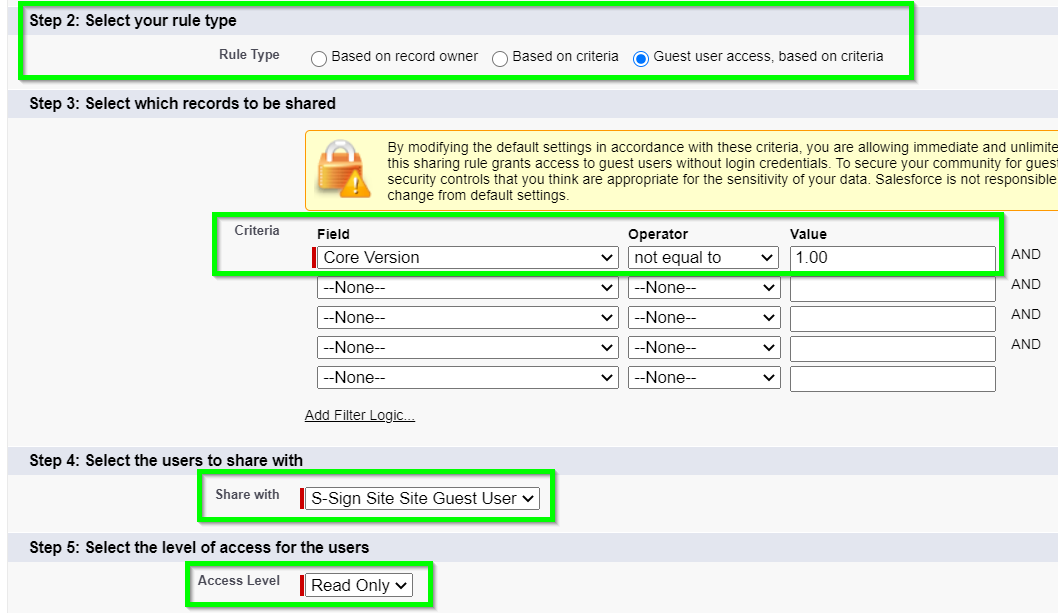
Rule Type: Guest user access, based on criteria
Field: Core Version
Operator: not equal to
Value: 1.00
Share With: S-Sign Site Guest User
Access Level: Read Only

Config Step 3: Create a Lookup Field to your Object on the S-Sign Envelope Object

You need to create a lookup field for any objects you’ll be using with S-Sign (Note: you can skip this step if your object is Opportunity or Contact, as a lookup field for these objects comes built into the package - if you are using version 2.1 and above, Contract, Quote, and Account will also have a lookup field pre-configured).

Navigate to the Object Manager in the Setup menu and click the S-Sign Envelope object (not S-Sign Envelope Documents).
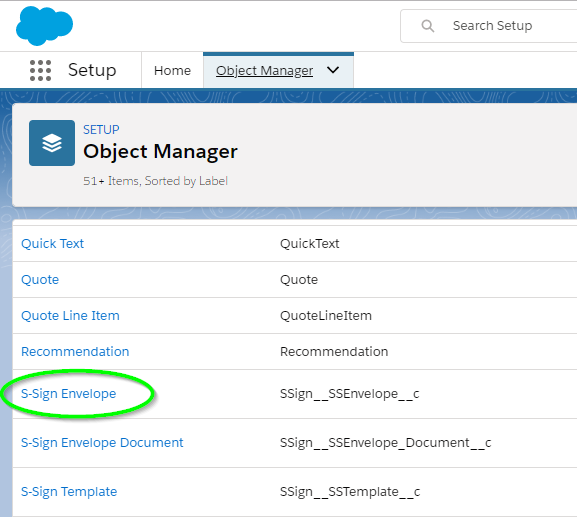
Click the Fields & Relationships tab and click New.

Step 1 of 6: Choose Lookup Relationship for the field type. Click Next.
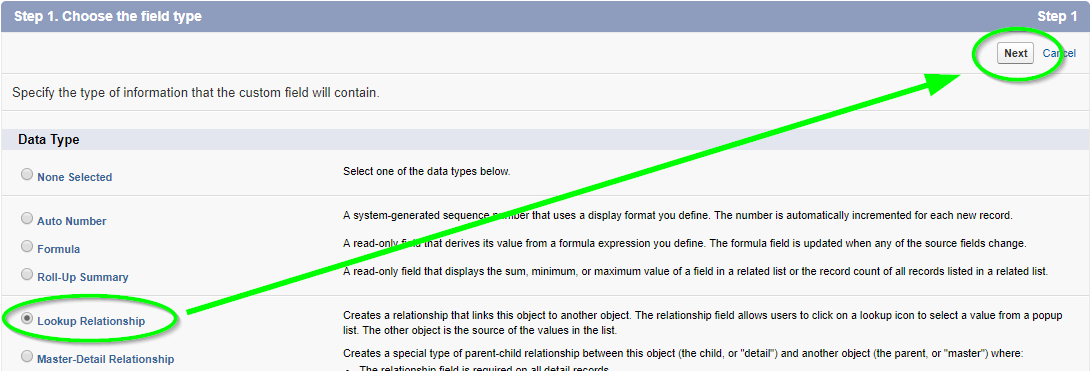
Step 2 of 6: Select the object for which you are creating the lookup relationship (the object you want to use S-Sign with). Click Next.

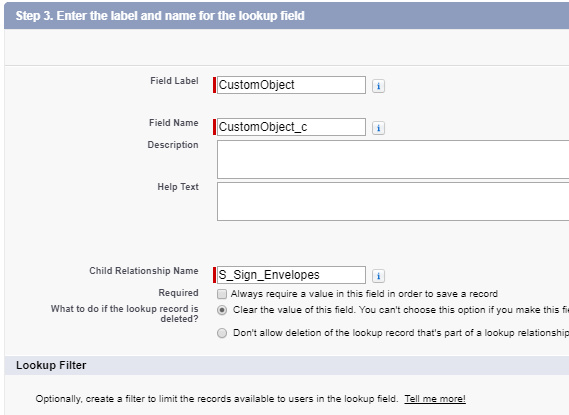
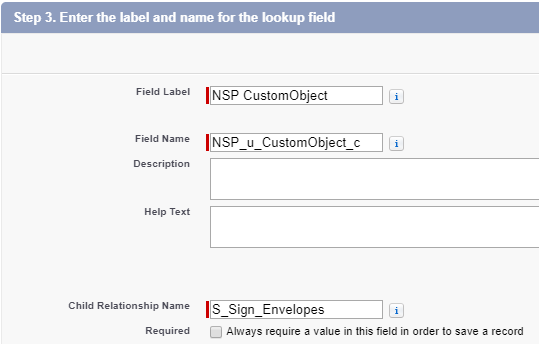
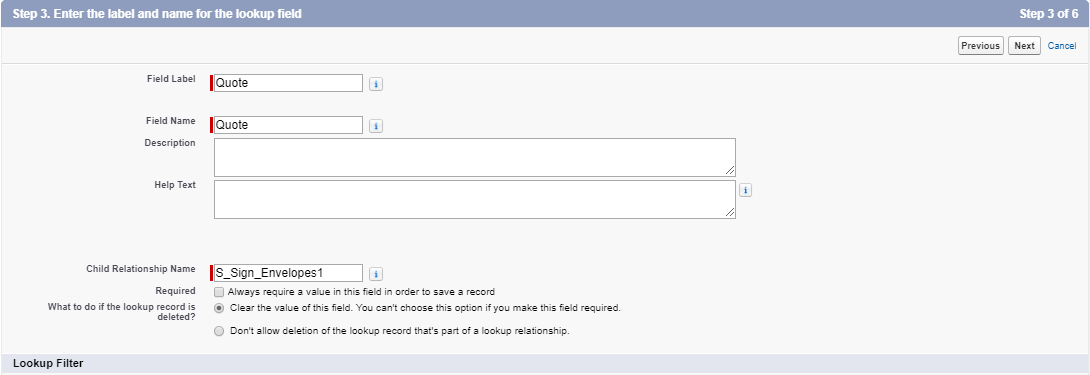
Step 3 of 6: This step is where you’ll add the field label and name. Default values can be kept for the rest of the fields.

  • For custom objects, the field label will just be the name of your custom object. The field name should be the API name of your custom object with only a single underscore and a 'c' at the end, instead of the usual "__c." For example: if your custom object was named CustomObject and the API name was CustomObject__c, then your field label would just be CustomObject, and your field name would be CustomObject_c.
  • If your custom object is part of a managed package, it will have a namespace at the beginning. Say the object's API name is NSP__CustomObject__c. For the field name, you would replace the two underscores after the namespace with _u_ and remove one of the underscores from __c, so the resulting API name would be NSP_u_CustomObject_c.
  • For standard objects, just enter the name of your standard object (ex. the Quote object would have the field name and field label 'Quote').
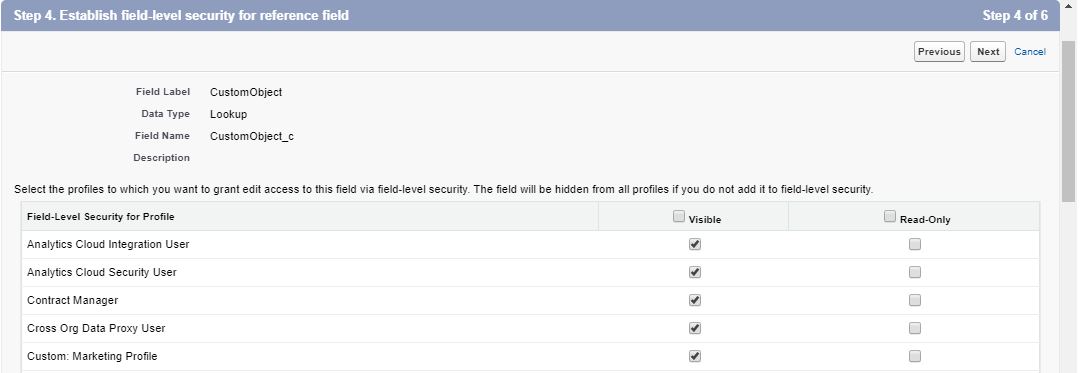
Step 4 of 6: Select your own field-level security settings. Click Next.
Step 5 of 6: Keep the default values.

Step 6 of 6: Add the S-Sign Envelopes related list to the appropriate page layouts. Click Save, and when you go to your object’s page, you’ll see the S-Sign Envelopes related list.

Config Step 4: Create an S-Docs Connected App

S-Sign leverages Salesforce's secure Connected App integration. This involves configuring a Salesforce Connected App and specifying an internal user in your org to conduct S-Sign operations through. To set this up, please follow the steps outlined in this article.

Assign The S-Sign Internal User Permission Set

After specifying an S-Sign Internal User during the Connected App configuration in Step 4, you need to assign the S-Sign Internal User Permission Set to said user.

From the Setup menu, type "Permission" into the Quick Find bar, click Permission Sets in the dropdown menu, then click on the S-Sign Site Internal User permission set.
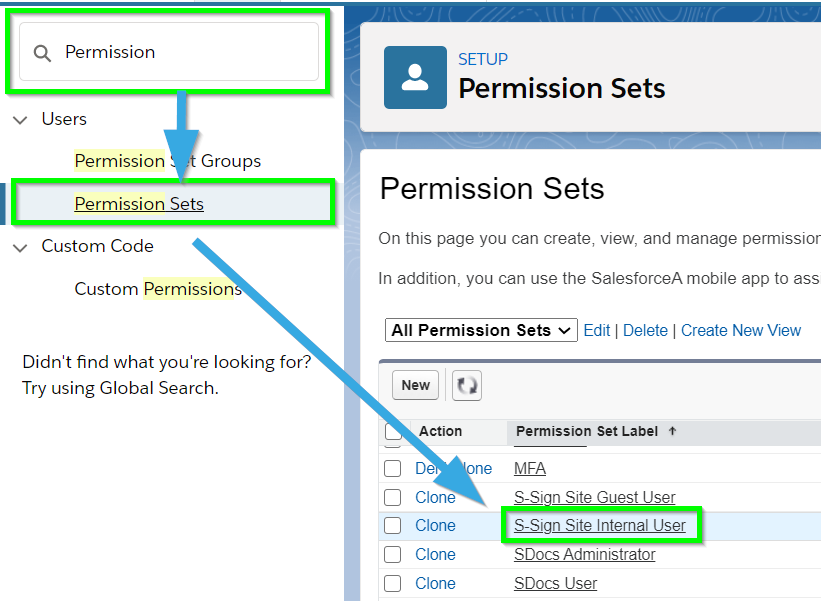
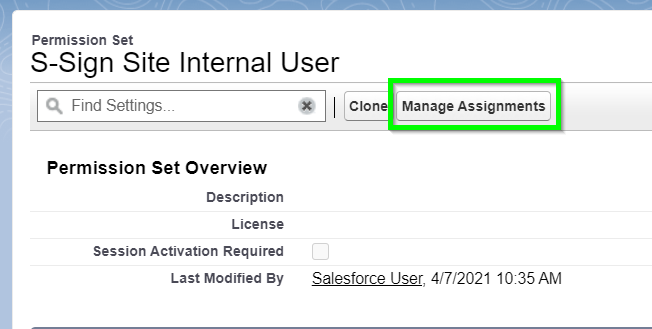
Next, click Manage Assignments.
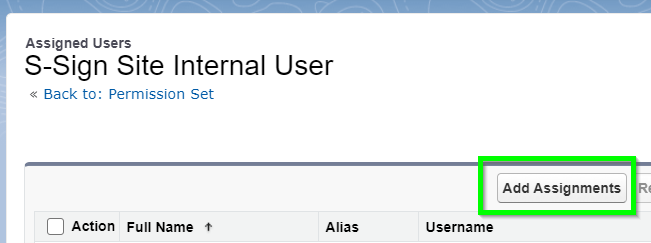
Then, click Add Assignments.
From there, choose the username that you specified as the S-Sign Internal User in Step 4.

Config Step 5: Provide Site Info

The next step is providing S-Sign with your Site's Site label and URL.

Start by navigating to the S-Sign Configuration page. If you are using S-Docs 4.381+, you can get to this page by clicking the App Launcher in the upper left corner, typing "S-Docs Setup" into the QuickFind bar, then clicking S-Docs Setup in the dropdown menu. From there, find and click on Go To S-Sign Setup Page.

If you are using a version of S-Docs below 4.381, the S-Sign Configuration page can be accessed through one of the following links:

[Production]: https://login.salesforce.com/apex/SSIGN__SSConfig
[Sandbox]: https://test.salesforce.com/apex/SSIGN__SSConfig

  1. The S-Sign Configuration page contains a field for your S-Sign Site URL. Ensure that the URL shown in this field matches the Site URL you created in step 2. To do so, navigate to the Site detail page for your S-Sign site (Setup > Sites > S-Sign Site), copy the site domain from the Custom URLs list, and paste it into the S-Sign Site URL field on the S-Sign Configuration page. Make sure to add https:// at the beginning of the domain.
  2. If your Site detail Custom URLs list includes two S-Sign Site URLs (shown below), use the URL that ends with secure.force.com.

Then, click the Set Site Info & Assign Permissions button. You can also click the Assign License button to assign an S-Docs license to the S-Sign Internal User if one has not already been assigned.
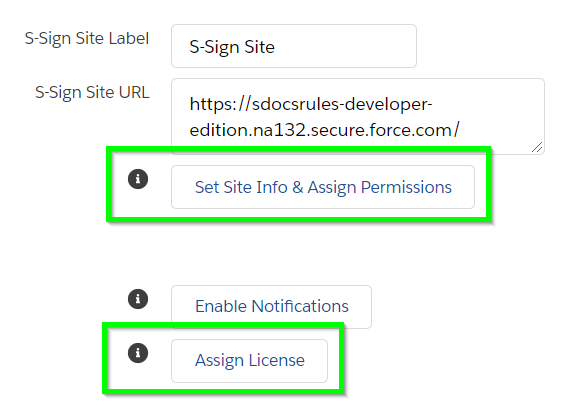
Config Step 6: Enter your License Key and Assign Licenses to Users

Once you've completed steps 1-5, you are ready to enter you license key and assign licenses to users in your org. Click Go To S-Sign License Page at the top of the S-Sign Configuration page.
From there, you can enter your license key.
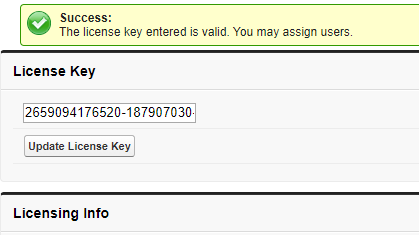
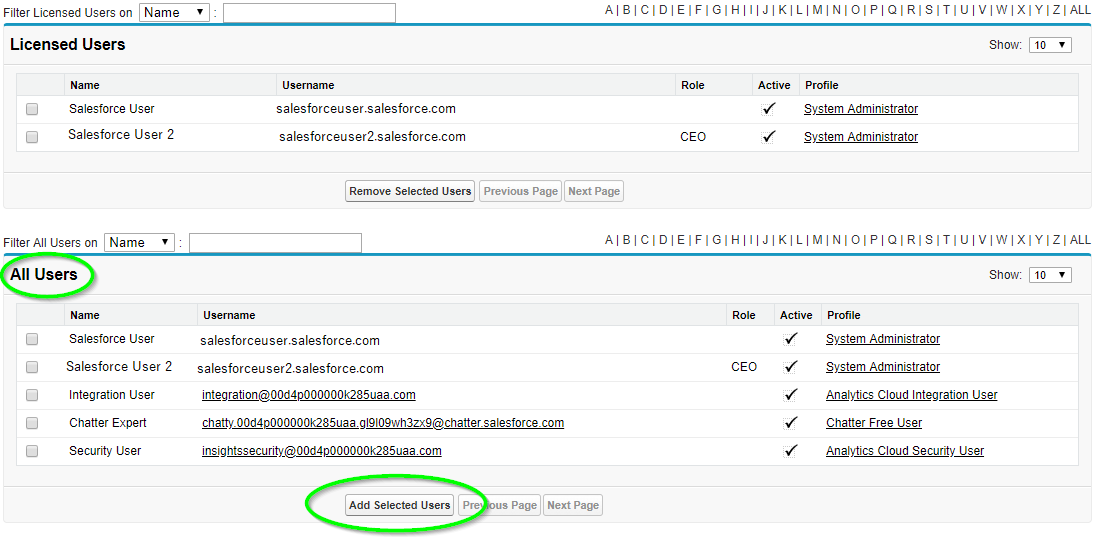
If you are on the trial version, all you need to do is enter the license key, and then all users in your org will be able to use S-Sign. If you are on the paid version, you can now scroll down to assign licenses to individual users by selecting their names and clicking Add Selected Users.
That's it! S-Sign is configured for your org. You are now ready to create S-Sign-enabled S-Docs templates to send for E-Signature.

Use Global Functions To Add Or Remove Licenses

Orgs that need to add or remove a large number of S-Sign licenses can use the addSSignUserLicenses and removeSSignUserLicenses functions. These functions are global and can be called from anywhere, allowing for flexibility if you need to make a bulk update to your S-Sign license assignments. These functions take a List<String> object. Although there are many ways to use them, the following example demonstrates how to add an S-Sign license to all active users:

[code lang="html"]List<String> userIds = new List<String>();
List<User> activeUsers = [SELECT Id FROM User WHERE isActive = true];
for (User activeUser : activeUsers) {
userIds.add(String.valueOf(activeUser.Id));
}
SSIGN.SSLicensesController.addSSignUserLicenses(userIds);[/code]
Formatting Currencies

By Additional Formulas, Documentation, S-Docs Cookbook No Comments

Introduction

This article will teach you how to override the default currency format in your template and choose your own.

Let's say you would like to display “$235,000.00” as the Opportunity amount in your document rather than “235000,” which is the default formatting for the currency field. You can do this in one of two ways. The first option is to use S-Docs formatting, and the second is to use a Salesforce formula field.

Format Currency With S-Docs Syntax

To format currency using S-Docs syntax, you can simply add the correct formatting directly within your merge fields (add a space after the merge field name, followed by the currency format you would like):

[code lang="html"]${{!Contract.Total_Amount__c #,###}}[/code]

You can add this formatting yourself, or use the Insert Field button within the template editor to do so; currency options will appear for currency fields.

If the number/currency field is located in a related list column, you would need to edit the template source. Click the Source button and then locate the number/currency field within your template. You then need to replace the syntax to match the following:

[code lang="html"]<column format-number="#,###">quantity</column>
<column format-number="#,###.##" prefix="$">unitprice</column>
<column format-number="#.###,##" postfix="€">euro_price__c</column>[/code]

The example above shows the three supported formatting options. For others, you can use a formula field described below.

Format Currency With Salesforce Formula Fields

By adding the following formula field to your object, you leverage built-in Salesforce functionality. You would need to substitute your field name into the formula below (in place of “Amount”), and then drop the formula field into your S-Docs template. You do not need to add any of these fields to any page layout. You can add the dollar sign ($) to either the start of the formula or within the template design document proceeding your field.

[code lang="html"]IF(
Amount >= 1000000,
TEXT(FLOOR(Amount / 1000000)) & ",",
"") &
IF(
Amount >= 1000,
RIGHT(TEXT(FLOOR(Amount / 1000)), 3) & ",",
"") &
RIGHT(TEXT(FLOOR(Amount)), 3) & "." &
IF(<
MOD(Amount , 1) * 100 < 10,
"0" & TEXT(ROUND(MOD(Amount , 1), 2) * 100),
TEXT(MIN(ROUND(MOD(Amount , 1), 2) * 100, 99))
)[/code]

Note: This solution formats only the given value; it does not consider currency exchange rates. In such cases, you could use a combination of formulas: one to convert the currency based on the exchange rate, and another to format it correctly for your document.

Formatting Dates

By Additional Formulas, Documentation, S-Docs Cookbook No Comments

If you want to create a dated letter with the text “September 1, 2020” rather than the Salesforce formatted date-time, you can do so using S-Docs formatting syntax or using a Salesforce formula field. We recommend the first option where possible because it doesn’t require any Salesforce configuration changes.

Formatting Dates With S-Docs Syntax

Formatting dates with S-Docs syntax is easy; any Salesforce date and datetime field can be configured into any valid java pattern. Simply add a space in your date or datetime merge field, followed by the format you want:

[code lang="html"]{{!Quote.createdDate MM/dd/yyyy}}[/code]

You can also include time and timezone. For example:

[code lang="html"]{{!Quote.datetime__c MM/dd/yyyy hh:mm:ss TZ:America/New_York}}[/code]

Note: Make sure to use java time codes when using timezones.

If the date field is located in a related list column, use the following (you would need to edit the template source). Click the Source button and then locate the date column within your template.

[code lang="html"]<column format-date="MM/dd/yyyy">createddate</column>[/code]

The format-date syntax can accept a wide range of values. You can add minutes, timezones, etc. Pay attention to caps, as mm is minutes, whereas MM is month.

Use this reference to view all date formatting options:  https://docs.oracle.com/javase/7/docs/api/java/text/SimpleDateFormat.html

Formatting Dates With Salesforce Formula Fields

If S-Docs syntax options do not meet your requirements, you can format dates by leveraging Salesforce formula fields. By adding the following formula field to your object, you can leverage Salesforce functionality. You would need to substitute your field name. You do not need to add these fields to any page layout. If you are working with a Date Field (not a DateTime field), see the next example for slight modifications needed.

[code lang="html"]CASE( MONTH( DATEVALUE(LastModifiedDate) ), 1, "January", 2, "February", 3, "March", 4, "April", 5, "May", 6, "June", 7, "July", 8,
"August", 9, "September", 10, "October", 11, "November", 12, "December", "-" )
+ ' ' + TEXT(DAY( DATEVALUE(LastModifiedDate))) + ', ' + TEXT(YEAR( DATEVALUE(LastModifiedDate)))[/code]


Displaying checkboxes

By Documentation, S-Docs Cookbook, Using Images No Comments

If you want to create a document that contains checkbox images rather than “True” or “False” values, you can do so in two different ways.

Display Checkboxes With The Checkbox Merge Field Attribute

The easiest way is to add the checkbox merge field attribute to any boolean field that you want to display as a checked or unchecked checkbox.

Example Merge Field:

[code lang="html"]{{!Opportunity.Checkbox__c}}[/code]

Standard Checkboxes:

Display a standard checkbox (dotted white border with black check) that is checked if the boolean field is true, and unchecked if it is false:

[code lang="html"]{{!Opportunity.Checkbox__c checkbox="true"}}[/code]

Display a standard checkbox (dotted white border with black check) that is unchecked if the boolean field is true, and checked if it is false:

[code lang="html"]{{!Opportunity.Checkbox__c reverse_checkbox="true"}}[/code]

Black Checkboxes:

Display a black checkbox (solid black border that fills in black with a white checkbox) that is checked if the boolean field is true, and unchecked if it is false:

[code lang="html"]{{!Opportunity.Checkbox__c checkbox="black"}}[/code]

Display a black checkbox (solid black border that fills in black with a white checkbox) that is unchecked if the boolean field is true, and checked if it is false:

[code lang="html"]{{!Opportunity.Checkbox__c reverse_checkbox="black"}}[/code]

Radio Buttons

Display a radio button that is checked if the boolean field is true, and unchecked if it is false:

[code lang="html"]{{!Opportunity.Checkbox__c checkbox="radio"}}[/code]

Display a radio button that is unchecked if the boolean field is true, and checked if it is false:

[code lang="html"]{{!Opportunity.Checkbox__c reverse_checkbox="radio"}}[/code]

Learn more about merge field attributes here.

Display Checkboxes With CSS

Checkboxes can also be displayed using CSS styling similar to the following example:

[code lang="html"]<style type="text/css">.checkbox {
border: 1px solid black;
padding-left: 2px;
padding-bottom: 2px;
height: 9px;
width: 9px;
}
</style>
CHECKBOX
<div class="checkbox"> </div>[/code]

Display Checkboxes With Formula Fields

You can also display checkboxes by leveraging a formula field.

By adding the following formula field to your object, you can easily leverage it to place checkbox images into your S-Docs. (You do not need to add the field to the page layout.)

Note: Your formula field should have a Formula Return Type of Text and should be referenced as rich-text when merging into a template. The field used in the example, IsAccount__c, should be a checkbox field on your object that is checked by default.

[code lang="html"]IMAGE(
IF(IsAccount__c, '/img/checkbox_checked.gif', '/img/checkbox_unchecked.gif'),
'CheckBox'
)[/code]

Top