All Posts By

Admin

Translate The S-Docs UI

By Documentation, General Solutions, S-Docs Cookbook No Comments

Defining Your Own Translations

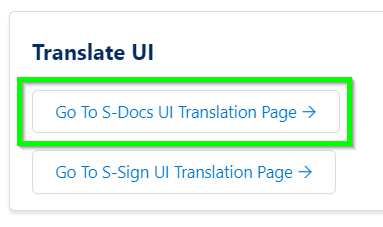
Translating the user experience of S-Docs is simple. Currently, only Spanish and German translations are available to download; this process is explained in the next section. If you want to define your own translations, you can do so on the S-Docs translation page. If you are using S-Docs 4.381+, navigate to this page by clicking the App Launcher, typing in "S-Docs Setup," and clicking S-Docs Setup in the dropdown menu. From there, scroll down to the Translate UI section and click Go To S-Docs UI Translation Page.

If you are using a version of S-Docs below 4.381, the S-Docs Translation page can be accessed by adding the following URL after "salesforce.com" in your browser:

[code lang="html"]/apex/SDOC__SDConfig?translateSDocs=true[/code]

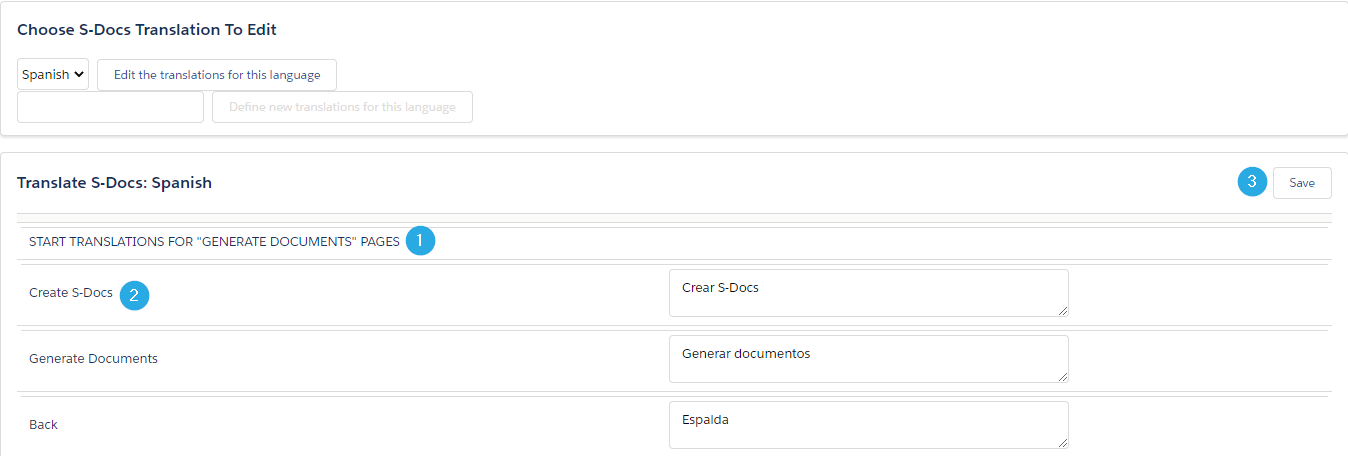
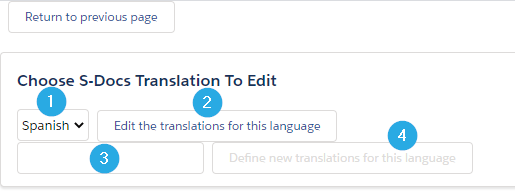
The S-Docs translation page appears as follows:

If you've defined translations for a language on this page before, you'll be able to [1] choose a language and [2] edit the translations for that language. If you haven't accessed this page before, you'll need to [3] enter the name of a language and then [4] click Define new translations for this language to bring up a list of available S-Docs fields that you can translate.

Translation options are [1] broken up into different sections. The following S-Docs pages can be translated on this page:

  • The Generate Documents page (where templates are selected and generated)
  • The Edit Document page (where generated documents can be edited using the Live Edit feature)
  • The Send Email page
  • The Contact Lookup window (this appears when users click inside of the Contact/User Lookup field on the Send Email page)
  • The Attach Files window (this appears when users click Attach or Remove Files on the Send Email page)
  • The Upload Files tab within the Attach Files window

[2] The English version of each field that can be translated appears on the left. You can translate the text in the text box on the right. Make sure to [3] click Save when you are done entering your translations.

Using S-Docs Translation Templates

1. Import The Template

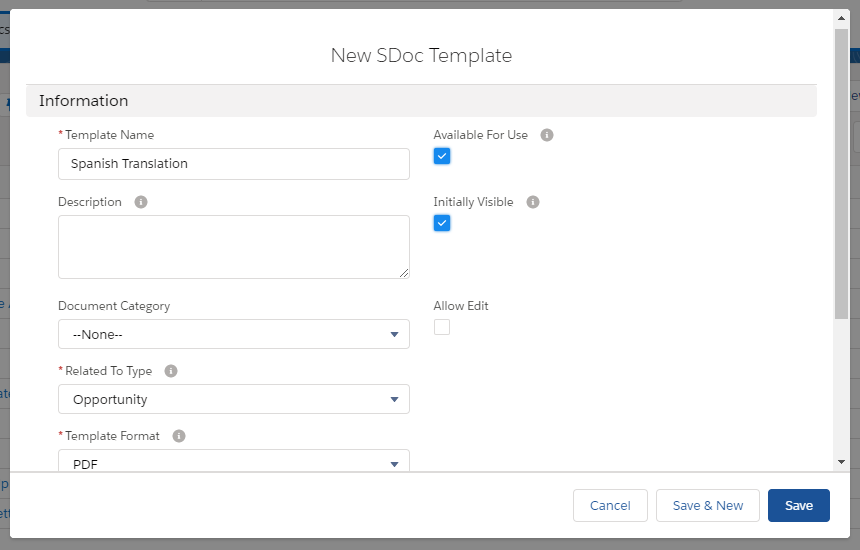
To use the translations we provide, begin by importing either the Spanish or German translation template. To do this, create a new template. You can set whatever values you want for "Related to Type" and "Template Format," as these will be overwritten when you import the translation template.

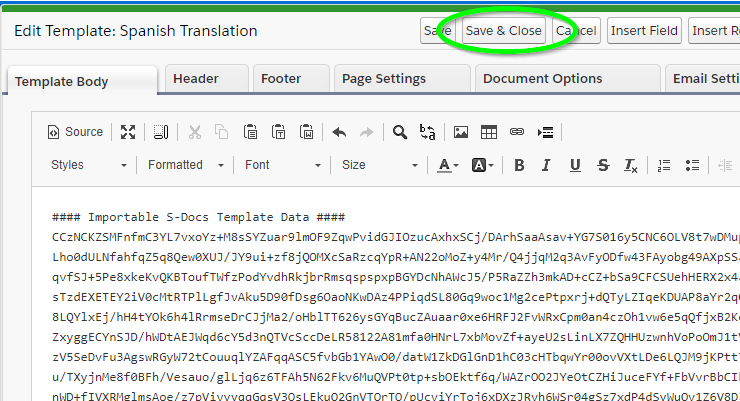
Navigate to the template editor and paste in the code from one of the links below, then click Save & Close.

Spanish: S-Docs Translation Spanish v2.955
German: S-Docs Translation German v2.955

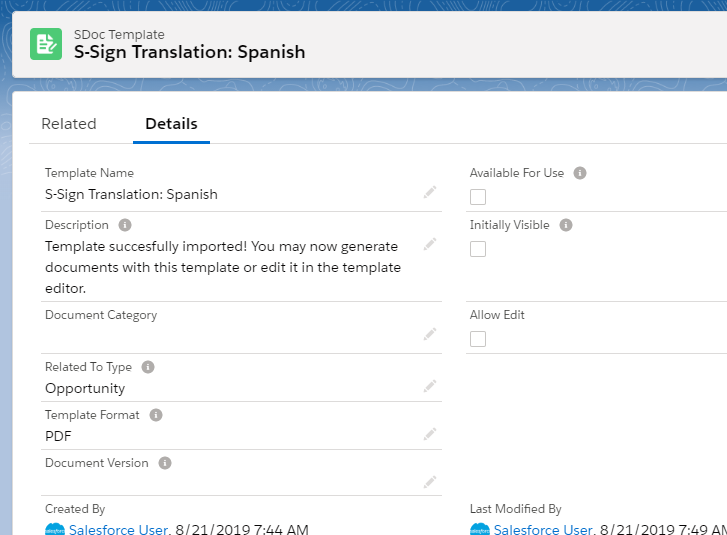
Once you click Save & Close, the template record should look like this.

Notice that Available for Use and Initially Visible have been unchecked, since this isn't a template that can be used for document generation; it's simply providing the translation for the S-Docs user experience.

2. Add The Translation Parameter To Your S-Docs Button

Note: The S-Docs button comes prepackaged for the following standard objects: Contract, Opportunity, Account, Contact, Lead, Task, and Event. Because of this, the button will be managed and therefore unable to be edited for these objects. You will need to create a new S-Docs button (and replace the old button on the object's page layout) to make edits.

Next, you need to add the following parameter to the S-Docs button for each object you're using S-Docs with (replace Spanish for German if using the German translation):

[code lang="html"]UILanguage='Spanish'[/code]

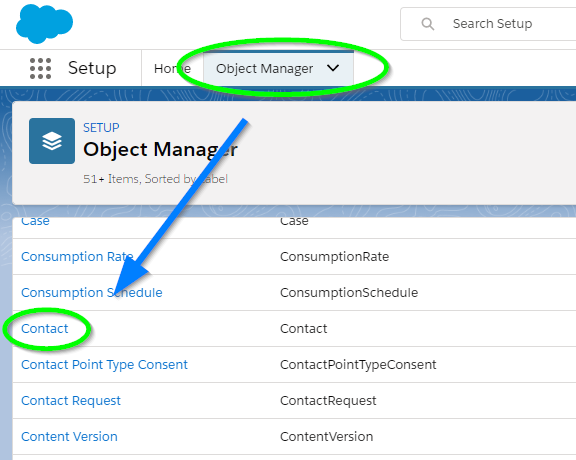
In this example, we'll add it to the S-Docs button for the Contact object. Navigate to Setup by clicking the cog in the upper right corner of your screen, then go to the Object Manager tab. Click your object.

Then, navigate to the Buttons, Links, and Actions tab. Find your S-Docs button and click Edit.

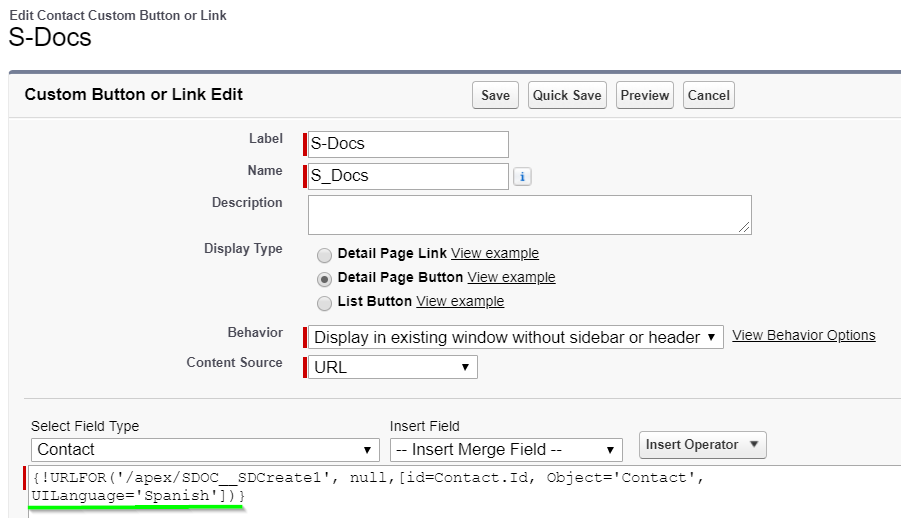
Add the parameter to your button.

[code lang="html"]{!URLFOR('/apex/SDOC__SDCreate1', null,[id=Contact.Id, Object='Contact',
UILanguage='Spanish'])}[/code]


Click Save and you're all set! The S-Docs user experience will now be translated.

S-Docs Quick Install & Configuration Guide

By Documentation, S-Docs Install Config and Upgrade No Comments

Step 1: Install S-Docs

This quick installation & basic configuration guide will teach you how to install S-Docs and create & email a custom document in Salesforce Classic. To view this article for Salesforce Lightning Experience, click here.

Note: You should download and install the S-Docs package into a SANDBOX or DEVELOPER organization. We strongly advise against installing it into any production org without proper testing.

You can watch the video above or follow the instructions below to install S-Docs.

1. Navigate to our Salesforce AppExchange listing and click Get it Now.

2. You will be prompted to log into your Salesforce org.

3. Once you are logged in, you'll be given the option to install S-Docs in your production org or a sandbox instance. We highly recommend testing in a sandbox instance before installing in your production org.

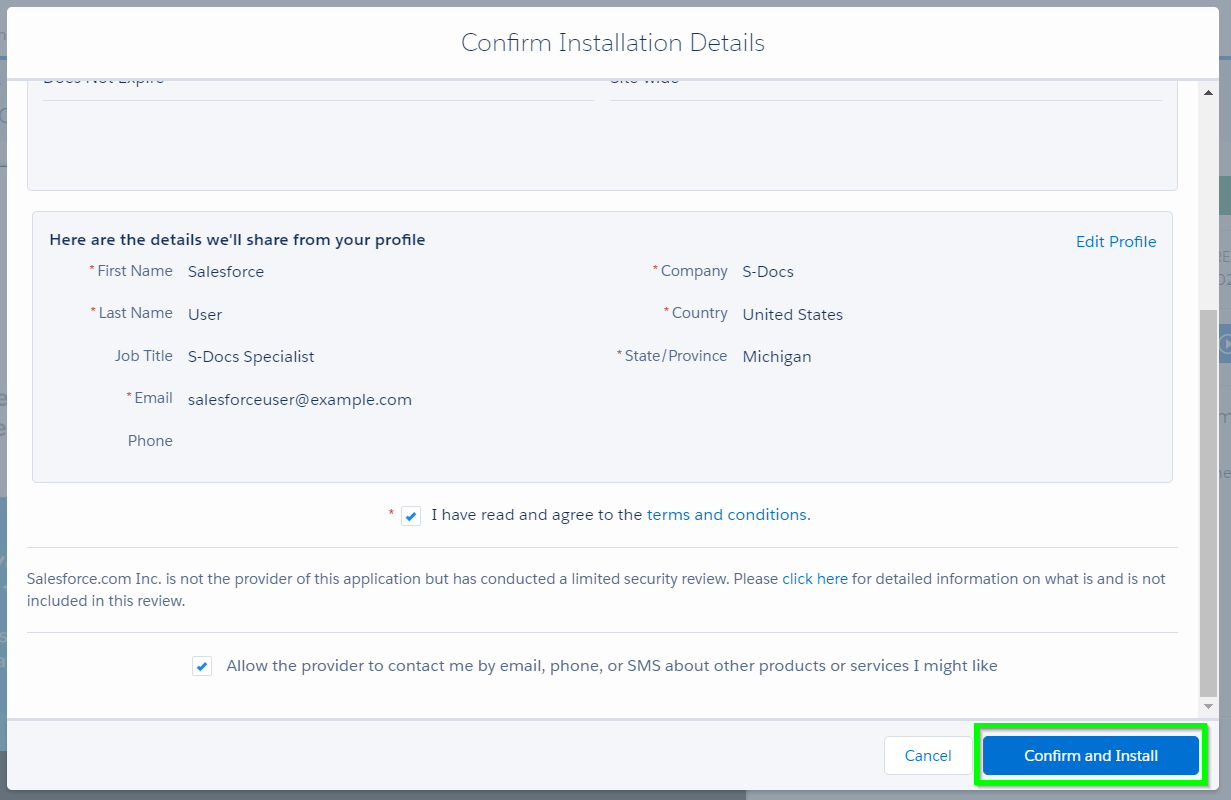
4. Confirm your profile details, agree to the terms and conditions, and click Confirm and Install.
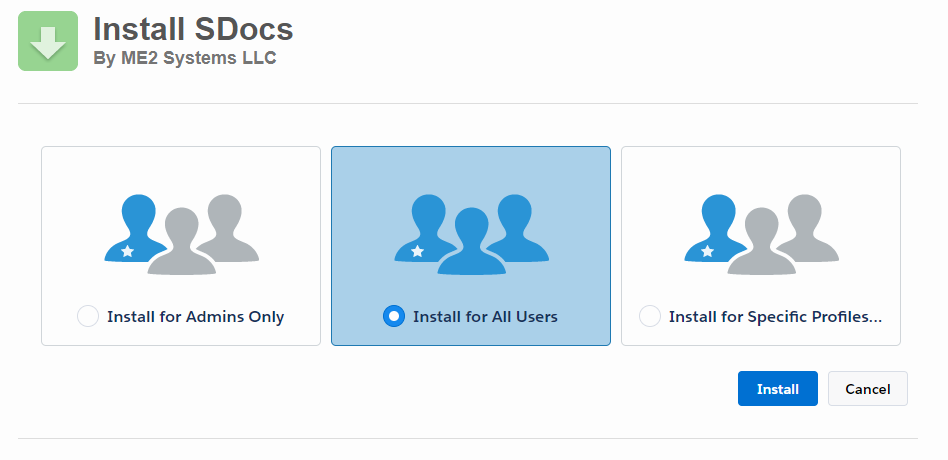
5. You'll then see the following screen. Make sure to select Install for All Users and then click Install.
Congratulations! S-Docs is now installed in your org.

We recommend assigning the S-Docs User or Administrator permission sets to yourself and users who will be interacting with S-Docs. Learn more about S-Docs permission sets here.

Step 2: Create the S-Docs Button and Add it to Your Object’s Page Layout

This section details setting up your S-Docs button for a standard object in Salesforce Classic. This button will initiate the template selection and document generation processes. Although the setups are fairly similar, please reference this documentation for information regarding S-Docs in Salesforce Lightning, and please refer to this documentation for information on setting up S-Docs with a custom object.

The S-Docs button comes pre-created for the following standard objects: Contract, Opportunity, Account, Contact, Lead, Task, and Event. If you're setting up S-Docs for these objects, you only need to add the button to your page layout. However, if you plan to customize the functionality of your button with apex parameters, you should create a new button so that you can edit it in the future. For other standard objects, you will need to create a new custom button.

In this example, we will be creating the S-Docs button for the Opportunity object.

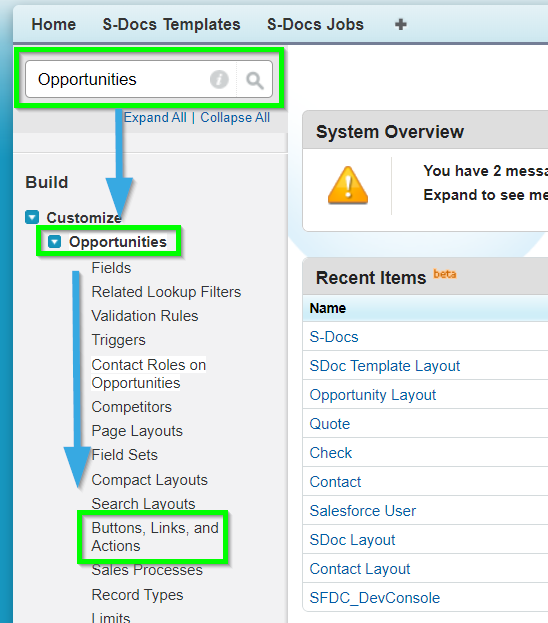
Navigate to Setup > Build > Customize > Opportunities > Buttons, Links, and Actions.
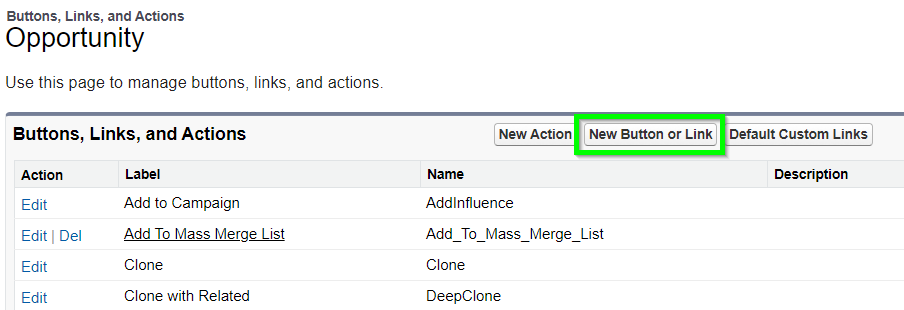
Click New Button or Link to add a new button.
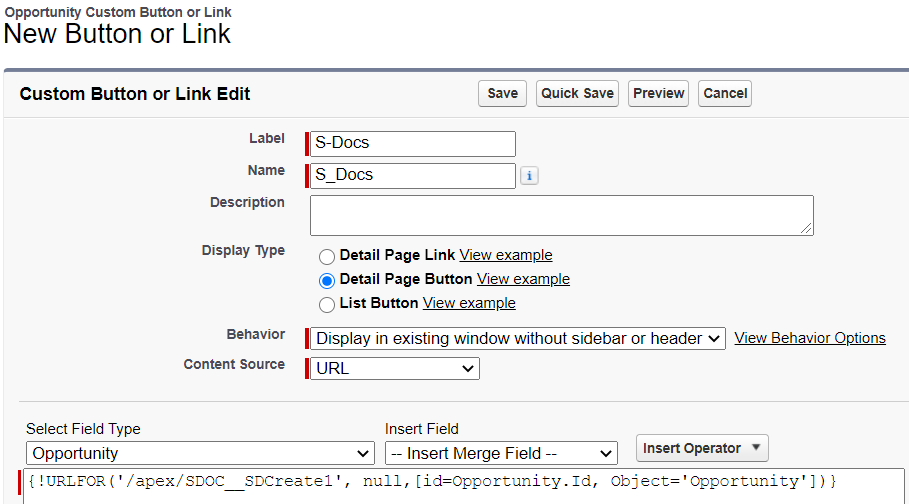
Fill in the following information for your button.

Button Label & Name: Choose a name. We'll name our button "S-Docs."
Description: Optionally enter a description, such as "Create documents for this object."
Display Type: Detail Page Button
Behavior: Display in existing window without sidebar or header
Content Source: URL
Button URL:

{!URLFOR('/apex/SDOC__SDCreate1', null,[id=Opportunity.Id, Object='Opportunity'])}

Note: Be sure to replace both instances of "Opportunity" with the API name of your object in this URL.

To read about how you can customize this button to allow for one or zero click automation, click here.
Add Your S-Docs Button To Your Page Layout

Once you save this button, you'll need to add it to the detail page layout for your object. Navigate to an object record and click Edit Layout.

Click Buttons in the top menu. The S-Docs button that you just created will appear in this menu. Click and drag it into the Custom Buttons area in the Opportunity Detail section. Click Save when done.

Add The S-Docs Related List To Your Page Layout

Additionally, you should add an S-Docs Related List to your page by clicking Related Lists and dragging the S-Docs box down into the Related Lists section.
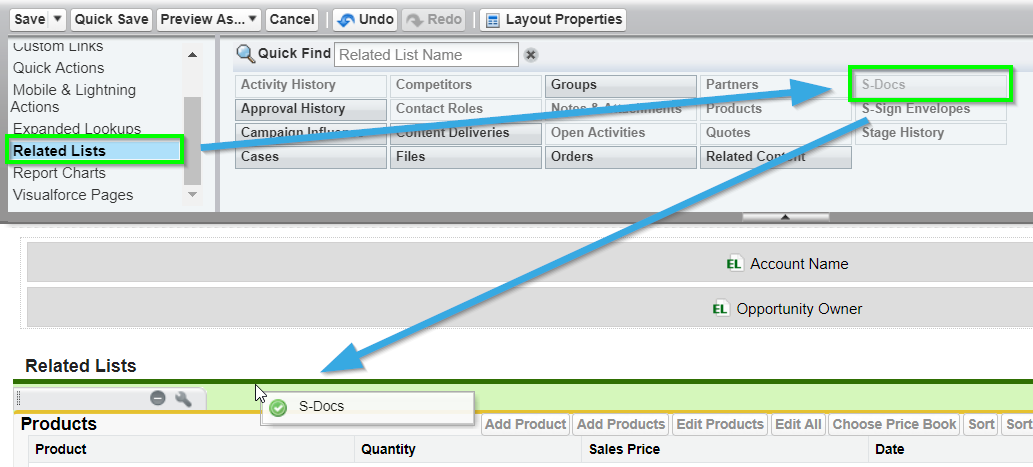
The S-Docs Related List on a given record should display all of the S-Docs ever generated for that record, as well as options to download and email those documents again. In order to display this, we need to add these columns to our Related List. Click the wrench icon on the S-Docs related list.

We recommend adding the following columns: View, Edit, Email, Doc Number, Name, Status, Doc Created On. These will display as columns from left to right on your related list (where top=left and bottom=right). To add a column, click on the column you want to add and then click the triangle button below "Add."

Additionally, we recommend sorting by Doc Created On descending.
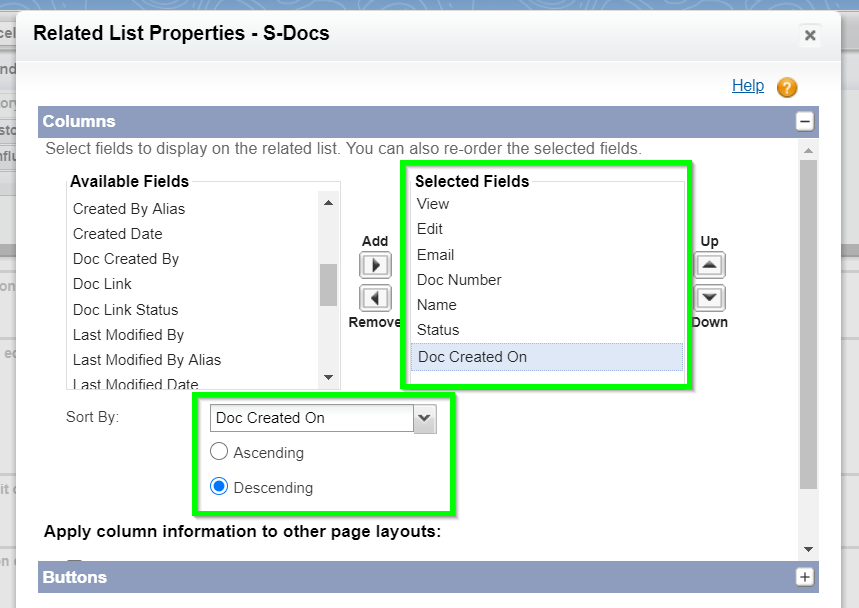
Click OK once you’ve added all of your fields. The related list will appear as follows on a particular record’s page.

Note: Each time you edit an S-Doc template record with Auto Create Salesforce Attachment and link to record unchecked, the documents on the related list will change to reflect those edits. The related list will not store documents generated from previous versions of your templates, but rather generate a new document reflecting the most recent version of your template each time you view or email a document in this list.

Step 3:  Configure Your First Template

In order to start using S-Docs, you need to configure and activate at least one template. Start by navigating to the S-Docs templates page by clicking All Tabs ("+" sign), scrolling down, and clicking S-Docs Templates.

This page is where all of your templates will appear. To create a new template, click New.
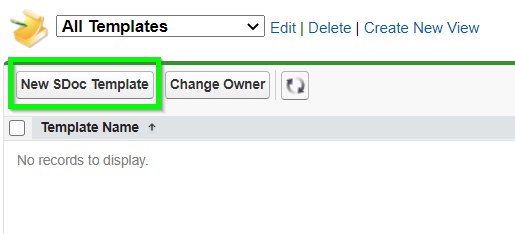
This is the template creation page. In this example, we will create an invoice template for the Opportunity object. Each field is explained below the screenshot.
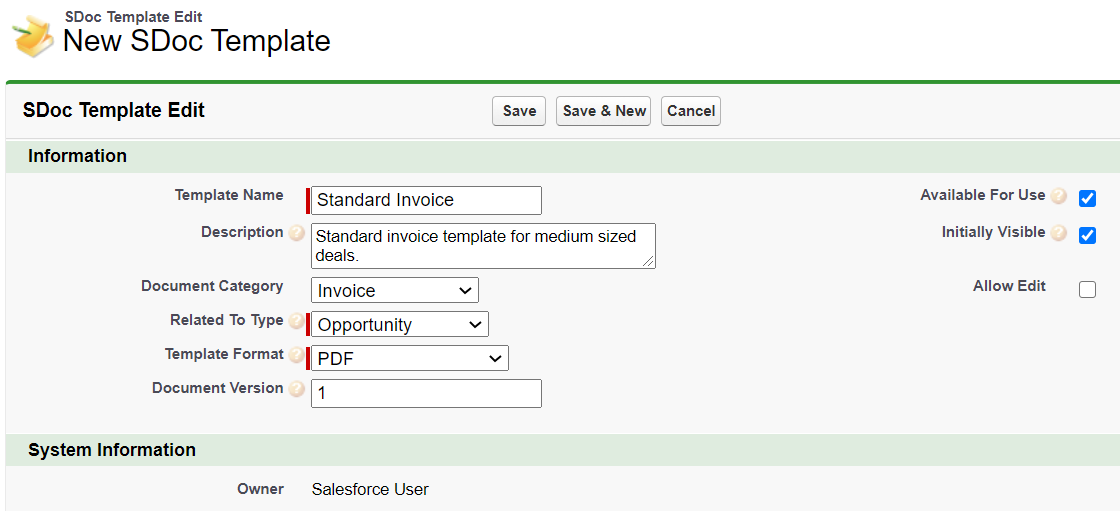
Template Name: Enter a template name. This field is required.
Description: Optionally add a description. You should include any keywords that will be useful when searching for this template, because this field and the name field are searched during the template selection step. End users will see this when they are selecting templates.
Document Category: Optionally chose a category from the picklist. Templates can be grouped together so that a user can browse templates using a category picklist. If needed, you can later customize this picklist.
Related to Type: Pick an object from the picklist. This is the base or primary object this template will use. If needed, you can customize this list with your custom objectsThis field is required.
Template Format: Pick an output format. To support the same document in multiple formats, simply clone the template with a different "Format" field value. This field is required.
Document Version: Optionally use this field to track any internally used version number (or date) for this template. This is only for reference purposes.
Available for Use: Keep this box checked (it is checked by default). This ensures that the template is visible for document creation.
Initially Visible: Keeping this box checked (it is checked by default) will make this template visible on initial load of the document creation page based on the object type. Typically, you want to set this checkbox for the 10 most used templates for each object type.
Allow Edit: If you want users to be able to edit this document after it has been generated, check this box. Learn more about this feature.

Once you've filled in all of the values to your specifications, click Save. The template is now ready to be edited.

Utilize the Template Editor

Once you've filled in all of the values to your specifications, click Save. The template is now ready to be edited. Click the Template Editor button to design your template.
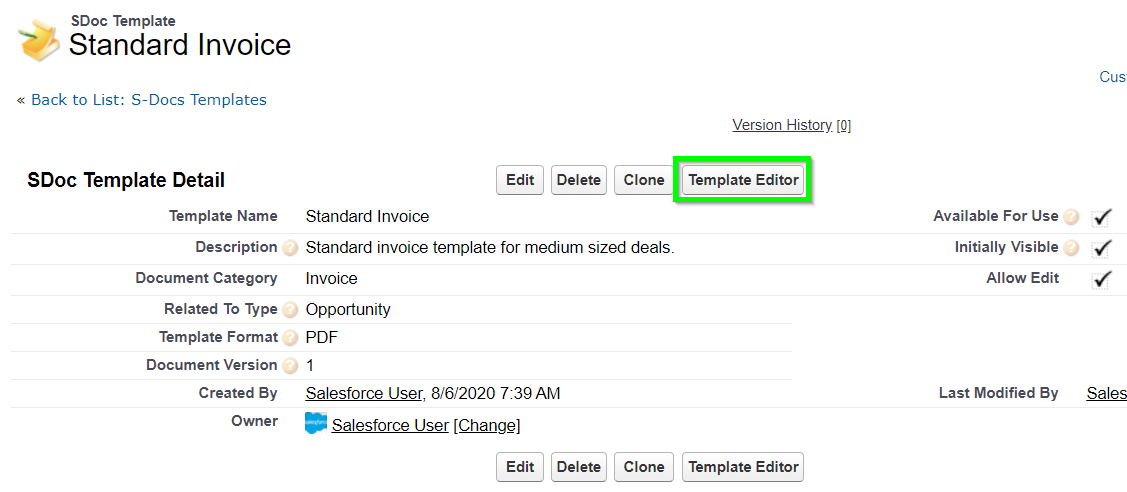
Note: This is a very basic overview of the template editor. For a more in-depth explanation,
click here.

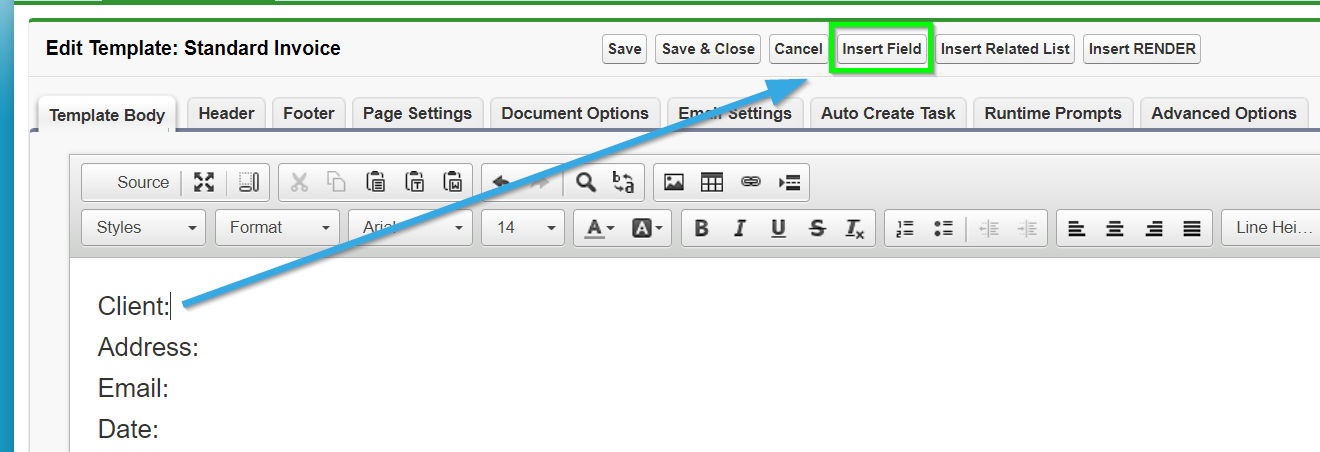
This is the WYSIWYG template editor (What You See Is What You Get). Add some text, place the cursor where you want your Salesforce record data to be merged into the template, and then click on the Insert field button.
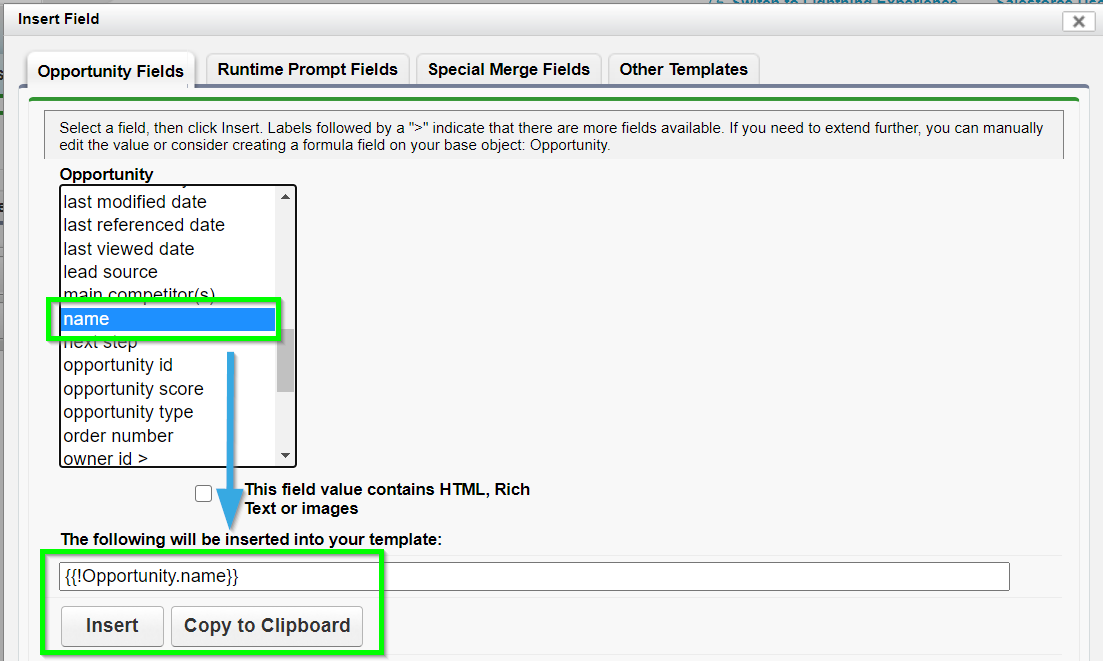
Select the field from the object you want to insert and click Insert.  The editor will add the merge field in the correct syntax into the template editor.
Repeat the above step for other fields.  In addition, you can add related lists and insert conditional logic. You can also use the editor tools to modify the document formatting. Or, click Source to view the HTML and add your own styles; the customization options are endless! Click Save when done.
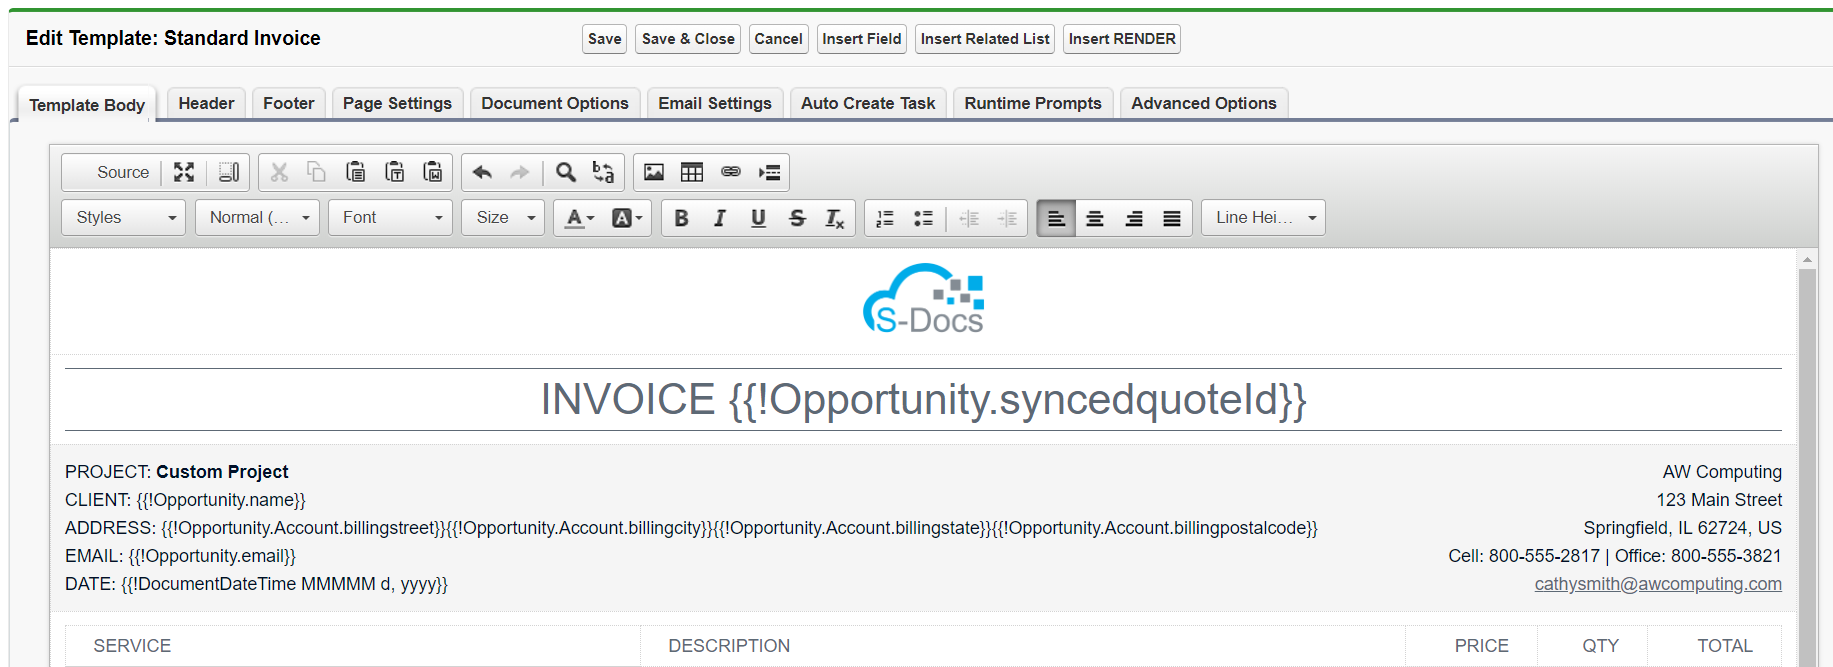
You have now created your first template!

Note: You can also insert images, span related objects and create child object line items and add CSS stylesheets. Click here for an in-depth explanation of the template editor, or click here to read about advanced template editor features.

Step 4: Generate And Email Your First Document

Open any record for your object and click the S-Docs button you just created.
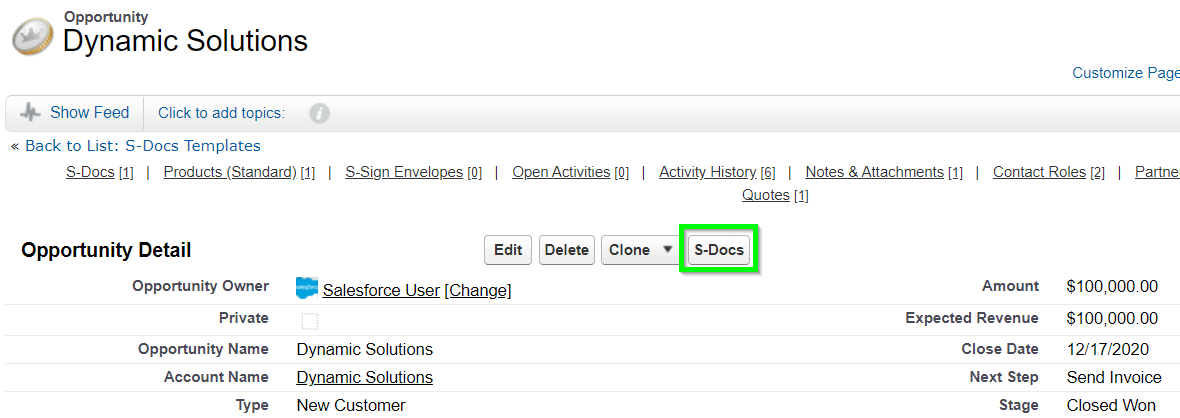
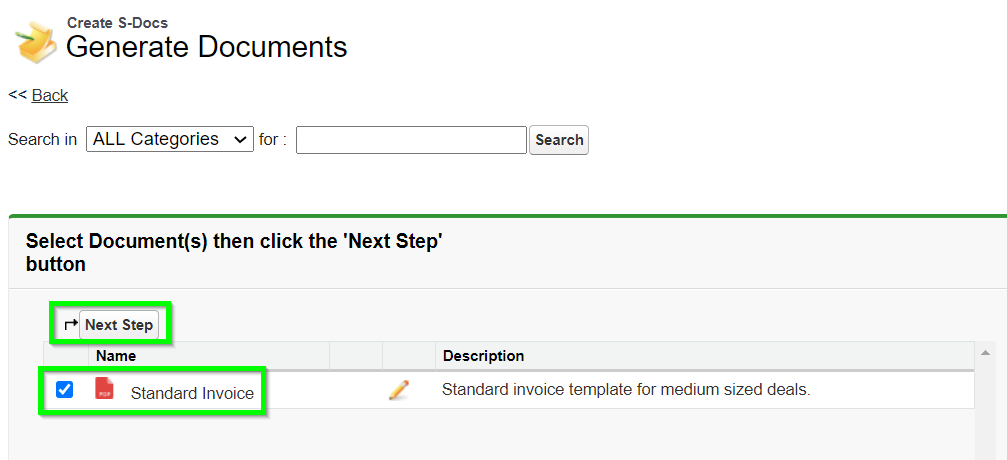
The template you created earlier will appear. (If it doesn't, make sure you’ve checked the Available for Use and the Initially Visible checkboxes when you created your template. Additionally, make sure you set "Related to Type" to the object you're using.) Select the template and click Next Step.
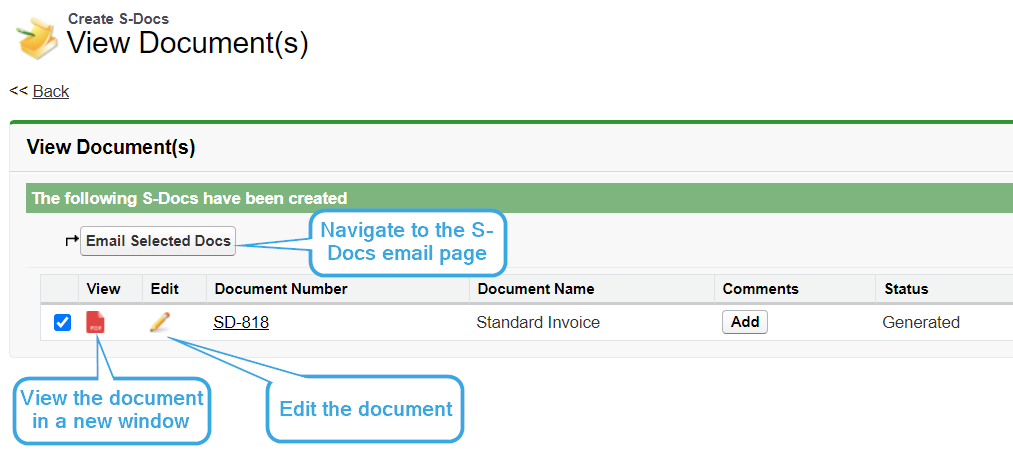
The document will generate in seconds. You can click on the "View" icon or the document number to view or download your document, or click the pencil icon to edit your document (this option is only available if Allow Edit has been checked on the template record). Click Email Selected Docs to bring up the email page for emailing the document.
You can edit all of the normal email fields on the email page, as well as the body of the email itself. The document you just generated is automatically added as an attachment to the email. To learn more about how to create custom email templates that automatically fill these fields in for you, click here.
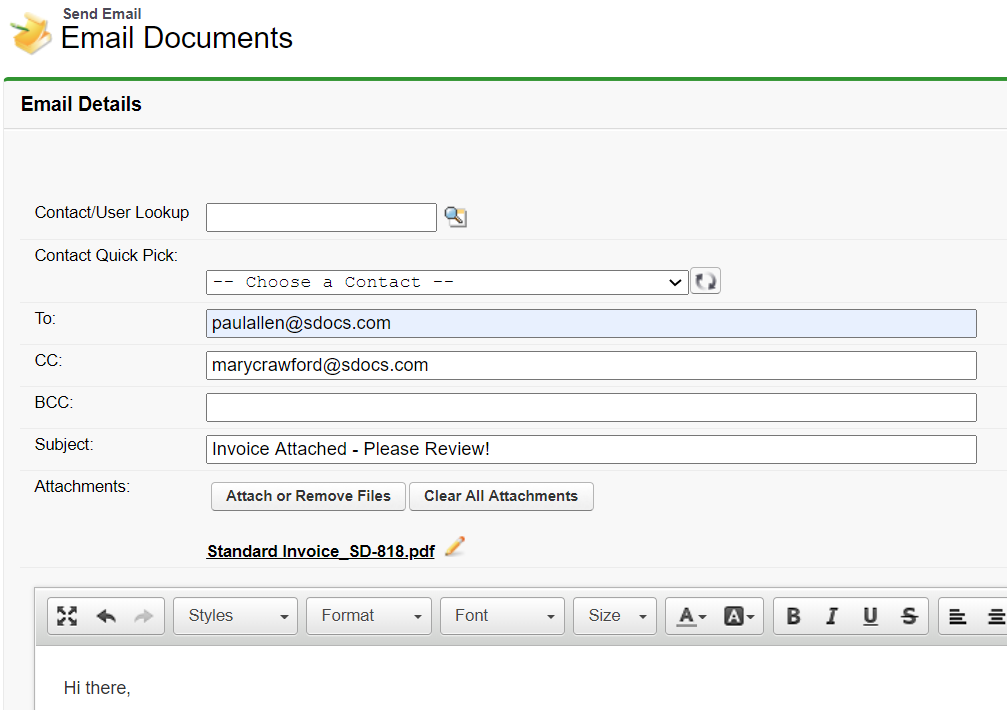
Click Send when done. You have now created and emailed your first document with S-Docs!

Email Failure Troubleshooting

By default, S-Docs links outbound emails to the contact record with a matching email address; Salesforce requires this linkage. If you try to send an email to an email address that is not listed under any Contact record in your org, S-Docs will attempt to link it to a single dummy contact record called "No Contact Record." This contact record is created automatically by the S-Docs package to handle this linkage, and is immediately deleted once the email is sent.

If your org has implemented validation rules that require additional contact fields to be completed, then the S-Docs package will not be able to create this contact record. In this case, there are two main options.

Option 1 (Recommended)

Create a before insert, before update Apex trigger on the Contact object that automatically changes the fields on the No Contact Record that S-Docs creates so that your validation rules are not triggered. For example, the trigger might look like this if your validation rules prevent the contact field "This_Cannot_Be_Null__c" from being null:

trigger ContactFirstName on Contact (before insert, before update) {
    for (Contact c : trigger.new) {
        if (c.LastName == 'No Contact Record') {
            c.This_Cannot_Be_Null__c = 'some non-null value';
        }
    }
}

With this option, S-Docs will be able to create and delete the No Contact Record, and the email will be sent and logged in Activity History on the base object record.

If you require test coverage for your No Contact trigger, you can use the following test class:

Class Name: NoContactTestClass

@isTest
private class NoContactTestClass {    @isTest
    public static void noContactTest() {
    	Test.startTest();
        Contact testContact = new Contact();
        testContact.LastName = 'No Contact Record';
        insert testContact;
        Test.stopTest();
    }}

Option 2

Create the S-Docs No Contact Record manually with all of the fields filled in that are required by your validation rules. The fields that S-Docs requires should be filled in as follows:
First Name: Not Required. We recommend writing S-Docs to avoid confusion.
Last Name: No Contact Record
Email Address: this.email@is.invalid
You then need to add the following parameter to the end of your S-Docs button: &useExistingNoContactRecord=true
Note: This option is not recommended, as the email will not be logged in Activity History on the base object record.

Sandbox Deliverability

If you are testing S-Docs in a sandbox org and emails are not being delivered, you should check Setup > Email Administration > Deliverability, and check that "Access to Send Email" is set to "All email." By default, Salesforce turns off outbound email access when a sandbox is created to reduce the risk of inadvertently sending emails to contacts during development and testing. Be aware that this change effects the entire sandbox and not just S-Docs.
Configuring S-Docs with Custom Objects – Salesforce Lightning

By Documentation No Comments

Introduction

S-Docs works great with the custom objects and even the Force.com platform edition, which is entirely comprised of custom objects. Your documents can span many relationships to include data from formula fields, rich text, parent records, child, grandchild and related objects--all within the same document.

Since every organization creates different custom objects to meet their unique requirements, you need to configure S-Docs to recognize which custom objects you want to leverage with S-Docs.

To learn how to configure S-Docs with custom objects in Salesforce Lightning Experience, you can watch the following tutorial video, which will walk you through the process. You can also refer to the written instructions below the video, which provide a detailed, step-by-step guide to configuring S-Docs with custom objects. To view the same guide for Salesforce Classic, click here.

For the purposes of this guide, we assume your custom object is named CustomObj and has an API name of CustomObj__c. (Note: the API name has two underscores.) Whenever you see "CustomObj" in this document, you can replace it with the name of your custom object. S-Docs can also integrate with other AppExchange apps. (Note: there are a few setup differences.) This document will walk you through the step-by-step configuration process in Salesforce Lightning. It is intended for Salesforce.com administrators who are familiar with standard configuration tasks.

Sample templates can be found here.

Tutorial Video

Step 1: Add a lookup field to allow relationship linking [00:54]

This step allows you to associate the S-Doc with the Custom object, so that users can see a related list of all S-Docs created on your Custom Object's page layout.

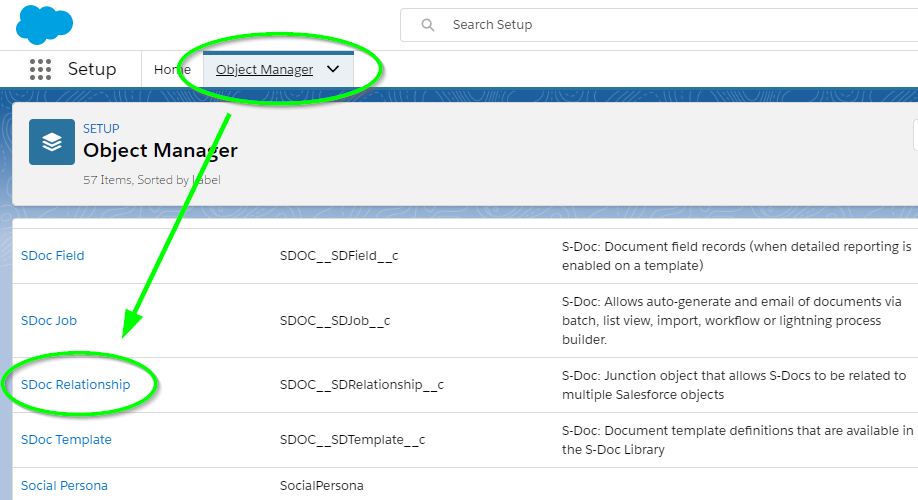
  1. In the Setup menu (the gear in the upper right corner), navigate to the object manager and select SDoc Relationship.
  2. Click Fields & Relationships in the sidebar, then click New.
  3. Follow the New Custom Field steps:

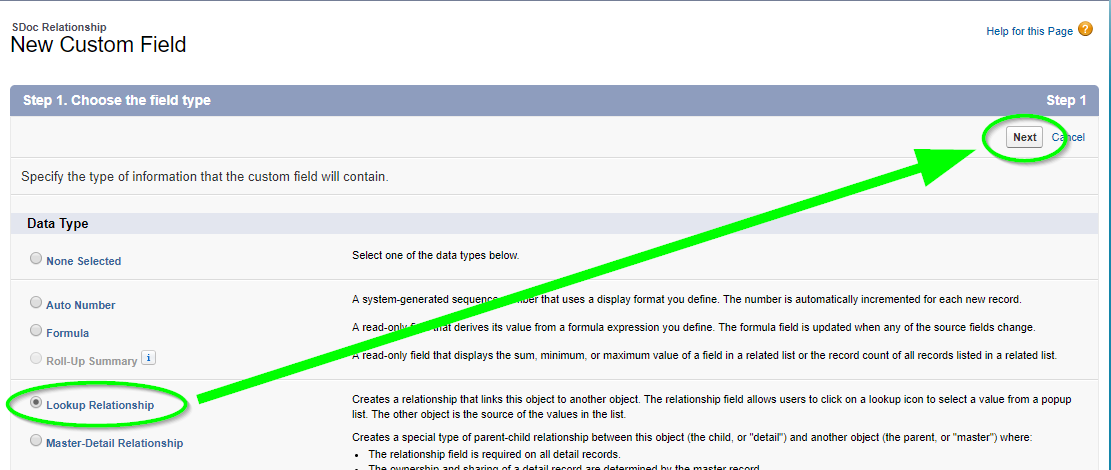
Step 1 of 6 - Pick Lookup Relationship. Click Next.
Step 2 of 6 - Select your Custom Object (e.g. CustomObj__c) from picklist values, then click Next.
Step 3 of 6* - Field label and field name should be your custom object name without the “__c.”  In our example it would be "CustomObj." Click Next.

*Note: If you are using S-Docs with another AppExchange managed package, your field name in step 3 above will need to accommodate for the double underscore in the field name, which is not allowed by Salesforce. Since your API name includes the domain name of the package followed by two underscores and then the object name (e.g. package__CustomObj__c), you will need to replace the first double underscore with “_u_” and remove the remaining “__c.” In our example, your field name should be set to: package_u_CustomObj.

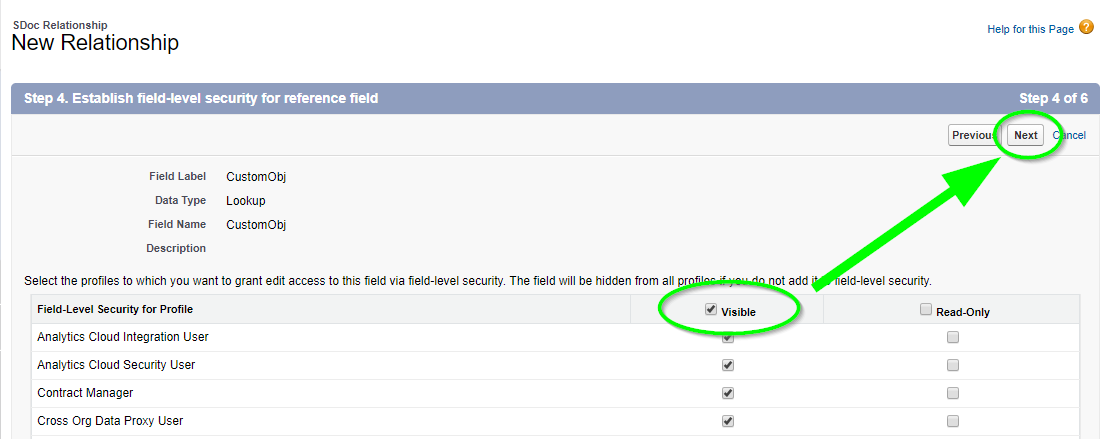
Step 4 of 6 - Checkbox should be visible for all users. Click Next.
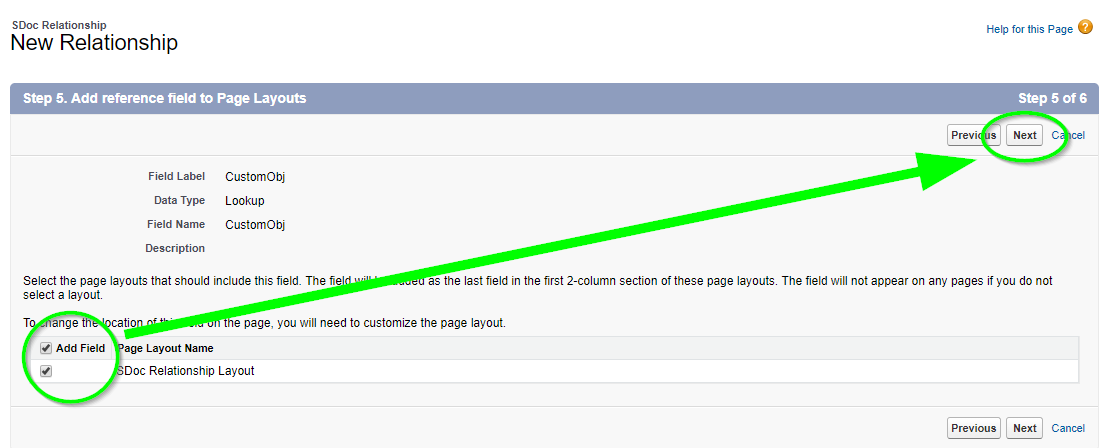
Step 5 of 6 - Checkbox should add the field for the layout.
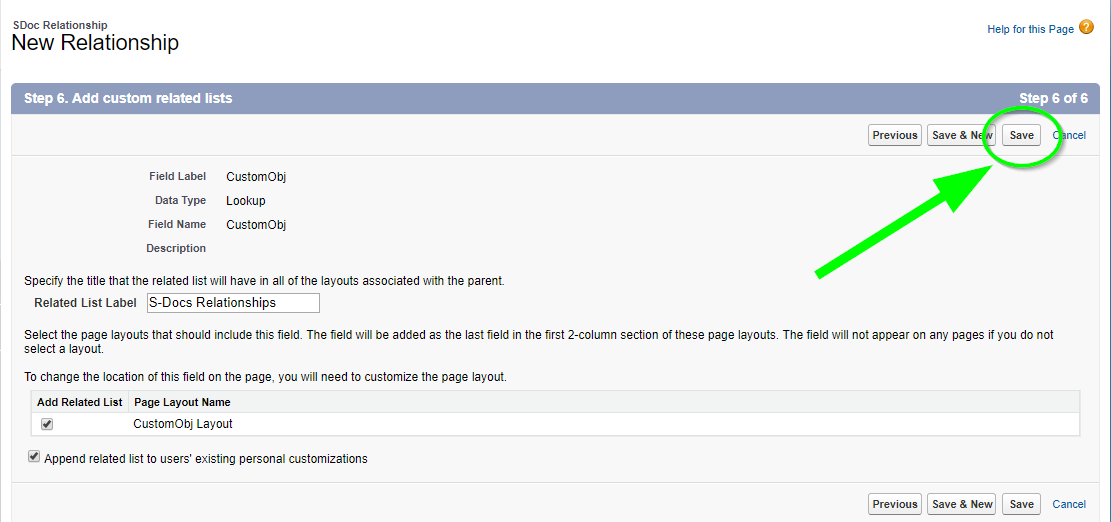
Step 6 of 6 - Accept default. Click Save.

Step 2: Create a button to place it on your Custom Object page Layout [02:06]

Just like using S-Docs with other objects, you need to place an S-Docs button on the record detail page layout. Users will click the button to initiate creating a document from the record detail page.

Create the S-Docs button.

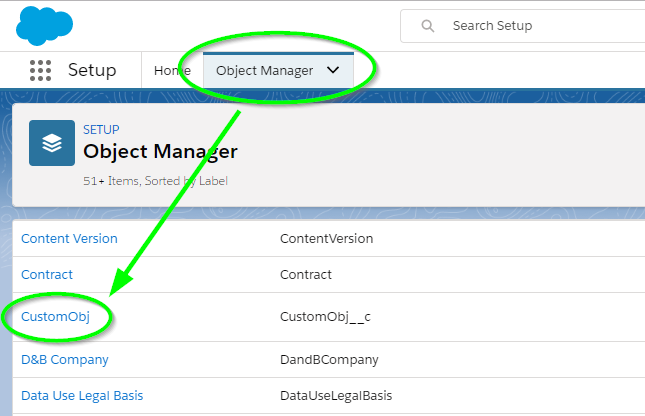
  1. Navigate back to the Object Manager in the Setup menu and click on the name of your custom object.
  2. Click Buttons, Links, and Actions in the sidebar and click New Button or Link.
  3. Button Label: Choose a label (e.g. "S-Docs")
  4. Display Type: Detail Page Button
  5. Behavior: Display in existing window without sidebar or header
  6. Content Source: URL
  7. Use the following URL (note that double underscores are used in three places):
    {!URLFOR('/apex/SDOC__SDCreate1', null,[id=CustomObj__c.Id, Object='CustomObj__c'])}
     

    Note: If you are using S-Docs with an object within another AppExchange managed package, your button syntax should include the entire object API name that includes the domain (e.g. package__CustomObj__c). Note that double underscores are used throughout. Your button syntax should therefore look similar to the following:
    {!URLFOR('/apex/SDOC__SDCreate1', null,[id=Package__CustomObj__c.Id, Object='Package__CustomObj__c'])}

  8. *Optional* You can have users save clicks by enabling the “One-Click” feature. Enabling this will bypass the document creation wizard. An administrator simply needs to change the button definition to include a list of pre-selected S-Docs template names that will be automatically generated. Placing this button will let users create all the documents encoded in the button without any additional interaction. The button syntax uses a parameter called “doclist,” which is followed by one or more template names to be auto-generated. Here is an example of the button syntax (replace the highlighted values with your own template names):
    {!URLFOR('/apex/SDOC__SDCreate1', null,[id=CustomObj__c.Id, Object='CustomObj__c', doclist='Template1,Template2'])}
  9. Click Save

Step 2b: Place button on your page layout [02:52]

  1. Navigate back to the Object Manager in the Setup menu and click the name of your custom object.
  2. Click on Page Layouts in the sidebar, then click the Edit link (you will repeat this for each page layout that you want the S-Docs button to appear in).                                         
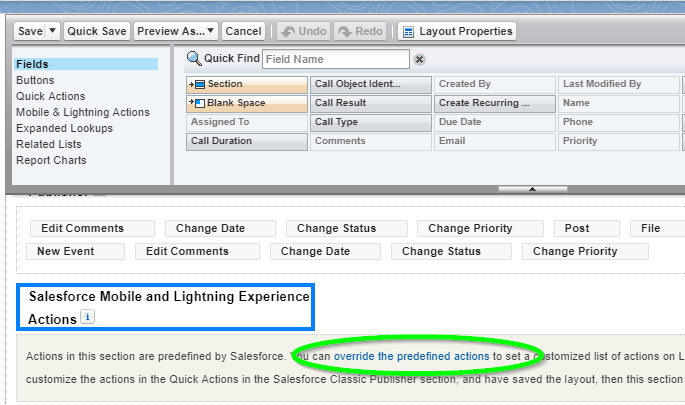
  3. In the layout editor, scroll down to the “Salesforce Mobile and Lightning Experience Actions” section and click override the predefined actions.
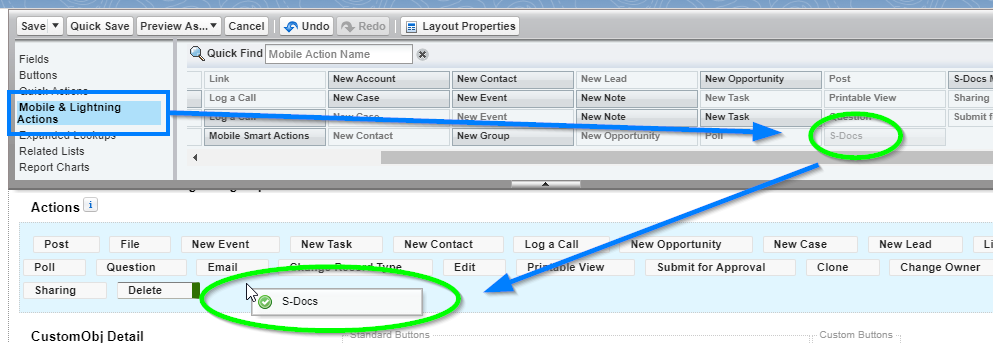
  4. Then, click Mobile & Lightning Actions in the top menu. Find the S-Docs button you just created, and drag it down into the “Salesforce Mobile and Lightning Experience Actions” section.
  5. Be sure to click Save to apply the changes to the page layout and repeat steps 3-6 for any other layouts where you would like to add the button.

To use this new S-Docs button, you first need to add your custom object as an available picklist value in the "Related to Type" field on the S-Docs template detail page, and then create at least one template to use with your custom object. The next two steps describe this process.

Step 3: Add Your Custom Object API Name  to the "Related to type" field on the "SDoc Template" object [03:25]

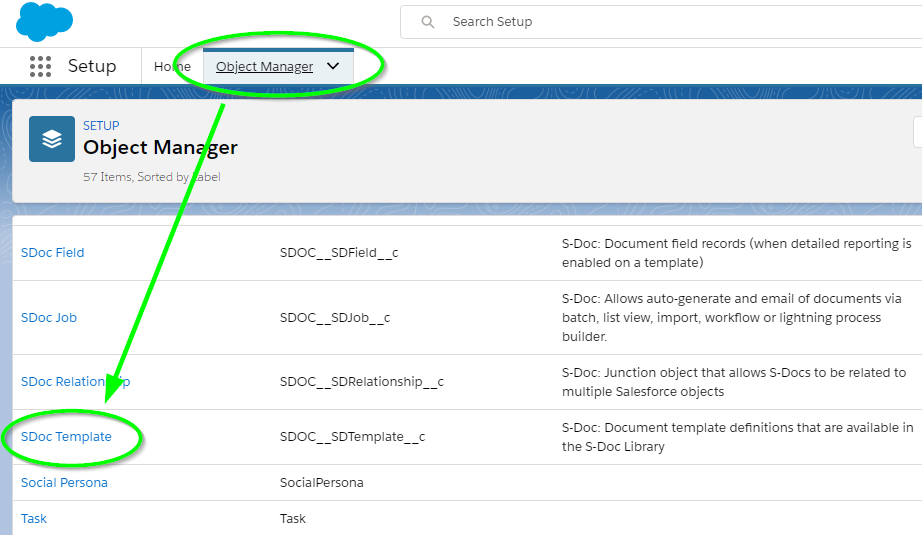
  1. Navigate back to the Object Manager, then click on the S-Doc Template link.
  2. Click on Fields & Relationships in the sidebar, then click on the Related to Type link.
  3. Scroll down to the "Values" section and click on the New button.
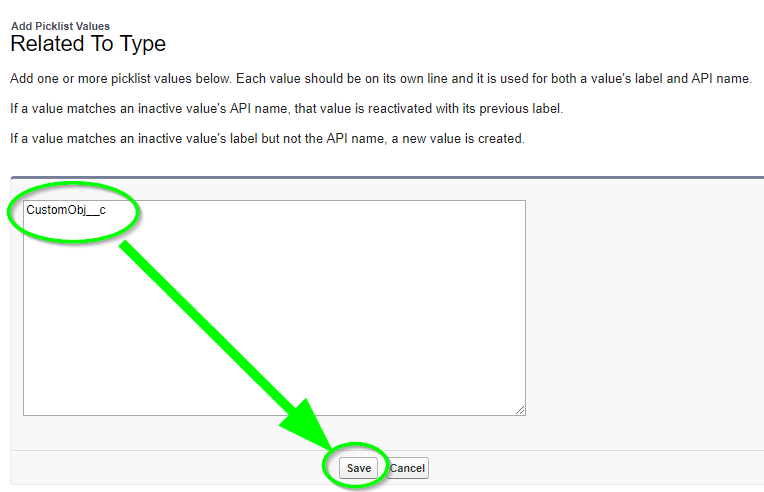
  4. Add your custom object’s API name (e.g. CustomObj__c)  as a picklist value, then click Save.
Note: if you are using S-Docs with another AppExchange managed package, then your custom object API name should include the domain name of the package followed by two underscores and then the object name (e.g. package__CustomObj__c). You should use the entire API name for the S-Docs picklist value.

As a reminder, you should substitute your object’s API name (not use the example CustomObj__c shown above).

Step 4: Create your Custom Object Template [04:09]

  1. Go to the S-Docs template home page by clicking on the App Launcher in the upper left corner and selecting S-Docs.
  2. Navigate to the S-Docs Templates tab and click New.
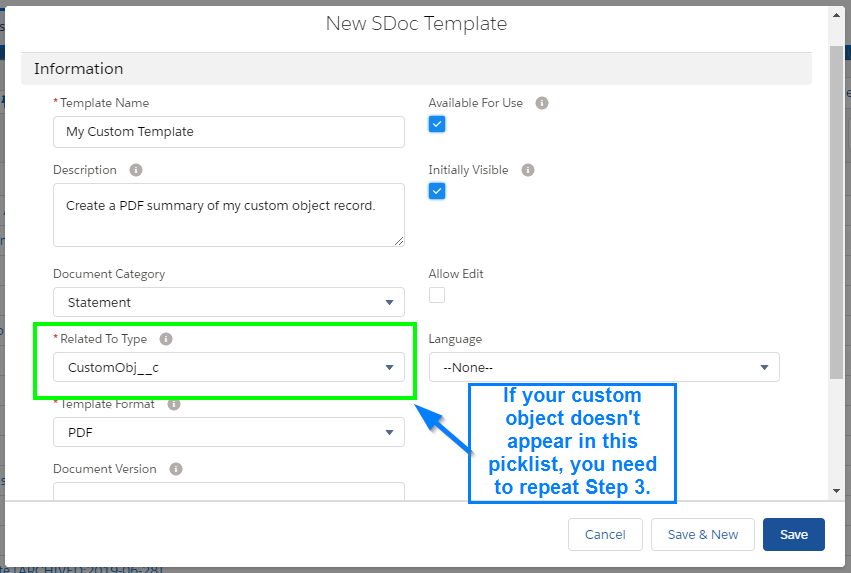
  3. Create your Custom Object template record. Be sure to select your Custom Object name from the “related to type” picklist values. Before you can first use this template, you should confirm you have also checked the Available for Use and Initially Visible checkboxes.
  4. Click Save, then click the Template Editor button.
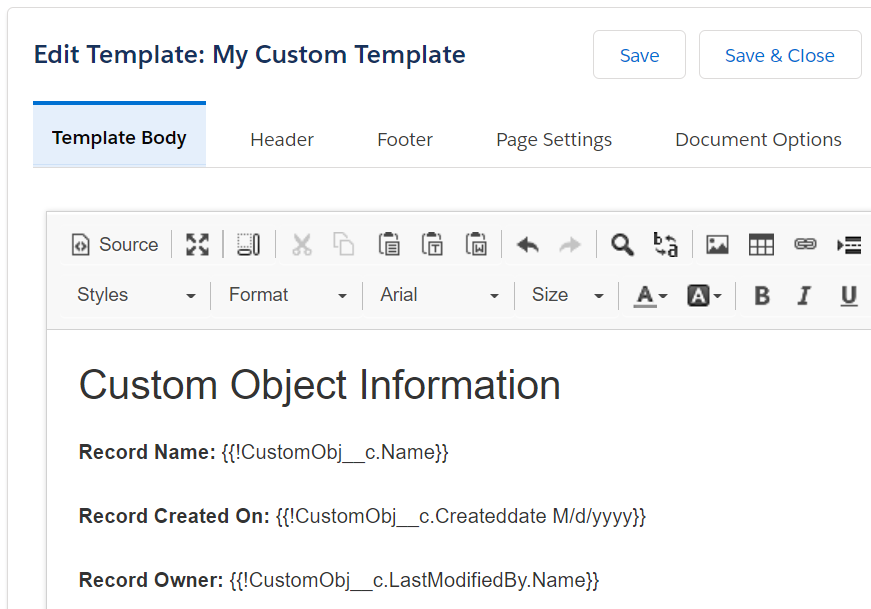
  5. Once in the editor mode, you can design your template using the WYSIWYG editor. The editor allows you to add text, format styles, insert tables, insert images and merge Salesforce data by using the Insert Field and Insert Related List buttons.
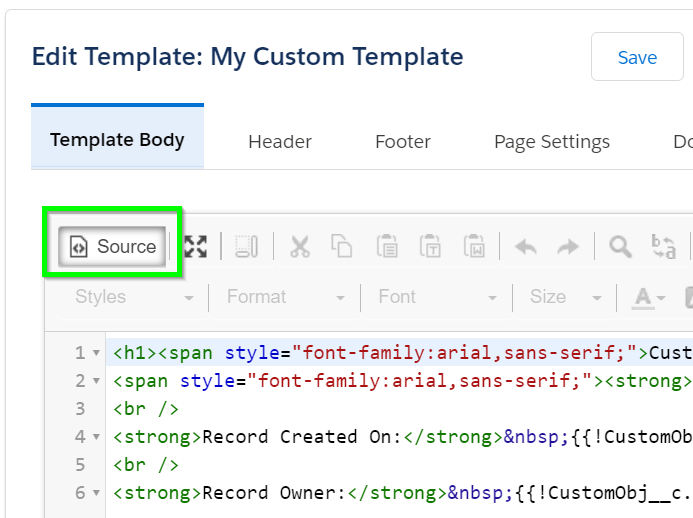
  6. You can also edit the template HTML directly by clicking on the Source button. You can additionally paste pre-made template code here. Sample templates are available here.
  7. Once your template is saved, you can test it by opening a sample custom object record, clicking on the S-Docs button, selecting your new template, then clicking on Next Step.
  8. Click on the View PDF icon or the document number to view or download the document.
  9. The document will open in another tab with all of the fields filled in.
Nurse Helping Elderly Couple At Hospital Counter

4 Ways Native Salesforce Apps are Transforming the Healthcare Industry

By Blog No Comments
Nurse Helping Elderly Couple At Hospital Counter

If you’ve been to the doctor recently, you’ve likely noticed some new technology. Paperwork that used to be filled out on a clipboard has been replaced by digital forms via email that can be completed beforehand. In some cases, your doctor speaks to you virtually on a screen, rather than in person. Your prescription can be ordered and filled before you’ve even left the office. Healthcare is changing and many organizations are looking for innovative technology to help make their teams more productive.

Salesforce, the number one ranked customer relationship management software, is often working behind the scenes to help healthcare businesses integrate, store and process patient data all while keeping it secure. If you’re familiar with Salesforce then you’ve most likely shopped the AppExchange, a marketplace of cloud-computing solutions available to Salesforce users.

With thousands of apps available, it can be difficult for a healthcare organization to know which would make their team the most productive. Our answer? Native apps.

Native apps are built 100% within the Salesforce infrastructure. This means that data does not leave the cloud. So what are the unique features native apps offer that are transforming the healthcare industry and making teams more productive?

You Might Also Like: Always Choose The Native App On The AppExchange -- Here's Why

Increased Security: Keeping patient data secure is a top priority for healthcare businesses. Because native apps are built directly on the Salesforce platform, all patient data remains within Salesforce and is never stored or processed on external servers. This is not the case with non-native applications. Healthcare teams benefit from native apps because they conform to the security settings already established within Salesforce.

Consistent Reliability: In the healthcare industry, having reliable software applications is key to productivity. Because native apps reside 100% within Salesforce, they update when Salesforce updates. Consistency is maintained with any new releases Salesforce pushes and native apps automatically work with any recent updates. This is a game changer for healthcare organizations that count on their technology to communicate patient data at all times risk software not being up to date.

Reduce Costs: The rising cost of healthcare is a hot topic these days and many healthcare organizations are looking for ways to save. One solution is choosing a native app on the AppExchange because native apps leverage your existing Salesforce licenses and offer cost savings in an increasingly expensive industry.

Streamline Business: Communicating between teams relies on well-tuned processes and software that moves quickly and efficiently. Healthcare organizations have transformed the way they transfer data from team to team with native apps and eliminated the frustration of inefficient workflows.

For healthcare organizations, there are plenty of options to choose from on the AppExchange. When searching for a native app, it’s important to note that some apps claim to be native, but just offer a native user experience. Make sure you can recognize the distinction. 100% native apps are built on the Force.com platform. Be sure to thoroughly research the app you’re considering beforehand so you know it’s 100% native.

As healthcare continues to change, introducing new technologies to maximize productivity can ensure your business stays on the front end of innovation. And native apps are a quick and simple solution that can help any team reach new levels of productivity with Salesforce.

See S-Docs In Action

Leave your Salesforce document workflow worries behind.

Request Demo

Enjoying our blog?

Subscribe now and we'll make sure to send you the latest as we publish new content!

Connect With Us!

For Salesforce news, digital document & e-signature insights, or just for fun.


Read More

Blog
June 12, 2024

Optimizing Sales Ops KPIs with Effective Reporting and Document Automation

Optimizing Sales Ops KPIs with Effective Reporting and Document Automation You don't have to micromanage your sales executives to optimize sales operations. Instead, you’ll have more success by establishing sales…
Blog
June 5, 2024

Are You Ready for a Document Automation Tool?

The Need for Efficiency in Today’s Businesses Business efficiency is crucial. Imagine running a marathon while juggling — sounds chaotic, right? That’s what managing documents without automation can feel like.…
Blog
May 29, 2024

Understanding and Advancing Organization Maturity Levels in Your Business

Understanding and Advancing Organization Maturity Levels in Your Business An organizational maturity assessment identifies where your company stands within the stages of a chosen maturity model framework so you can…

S-Docs Q2 2019 Highlights

By Press Release No Comments

Tuesday, 25 June, 2019

With team members flying in from New York, San Francisco, Boston and Tel Aviv, the quarterly S-Docs Town Hall kicked off last Monday at our Innovation Center in Ann Arbor, Michigan. Representatives from every department presented on exciting updates that have been developing this quarter and exemplified the innovative mindset that we pride ourselves on. The three-day event was a great look into the team’s cohesiveness at home and abroad, and how it benefits both our internal operations and our clients.

CEO Dan Pejanovic set the Town Hall in motion with a presentation on our core values and how they direct the innovation of our product.

“Everything revolves around trust,” said Dan. “We trust our team, our brand, and our product. In short, S-Docs is the trusted partner to help you solve your business problems.”

Led by Dan, a former Salesforce Director and Technical Architect, S-Docs has maintained the trust of our clients since 2010. Since it’s a native Salesforce app, the data used to generate documents with S-Docs never leaves the Salesforce cloud, making it the most secure solution for document generation on the market.

Our commitment to trust and security that our customers need doesn’t stop at S-Docs. Senior Salesforce Developer Zachary Clark took the stage next to unveil S-Sign 2.0, a major update to our e-signature solution that will be released at the end of the month. New developments include the implementation of hash verification, which allows users to upload S-Sign documents to our website to verify their legitimacy, and a newly secured audit trail for each document. Other new improvements include expiration/reminder notifications, multi-language support, and the adopt-a-signature feature.

“Customers define the development of our product,” said Zachary.

Director of Sales Matt Fabian emphasized our customer orientation and how it drives new business. By prioritizing personalized PoC demonstrations that show our clients how S-Docs can best benefit them, we’ve been able to welcome some exciting new customers like American Red Cross and Intel, as well as several large healthcare organizations that trust us to generate sensitive documents for medical clients. We’ve also continued to expand internationally, welcoming clients like French energy company Dalkia, and Albert Heijn, the largest Dutch supermarket chain.

Marketing Director Libby Lienhoop presented on the strategy behind connecting with customers and engaging with prospective users, and how this strategy helps us achieve our trusted status. Last year, we completely revamped our website and launched our new blog. More recently, we’ve been expanding our social media presence and publishing informative pieces to spread the word about the power of document generation. And we’re not just online--last month we travelled to London to meet with clients at the Salesforce World Tour, and this November make sure to look out for us at Dreamforce 2019 happening in San Francisco, Salesforce’s HQ city! Our goal is to raise awareness so that we can continue to provide 5-star service and intuitive, secure solutions to clients that need them.

The Town Hall closed in high spirits on Wednesday with a look into the past as well as the future. S-Docs began as just a few people with a vision and has since expanded into a robust company whose team members stretch across the globe. As we continue to bring in excellent new talent, we can’t wait for what developments next quarter will bring.

Headquarters
521 Fifth Ave
New York City, NY 10175

800-519-DOCS
       
Health visitor and a senior man with tablet during home visit.

Document Automation in Healthcare: 3 Patient Data Benefits You’ll Love

By Blog No Comments
Health visitor and a senior man with tablet during home visit.

In the healthcare industry, the number one key to success is maintaining patient satisfaction. Keeping patients comfortable, well-informed and healthy all translate to success.

But what about keeping patients’ information secure?

Healthcare documents hold the most sensitive data patients have. Every healthcare organization is familiar with HIPAA and the compliance required to uphold the national standards for patient medical history and records. It’s laws like these that can make it difficult for healthcare organizations to implement critical software while keeping patient data secure.

But with the recent trend in digitizing the healthcare industry, innovative technology like document automation is paving the way for a new level of patient data security. So how does document automation keep patient information more secure, leading to more success for healthcare companies?

Patient Data Never Leaves The Cloud

Because of these HIPAA privacy laws, working with many cloud-based software providers can be challenging. For some healthcare organizations, there is too much risk involved.
This is because a lot of document automation apps utilize external clouds, think Amazon Web Services (AWS) or other 3rd party servers, to generate, store and aggregate patient data. It can be difficult to find a document automation solution that meets the needs of risk-averse IT organizations who must retain control of data. However, with a native Salesforce document automation app like S-Docs, patient data never leaves the Salesforce cloud.
You Might Also Like: 4 Ways Native Apps Are Transforming The Healthcare Industry

Patient Data Transferred More Efficiently

With the number of sensitive healthcare documents that are required by various departments, the transfer between teams can add additional risk and slow teams down.
When using document automation in healthcare, patient data changing hands is significantly less risky and less time-consuming. Document automation apps help teams easily and safely generate documents like treatment plans, patient reports and post-visit assessments and move them from one team to another automatically. The efficient exchange of information between teams ultimately makes healthcare organizations more successful.

Reduces Errors in Patient Data

One of the key benefits to the digitization of healthcare documents is that it reduces the risk of human errors when documenting patient data. Healthcare organizations are implementing new electronic health record management systems and moving away from the paper age altogether. But even with these technological advancements, the risk of errors still exist for many healthcare documents that are not automated. By automating healthcare documents such as doctor correspondence letters or medical device audits, the risk of human error decreases significantly.

S-Docs, the preferred document automation app by healthcare organizations such as Bayer, Johnson & Johnson and Baxter, is 100% Native — meaning it’s faster, easier to use and has the same look and feel as Salesforce. Since data never leaves the cloud it is more secure, creates cohesive patient data forms and compliance across different organizations in the business.

See S-Docs In Action

Leave your Salesforce document workflow worries behind.

Request Demo

Enjoying our blog?

Subscribe now and we'll make sure to send you the latest as we publish new content!

Connect With Us!

For Salesforce news, digital document & e-signature insights, or just for fun.


Read More

Blog
June 12, 2024

Optimizing Sales Ops KPIs with Effective Reporting and Document Automation

Optimizing Sales Ops KPIs with Effective Reporting and Document Automation You don't have to micromanage your sales executives to optimize sales operations. Instead, you’ll have more success by establishing sales…
Blog
June 5, 2024

Are You Ready for a Document Automation Tool?

The Need for Efficiency in Today’s Businesses Business efficiency is crucial. Imagine running a marathon while juggling — sounds chaotic, right? That’s what managing documents without automation can feel like.…
Blog
May 29, 2024

Understanding and Advancing Organization Maturity Levels in Your Business

Understanding and Advancing Organization Maturity Levels in Your Business An organizational maturity assessment identifies where your company stands within the stages of a chosen maturity model framework so you can…
S-Docs volunteering at soup kitchen

Pledge 1%: How S-Docs Gets Involved in the Local Community

By Press Release No Comments

Tuesday, 11 June, 2019

Here at S-Docs, we enjoy working with our diverse group of customers around the globe--but we also love getting involved at home and serving our local communities. As part of our commitment to Pledge 1%, our Ann Arbor team headed down the block last week to volunteer at the Robert J. Delonis Center, a shelter operated by the Shelter Association of Washtenaw County (SAWC), whose mission is to end homelessness in Washtenaw County. The SAWC provides resources to people experiencing homelessness, including food, temporary housing, access to showers and phones, and tools for finding income and affordable housing.

Our team volunteered in the Community Kitchen, where we helped prep food for the next day and wash the dishes of the 100+ people who received a meal that night. The kitchen is operated by Food Gatherers, a not-for-profit organization that relies on 1,600 volunteers annually to help prepare and serve meals 364 days a year to anyone in need. Dedicating the evening to helping those in need was an incredibly rewarding experience for our team, and we were glad to contribute to making a positive difference in our community.

“One of the many wonderful things I learned from my years at Salesforce was how business can make a positive impact in every community. I’m very proud that we’ve continued that tradition at S-Docs,” said Dan Pejanovic, CEO of S-Docs.

We’re already looking forward to our next trip to the Delonis Center, which will be centered around our intern program. Volunteering isn’t the only way we get involved, though; our Ann Arbor team recently participated in the city’s Commuter Challenge, which challenges individuals to use greener methods of transportation. We’re proud to say that we reached 100% participation! Taking an active role in the community is both rewarding and beneficial, which is why we value it so highly at S-Docs. To learn more about our commitment to Pledge 1%, click here.

S-Docs volunteering at soup kitchen

Headquarters
521 Fifth Ave
New York City, NY 10175

800-519-DOCS
       

Whitepaper: Automate These 3 Documents and Your Team May Throw You a Party

By Blog No Comments

What’s better than being recognized at work? Few things make us feel more validated than receiving a shout-out from our boss or being taken to lunch for our contributions. And with today’s focus on working efficiently, it’s a wonder that no recognition or award exists for identifying better, faster ways of doing things – that we know of at least.

The last thing any team needs to jam up productivity is an overload of documents they need to create manually. Fortunately, innovative technology is readily available to help organize your team’s workflow processes.

We’ve identified three documents that can be easily automated - featuring examples from industry leaders Panasonic, Nestle, and Philips to help create faster, more efficient teams. By utilizing a document generation app, you will save your team time and headache not to mention reduce manual tasks, save money, and eliminate wasted effort. And who knows, your team may just thank you for the time and money saved and give you an award, throw you a party or buy you a drink!

To learn more about the three documents you should automate, download our most recent whitepaper by clicking below.

Download Whitepaper

See S-Docs In Action

Leave your Salesforce document workflow worries behind.

Request Demo

Enjoying our blog?

Subscribe now and we'll make sure to send you the latest as we publish new content!

Connect With Us!

For Salesforce news, digital document & e-signature insights, or just for fun.


Read More

Blog
June 12, 2024

Optimizing Sales Ops KPIs with Effective Reporting and Document Automation

Optimizing Sales Ops KPIs with Effective Reporting and Document Automation You don't have to micromanage your sales executives to optimize sales operations. Instead, you’ll have more success by establishing sales…
Blog
June 5, 2024

Are You Ready for a Document Automation Tool?

The Need for Efficiency in Today’s Businesses Business efficiency is crucial. Imagine running a marathon while juggling — sounds chaotic, right? That’s what managing documents without automation can feel like.…
Blog
May 29, 2024

Understanding and Advancing Organization Maturity Levels in Your Business

Understanding and Advancing Organization Maturity Levels in Your Business An organizational maturity assessment identifies where your company stands within the stages of a chosen maturity model framework so you can…

Are Document Creation Apps As Important As Sleep?

By Blog No Comments

There’s one human function crucial to our livelihood that is often underestimated – a healthy amount of sleep. Oh yes, maintaining a decent dose of z’s is just about as important to sustaining our health as any other basic human need. And sleep benefits us in more ways than one because when we’re fast asleep, our bodies work to retain information, process memories and repair tissue. And when we wake up, we feel rested and rejuvenated.

Unfortunately for most of us, getting a good amount of sleep is often placed on the back burner. Much like the way sleep benefits our health, so do efficient business functions benefit company health. Often we back-burner efficient business functions the same way we do sleep.

Case in point, document creation apps make business more efficient, yet they can easily be overlooked or neglected.

You Might Also Like: 6 Benefits Of A Salesforce Document Generator

Three Ways Document Creation Apps Are As Important As Sleep

Document Creation Apps Improve Efficiency

If you’ve ever pulled an all-nighter, you’ve likely experienced how lack of sleep affects your productivity the following day. You feel slow, groggy and one step behind the curve. Just like that feeling, the inefficient process of creating custom documents in Salesforce feels the same way. It’s slow and frustrating, especially when you have to navigate between multiple platforms. By using a document creation app like S-Docs, which is natively built on the Force.com platform, templates are easily customizable and accessible with the click of a button without ever leaving Salesforce. Just like waking up after a full eight-hour night of sleep, document creation apps keep you from feeling unprepared or inefficient and help create a more productive, healthy team.

Document Creations Apps Leave Less Room for Error

Without a healthy amount of sleep every night, our brains don’t have time to process information and transfer experiences to memory, which usually results in our forgetfulness and making silly mistakes. Similar to how these mistakes are a side-effect from lack of sleep, manually updating large documents between multiple teams can lead to side-effects like input errors and inconsistencies. Document creation apps can prevent these side-effects with automation technology that merges data seamlessly so no information gets lost, no matter how many teams handle it.

Document Creation Apps Keep You From Going Through the Motions

Lack of sleep can put you in a zombie-like state — you feel like you’re going through the motions, which makes work feel tedious. Your team can often fall into this same routine, completing tasks no matter how tedious they are because that’s how things have always been done. One routine task that could turn very tedious is creating contracts for customers by copying and pasting information, an exercise that feels like it’s twelve steps long. But these twelve steps could turn into two steps by using a document creation app to generate a simple, custom contract. What’s more, the data would never leave the Salesforce platform with a natively built app like S-Docs, so it would be more secure than other non-native options.

In case you’re new to document creation apps, their benefits go far beyond those listed above. But to put things simply, document creation apps empower your team to work faster and more efficiently within Salesforce. And just like a full night of sleep sets you up for success, so does a document creation app.

And it’s possible that once you’re using one, and it starts doing the work for you, you can get more sleep – it’s a win-win, really.

See S-Docs In Action

Leave your Salesforce document workflow worries behind.

Request Demo

Enjoying our blog?

Subscribe now and we'll make sure to send you the latest as we publish new content!

Connect With Us!

For Salesforce news, digital document & e-signature insights, or just for fun.


Read More

Blog
June 12, 2024

Optimizing Sales Ops KPIs with Effective Reporting and Document Automation

Optimizing Sales Ops KPIs with Effective Reporting and Document Automation You don't have to micromanage your sales executives to optimize sales operations. Instead, you’ll have more success by establishing sales…
Blog
June 5, 2024

Are You Ready for a Document Automation Tool?

The Need for Efficiency in Today’s Businesses Business efficiency is crucial. Imagine running a marathon while juggling — sounds chaotic, right? That’s what managing documents without automation can feel like.…
Blog
May 29, 2024

Understanding and Advancing Organization Maturity Levels in Your Business

Understanding and Advancing Organization Maturity Levels in Your Business An organizational maturity assessment identifies where your company stands within the stages of a chosen maturity model framework so you can…

Can a Native App Help Overcome a Tedious Software Approval Process?

By Blog No Comments

If you’ve ever tried to enact change at work, you know it can be an arduous process. Something as simple as coming up with a better system for handling the dishes piling up in the kitchen can feel like it takes months to implement. And when it comes to more involved processes like getting approval on new software, it can seem as if the list of steps and approvals never ends.

With over 3,000 apps on the Salesforce AppExchange, there are countless software options that integrate with the popular CRM platform. However, many of these apps and their integration with Salesforce often triggers a series of protocols for security and procurement teams. For example, even though all industries know data security is important, Financial Services is unique in that the data they specialize in is held to an even higher standard. Data like personally identifiable information (PII), finances, credit and loan details, and underwriting, all require extremely high standards and regulatory compliance for data security. In their world, one of their top priorities, often above all else, is to keep data secure and ensure all software purchases comply with corporate and government regulations.

To ensure compliance, they've developed thorough processes for approvals that validate all software purchases. Typically speaking, new software must go through an in-depth security review with security officers. Once a need has been identified and a software recommendation has been made, getting budget approval and department buy-ins takes a lot of time and energy. Routine procurement negotiations on top of security reviews slow down the time-to-value for software purchases and can be frustrating for other teams involved. The software buyers want to get things up and running as soon as possible, and the software sales reps only see the benefits of their labor when contracts get signed.

The Loophole

Although every security and procurement process varies from company to company, getting approval on new software is generally fairly tedious. However, there’s always a loophole. If you’re already using Salesforce, a workaround exists for getting approval on new software from the AppExchange — it comes in the form of a native app. Software that’s native to Salesforce software, which has already been approved, could be music to your security and procurement teams’ ears.

You Might Also Like: Always Choose The Native App On The AppExchange -- Here's Why

Because native apps are built on the Salesforce platform, nothing leaves the Salesforce cloud and data remains secure, eliminating the need to run additional in-depth security reviews. For example, with a Native document generation app like S-Docs, the security and procurement processes that were previously completed to purchase Salesforce will likely cover the additional purchase of S-Docs.

Document Generation software handles some of the most sensitive data points and therefore should be subject to the same tedious approval and procurement processes as all other software. Fortunately, when it’s native to Salesforce, these steps aren’t always necessary. With an app like S-Docs, your Financial Services organization can say goodbye to the cumbersome process of getting approval on new software and work with fully integrated Salesforce technology that your security and procurement teams will thank you for.

See S-Docs In Action

Leave your Salesforce document workflow worries behind.

Request Demo

Enjoying our blog?

Subscribe now and we'll make sure to send you the latest as we publish new content!

Connect With Us!

For Salesforce news, digital document & e-signature insights, or just for fun.


Read More

Blog
June 12, 2024

Optimizing Sales Ops KPIs with Effective Reporting and Document Automation

Optimizing Sales Ops KPIs with Effective Reporting and Document Automation You don't have to micromanage your sales executives to optimize sales operations. Instead, you’ll have more success by establishing sales…
Blog
June 5, 2024

Are You Ready for a Document Automation Tool?

The Need for Efficiency in Today’s Businesses Business efficiency is crucial. Imagine running a marathon while juggling — sounds chaotic, right? That’s what managing documents without automation can feel like.…
Blog
May 29, 2024

Understanding and Advancing Organization Maturity Levels in Your Business

Understanding and Advancing Organization Maturity Levels in Your Business An organizational maturity assessment identifies where your company stands within the stages of a chosen maturity model framework so you can…
Top