All Posts By

Admin

team collaborating together at work

What Salesforce Document Automation Can Teach You About Embracing Change

By Blog No Comments
team collaborating together at work

When was the last time you learned a new skill, tried out a new hobby, attempted to use a new technology or all of the above? Undoubtedly, it was challenging. Learning new ways of doing things, especially when we’re used to doing things our own way, can be hard. But we all know that change, no matter how hard to swallow, is inevitable and often brings new opportunity and efficiency.

We hear you, no one likes change

Maybe you’ve been in this situation before. Your company implements new software and expects everyone to get on board. However, you already have a process that is familiar and functions well.

Thoughts like these are racing through your head.

“Why is this necessary?”
“It takes too long to learn a new workflow, so is it really that productive?”
“The process I have in place already works for me, so  why do I need to change it?”

Although these questions are valid, they keep us from seeing the bigger picture. Embracing change in the workplace and adopting new technology can have long-lasting benefits.

How change can improve your workflow

When popular CRM Salesforce came on the scene in 1999, it was innovative. However, there was still plenty of pushback and reasons not to move to the cloud. The same is true for any software. For example, let’s consider document automation software. If you’ve been manually creating your sales invoices the same way for as long as you can remember, you may not realize how much an innovative document automation app will improve your workflow.

You may feel that the following workflow is simple, especially if you’ve been following it for a long time:

  1. First, you create a report in Salesforce to pull the data you need
  2. Then, you export to Excel/Word
  3. Next, you manually manipulate your data
  4. Finally, you create your own template to plug the data into where it needs to go 

The problem with manual processes, though, is that they are tedious and often leave room for errors. But just because you’ve grown accustomed to this process does not make it easily replicated, efficient or flexible.

Embracing change in your workplace means being open to improving your workflow. Document automation software eliminates the manual steps you take in Salesforce and streamlines your workflow. In fact, our native document automation solution S-Docs is malleable, offering a template library of standard documents that you can download, try out, modify and use. By adopting a document automation software, you’ll improve your workflow in several ways, such as:

  1. You’ll get your time back, letting you focus on aspects of your work you couldn’t before
  2. Work proactively to get ahead rather than doing tedious reactive tasks that only achieve the minimum
  3. Branding remains consistent across documents, saving you from sending outdated or off brand documents to clients
  4.  Cross-functional team collaboration improves and increases turn-around times
  5. Fewer errors/typos
  6. Affect all areas of business from finance to sales to employee onboarding by making all your workflows more streamlined and easy to use 

With change comes new opportunities

Although implementing document automation into your workflow can have a learning curve, it solves more problems than it causes. Who knows, your innovation could inspire similar departments to get rid of their tedious, manual processes in Salesforce and embrace change as well. And before you know it, the whole business is running more efficiently.

Embracing change in the workplace with document automation brings new experiences and opportunities. It can even win you some bonus points and impress your boss. So what do you say, is it time to be the change in your workplace?

Sign up for a customized S-Docs demo today to see how document automation can improve your current processes. 

See S-Docs In Action

Leave your Salesforce document workflow worries behind.

Request Demo

Enjoying our blog?

Subscribe now and we'll make sure to send you the latest as we publish new content!

Connect With Us!

For Salesforce news, digital document & e-signature insights, or just for fun.


Read More

Blog
June 12, 2024

Optimizing Sales Ops KPIs with Effective Reporting and Document Automation

Optimizing Sales Ops KPIs with Effective Reporting and Document Automation You don't have to micromanage your sales executives to optimize sales operations. Instead, you’ll have more success by establishing sales…
Blog
June 5, 2024

Are You Ready for a Document Automation Tool?

The Need for Efficiency in Today’s Businesses Business efficiency is crucial. Imagine running a marathon while juggling — sounds chaotic, right? That’s what managing documents without automation can feel like.…
Blog
May 29, 2024

Understanding and Advancing Organization Maturity Levels in Your Business

Understanding and Advancing Organization Maturity Levels in Your Business An organizational maturity assessment identifies where your company stands within the stages of a chosen maturity model framework so you can…

Automation & Batch Processing Using S-Docs Jobs in Salesforce Lightning

By Documentation, S-Docs Automation: Jobs & REST API No Comments

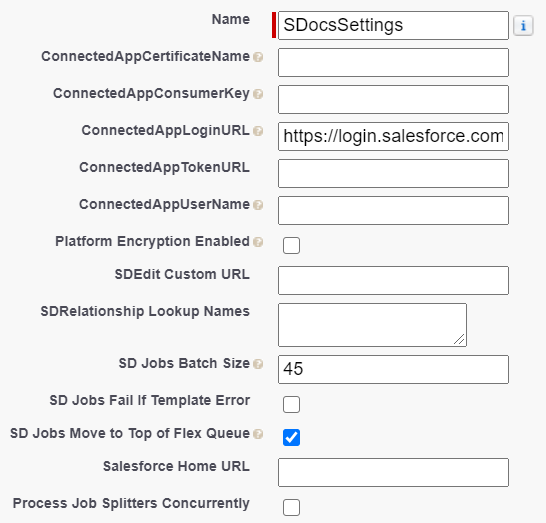
Winter '20 Release Note: If you are using S-Docs below version 4.53, you may experience an "Attempt to de-reference a null object" error when interacting with various forms of automation in S-Docs. In order to fix this bug, you can create a new SDocs Settings custom settings set. To do this, type "Custom Settings" into the Quick Find / Search bar in the Setup menu, and click Custom Settings. Click SDocsSettings, then click Manage at the top of the page. From there, click New. Fill out the following information:

Name: SDocsSettings
ConnectedAppLoginURL:
Production: login.salesforce.com
Sandbox: test.salesforce.com
SD Jobs Batch Size: 45
SD Jobs Move to Top of Flex Queue:

Additionally, ensure that you have a Remote Site Setting for either login.salesforce.com (production), or test.salesforce.com (sandbox).

Introduction

If you're looking for a way to automate your document generation process--perhaps you want a document to be automatically generated and emailed when a field value has changed or a date has passed--this document will help you configure S-Docs to meet your requirements using the S-Docs Jobs object.

For example, when a user changes an opportunity stage field to “send quote,” you can configure S-Docs to generate a PDF quote along with a customized cover letter and email it to the opportunity contact. Users would not need to click on any buttons or choose any templates. Whenever the field value is changed, even from a mobile device, the process is invoked and the documents are generated and optionally emailed.

This document will show you how to use S-Docs Jobs to automate document generation in three different ways: with Salesforce Process Builder, APEX Triggers, and Flows.

If you are looking for a way to generate multiple S-Docs (in batch) from an object list view, you can accomplish this with S-Docs Jobs as well. For example, a user could select multiple records at once from a list view and send each record a custom invitation email to an event. The possibilities to further automate and distribute your documents are unlimited. Please refer to this documentation for more information about batch document generation.

Automatic Document Generation with S-Docs Jobs

An S-Docs Job is a simple, intuitive Salesforce object designed for automatically generating (and optionally emailing) documents with your custom code, Salesforce Processes, Salesforce Flows, or other integrations. We recommend you use S-Docs Jobs with Process Builder, which can do just about anything workflows can.

For use with your custom code, Salesforce Processes, or Salesforce Flows, the API name for S-Docs Jobs is SDOC__SDJob__c, and the API names for some of its fields can be found in the following list. You'll use these fields later when configuring your document automation.

To automatically generate S-Docs with S-Docs Jobs, you'll be configuring your Salesforce Process, custom code, or Flow to do at least five things:

  1. Create an S-Docs Job record
  2. Specify the ID of the record you would like to generate these documents for
  3. Specify this record’s object API name (Opportunity, Account, etc.)
  4. Specify the name of the template you would like to use for document generation
  5. Optionally fill in the fields for emailing these documents. Finally, you will need to set the SDOC__Start__c field for this Job record to “true” in your APEX code or Salesforce flow to run this Job (i.e. to generate and optionally email the specified documents)

Before we see how to use S-Docs Jobs for automatic document generation, we’ll see what the Job records themselves look like.

Behind the Scenes of S-Docs Jobs

When one of the three methods (Salesforce Processes, APEX code, or Flow) creates an S-Docs Job, it is stored as an S-Docs Jobs record. To view these records, navigate to the App Launcher, scroll down to All Items, and click S-Docs Jobs.

All S-Docs Jobs Record appear here. In most (if not all) cases, we will not be creating Jobs records with the New button here; the records here should be created by your Salesforce Process, APEX triggers, Salesforce flows, etc. However, you can delete logs here by clicking the arrow at the end of each log and then clicking Delete (though this may also be done programmatically).You can open a job record by clicking on the blue SDJOB number. The record will show you things like the IDs of the templates used to generate it (i.e. the Doclist), the ID of the record it generated documents for (i.e. the Object ID), and other relevant Jobs fields.
The documents the Job generated will also be included in the record under the Job Execution Details section. You can click on their icons to view them.

You don't need to find the job record to view documents generated by a job, however. A related list for these documents will be automatically created on the page of the record you generated the documents for. For example, if we created an APEX trigger that would create a Job to generate three documents whenever an account record was created, we would see those three documents on that account record’s related tab like so:


Note that these documents would still exist in the S-Docs related list on the account record page even if we deleted the Job that created these documents. If you wanted to delete these documents for good, you could delete them from the S-Docs related list.

Now that we’ve seen how S-Docs Jobs work behind the scenes, we can see how we might leverage their functionality with Salesforce Processes, APEX triggers, and Salesforce flows.

Use Case: Automatically Generating & Emailing a Welcome Letter Whenever an Account is Created

Consider the following use case: whenever an account is created, we would like S-Docs to generate a welcome letter for that account, and then email it to a contact associated with that account. This process can be automated in no time using S-Docs Jobs! In the three sections following this one, we will explore how to accomplish this in Process Builder, APEX triggers, and in Salesforce Flows. In all three of these scenarios, we will have to fill in the following fields in order to automate this particular case; you'll see how to use these fields once we get into each scenario.

Fields for our Use Case
SDOC__Start__c (Start Job)This will be set to ‘true’ so that the specified documents will automatically generate (and in this case, automatically email, as we have specified them to do so using the Job’s email fields) upon the creation of this particular S-Doc Job record.

SDOC__SendEmail__c (Send Email)If we set this to ‘0,’ an email will not be sent. If we set it to ‘1,’ this S-Doc Job record will email the document it generated. Thus, we will be setting this to ‘1.’

For this to work properly, our Doclist needs to include an S-Doc HTML email template. In our example, this template will use a merge field in the Email To field (found under the Email Settings tab of the template editor) that will be dynamically populated with the appropriate contact's email address. Then, each Job record would generate a welcome letter PDF, generate an email using the HTML email template, attach the welcome letter PDF to that email, and then send that email.

SDOC__Oid__c (Object ID): This is the Object ID field, i.e. the place where we specify which object our Process/APEX Trigger/Flow should pull record IDs from. In our example, we will choose Account, since we want our process to use Account record IDs.

SDOC__ObjAPIName__c (Object API Name)This is the API name of our objects. In our example, we’re creating this trigger for new accounts, so we store Account in this field.

SDOC__Doclist__c (Doclist)This is the comma-delimited list of S-Docs template names that we will be using to generate our documents. Make sure there aren’t any spaces in your comma-delimited list. In our example use case, Welcome Letter is the name of our S-Docs PDF welcome letter template, and Email Template is the name of our S-Docs HTML email template. Thus, we will be using the following Doclist for our example use case Salesforce Process, APEX code, and Salesforce Flow:

Welcome Letter,Email Template

You can also use template IDs for the doclist parameter, however this is not recommended because these IDs will change between sandbox and production orgs, meaning that you will have to re-add the new template IDs into this parameter after transferring to production.

To find the template IDs for use in your Doclist field, go to the template record page for each template you're using.


The template ID can be found in the URL of the template record. You can then copy and paste this ID into your Doclist field for an S-Docs Job in your Process, APEX code, Flow, etc.

Note: If your org contains multiple templates with the same name, all of them will generate if one of them is referenced in one of your processes. In this case, you should use the template ID instead.

In the following three sections, we will see how to use S-Docs Jobs with Salesforce Processes, APEX triggers, and Salesforce Flows to automatically generate and email a welcome letter whenever an account is created.

Additional Fields

While the example use case in this article only uses 5 fields, S-Docs Jobs also support a number of other fields that you can use to further customize your process.

Email From

Email From allows you to set an org-wide email address as the From address when your S-Docs Job process includes emailing a document.

Email Params

Email Params allows you to add advanced email parameters to your process that are not available to access through standard fields on the S-Docs Job object, such as useExistingNoContactRecord=true.

Incl. Attachments with Email

Incl. Attachments with Email allows you to specify a comma-delimited list of Salesforce Attachment IDs to be included in the email sent out by the S-Docs Job.

Incl. Documents with Email

Incl. Documents with Email allows you to specify a comma-delimited list of Salesforce Document IDs to be included in the email sent out by the S-Docs Job.

Incl. Files with Email

Incl. Files with Email allows you to specify a comma-delimited list of Salesforce File IDs to be included in the email sent out by the S-Docs Job.

Include All Related Files

Include All Related Files allows you to opt to attach every file related to the base record to the email sent out by the S-Docs Job.

Using S-Docs Jobs with Process Builder

The easiest way to generate and email a welcome letter whenever an account is created is to use an S-Docs Job in a Salesforce Process. From the Setup menu, type "Process Builder" into the Quick Find / Search bar and click Process Builder.

Click New to create a new process.

You can name the process whatever you want, then choose to have this process start when a record changes. Click Save.

Click Add Object, choose Account, and start the process only when a record is created.


Click Save. Then, click Add Criteria and set it to No Criteria, since we want our Job to execute every time a new account record is opened.


Then, click Add Action and choose Create a Record for our Action Type. For the Record Type, select SDoc Job. You may have to type it in to find it.


A Field Values menu will appear below. This is where you will add the five fields described above in the Fields for Our Use Case section. Click Add Row to add each new field.


Then, we click Save and click Activate at the top right of the screen.

All done! S-Docs will now automatically generate and email a welcome letter whenever an account is created.

Using S-Docs Jobs with APEX Triggers

S-Docs Jobs are also simple to use with APEX triggers. To get started, click the Setup cog in the upper right corner, then click Developer Console.

Then, navigate to File > New > Apex Trigger.

You can name the trigger whatever you want, then select Account for the sObject.

You'll see the following screen.

You can delete the text here, then copy and paste the following APEX trigger into the text field.

[code lang="html"]trigger SendWelcomeLetter on Account (after insert) {
List<SDOC__SDJob__c> jobList = new List<SDOC__SDJob__c> {};
for(Account acct : Trigger.New) {
SDOC__SDJob__c job =
new SDOC__SDJob__c(SDOC__Start__c=true,
SDOC__Oid__c=acct.Id,
SDOC__ObjApiName__c='Account',
SDOC__SendEmail__c='1',
SDOC__Doclist__c='Welcome Letter,Email Template');
jobList.add(job);
}
insert jobList;
}[/code]

This simply creates a Job Object in the APEX trigger, fills in its fields as previously discussed in the Fields for our Use Case section above, and inserts each Job into our Salesforce database. Note that SDOC__SendEmail__c is a string, so its value must be specified in single quotes. SDOC__Doclist__c and SDOC__ObjApiName__c must be specified in single quotes as well.

SDOC__Oid__c, the Object ID field, is given the value acct.Id. This means that for each account record in our loop, the S-Doc Job created for this particular account record will have this account record’s ID stored in its SDOC__Oid__c field.

Click File > Save to complete your APEX Trigger!

Using S-Docs Jobs with Salesforce Flows

This option is a special case; say we don’t want to generate an email letter whenever an account is created anywhere in our org. Rather, we would like to generate and email a welcome letter only when an account record is created in a Salesforce Flow. Using S-Docs Jobs with Salesforce Flows is as simple as using any other object with Salesforce Flows, so this is easy to accomplish. To get to Flow Builder, type "Flows" into the QuickFind / Search bar in the Setup menu, click Flows, then click New Flow.

Create an Autolaunched Flow.

First, we need to create a new variable called “acct.” Select Manager in the Toolbox area, then click New Resource.

For the Resource Type, select Variable. Enter "acct" for the API name, and make sure the Data Type field is set to Text.

Now we need to create two Record Creates: one for an Account and one for an SDoc Job. We'll create the Record Create for an Account first. Navigate back to the Elements tab in the Toolbar, then drag Create Records into the Flow.

Insert the following information:

Label: Create Account
API Name: Create_Account
How Many Records to Create: One
How to Set the Field Records: Use separate variables, resources, and literal values
Object: Account
Field: Name
Value: New Account Example
Variable: {!acct}


Next, we need to add a Record Create for the SDoc Job. Drag Create Records into the flow again. Insert the following information:

Name: Automatically Generate and Email Welcome Letter
Label: Automatically_Generate_and_Email_Welcome_Letter
How Many Records to Create: One
How to Set the Record Fields: Use separate variables, resources, and literal values
Object: SDoc Job

Fields & Values:

SDOC__Start__c: {!$GlobalConstant.True}
SDOC__SendEmail__c: 1 (This specifies that we wish to email the document generated by this Job record (we would type in “0“ (without quotes) if we did not wish to send an email)
SDOC__Oid__c: {!acct} This variable stores the ID of the Account record created when the “Record Create” that we made for an Account executes.
SDOC__ObjApiName__c: Account
SDOC__Doclist__c: [Insert your template names here]

Once you've saved both record creates, attach them together by clicking the circle on "Create Account" and dragging the line to the circle on "Automatically Generate and Email Welcome Letter," and attach "Start" to "Create Account."

At this point, running this flow would result in an account called “New Account Example” being created, and documents for this account would automatically be generated and emailed by the S-Doc Job record created for this account.

If we wanted to, we could now start building a much larger flow involving these two Record Create boxes.

Batch Processing with S-Docs Jobs (Recommended)

S-Docs Jobs are also used to facilitate batch document processing. However, they are used behind the scenes throughout the entire process; batch processing is performed in a simple click-only interface, so you won’t have to worry about creating the Jobs themselves. This feature, in addition to the mass merge feature, is covered in detail in the S-Docs Mass Merge & Batch Document Feature documentation.

Translate Merge Fields & Field Labels

By Documentation, General Solutions, S-Docs Cookbook No Comments

Introduction

S-Docs can translate field labels and field data within your S-Docs templates as long as the translations are already defined within the Salesforce Translation Workbench.

Currently, all field labels are able to be translated (you only need to define translations for custom field labels, as standard field labels already have translations stored within Salesforce), but the only type of merge field data that can be translated are picklist values, since the Translation Workbench doesn't allow you to translate things like text field data.

There are three steps to translating field labels and picklist field data within your S-Docs templates, which we will go over in detail below.

Defining Translations

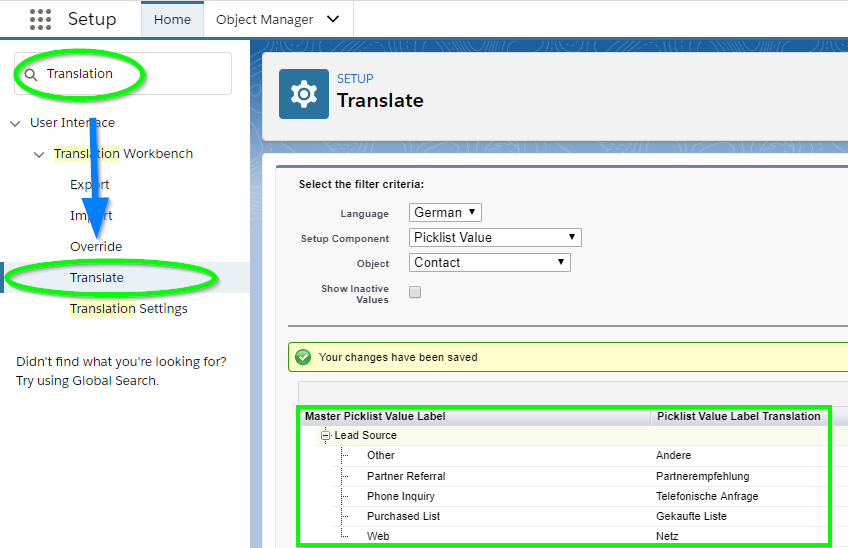
S-Docs pulls translations from the Salesforce Translation Workbench, so the first step to translating field data is defining your own translations. From the Setup menu, type "Translation" into the Quick Find / Search bar, then click Translate. In this example, we will be translating the Lead Source picklist into German for the Contact object, so we set Language to German, Setup Component to Picklist Value, and Object to Contact. Then, we scroll down and add our own German translations for the Lead Source picklist.

You can also translate field labels within the Translation Workbench. All standard field labels already have translations stored within Salesforce, so you only need to translate custom field labels yourself. To do so, set the Setup Component to Custom Field, and set the Aspect to Field Label, then enter your translations below.

Enabling Translations

After you've defined your translations, you need to enable the translate feature within S-Docs. There are two different ways you can do this.

Option 1: Add the translation parameter to the S-Docs button

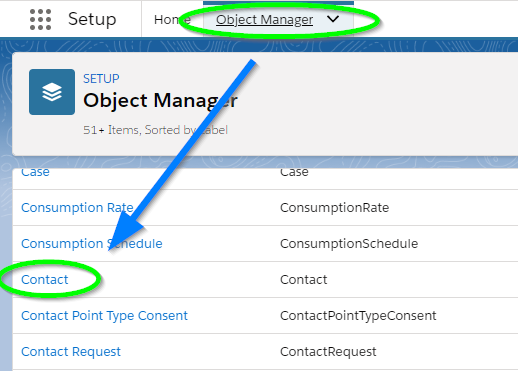
From the setup menu, navigate to the Object Manager and click the object you've defined translations for. In this example, we are using the Contact object.

Navigate to the Buttons, Links, & Actions tab, find your S-Docs button, and click Edit.

If you're using the Contract, Opportunity, Account, Contact, Lead, Task, or Event objects, the S-Docs button comes as part of the S-Docs package and is therefore managed & unable to be edited. You'll need to create a new S-Docs button with the same parameters as the managed button, and add it to your object's page layout in place of the original button. Click here to learn more about creating an S-Docs button.

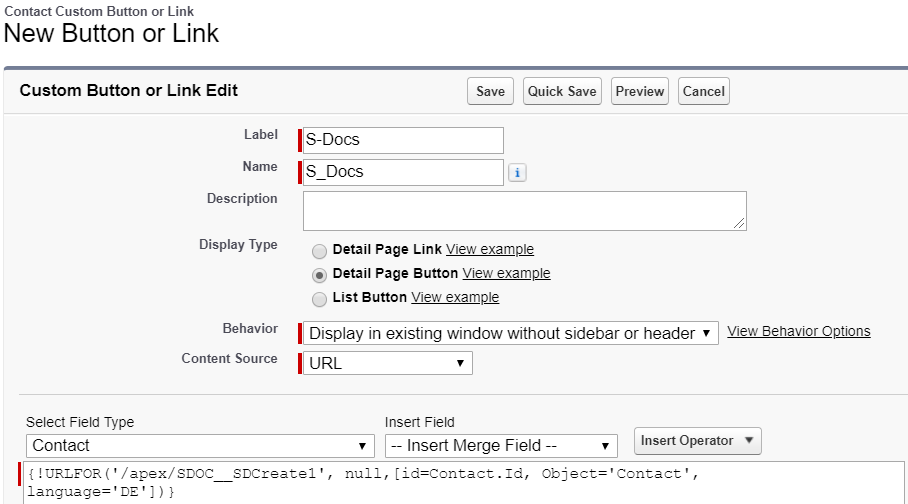
Then, add the following parameter to your S-Docs button URL: language='LANGUAGE_CODE'. You'll need to replace LANGUAGE_CODE with the appropriate Salesforce language code.

Since we're translating to German in our example, our button code will look like this for the Contact object:

[code lang="html"]{!URLFOR('/apex/SDOC__SDCreate1', null,[id=Contact.Id, Object='Contact',
language='DE'])}[/code]

Click Save.

Option 2: Change the Template Language

For this option, you'll need to add the language field to the template detail page layout, and then add the appropriate Salesforce language codes as picklist values for this field. From the Setup menu, navigate to the Object Manager and click the SDoc Template object.

Then, go to the Page Layouts tab and click Edit for the appropriate page layout.

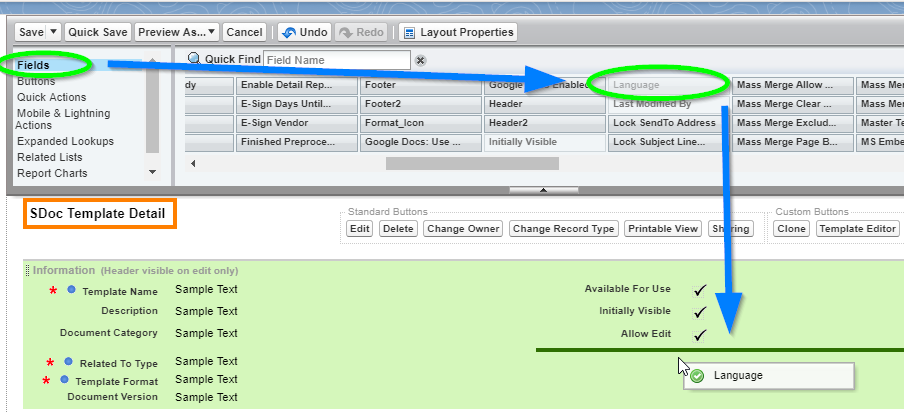
In the Fields menu, scroll over to find the Language field. Drag it down into the SDoc Template Detail section. Click Save.

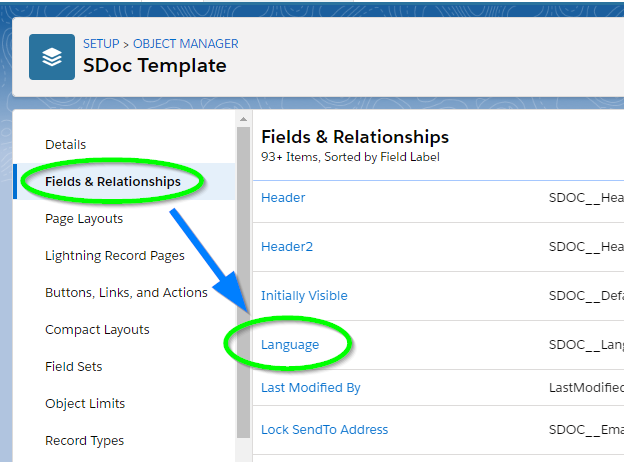
Next, navigate to the Fields & Relationships tab and click Language (not the Edit button).

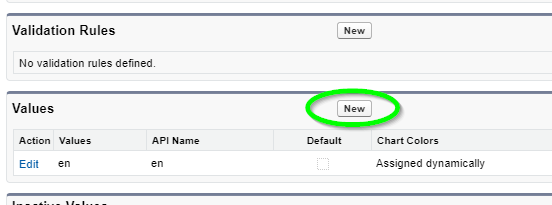
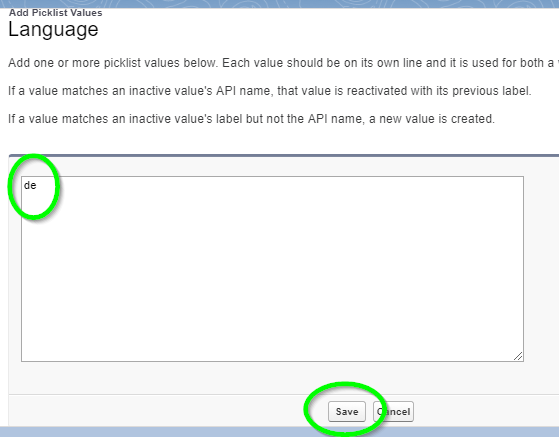
Scroll down to the Values section and click New.

Add the appropriate Salesforce language code, then click Save.

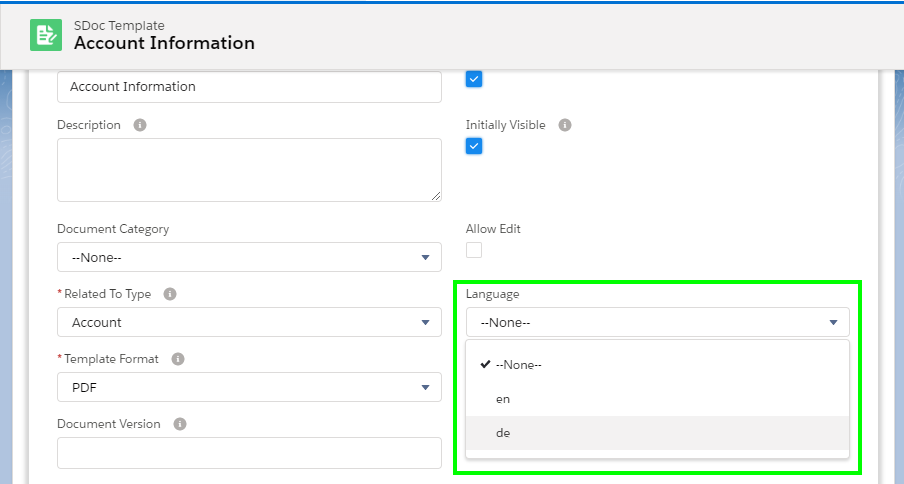
When you navigate to any template detail page, you'll now be able to set the language for that template.

Add the Translate Attribute to Your Merge Fields

The last step is adding the "translate" attribute to the merge fields/field labels you want to be translated within your documents. Note that once you add the "translate" attribute to one instance of a merge field, all other instances of the same merge field within that document will also be translated, regardless of if they have the translate tag or not. Since we translated the Lead Source picklist in the Translation Workbench, we'll add add the "translate" attribute to this merge field.

For reference, the regular Contact Lead Source merge field looks like this:
[code lang="html"]{{!Contact.leadsource}}[/code]

The translated Contact Lead Source merge field looks like this:
[code lang="html"]{{!Contact.leadsource translate="true"}}[/code]

Translating field labels works in the same way:

The regular field label for Lead Source looks like this:
[code lang="html"]{{!Label.Contact.leadsource}}[/code]

The translated field label for contact Lead Source looks like this:
[code lang="html"]{{!Label.Contact.leadsource translate="true"}[/code]

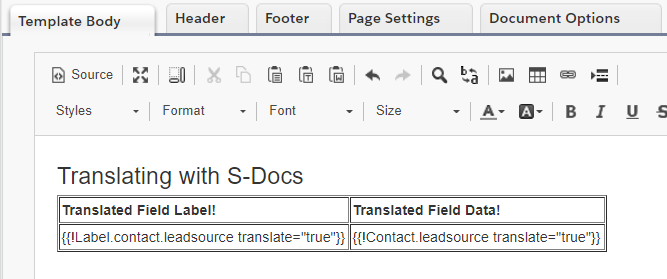
In the template editor, it looks like this:

When you generate the document, the fields will be translated!

Office closing business deals

Close Deals Faster With A Document Generation App – 5 Helpful Tips

By Blog No Comments
Office closing business deals

Remember that iconic line from 1992 film Glengarry Glen Ross? 

“ABC: Always be closing.” 

Well, if you’re in a sales role, you know the pressure of closing deals and that there can be setbacks at just about every stage in the process. Fortunately, technology has advanced from the old-school “smile and dial” process with the creation of sales automation tools — enabling sales professionals’ to accomplish tasks more efficiently.   

Put simply — the right tools will help you with the ABCs (always be closing) of sales. 

But even with the plethora of sales tools available, some deals can still get stuck in the pipeline. There is, however, one sales technology out there that Salesforce pros use to drive deals to a faster close —- a document generation app. 

First step: Get a document generation app if you don’t already have one added to Salesforce.

Next step, put it to use with these five tips for using a document generator to close deals faster:

Ensure Proposals Are Delivered to the Right Hands Without Delay

Have you ever accidentally delayed sending a proposal because a hundred different things popped up right after you got off the phone with a client? Use a document generation app to set up a process that sends out proposals based off a status change in Salesforce – this will ensure your proposals reach the right hands quickly without having to go back and manually attach files in an email.

Auto-create Sales Quotes Instantly

You know that feeling of excitement when you get off the phone with a prospect who’s ready to buy, only to have it fizzle out quickly because the next thing you have to do is manually customize a proposal for them? From inputting the name, product descriptions and not to mention double checking the price quote, it can take a while. Use a document generation solution to auto-populate the data you need with the click of a button. 

Maintain Brand Consistency Across Sales Documents

Don’t make the mistake of sending over a proposal with an outdated logo or inconsistent branding —- it looks unprofessional. Maintain your brand across all sales documents using a document generation app to make sure you’re putting your best foot forward when closing a deal. 

Automate Status Updates in Salesforce

From time to time, deals remain stuck in the wrong status because someone simply forgot to move them to the next deal stage. Use your document generation app to automatically update the opportunity stage  when a specific document is sent out. For example, when you generate a final contract for signature the app can automatically update the opportunity stage to “Pending Signature.” 

You Might Also Like: Salesforce Hack: How To Increase Productivity Through Automation

Impress Clients With Quicker Turnarounds

It’s a competitive world out there and when it comes to winning business, how fast you move deals along can make all the difference. Use your document generation app to unlock maximum efficiency , and cut  down the time between initial contact and a closed business. 

By following the above tips, deals are sure to close faster. Don’t have a document generation app in your wheelhouse yet? Try out S-Docs, the only 100% native document generation app that can do all of this and so much more. Let us know if you’re interested in a customized demo to see it in action. 

Happy selling!

See S-Docs In Action

Leave your Salesforce document workflow worries behind.

Request Demo

Enjoying our blog?

Subscribe now and we'll make sure to send you the latest as we publish new content!

Connect With Us!

For Salesforce news, digital document & e-signature insights, or just for fun.


Read More

Blog
June 12, 2024

Optimizing Sales Ops KPIs with Effective Reporting and Document Automation

Optimizing Sales Ops KPIs with Effective Reporting and Document Automation You don't have to micromanage your sales executives to optimize sales operations. Instead, you’ll have more success by establishing sales…
Blog
June 5, 2024

Are You Ready for a Document Automation Tool?

The Need for Efficiency in Today’s Businesses Business efficiency is crucial. Imagine running a marathon while juggling — sounds chaotic, right? That’s what managing documents without automation can feel like.…
Blog
May 29, 2024

Understanding and Advancing Organization Maturity Levels in Your Business

Understanding and Advancing Organization Maturity Levels in Your Business An organizational maturity assessment identifies where your company stands within the stages of a chosen maturity model framework so you can…

S-Docs Quick Install & Configuration Guide – Salesforce Lightning

By Documentation, S-Docs Install Config and Upgrade No Comments

Video Tutorial

Some invisible text

Step 1: Install S-Docs

This quick installation & basic configuration guide will teach you how to install S-Docs and create & email a custom document in Salesforce Lightning Experience. To view this article for Salesforce Classic, click here.

Note: You should download and install the S-Docs package into a SANDBOX or DEVELOPER organization. We strongly advise against installing it into any production org without proper testing.

1. Navigate to our Salesforce AppExchange listing and click Get it Now.

2. You will be prompted to log into your Salesforce org.

3. Once you are logged in, you'll be given the option to install S-Docs in your production org or a sandbox instance. We highly recommend testing in a sandbox instance before installing in your production org.

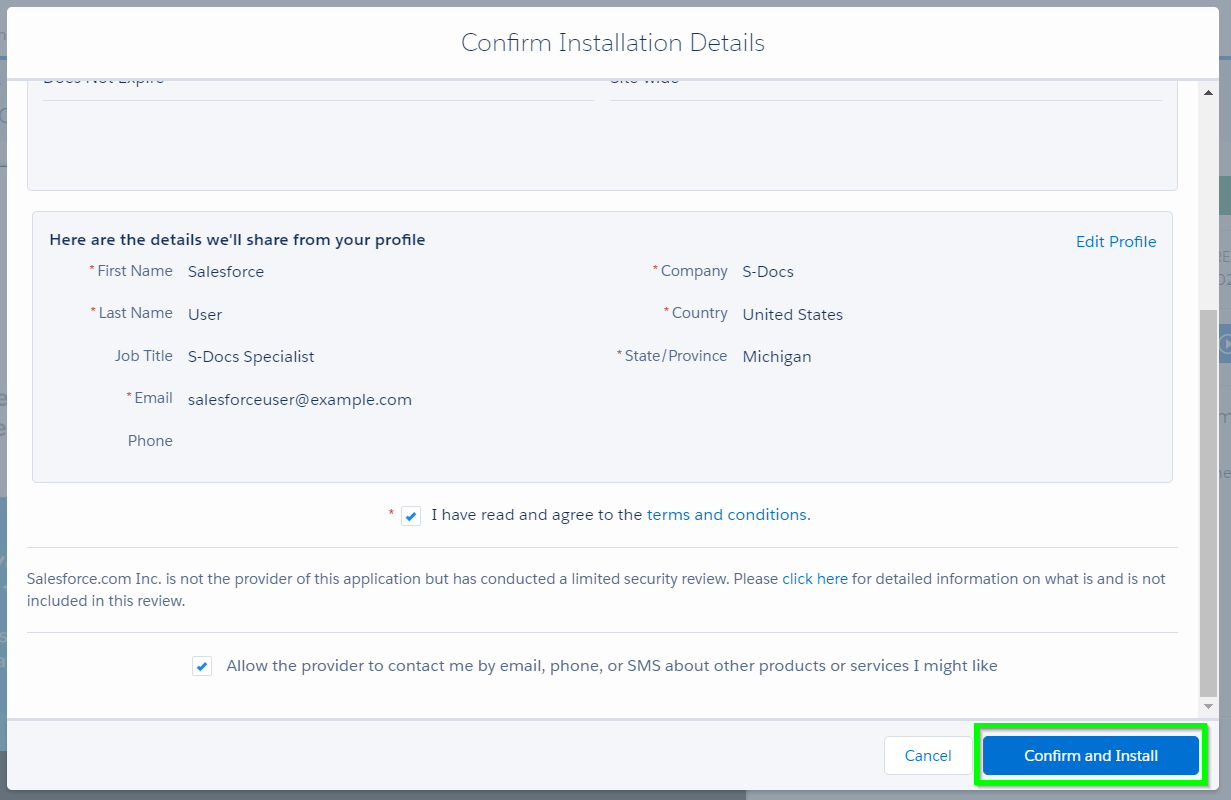
4. Confirm your profile details, agree to the terms and conditions, and click Confirm and Install.

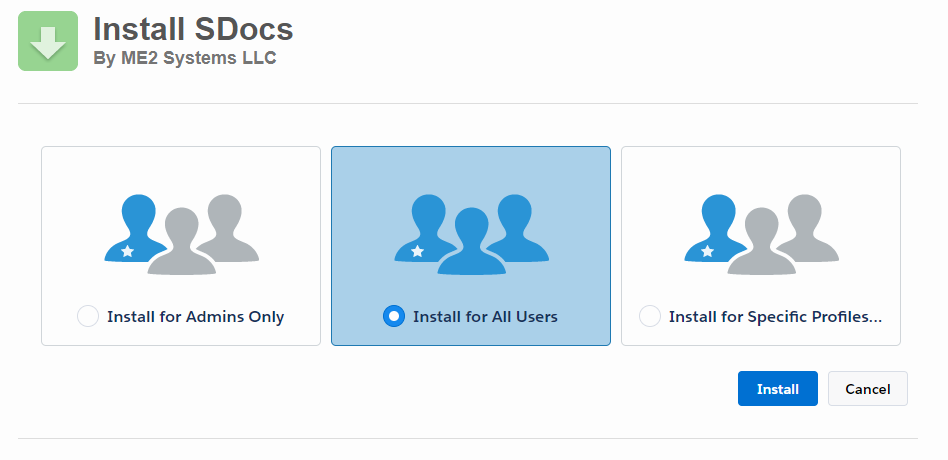
5. You'll then see the following screen. Make sure to select Install for All Users and then click Install.

Congratulations! S-Docs is now installed in your org.

We recommend assigning the S-Docs User or Administrator permission sets to yourself and users who will be interacting with S-Docs. Learn more about S-Docs permission sets here.

Step 2: Add An S-Docs Button To Your Object’s Page Layout

This section details setting up your S-Docs button for a standard object in Salesforce Lightning. This button will initiate the template selection and document generation processes. Although the setups are fairly similar, please reference this documentation for information regarding S-Docs in Salesforce Classic, and please refer to this documentation for more information on setting up S-Docs with a custom object.

The S-Docs button comes pre-created for the following standard objects: Contract, Opportunity, Account, Contact, Lead, Task, and Event. If you're setting up S-Docs for these objects, you only need to add the button to your page layout. However, if you plan to customize the functionality of your button with apex parameters, you should create a new button so that you can edit it in the future. For other standard objects, you will need to create a new custom button.

In this example, we will be creating the S-Docs button for the Opportunity object. From the setup menu, navigate to the Object Manager, and click the object you're creating the button for.

Click Buttons, Links, and Actions in the sidebar, then click New Button or Link.

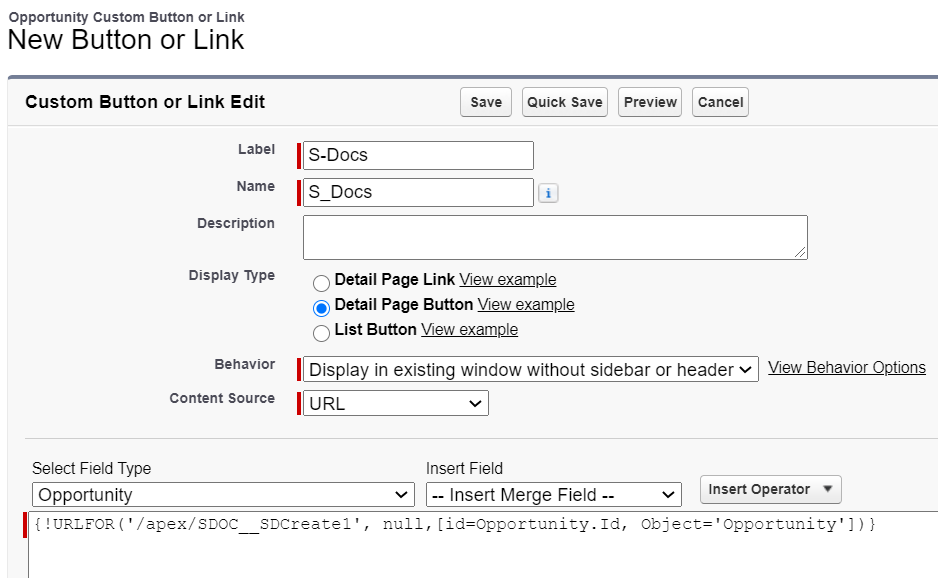
Enter the following information for your button:
Button Label & Name: Choose a name. We'll name our button "S-Docs."
Description: Optionally enter a description, such as "Create documents for this object."
Display Type: Detail Page Button
Behavior: Display in existing window without sidebar or header
Content Source: URL
Button URL:

{!URLFOR('/apex/SDOC__SDCreate1', null,[id=Opportunity.Id, Object='Opportunity'])}

Note: Be sure to change both instances of "Opportunity" with the name of your object in your button URL.

Note: To read about how you can customize this button to allow for one or zero click automation, click here.

Additional Note: If you encounter problems with your S-Docs button in lightning, add the lightningnav='true' parameter to your button URL. This step usually isn't necessary, but it can fix problems in lightning should they arise.

{!URLFOR('/apex/SDOC__SDCreate1', null,[id=Opportunity.Id, Object='Opportunity', lightningnav='true'])}

Add Your S-Docs Button to Your Object Page Layout

Once you save this button, you'll need to add it to the detail page layout for your object. Click Page Layouts in the sidebar of the object manager for your object. Click the arrow at the left of your page layout, then click Edit.

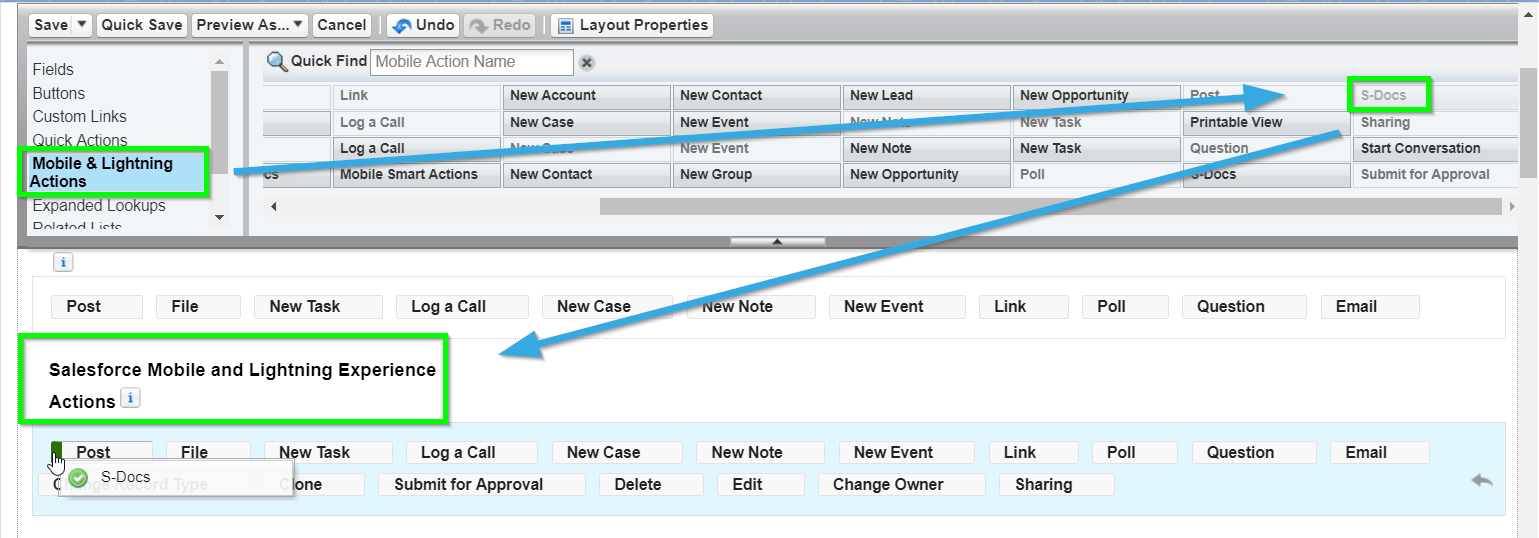
Click Mobile & Lightning Actions in the sidebar menu. The S-Docs button that you just created will appear in the menu of available mobile & lightning actions. Click and drag it into the "Salesforce Mobile and Lightning Experience Actions" section. Click Save when done.

Add The S-Docs Related List To Your Object Page Layout

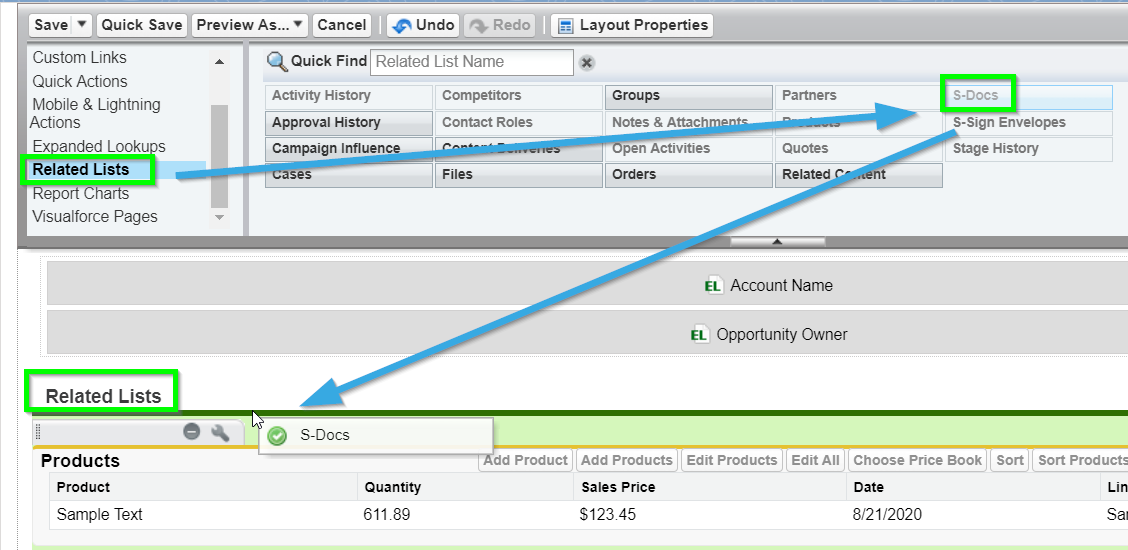
Additionally, you should add an S-Docs Related List to your page by clicking Related Lists and dragging the S-Docs box down into the Related Lists table.

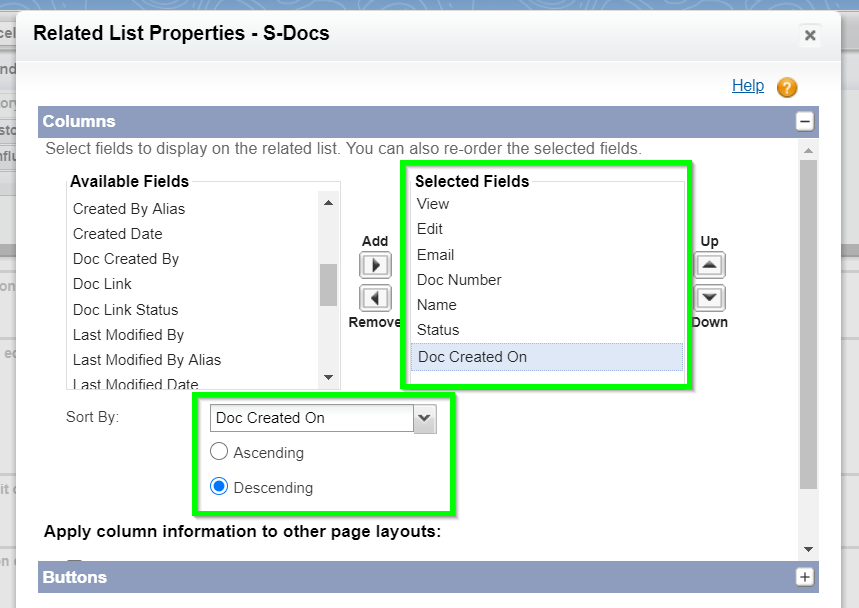
The S-Docs Related List on a given record should display all of the S-Docs ever generated for that record, as well as options to download and email those documents again. In order to display this, we need to add these columns to our Related List. Click the wrench icon on the S-Docs related list.

We recommend adding the following columns: View, Edit, Email, Doc Number, Name, Status, Doc Created On. These will display as columns from left to right on your related list (where top=left and bottom=right). To add a column, click on the column you want to add and then click the triangle button below "Add."

Additionally, we recommend sorting by Doc Created On descending.

Click OK once you’ve added all of your fields. The related list will appear as follows on a particular record’s page.

Note: Each time you edit an S-Docs template record with Auto Create Salesforce Attachment and link to record unchecked, the documents on the related list will change to reflect those edits. The related list will not store documents generated from previous versions of your templates, but rather generate a new document reflecting the most recent version of your template each time you view or email a document in this list.

Step 3:  Configure Your First Template

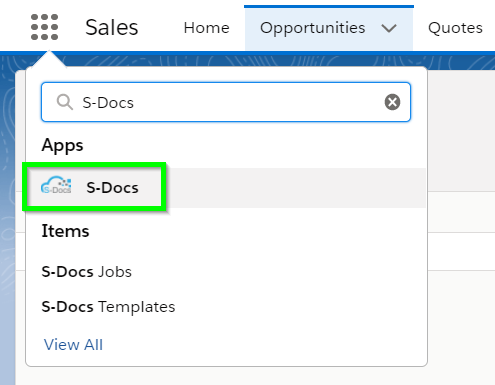
In order to start using S-Docs, you need to configure and activate at least one template. Start by navigating to the S-Docs templates page by clicking on the App Launcher in the upper left corner, typing S-Docs into the search bar, and clicking the S-Docs app.

Click over to the S-Docs Templates tab. This page is where all of your templates will appear. To create a new template, click New.

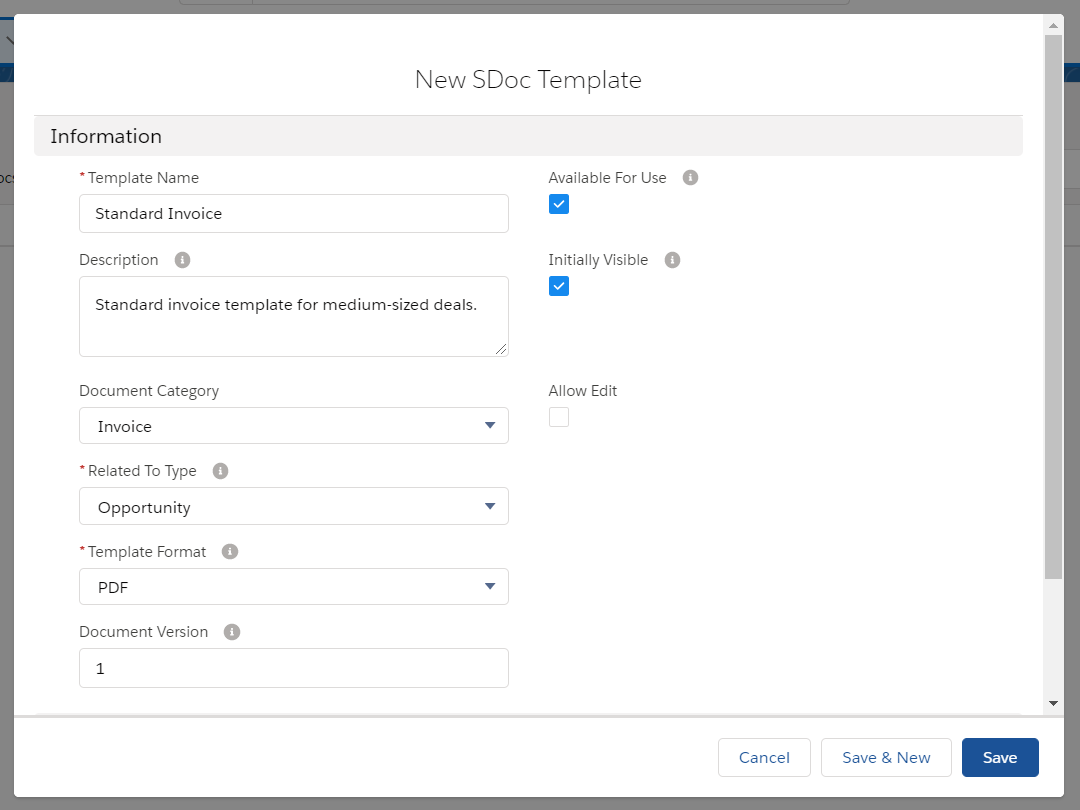
This is the template creation page. In this example, we will create an invoice template for the Opportunity object. Each field is explained below the screenshot.

Template Name: Enter a template name. This field is required.
Description: Optionally add a description. You should include any keywords that will be useful when searching for this template, because this field and the name field are searched during the template selection step. End users will see this when they are selecting templates.
Document Category: Optionally chose a category from the picklist. Templates can be grouped together so that a user can browse templates using a category picklist. If needed, you can later customize this picklist.
Related to Type: Pick an object from the picklist. This is the base or primary object this template will use. If needed, you can customize this list with your custom objectsThis field is required.
Template Format: Pick an output format. To support the same document in multiple formats, simply clone the template with a different "Format" field value. This field is required.
Document Version: Optionally use this field to track any internally used version number (or date) for this template. This is only for reference purposes.
Available for Use: Keep this box checked (it is checked by default). This ensures that the template is visible for document creation.
Initially Visible: Keeping this box checked (it is checked by default) will make this template visible on initial load of the document creation page based on the object type. Typically, you want to set this checkbox for the 10 most used templates for each object type.
Allow Edit: If you want users to be able to edit this document after it has been generated, check this box. Learn more about this feature.

Once you've filled in all of the values to your specifications, click Save. The template is now ready to be edited.

Utilize the Template Editor

Click the arrow on the left of the template detail page to show more buttons, then click the Template Editor button to design your template.

This is a very basic overview of the template editor. For a more in-depth explanation, click here.

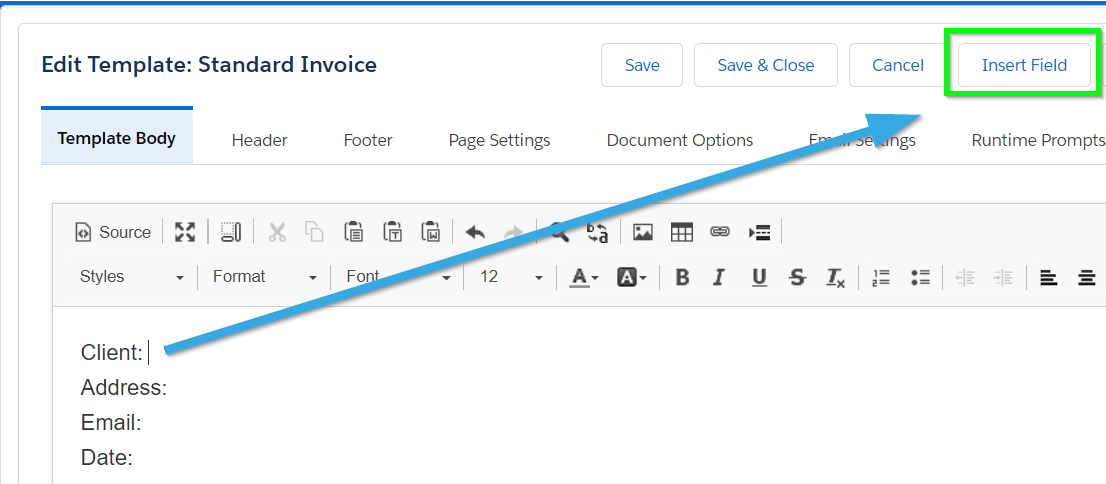
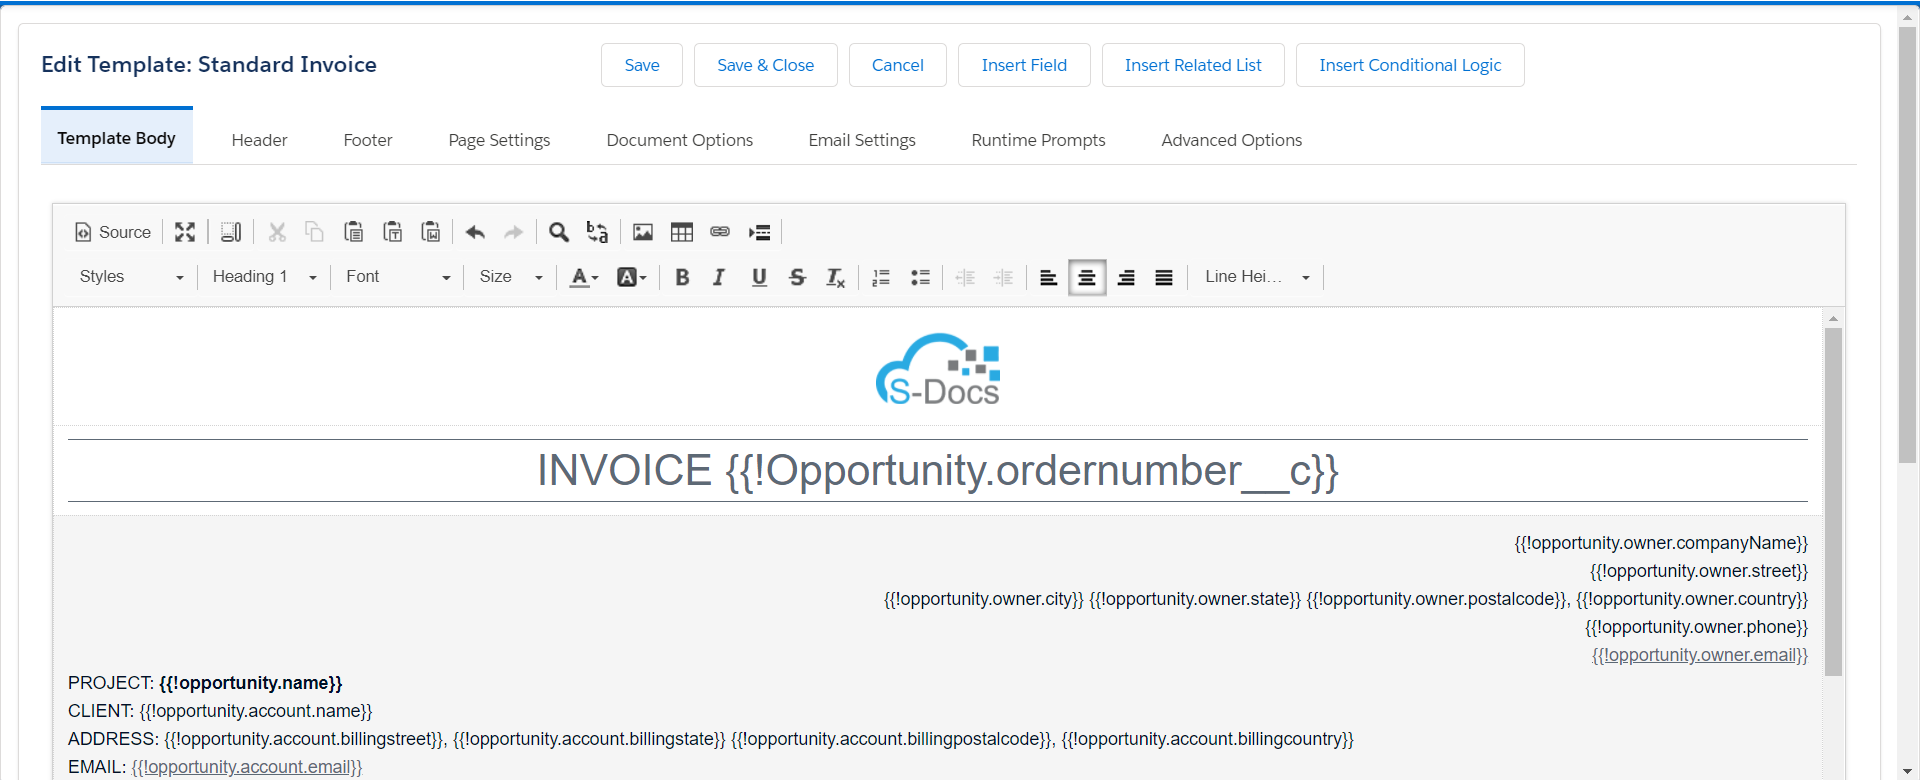
This is the WYSIWYG template editor (What You See Is What You Get). Add some text, place the cursor where you want your Salesforce record data to be merged into the template, and then click on the Insert field button.

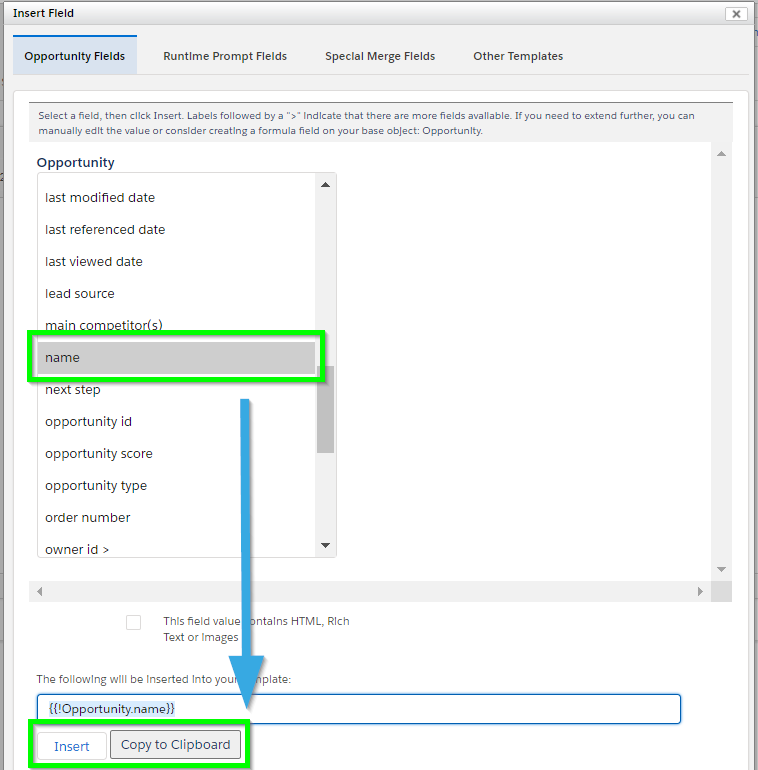
Select the field from the object you want to insert and click Insert.  The editor will add the merge field in the correct syntax into the template editor.

Repeat the above step for other fields.  In addition, you can add related lists and insert conditional logic. You can also use the editor tools to modify the document formatting. Or, click Source to view the HTML and add your own styles; the customization options are endless! Click Save when done.
You have now created your first template!

Note: You can also insert images, span related objects and create child object line items and add CSS stylesheets. Click here for an in-depth explanation of the template editor, or click here to read about advanced template editor features.

Step 4: Generate And Email Your First Document

Open any record for your object and click the S-Docs button you just created.

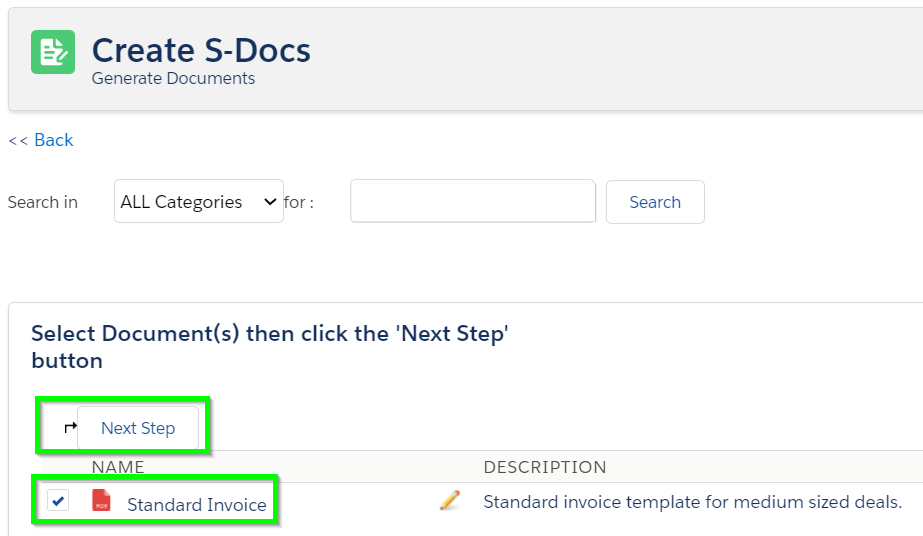
The template you created earlier will appear. (If it doesn't, make sure you’ve checked the Available for Use and the Initially Visible checkboxes when you created your template. Additionally, make sure you set "Related to Type" to the object you're using.) Select the template and click Next Step.

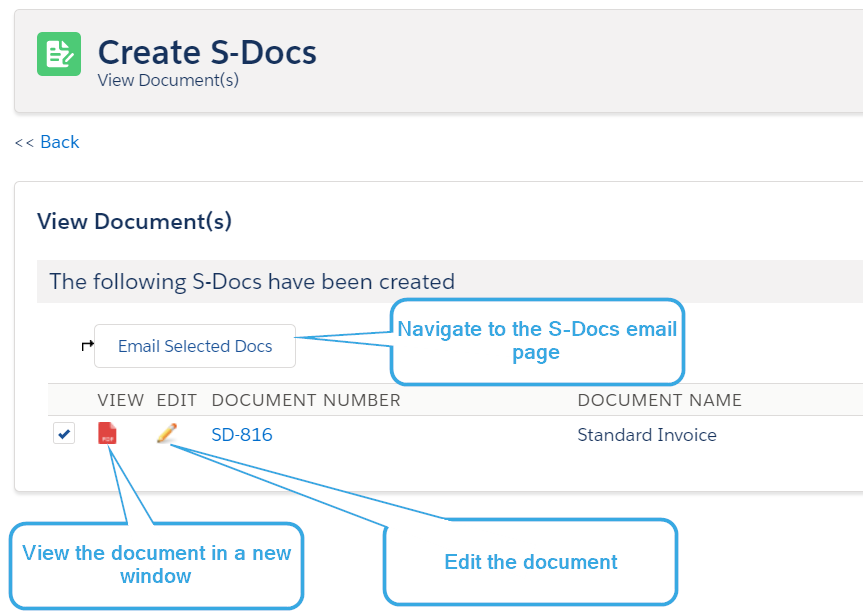
The document will generate in seconds. You can click on the "View" icon or the document number to view or download your document, or click the pencil icon to edit your document (this option is only available if Allow Edit has been checked on the template record). Click Email Selected Docs to bring up the email page for emailing the document.

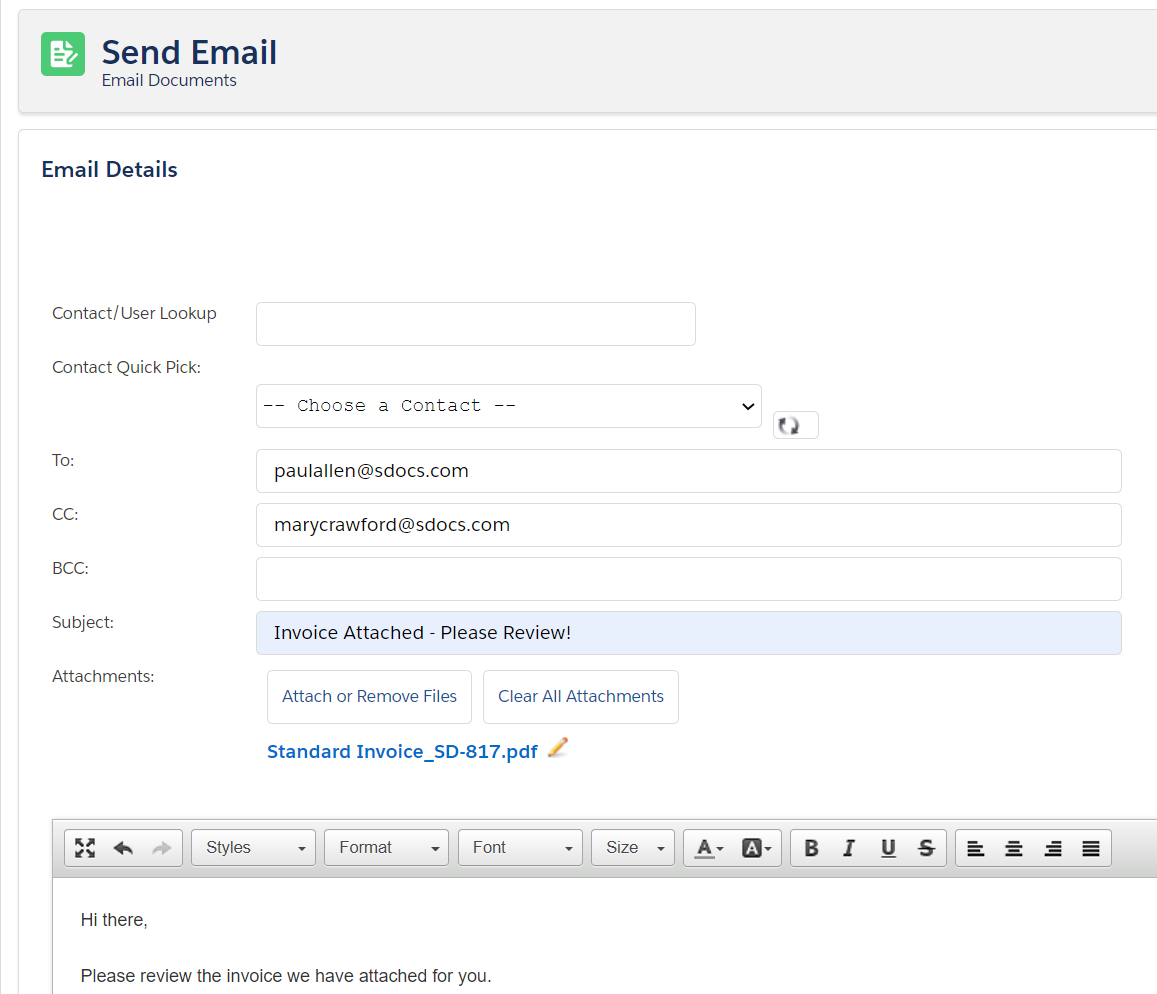
You can edit all of the normal email fields on the email page, as well as the body of the email itself. The document you just generated is automatically added as an attachment to the email. To learn more about how to create custom email templates that automatically fill these fields in for you, click here.

Click Send when done. You have now created and emailed your first document with S-Docs!

Email Failure Troubleshooting

By default, S-Docs links outbound emails to the contact record with a matching email address; Salesforce requires this linkage. If you try to send an email to an email address that is not listed under any Contact record in your org, S-Docs will attempt to link it to a single dummy contact record called "No Contact Record." This contact record is created automatically by the S-Docs package to handle this linkage, and is immediately deleted once the email is sent.

If your org has implemented validation rules that require additional contact fields to be completed, then the S-Docs package will not be able to create this contact record. In this case, there are two main options.
Option 1 (Recommended)

Create a before insert, before update Apex trigger on the Contact object that automatically changes the fields on the No Contact Record that S-Docs creates so that your validation rules are not triggered. For example, the trigger might look like this if your validation rules prevent the contact field "This_Cannot_Be_Null__c" from being null:
trigger ContactFirstName on Contact (before insert, before update) {
    for (Contact c : trigger.new) {
        if (c.LastName == 'No Contact Record') {
            c.This_Cannot_Be_Null__c = 'some non-null value';
        }
    }
}

With this option, S-Docs will be able to create and delete the No Contact Record, and the email will be sent and logged in Activity History on the base object record.

If you require test coverage for your No Contact trigger, you can use the following test class:

Class Name: NoContactTestClass

@isTest
private class NoContactTestClass {    @isTest
    public static void noContactTest() {
    	Test.startTest();
        Contact testContact = new Contact();
        testContact.LastName = 'No Contact Record';
        insert testContact;
        Test.stopTest();
    }}

Option 2

Create the S-Docs No Contact Record manually with all of the fields filled in that are required by your validation rules. The fields that S-Docs requires should be filled in as follows:
First Name: Not Required. We recommend writing S-Docs to avoid confusion.
Last Name: No Contact Record
Email Address: this.email@is.invalid
You then need to add the following parameter to the end of your S-Docs button: &useExistingNoContactRecord=true
Note: This option is not recommended, as the email will not be logged in Activity History on the base object record.

Sandbox Deliverability

If you are testing S-Docs in a sandbox org and emails are not being delivered, you should check Setup > Email Administration > Deliverability, and check that "Access to Send Email" is set to "All email." By default, Salesforce turns off outbound email access when a sandbox is created to reduce the risk of inadvertently sending emails to contacts during development and testing. Be aware that this change effects the entire sandbox and not just S-Docs.

5 Reasons You Need to Digitize Your Business

By Blog No Comments

When is the last time you heard the word digitize? Truth be told, other than ‘digitization’ being an extremely high scoring play in Scrabble, the term often gets lost in a sea of buzzwords associated with tech trends like modernization and simplification. Buzzwords start to lose their meaning and significance to a business owner when used too frequently and interchangeably, but sooner or later the digitization process will play a unique and irreplaceable role in every business.

So what is digitization?

It seems like a process that’s just as new as the internet, but it’s actually been a part of innovation for much longer. Put simply, it’s the process of converting something into digital form. In a business context, this could be anything that transforms paper processes into digital form to improve efficiency.

If you feel at home in the paper-era, we know you have reasons for not wanting to jump headfirst into the world of digitization. However the reasons for implementing a digitization process are pretty compelling, so hear us out at least.

You Might Also Like: Close Deals Faster With A Document Generation App -- 5 Helpful Tips

Your Most Valuable Asset is Your Time

You’ve probably heard the expression before. When considering your business, time is often the most overlooked factor, when in reality it is our greatest asset. Digitization allows employees to spend less time on simple, repetitive tasks and focus on more complex, crucial tasks that result in a more efficiently run business. Transforming your business through the digitization process creates more access for your team to get things done rather than the roadblocks of outdated processes and paper trails, meaning they save time and you save time.

The Price is Right

I know what you’re probably thinking – Doesn’t digitizing my business mean that I’ll need to implement new software and processes that have a higher price tag than what I’m paying for today? While new technology inevitably comes at a steeper price than what you already have, deciding to digitize your business will reduce costs in the long run. Operating with the future in mind, digitization saves on storage space and cuts excess costs.

Now More Than Ever, Security Matters

In our day and age, keeping data secure is no longer a ‘nice to have’ benefit from a business, it’s expected. Data security matters and if it’s not upheld it can destroy a company’s trust among customers. When you digitize your business, you create additional barriers for keeping customer data safe and instill greater amounts of trust among your customers.

Get A Leg Up on Your Competition

There’s no easier way to differentiate yourself from your competitors and create more separation between their business and yours than by digitizing your processes. You’ll have a quicker turnaround, more efficient communication in place which will result in improved customer experience. Plus, a digitization process enables your organization to continue to innovate faster, making it easier for your team to adapt to an ever-changing market.

Leave a Greater, More Positive Impact

Speaking of ways to continue to improve your business and set yourself apart, let’s talk about environmental impact. Maybe it isn’t top of mind when considering reasons you need to digitize, but the positive impact business can make on our environment by simply reducing their paper production and automating manual processes is significant. Digitization allows you to leave a greater impact on the world by simply reducing your output of paper.

Here’s the thing about digitization, it isn’t just a buzzword or trend that will be one day here and next day gone. Imagine how many people thought the Internet itself was just a trend? Now it’s second nature for businesses. More and more companies are looking to improve their processes and digitize their business. So, where should you start? Check out our recent whitepaper on the three documents your company should start to automate today.

See S-Docs In Action

Leave your Salesforce document workflow worries behind.

Request Demo

Enjoying our blog?

Subscribe now and we'll make sure to send you the latest as we publish new content!

Connect With Us!

For Salesforce news, digital document & e-signature insights, or just for fun.


Read More

Blog
June 12, 2024

Optimizing Sales Ops KPIs with Effective Reporting and Document Automation

Optimizing Sales Ops KPIs with Effective Reporting and Document Automation You don't have to micromanage your sales executives to optimize sales operations. Instead, you’ll have more success by establishing sales…
Blog
June 5, 2024

Are You Ready for a Document Automation Tool?

The Need for Efficiency in Today’s Businesses Business efficiency is crucial. Imagine running a marathon while juggling — sounds chaotic, right? That’s what managing documents without automation can feel like.…
Blog
May 29, 2024

Understanding and Advancing Organization Maturity Levels in Your Business

Understanding and Advancing Organization Maturity Levels in Your Business An organizational maturity assessment identifies where your company stands within the stages of a chosen maturity model framework so you can…
growing

Inside the S-Docs Intern Program That’s Boosting Customer Experience

By Blog No Comments
growing

Have you met the 2019 S-Docs interns? If you’re a current S-Docs customer, or even if you’re considering becoming one, chances are our interns have played a role in your S-Docs experience. This summer we brought on seven of University of Michigan and Michigan State’s brightest for a three-month internship to grow their knowledge and expand the ways we engage with our customers. The result was a happy team, plenty of new ideas and satisfied customers. So let’s dig into the S-Docs internship a little more, shall we?

The Backstory

It all started when S-Docs CEO Dan Pejanovic was looking for a way to establish and build a connection with U of M in Ann Arbor, MI to foster relationships with upcoming graduates. University of Michigan has prestigious computer science, engineering and business degree programs which are highly sought after by top talent every year. He thought, why not tap into this pool of talent and build mutually beneficial relationships with these students over their years in Ann Arbor, potentially opening the door for future employment? With this idea, the S-Docs internship program came to life.

Forget Fetching Coffee

We all know the stereotypical internship involves grunt work and fetching coffee, but we wanted to offer our summer interns a different, more beneficial experience. Instead, our aim was to expose college students and recent grads to the inner workings of a SaaS company; more specifically the culture, work ethic and product knowledge of S-Docs. Our interns gain a real-world opportunity to figure out how to problem solve, learn new skills and manage multiple projects at the same time. Plus, we’re empowering the next generation of business and technical talent and providing them an arena to identify and exercise their strengths. Zach, our content and technical writing intern, summed up his experience by saying:

“I was responsible for updating documentation which directly helps the customers by informing them on our product and our best practices. Because it’s a more tight knit team, we have more responsibility. That teaches you great work ethic.”

Boosting Customer Experience

The way we see it, our internship program has plenty of key benefits, for everyone involved, but especially for our customers. Because we take a hands-on approach with our interns, they work directly with customers on a day to day basis and bring fresh ideas to the team. From qualifying leads and getting in touch with interested companies from the AppExchange to setting up demos and answering product questions, our interns have an in-depth understanding of S-Docs to better assist our customers.

Matt Fabian, Account Director, commented on how the interns assist with customers:

“They help our customers get the information that they need and help them better understand how our business works. We’re expanding our program each year, and we love the input the interns bring.”

Beyond following up with leads and interacting with our customers, S-Docs interns are involved with the product development itself. This summer, two of our software engineering interns Josh and Jasmine worked on the S-Sign  product. Their focus was to enable multi-sign, which makes it possible for multiple users to sign the same document in a neat, orderly way. According to Jasmine:

“I enjoy enhancing the customer experience with S-Docs by helping build product improvements that the customer benefits from directly.”

You Might Also Like: S-Docs Is Proud To Be Part Of The Pledge 1% Movement

What Our Team Is Saying

As far as the S-Docs team goes, we couldn’t be more thrilled about the internship program. We gain fresh ideas and uncover new ways to solve problems from an influx of students with varying backgrounds and levels of experience.

And the consensus from our interns? They’re having the time of their lives, learning the ins and outs of marketing, sales, product development, and more. Looking toward the future, interns have an opportunity to continue to work throughout the school year, depending on class load, and upon graduation, there’s a foot in the door to be considered for a full-time position.

So here’s a special shout out to this summer’s S-Docs interns Jasmine, Josh, Alex, Brett, Mark, Kelly and Zach. We and our customers appreciate all your hard work!

See S-Docs In Action

Leave your Salesforce document workflow worries behind.

Request Demo

Enjoying our blog?

Subscribe now and we'll make sure to send you the latest as we publish new content!

Connect With Us!

For Salesforce news, digital document & e-signature insights, or just for fun.


Read More

Blog
June 12, 2024

Optimizing Sales Ops KPIs with Effective Reporting and Document Automation

Optimizing Sales Ops KPIs with Effective Reporting and Document Automation You don't have to micromanage your sales executives to optimize sales operations. Instead, you’ll have more success by establishing sales…
Blog
June 5, 2024

Are You Ready for a Document Automation Tool?

The Need for Efficiency in Today’s Businesses Business efficiency is crucial. Imagine running a marathon while juggling — sounds chaotic, right? That’s what managing documents without automation can feel like.…
Blog
May 29, 2024

Understanding and Advancing Organization Maturity Levels in Your Business

Understanding and Advancing Organization Maturity Levels in Your Business An organizational maturity assessment identifies where your company stands within the stages of a chosen maturity model framework so you can…

S-Docs Runtime Prompts: Merge User Input with Documents at Runtime

By Documentation, S-Docs Runtime Prompts Feature No Comments

Video Tutorial

Introduction to Runtime Prompts

The S-Docs Runtime Prompts feature allows you to set up forms with questions for users to respond to during the document generation process. This form input can then be merged into the document and/or conditionally render certain sections of the document. 

Setting up a template with Runtime Prompts is fairly simple: open your template in the Template Editor and head over to the Runtime Prompts tab.

Overview of the Runtime Prompts menu

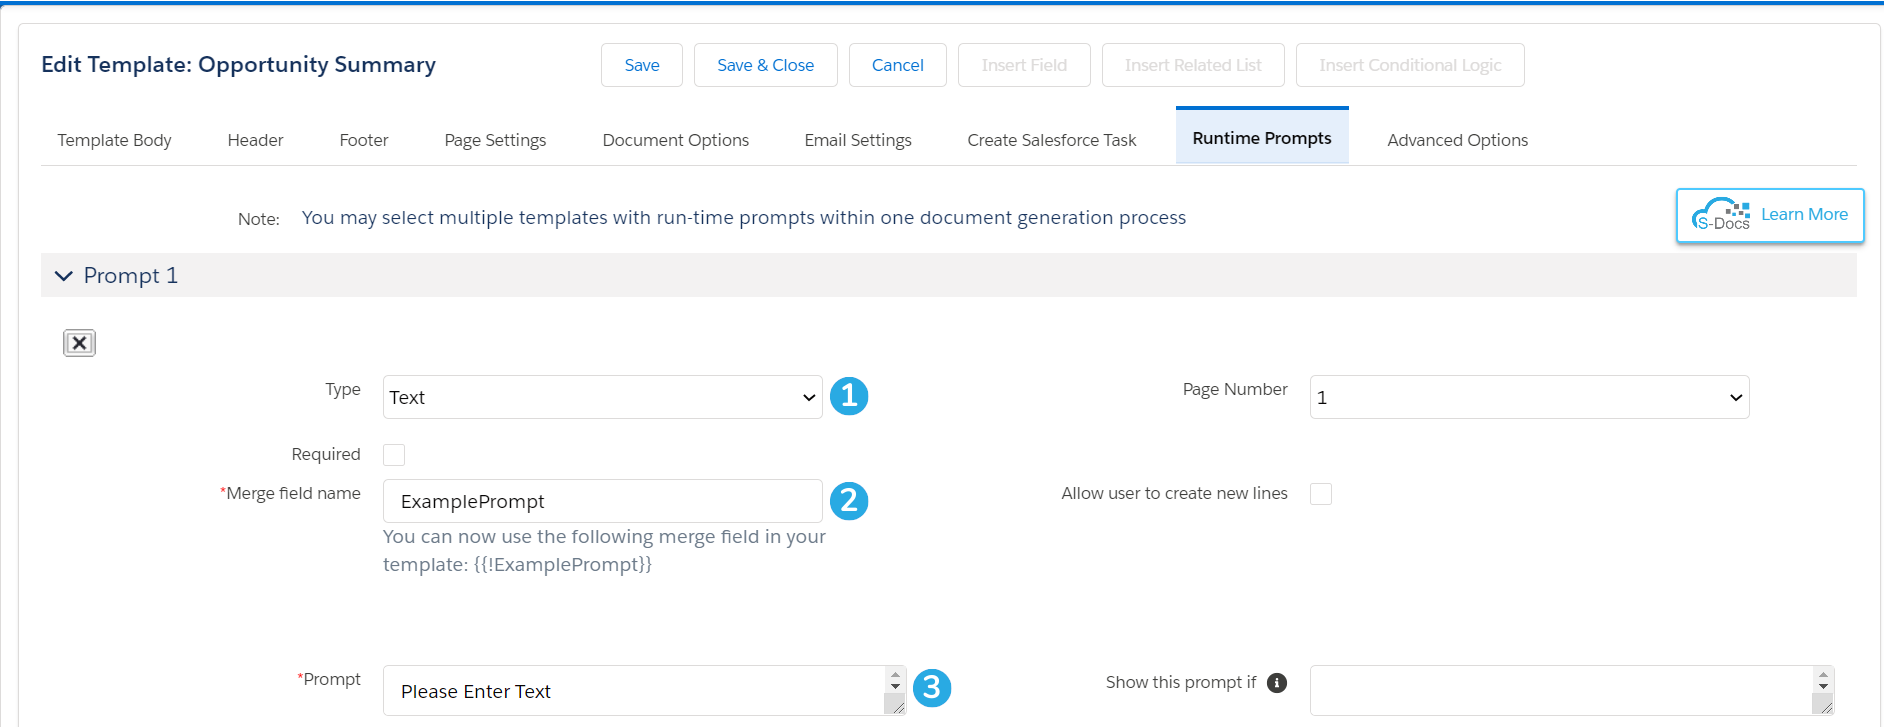
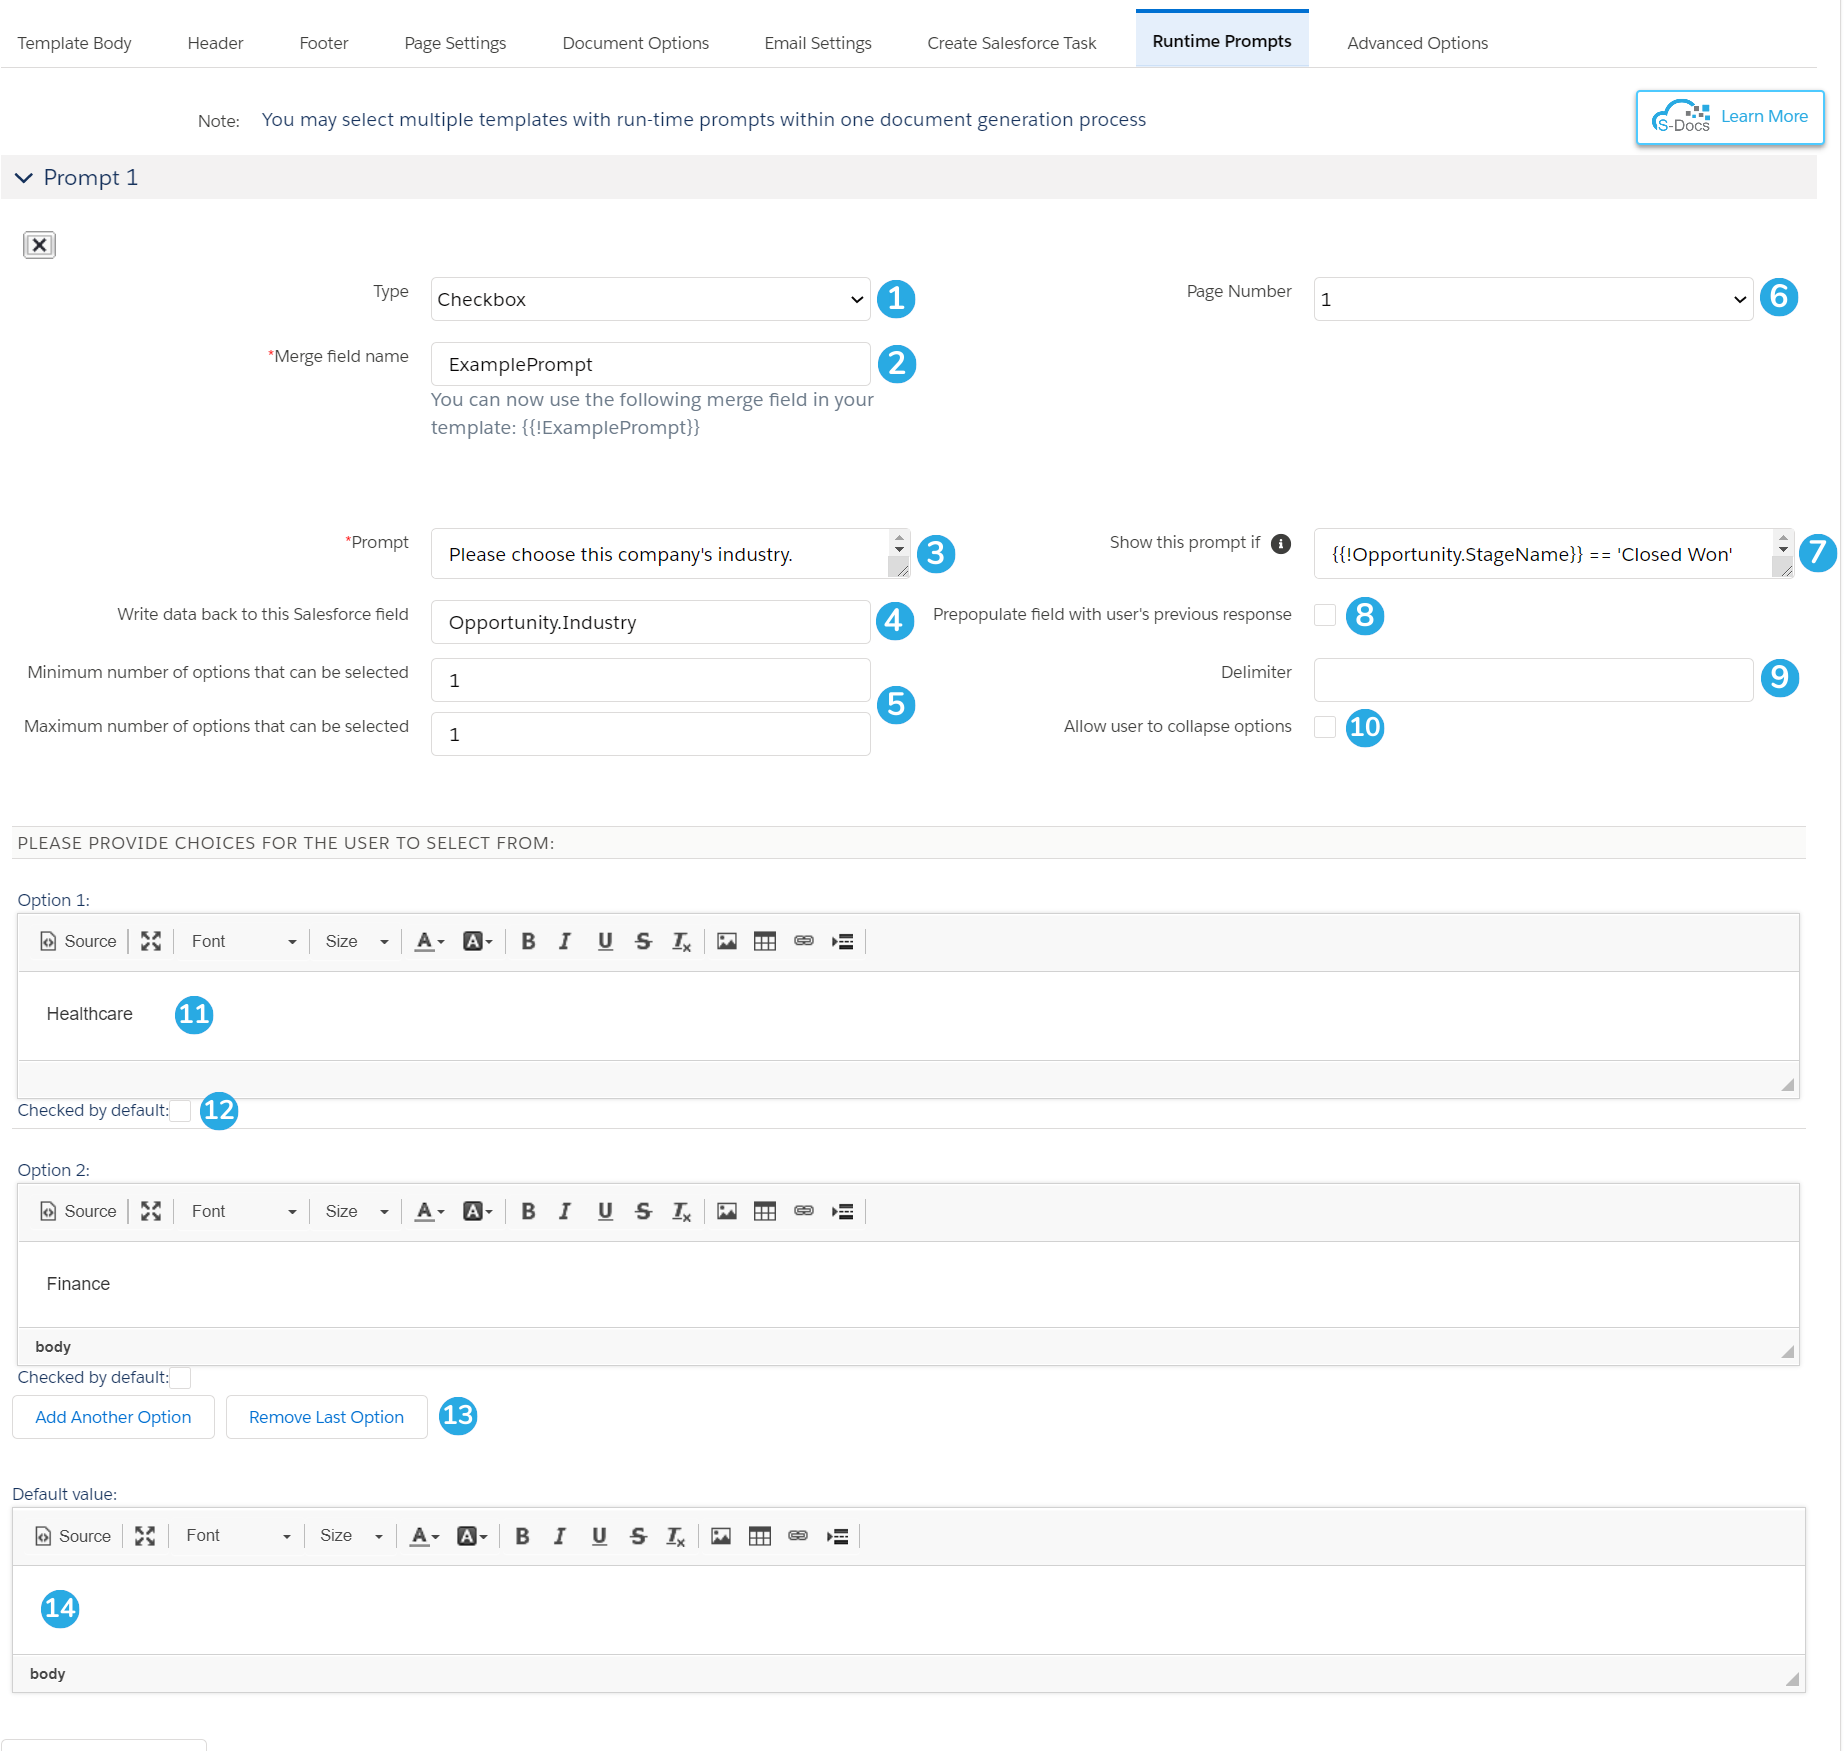
Although different options will appear for each type of prompt, this is the basic layout of the Runtime Prompts menu. Each piece of input you'd like to collect from your users is called a "Prompt." You can create as many as you like. To create a basic prompt:

[1] Select the type of prompt you would like users to answer: Text, Date, Checkbox, or Related List.

[2] Name the merge field for this prompt and place it within the template body. The user's response to the prompt will appear where the merge field is placed.

[3] Write the prompt itself. This is the question the user sees and responds to during the document generation process.

We will now go over the options for each individual prompt type.

The Four Types of Prompts

As we stated before, you can choose from Text, Date, Checkbox, and Related List Prompts.

Text Prompts

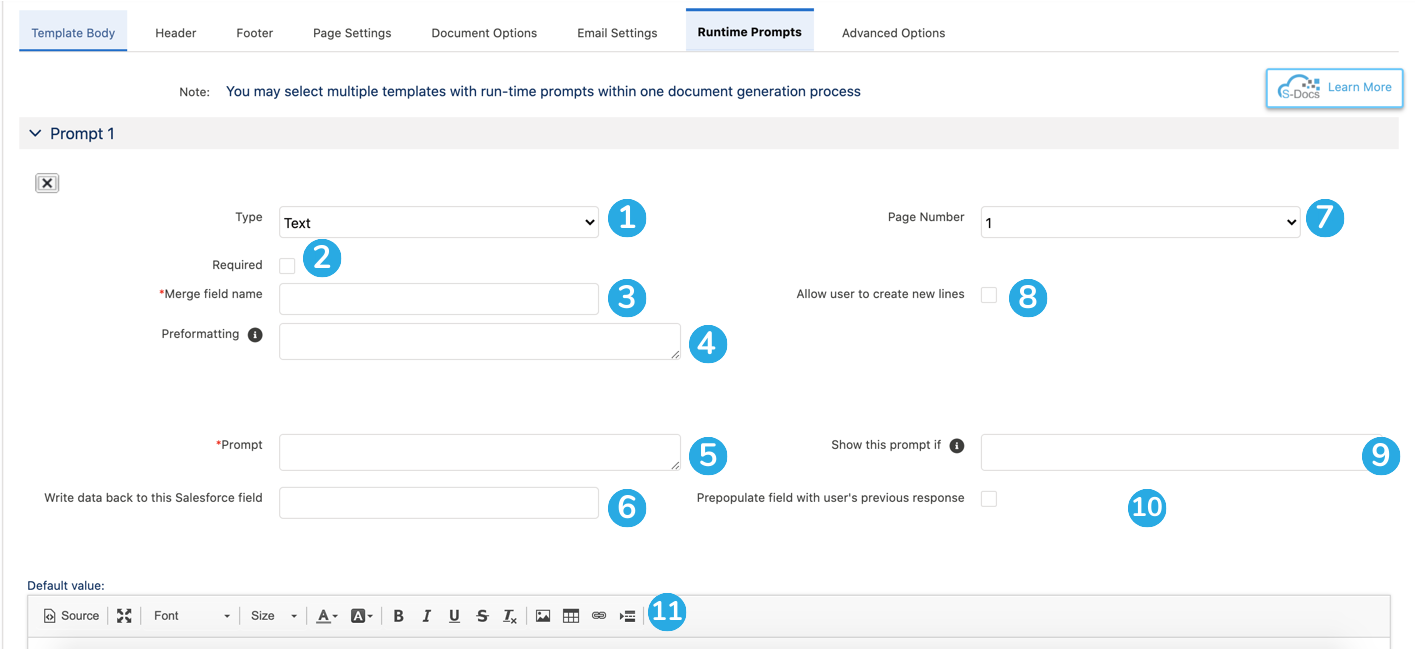
Text prompts are simple free-form text fields that the user can type whatever they want into. This is the text prompt menu:

[1] Set the prompt type to Text to create a text prompt.
[2] Make this prompt required or optional. The user will not be able to finish generating this document without responding to this prompt if it is required.
[3] Name the merge field for this prompt and place it within the template body. The user's response to this prompt will appear where the merge field is placed. This merge field can also be used within conditional statements.
[4] Preformatting tool to assign a specific number of characters that can be entered. Use an X to indicate any single-character input, or use a # to indicate a digit. For example, for U.S. phone numbers, do '(###) ###-####'.
[5] Write the text prompt itself. This is the question the user sees above the text box during document generation.
[6] Choose a Salesforce text field to write this data back to.

Note: Omit curly braces for Writeback merge fields used within Runtime Prompts. For example, instead of {{!Opportunity.Description}}, write Opportunity.Description.

[7] Choose which page this text prompt should appear on. You can create up to 10 different pages for your Runtime Prompts.
[8] Allow the end-user to expand the text box and create new lines of text. By default, users can only enter one line of text.
[9] Specify conditions for this prompt to be shown. This field accepts conditional statements, and can be used with regular merge fields and Runtime Prompt merge fields (see the Runtime Prompt Decision Trees section of this article for more information).
[10] Choose to prepopulate this prompt with the user's previous response. This means that if they typed "Example Response" into the text box the last time they generated this document, the default value for this field will be "Example Response" the next time they generate it.
[11] Specify a default value for this prompt. This will be used if the user leaves the prompt blank.

Note: You can only specify a default value if the prompt is not required.

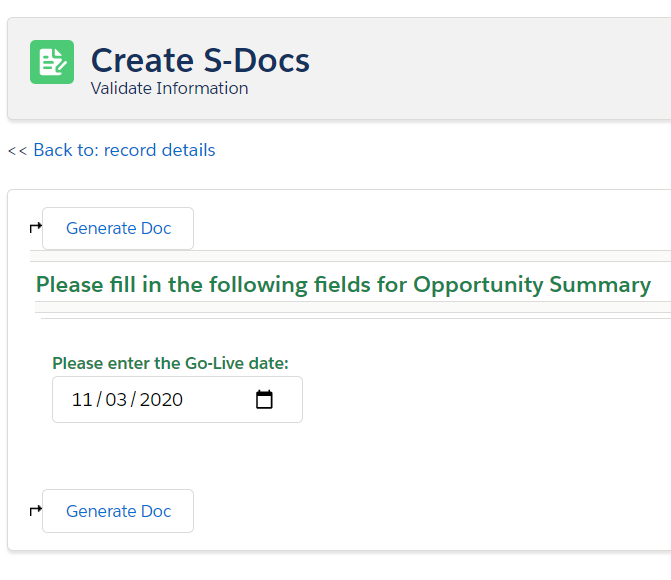
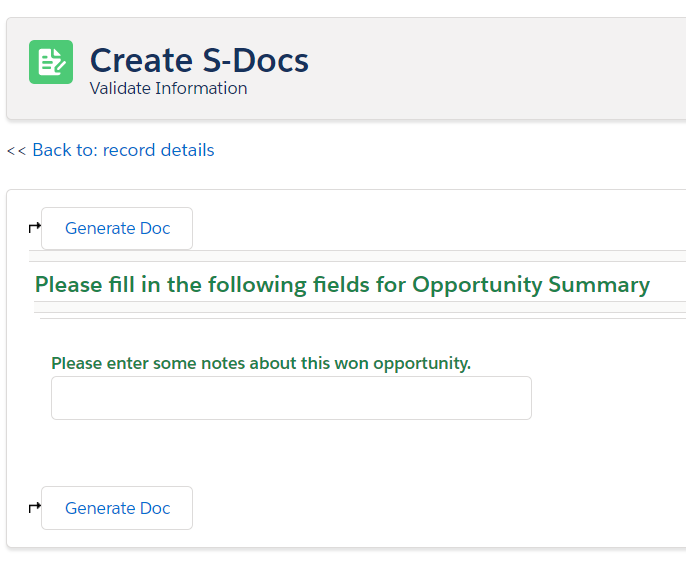
Text prompts look like this at runtime:

Date Prompts

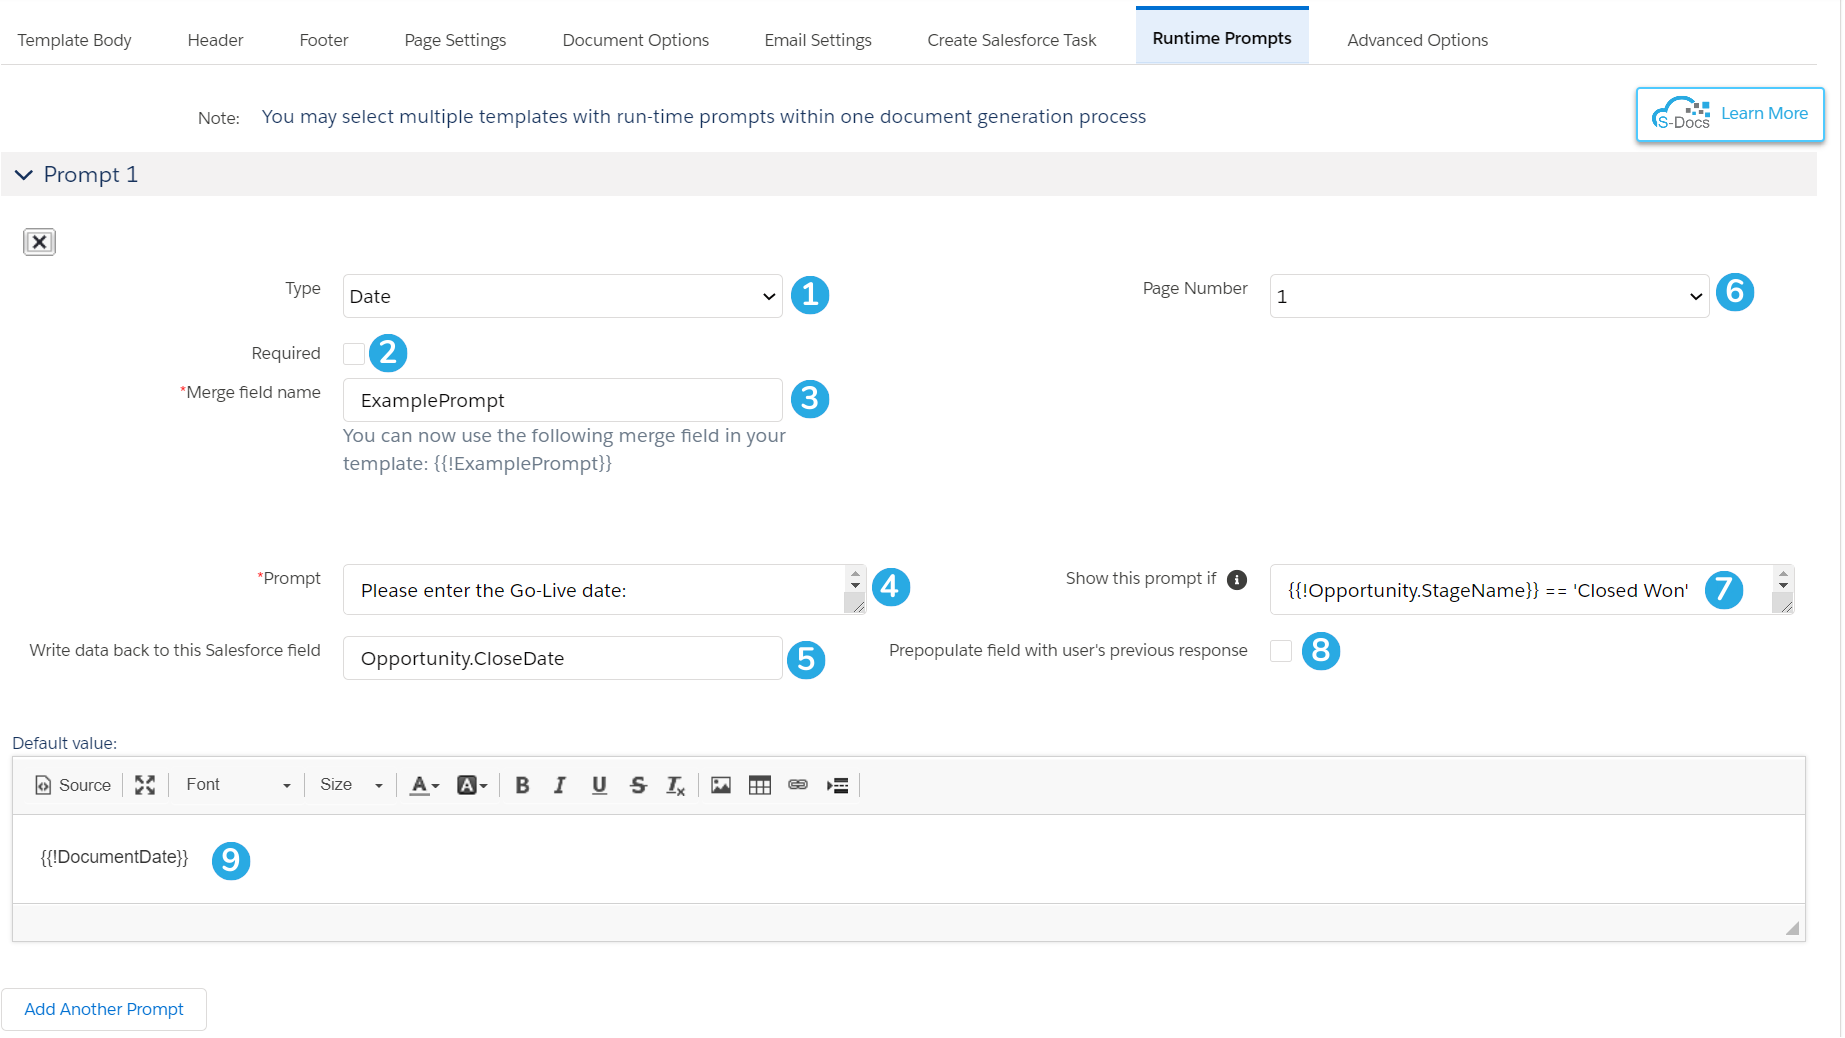
Date prompts provide a date picker that the user can choose a date from. This is the date prompt menu:

[1] Set the prompt type to Date to create a date prompt.
[2] Make this prompt required or optional. The user will not be able to finish generating this document without responding to this prompt if it is required.
[3] Name the merge field for this prompt and place it within the template body. The user's response to this prompt will appear where the merge field is placed. This merge field can also be used within conditional statements.

Note: This date field can be formatted with format-date(e.g. {{!ExamplePrompt MM/dd/yyyy}}), or it can be used to filter a WHERE clause in your related list (e.g. WHERE CreatedDate > {{!ExamplePrompt}}), or it can do pretty much anything else an ordinary date merge field can do.

[4] Write the date prompt itself. This is the question the user sees above the date picker during document generation.
[5] Choose a Salesforce date field to write this data back to.

Note: Omit curly braces for Writeback merge fields used within Runtime Prompts. For example, instead of {{!Opportunity.Description}}, write Opportunity.Description.

[6] Choose which page this date prompt should appear on. You can create up to 10 different pages for your Runtime Prompts.
[7] Specify conditions for this prompt to be shown. This field accepts conditional statements, and can be used with regular merge fields and Runtime Prompt merge fields (see the Runtime Prompt Decision Trees section of this article for more information).
[8] Choose to prepopulate this prompt with the user's previous response. This means that if they chose "8/11/2021" the last time they generated this document, the default value for this field will be "8/11/2021" the next time they generate it.
[9] Specify a default value for this prompt. This will be used if the user leaves the prompt blank. You can use merge fields and static text.

Date Prompts look like this at runtime:

Checkbox Prompts

Checkbox Prompts provide users with a variety of options to choose from. This is the checkbox prompt menu:

[1] Set the prompt type to Checkbox to create a checkbox prompt.
[2] Name the merge field for this prompt and place it within the template body. The user's response to this prompt will appear where the merge field is placed. This merge field can also be used within conditional statements.
[3] Write the checkbox prompt itself. This is the question the user sees above the list of checkbox options during document generation.
[4] Choose a Salesforce text field to write this data back to.

Note: Omit curly braces for Writeback merge fields used within Runtime Prompts. For example, instead of {{!Opportunity.Description}}, write Opportunity.Industry.

[5] Specify the minimum and maximum number of options that can be selected by the user. If you leave these fields blank, users will be able to select all options.
[6] Choose which page this checkbox prompt should appear on. You can create up to 10 different pages for your Runtime Prompts.
[7] Specify conditions for this prompt to be shown. This field accepts conditional statements, and can be used with regular merge fields and Runtime Prompt merge fields (see the Runtime Prompt Decision Trees section of this article for more information).
[8] Choose to prepopulate this prompt with the user's previous response. This means that if they chose "Option A" the last time they generated this document, the default value for this field will be "Option A" the next time they generate it.
[9] Specify a delimiter to separate multiple values by in the document. For example, say your Options are Okay, Good, Better, & Best, your merge field is {{!ExamplePrompt}}, and your delimiter is "AND." If the user selects Good, Better, and Best at runtime, then {{!ExamplePrompt}} will be replaced with "Okay AND Good AND Best" in the final document.
[10] Allow the user to collapse the checkbox options and only show the prompt on screen.
[11] Create the checkbox Options for users to choose from. An Option can be just one word, or it can consist of heavily formatted rich text paragraphs; you can even use merge fields in an Option. You can define as many Options as you'd like.
[12] Choose to have options appear checked or unchecked by default.
[13] Add or remove as many options as you'd like.
[14] Specify a default value for this prompt. This will be used if the user leaves the prompt blank. You can use merge fields and static text.

Now, what about picklists? Where are the Picklist Prompts!? Trick question - they're here! Runtime Prompts plays off of simplicity and flexibility to allow you to get a lot of power out of these three little Prompt types.

So, how can we get a picklist? Well, let's start with what a picklist functionally is: a collection of options that allows for the selection of exactly one of those options. In other words, a list of options from which you can select a minimum of 1 option and maximum of 1 option, meaning you can simply create a Checkbox Prompt with "1" as the value for both "Minimum number of options that can be selected" and "Maximum number of options that can be selected."

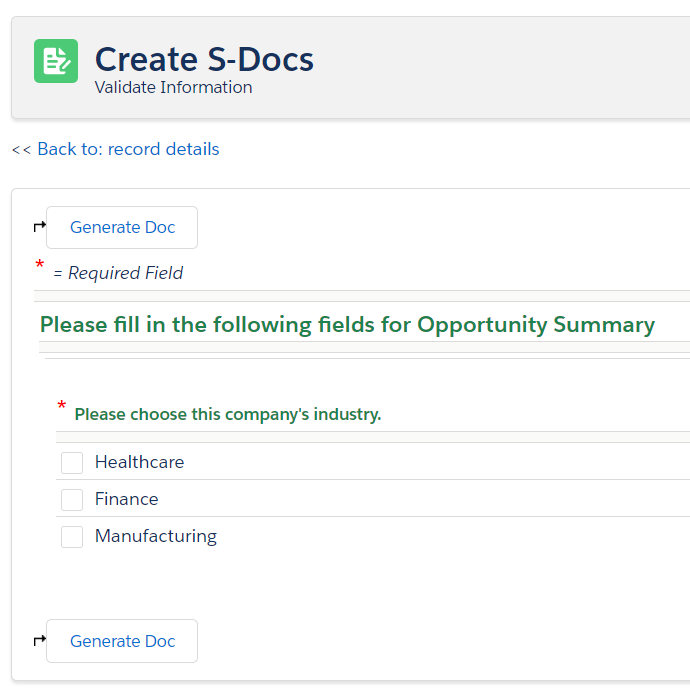
Checkbox prompts look like this at runtime:

Related List Prompts

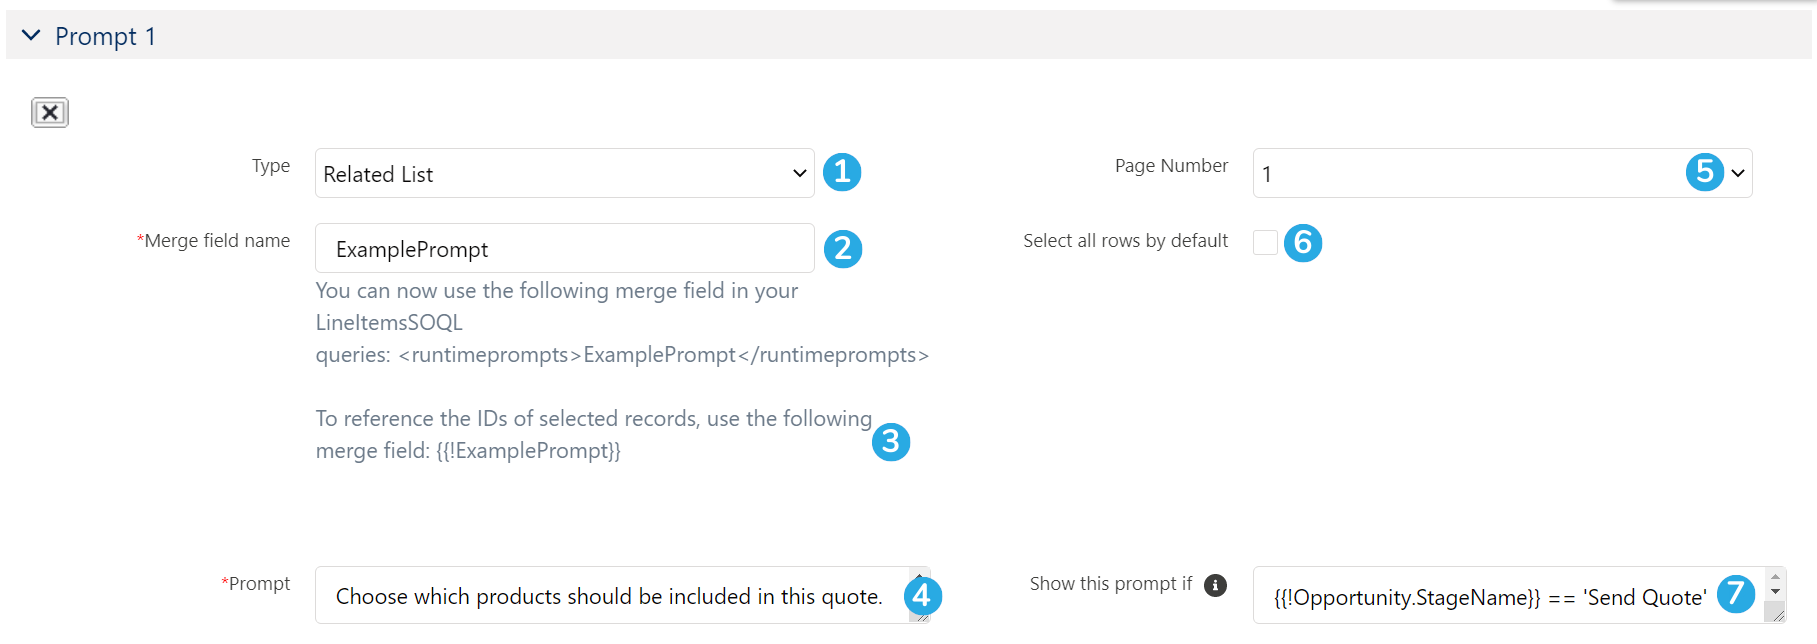
Related List Prompts display records from a related list and allow the user to select which records to include in the document. They can be used with LineItemsSOQL queries. This is the related list prompt menu:

[1] Set the prompt type to Related List to create a related list prompt.
[2] Enter a name to be included within <runtimeprompts> tags within your LineItemsSOQL statement. Let's say we wanted users to be able to select which opportunitylineitems to include in a table on a quote. The LineItemsSOQL statement would look similar to the following:

[code lang="html" highlight="18,19"]<img src="data:image/gif;base64,R0lGODlhAQABAIAAAAAAAP///yH5BAEAAAAALAAAAAABAAEAAAIBRAA7" data-wp-preserve="%3Cstyle%20type%3D%22text%2Fcss%22%3Etable%20%7B%20border%3A%20collapse%3B%20%7D%0A%20%20table%2C%20tr%2C%20td%2C%20th%20%7B%20border%3A%201px%20solid%20black%3B%20%7D%0A%20%20th%20%7B%20font-weight%3A%20bold%3B%20%7D%0A%3C%2Fstyle%3E" data-mce-resize="false" data-mce-placeholder="1" class="mce-object" width="20" height="20" alt="&lt;style&gt;" title="&lt;style&gt;" />
<strong>Products</strong>
<table cellpadding="4" cellspacing="0">
<thead>
<tr>
<th>name</th>
<th>quantity</th>
<th>listprice</th>
<th>totalprice</th>
<th>productcode</th>
</tr>
</thead>
<tbody><!--{{!
<LineItemsSOQL>
<runtimeprompts>ExamplePrompt</runtimeprompts>
<uniqueid>123</uniqueid>
<class>table151</class>
<soql>
SELECT name, quantity, listprice, totalprice, productcode
FROM opportunitylineitem
WHERE opportunityid='{{!Opportunity.id}}'
</soql>
<column>name</column>
<column>quantity</column>
<column>listprice</column>
<column>totalprice</column>
<column>productcode</column>
</LineItemsSOQL>
}}-->
</tbody>
</table>[/code]

Note that the "Merge Field Name" goes inside <runtimeprompts> tags. You must also enter a unique ID (any unique string of numbers) and enter it within <uniqueid> tags, as shown above.
Upon generating the document, users would be presented with a list of related opportunitylineitems that displays the name, quantity, list price, total price, and product code of each product. They could then select which products to include in the document's related list table.

[3] Use this merge field in your document to reference the record IDs that the user selects from the Runtime Prompt related list. For example, you could write a new SOQL query in your document that only displays the records chosen, similar to the following:

[code lang="html"]SELECT ... FROM .... WHERE id IN {{!ExamplePrompt}}[/code]

You can also use this merge field in additional related list runtime prompts, so that only the records chosen in one prompt will display in another prompt. If you opt to do this, each prompt must be on its own Runtime Prompt page.

[4] Write the related list prompt itself. This is the question the user sees above the list of related list records during document generation.
[5] Choose which page this related list prompt should appear on. You can create up to 10 different pages for your Runtime Prompts.
[6] Choose to automatically select each record in the related list by default (the user could then uncheck items that shouldn't be included).
[7] Specify conditions for this prompt to be shown. This field accepts conditional statements, and can be used with regular merge fields and Runtime Prompt merge fields (see the Runtime Prompt Decision Trees section of this article for more information).

Related list prompts look like this at runtime:

Runtime Prompt Decision Trees

You can conditionally show certain prompts based on responses given for previous prompts, meaning that you can create complex decision trees for your documents. We'll demonstrate this with the following example.

Example Use Case

Alex owns a professional paint removal service. His representatives conduct preliminary evaluations at their clients' homes, then send follow-up letters afterward. Alex wants his representatives to be able to generate these letters from a pre-made template - the only problem is, there are different types of paint removal and methods of getting it done. Alex doesn't want his employees to have to choose from a list of 20 different templates each time they want to send a follow-up letter!

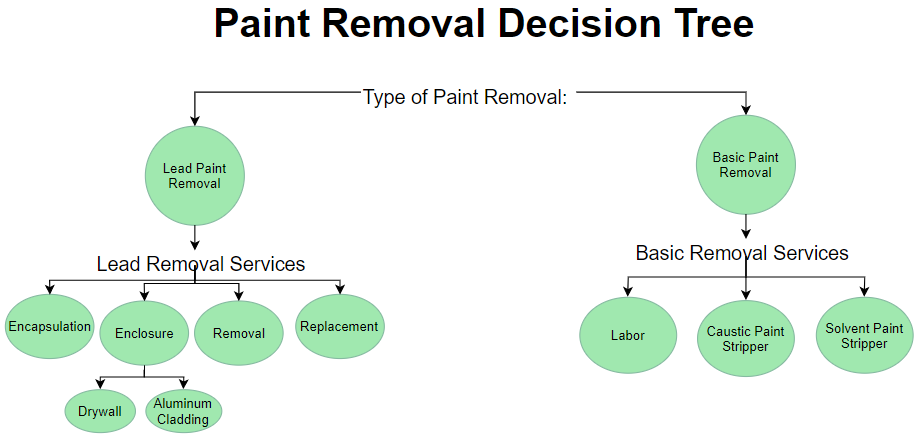
Luckily, Runtime Prompts can help him out. Let's take a look at the possible choices that Alex's representatives have for their letters:

Setting Up The Prompts

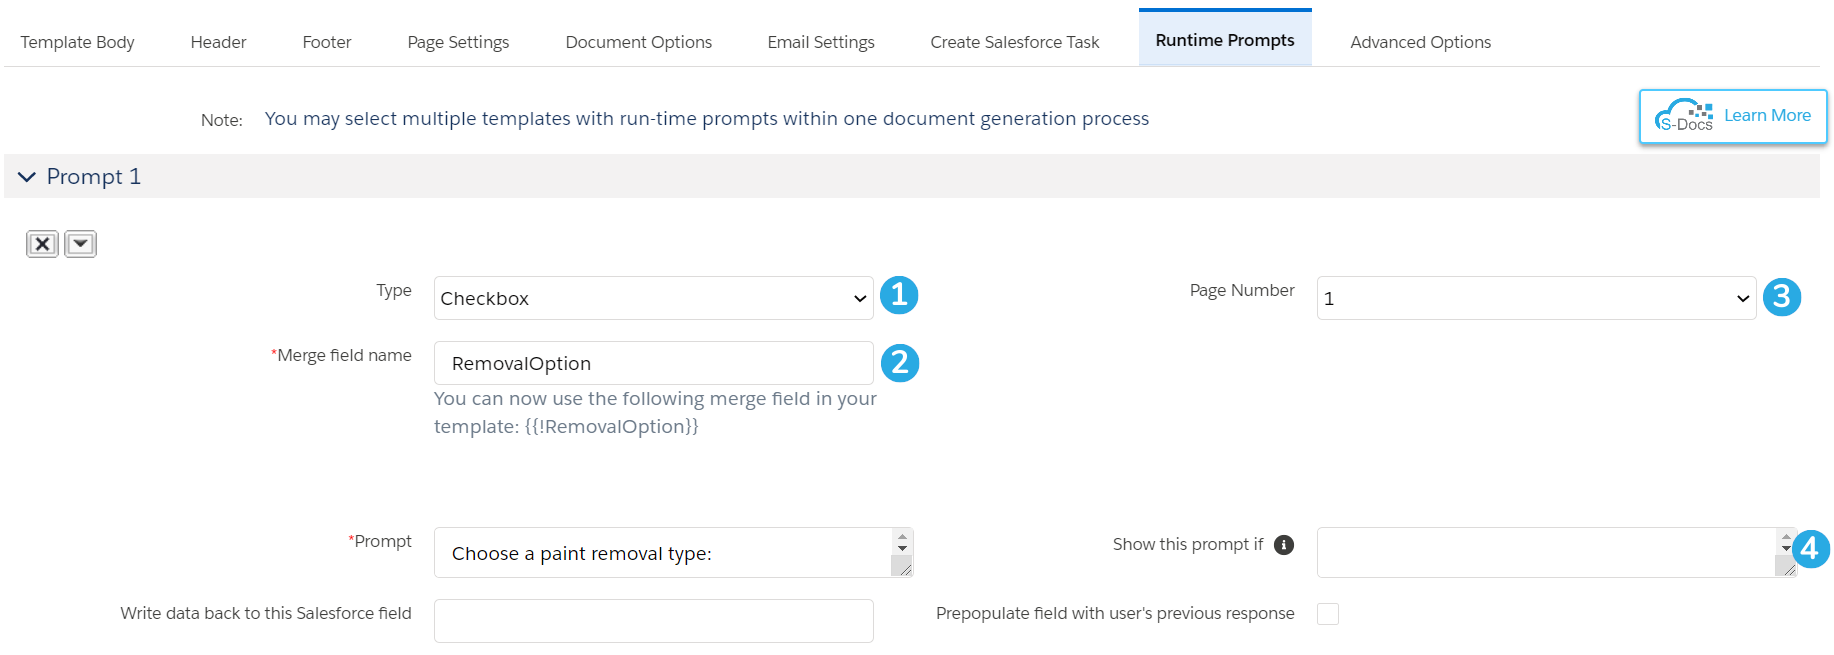
The two initial options are lead paint removal and basic paint removal. For these, Alex [1] creates a simple checkbox prompt. [2] He names the merge field "RemovalOption," and [3] chooses to have it appear on page 1 of the Prompts, since it is the first question that needs to be asked. He [4] leaves the Show this prompt if field blank, since his representatives should always see this question when they generate follow-up letters.

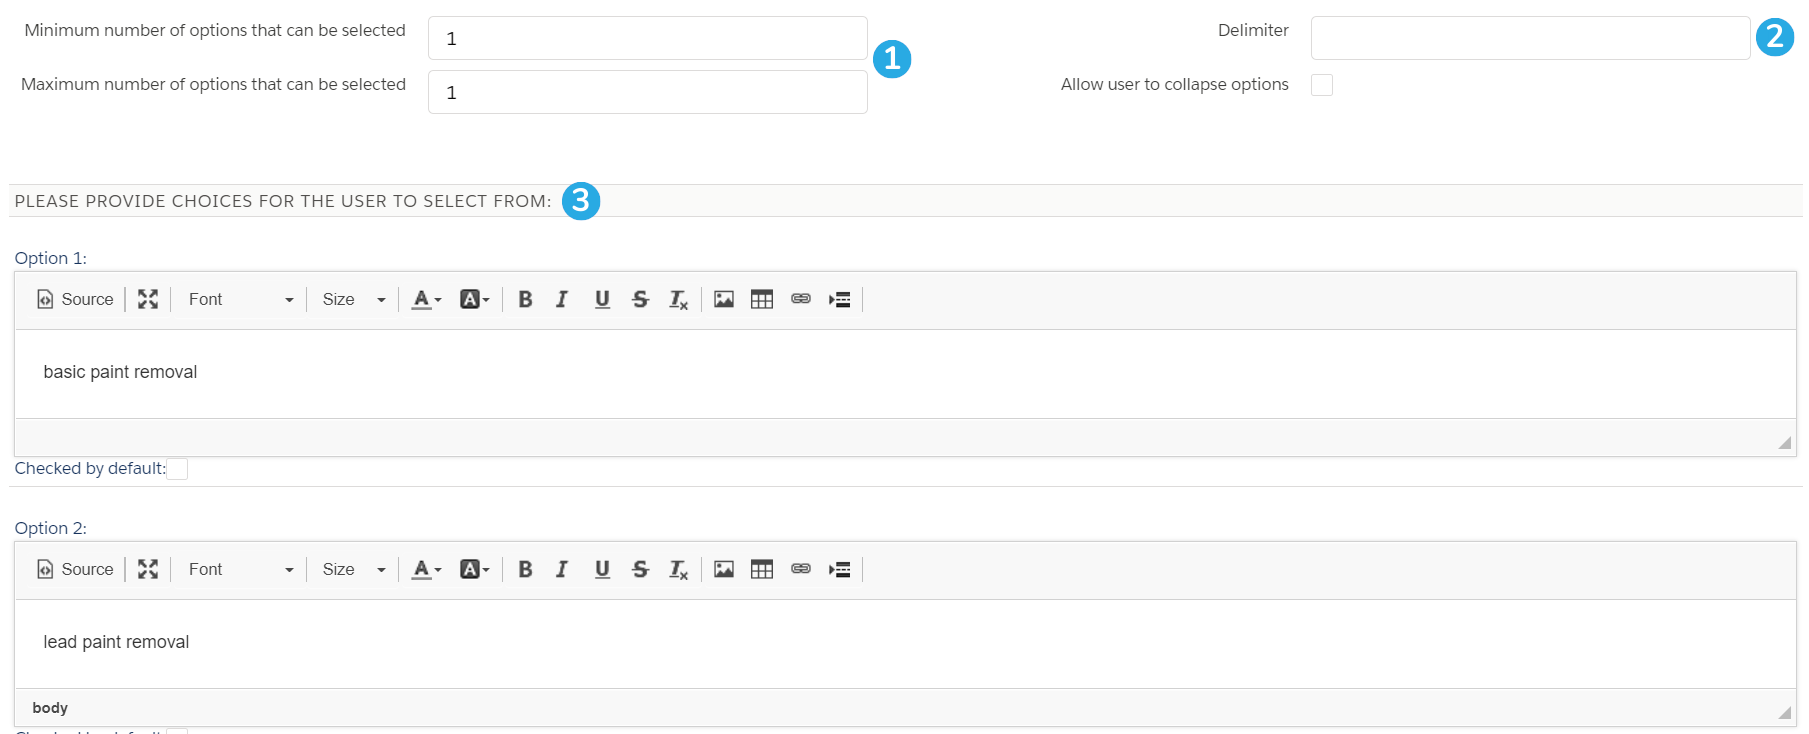
Since only 1 option is allowed to be checked, Alex [1] inputs "1" for both the minimum and maximum number of options that can be selected, and [2] leaves the delimiter field blank. He then [3] adds the two choices in as Options.

He now needs to provide his representatives with a list of basic and lead paint removal services to choose from. He only wants his representatives seeing basic removal options if they chose basic paint removal, and lead removal options if they chose lead paint removal.

He starts with the prompt for basic paint removal. He [1] chooses a Checkbox prompt, [2] names the merge field "BasicCharges," and [3] opts to have it appear on page 2, since it's a conditional prompt. In the Show this prompt if field, he [4] denotes that the Prompt should only appear if the representative chose "basic paint removal," using the syntax {{!removaloption}} == 'basic paint removal.'

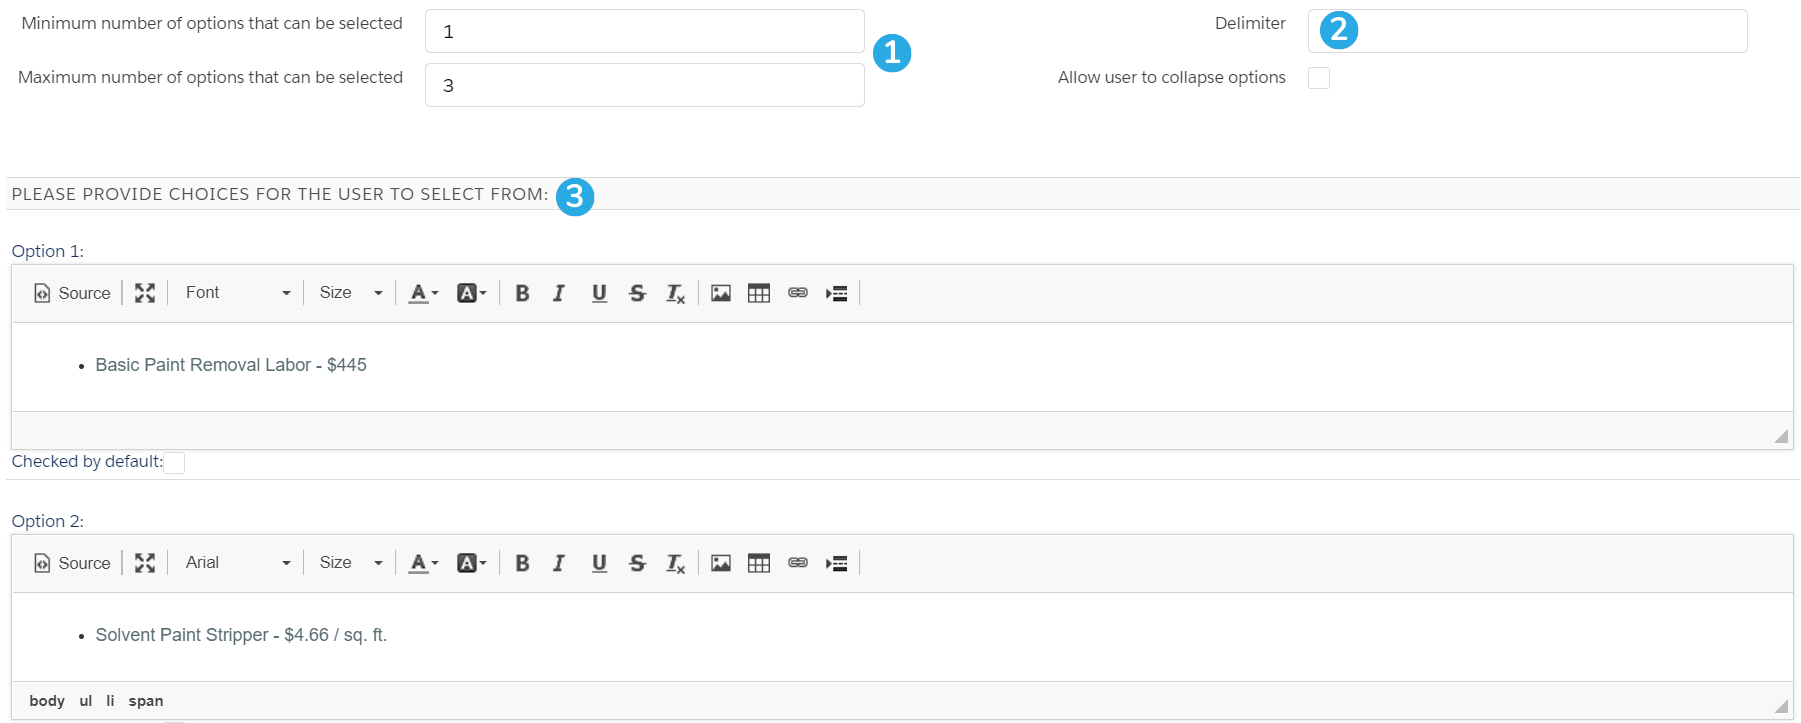
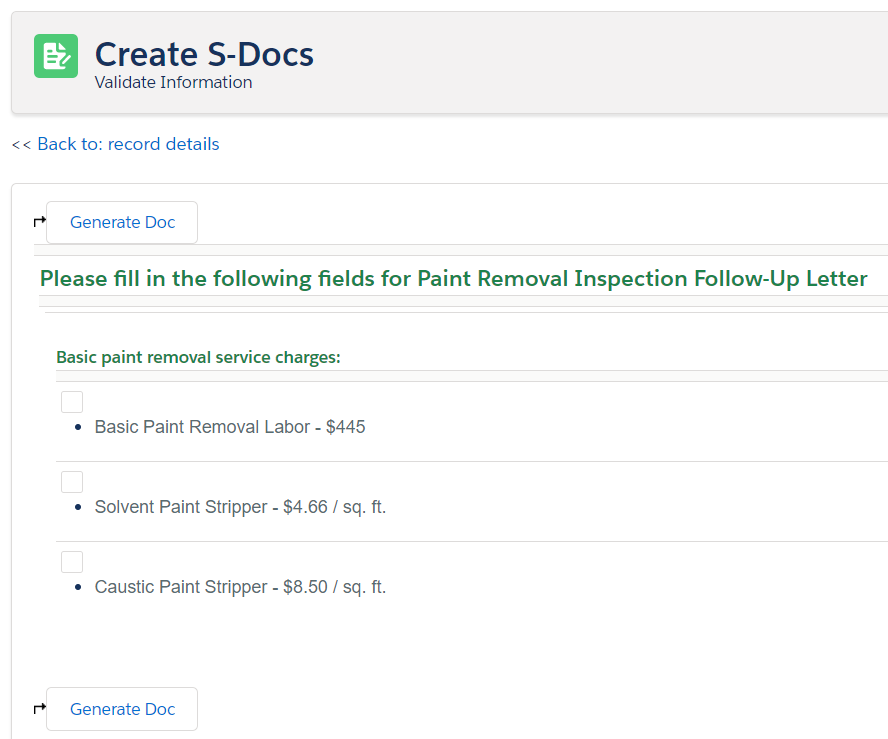
He then adds the basic removal options. Alex [1] requires at least one option to be chosen, but accepts a maximum of three choices, since a few different service charges might apply for this option. He [2] doesn't specify a delimiter because he has edited the source of his Options so they appear as bullets. He then [3] adds the three basic paint removal service charges.

He repeats this process for the lead removal options and the other conditional prompts he requires. This is the gist of Runtime Prompt Trees: they can be as basic or complex as you want!

Adding The Prompt Merge Fields Into The Document

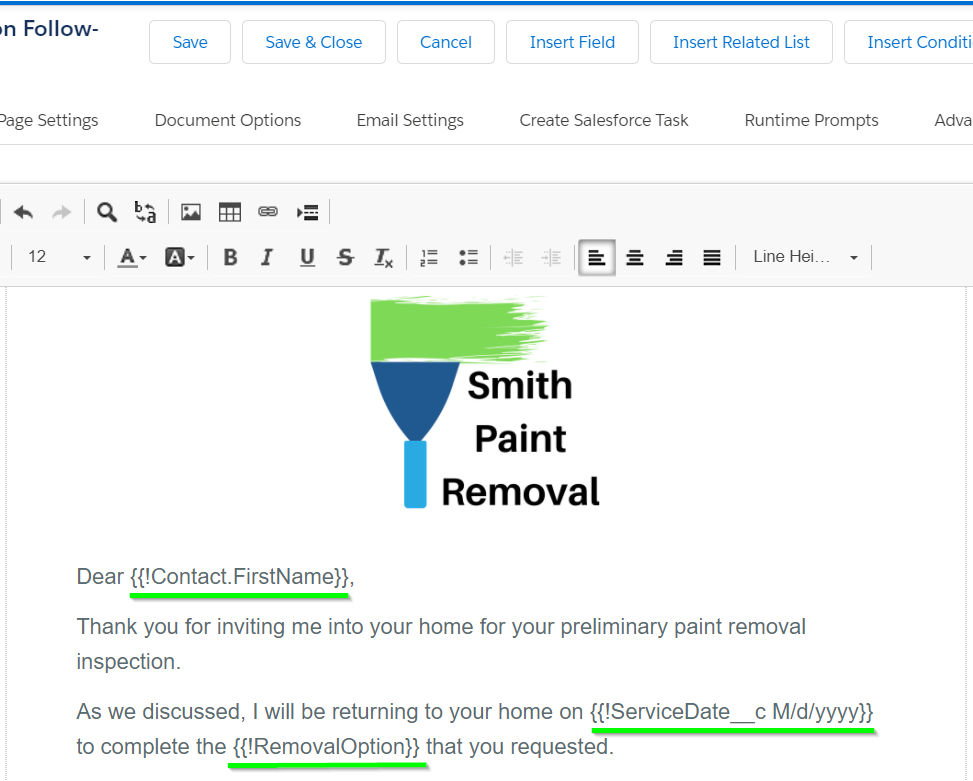
Once Alex finishes creating his Runtime Prompts, he needs to add his custom merge fields to the followup letter template. He begins by adding in the merge fields that will always appear in the document: the client's name, the date of the representative's return, and the paint removal type.


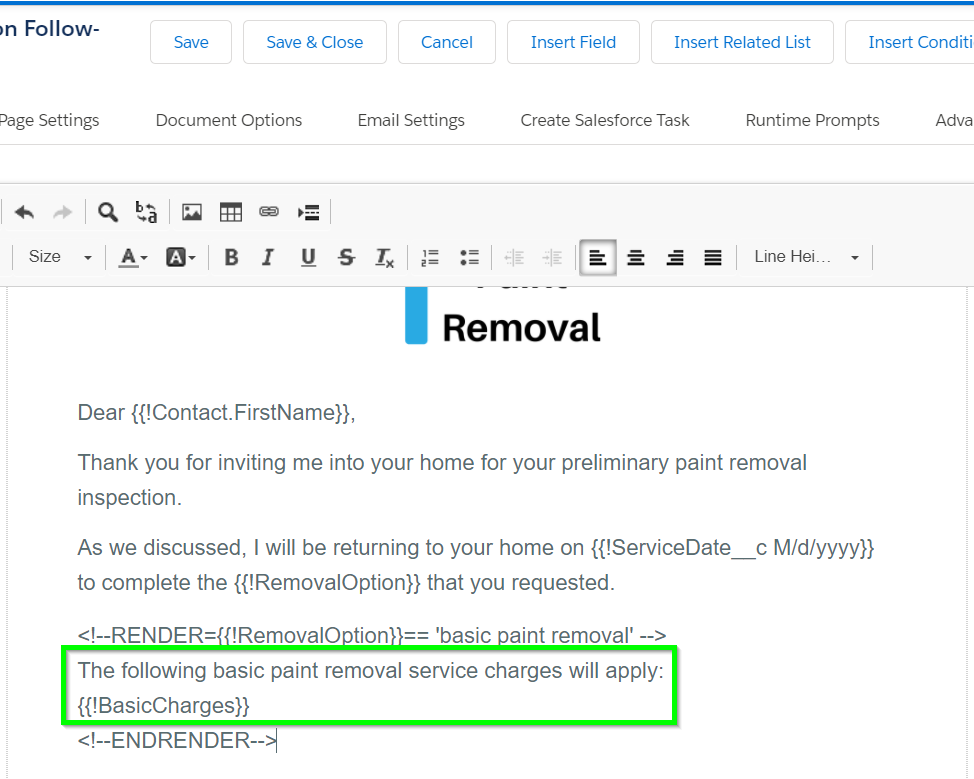
After this introduction, he wants certain sections of the document to conditionally appear/disappear based on responses to his Runtime Prompts, so he opts to use the Conditional Logic feature. He first inserts a conditional statement for basic paint removal. The portion outlined in green is what will appear in the document if "basic paint removal" is chosen by his representatives.

He uses a nested conditional statement for lead removal options, since one of the options (enclosure) has further options to choose from, and he only wants these further options shown if both "lead paint removal" is chosen and "enclosure" is picked as the type. The portions outlined in green are what will appear if "lead paint removal" is chosen by his representatives, and the portion outlined in orange is what will appear if "enclosure" is chosen as the removal type.

What The End User Sees

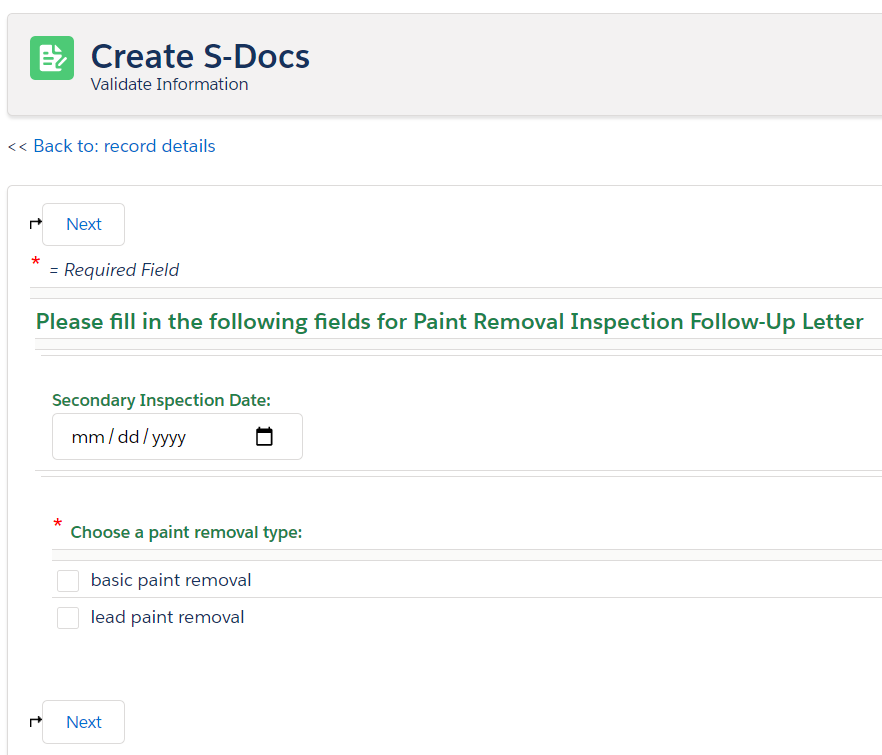
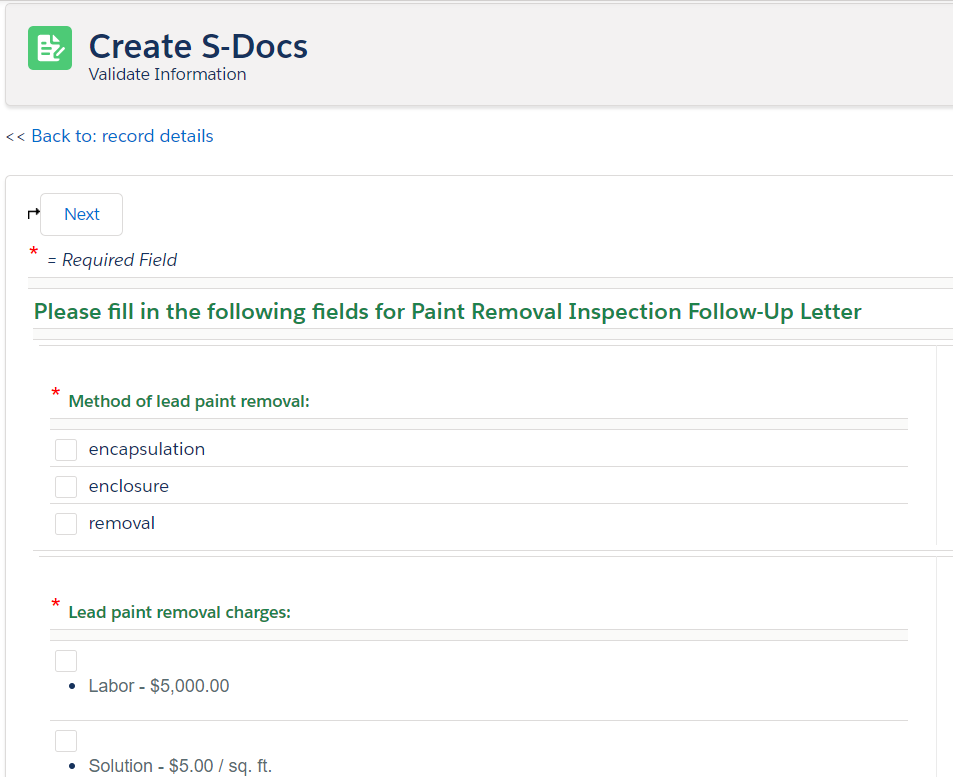
Now that Alex has added in all of his merge fields, let's see what his representatives will see each time they generate the follow-up letter. On the first page, they will simply be prompted to enter the date of their return and the type of paint removal that the client needs.

If they choose "basic paint removal," they will be prompted with the appropriate options.

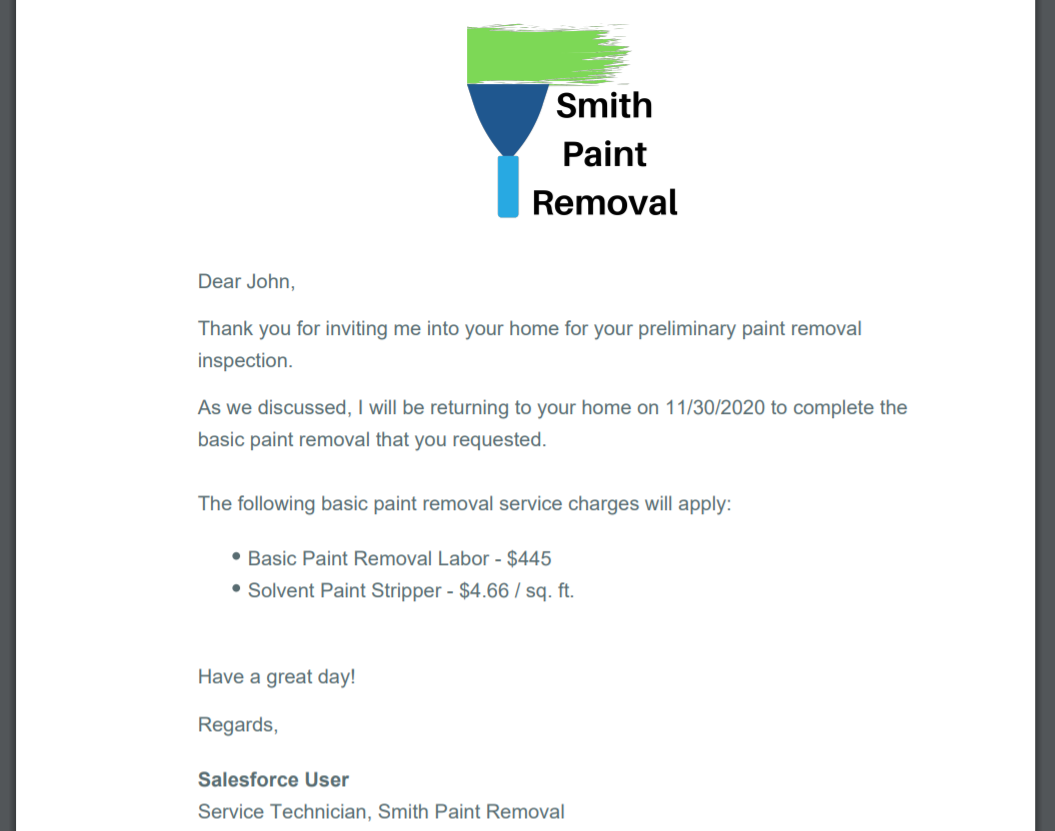
Since there are no more options that go with basic paint removal, the representative can click Generate Doc to generate the follow-up letter with their choices incorporated.

Let's go back to before the document was generated. If Alex's representatives choose lead paint removal instead, they will be prompted with the lead options.

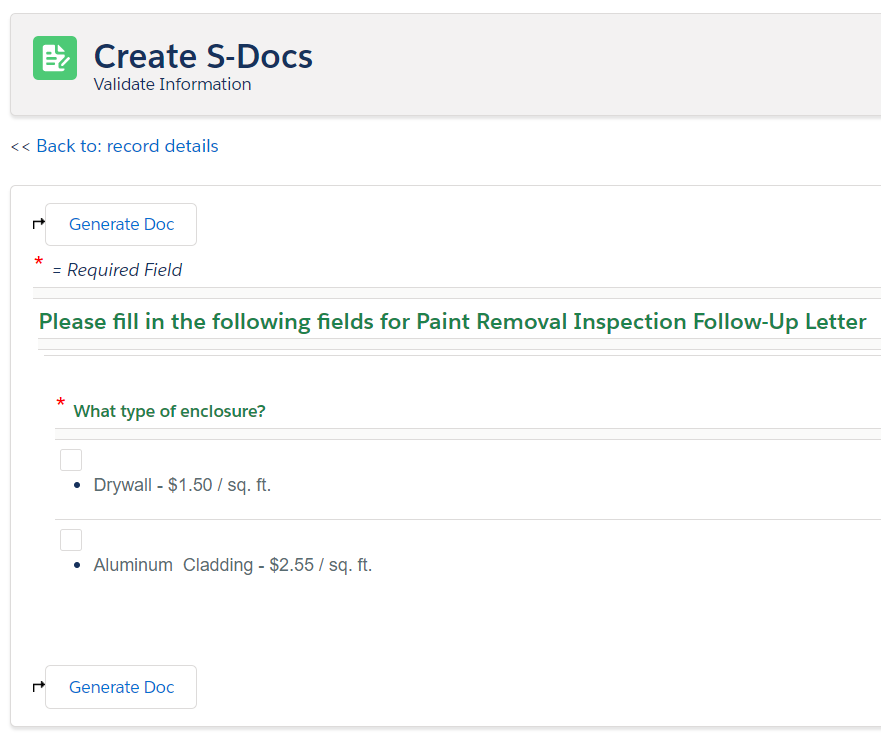
Finally, if they choose enclosure as the method of lead paint removal, they will be prompted with the further options that are available, on a separate page.

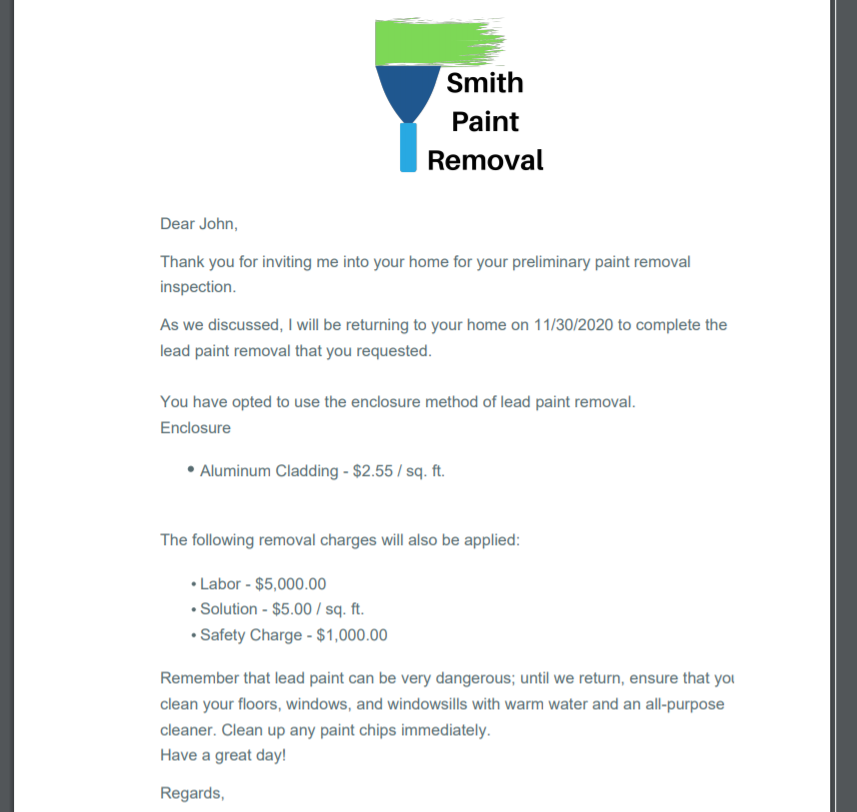
The final document will render only the lead paint removal sections.

That's it! We designed Runtime Prompts to be as simple as possible while providing enough flexibility so that you can integrate them with other features in order to achieve pretty much any result imaginable when form input is required prior to document generation. If you want to download and play around with a template already set up with Runtime Prompts, you can get this Boiler Inspection Follow-Up Letter from our Template Library. This is one of many examples of how we can use form data to build a living, breathing document.

S-Docs at Salesforce Basecamp in Detroit

By Press Release No Comments

Tuesday, July 23, 2019

Last Tuesday, team members from our Ann Arbor Innovation Center headed down to the Westin Book Cadillac Hotel in Detroit to attend Salesforce Basecamp. We joined hundreds of other local businesses in pursuit of Salesforce knowledge, making connections, and, of course, free food. We’re always looking out for the latest & greatest in Salesforce features and functionality, and we also like to keep an eye out for ways we can get involved in our local communities. This event was a perfect opportunity for both!

The 360 Customer View

The conference focused on how companies are using Salesforce Customer 360, a cross-cloud platform that integrates data from the Marketing, Sales, Commerce, and Service Clouds to achieve a comprehensive, 360-degree view of their customers so they can provide the personalized service customers demand. There was also a feature presentation on how Salesforce Blockchain can help businesses extend trust and transparency in every customer interaction.

Efficiency Through Artificial Intelligence

Increasing efficiency throughout the sales cycle with Artificial Intelligence was another key topic. Salesforce showcased Einstein Voice, a voice-to-text assistant that allows users to send emails, create reminders, and even update Salesforce records on the go. We saw some other cool things Einstein can do as well, such as making predictions and recommendations about the next best action to take in the sales cycle. Of course, all of these features can be accessed from the Salesforce mobile app, meaning that work can be done in the field just as fast as it can be done in the office.

Keeping Customers First

In essence, Salesforce Basecamp Detroit was about how businesses can leverage Salesforce functionality to build a more customer-oriented approach across all departments, keeping their customers happy through consistency. This really struck a chord with us here at S-Docs. Our native solutions aren’t just e-signature and document generation applications; they’re tools that make your customers happier by delivering a smooth, consistent, and personal experience, allowing you to spend more time providing them with the service they love. Whether it’s through custom email templates that dynamically insert your customers’ names or the ability to generate and send an invoice simply by updating a record on your phone, we believe that by leveraging S-Docs and Salesforce together, your business can do great things.

Get to Know Us!

It was great getting out and meeting people from other local businesses this week. We heard a lot about how they’re using Salesforce to improve efficiency and keep their customers happy. Want to chat with us? We’ll be at Midwest Dreamin’ in Chicago August 7-9th and Dreamforce 2019 in San Francisco this November! Make sure to stop by and say hello. You can also leave us a message on our website, or contact sales@sdocs.com.

Headquarters
521 Fifth Ave
New York City, NY 10175

800-519-DOCS
       
easy button

Searching for an Easy Document Generator for Salesforce? We’ve Got You.

By Blog No Comments
easy button

When was the last time you started looking for something you thought would be a simple, but wound up spending hours scouring the internet for the answer? The rabbit hole can suck you in quickly, especially when you know there has to be a way yet you can’t seem to find the answer. We’ve all been there.

Whether you’re new to Salesforce or have been using it for years, there’s no shortage of tips and tricks to help you navigate your way around the popular CRM. But despite Salesforce’s ease of use, questions are bound to come up that stump people and cause them to go looking for answers. One of those questions you may have asked and we get asked about all the time  - is there an easy way to generate documents within Salesforce?

The short answer is not exactly.

The Limits of Salesforce

When Salesforce was built, their main focus was on creating a high-performing CRM, which they have executed very well. The ability to create documents in Salesforce was not their main priority and the functionality to date is very limited. Users can generate documents such as emails, quotes, and export Excel files but those are very limited. That leaves Salesforce users two places to look: free apps and paid apps.

Free Apps are Great, but Limited

Because Salesforce lacks the functionality to generate robust, customized documents for users, a few companies built solutions to alleviate the burden of easily extracting Salesforce data into a nice looking document. Free apps for creating documents in Salesforce enable users more customization than Salesforce’s out-of-box functionality. With free tools, users can often add images, headers and predetermined clauses, like Terms & Conditions, to their documents. The drawbacks? Free apps lack many of the customization features, dynamic functionalities and integrations users are often searching for when looking for an easy way to create documents from Salesforce.

You Might Also Like: How To Choose The Best Apps On The AppExchange

Why Paid Apps are the Holy Grail

Paid apps are hands down the most reliable and easiest way to generate documents from Salesforce. With an unmatched level of features, plenty of pre-built templates plus 24/7 live support, paid apps are the way to go. When users pay for an app, they unlock sophistication in their document generation process. This might include the ability to incorporate related lists, SOQL queries, conditional logic and other advanced rules. What’s more, paid apps easily integrate with third party software such as Google Drive, which speeds up internal communication and overall team efficiency.

In the end, you don’t need to scour the web looking for an easy document generator for Salesforce. A paid document creation app is worth the investment and allows users to generate sleek looking documents at the click of a button. Looking to narrow down your search even further? Try a native app. S-Docs is the only 100% native document generation solution for Salesforce, which means your data never leaves Salesforce, making your documents more secure and teams more efficient.

See S-Docs In Action

Leave your Salesforce document workflow worries behind.

Request Demo

Enjoying our blog?

Subscribe now and we'll make sure to send you the latest as we publish new content!

Connect With Us!

For Salesforce news, digital document & e-signature insights, or just for fun.


Read More

Blog
June 12, 2024

Optimizing Sales Ops KPIs with Effective Reporting and Document Automation

Optimizing Sales Ops KPIs with Effective Reporting and Document Automation You don't have to micromanage your sales executives to optimize sales operations. Instead, you’ll have more success by establishing sales…
Blog
June 5, 2024

Are You Ready for a Document Automation Tool?

The Need for Efficiency in Today’s Businesses Business efficiency is crucial. Imagine running a marathon while juggling — sounds chaotic, right? That’s what managing documents without automation can feel like.…
Blog
May 29, 2024

Understanding and Advancing Organization Maturity Levels in Your Business

Understanding and Advancing Organization Maturity Levels in Your Business An organizational maturity assessment identifies where your company stands within the stages of a chosen maturity model framework so you can…
Top