In This Article:
- Introduction
- Video Tutorial
- Step 1: Create Remote Site Settings
- Step 2: Create a Self-Signed Certificate
- Step 3: Create A New Connected App
- Step 4: Create A New Custom Setting Entries
- Step 5: Configure Your Salesforce Process, Apex Trigger, or Flow
- My Self-Signed Certificate Is Expiring Soon!
- Troubleshooting
Introduction
This document is intended as an additional reference for allowing S-Docs Jobs to be run as a specified user. Click here for the complete guide to automating S-Docs with S-Docs Jobs.
Running S-Docs Jobs as any user is simple; getting Salesforce to allow this, however, is a bit more work. This document discusses how you can get Salesforce to allow you to run S-Docs Jobs as another user and configure Process Builder to run as another user. This setup uses JWT Bearer assertion flow to run as any user without preauthorization. The steps include adding remote site settings, creating a connected app, and linking the app details to S-Docs via a custom settings entry.
Video Tutorial
Step 1: Create Remote Site Settings
From the setup menu, type "Remote Site Settings" into the Quick Find bar, then click Remote Site Settings in the dropdown menu.
- Click New Remote Site. For Remote Site Name, enter whatever you'd like. For Remote Site URL, enter:
- For production: https://login.salesforce.com
- For sandbox: https://test.salesforce.com
Ensure that the Active checkbox is checked, and click Save.
- Click New Remote Site again. For Remote Site Name, enter whatever you'd like. For Remote Site URL, enter your Salesforce domain URL.
Note: In Classic, you can copy your domain from your address bar, e.g. https://na1.salesforce.com or https://cs2.salesforce.com. In the URL, note that the number after na or cs will vary.
In Lightning, you can copy your domain by clicking your user profile in the upper right corner, and copying it from under your username. Note that you need to add "https://" at the beginning.
Ensure that the Active checkbox is checked, and click Save.
- If you are using S-Docs with Communities with a custom domain, you should add a new remote site for your custom domain as well.
Step 2: Create a Self-Signed Certificate
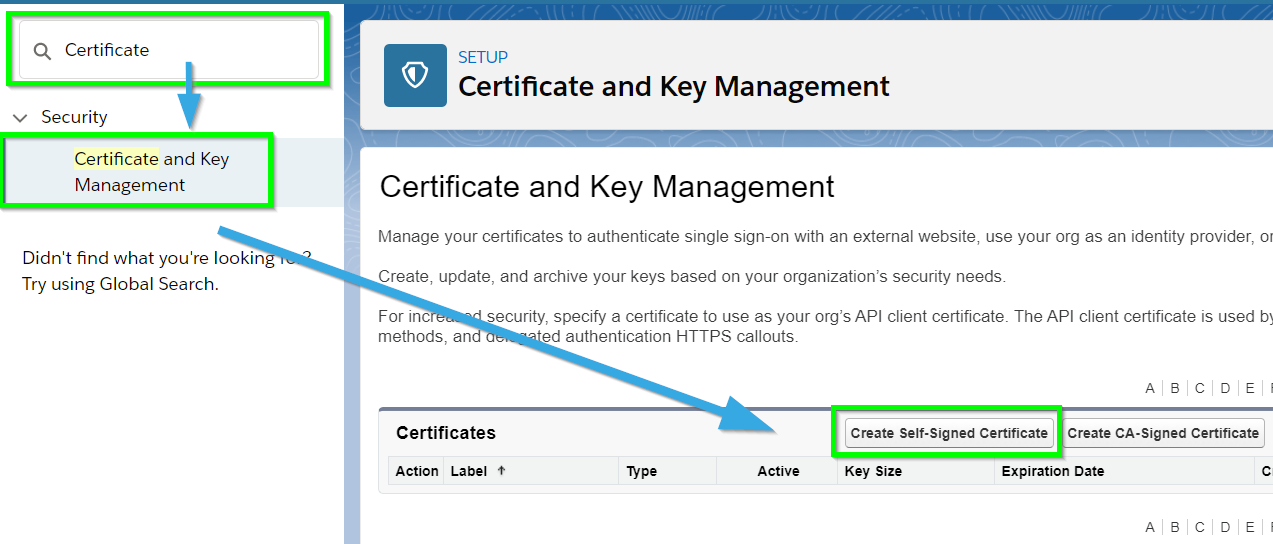
From the setup menu, type "Certificate" into the Quick Find bar, then click Certificate and Key Management in the dropdown menu. Click Create Self-Signed Certificate.
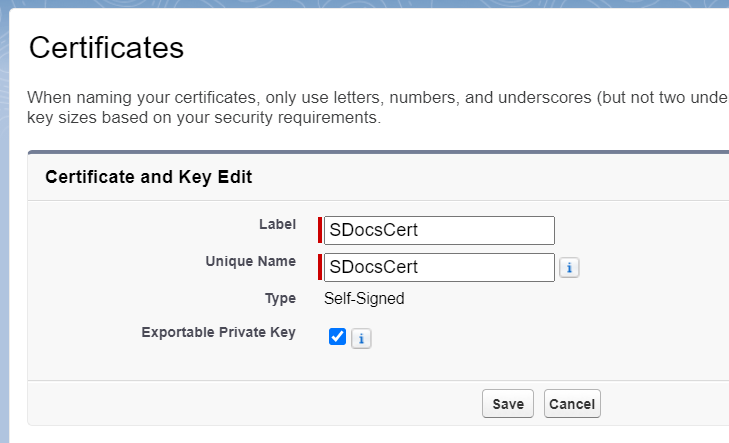
Name your certificate SDocsCert. Click Save.
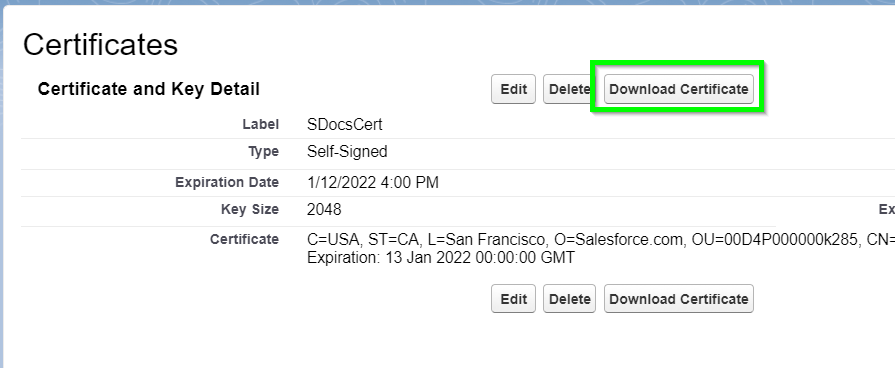
Click Download Certificate, and keep track of where the file is stored. We will use this in the next step.
Step 3: Create A New Connected App
Navigating to the Connected App creation page is a bit different in Classic and Lightning. In Lightning, type "App Manager" into the Quick Find bar in the setup menu, then click App Manager in the dropdown menu. Click New Connected App in the top right.

In Classic, type "Apps" into the Quick Find bar in the setup menu, then click Apps in the dropdown menu (under Build > Create). Scroll down to the Connected Apps section and click New.

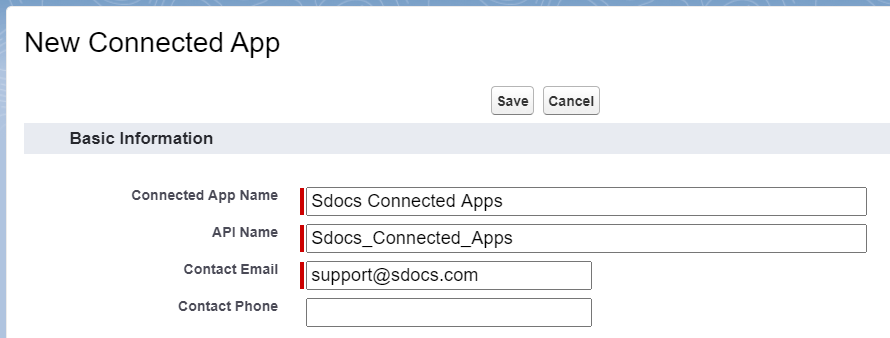
In the Basic Information section, fill in the following fields:
Connected App Name: Sdocs Connected Apps
API Name: Sdocs_Connected_Apps
Contact Email: support@sdocs.com
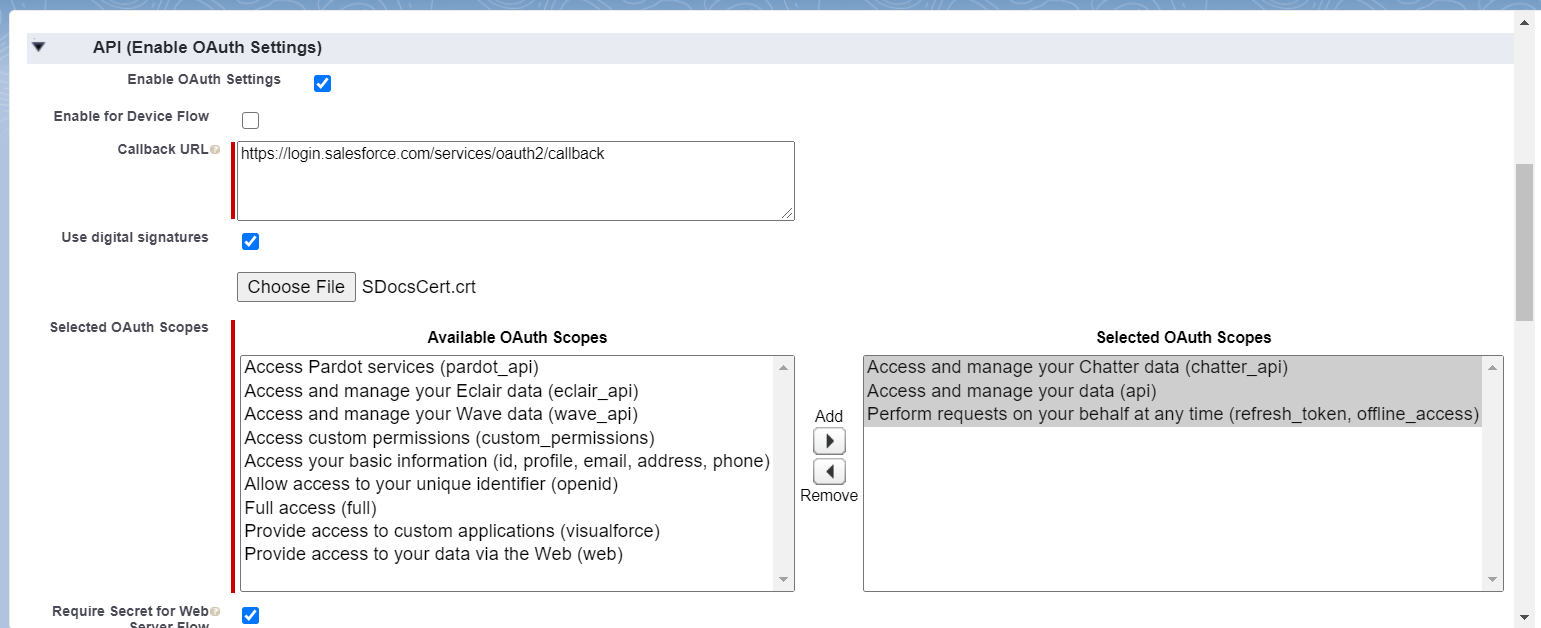
Scroll down to the API (Enable OAuth Settings) section and check Enable OAuth Settings. Then, enter one of the following URLs into the Callback URL field, depending on if you're working in a sandbox or production environment:
Production: https://login.salesforce.com/services/oauth2/callback
Sandbox: https://test.salesforce.com/services/oauth2/callback
Next, check the Use Digital Signatures checkbox and upload the self-signed certificate that you downloaded in step 2.
Then, scroll down to the Selected OAuth Scopes field. Add the following scopes to your selected scopes:
- Perform requests on your behalf at any time
- Access and manage your data
- Access and manage your Chatter data
This section should look similar to the following image when you are finished:
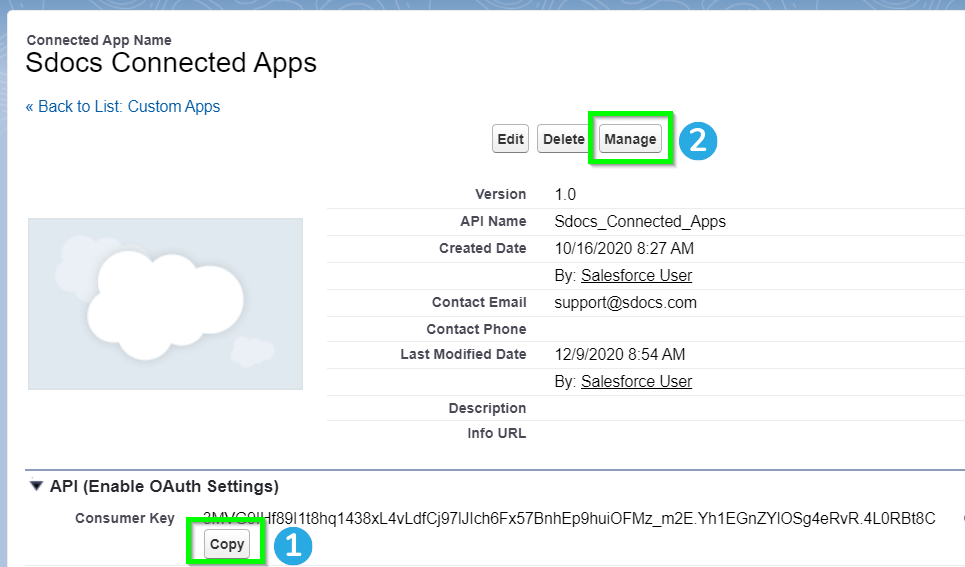
Leave the rest of the fields at their default settings, and click Save. You will be redirected to the Connected App detail page. Scroll down to the API (Enable OAuth Settings) section and click Copy next to the Consumer Key field. Paste this somewhere you can access later. You will use this key in Step 4. Then, click Manage at the top of the page.
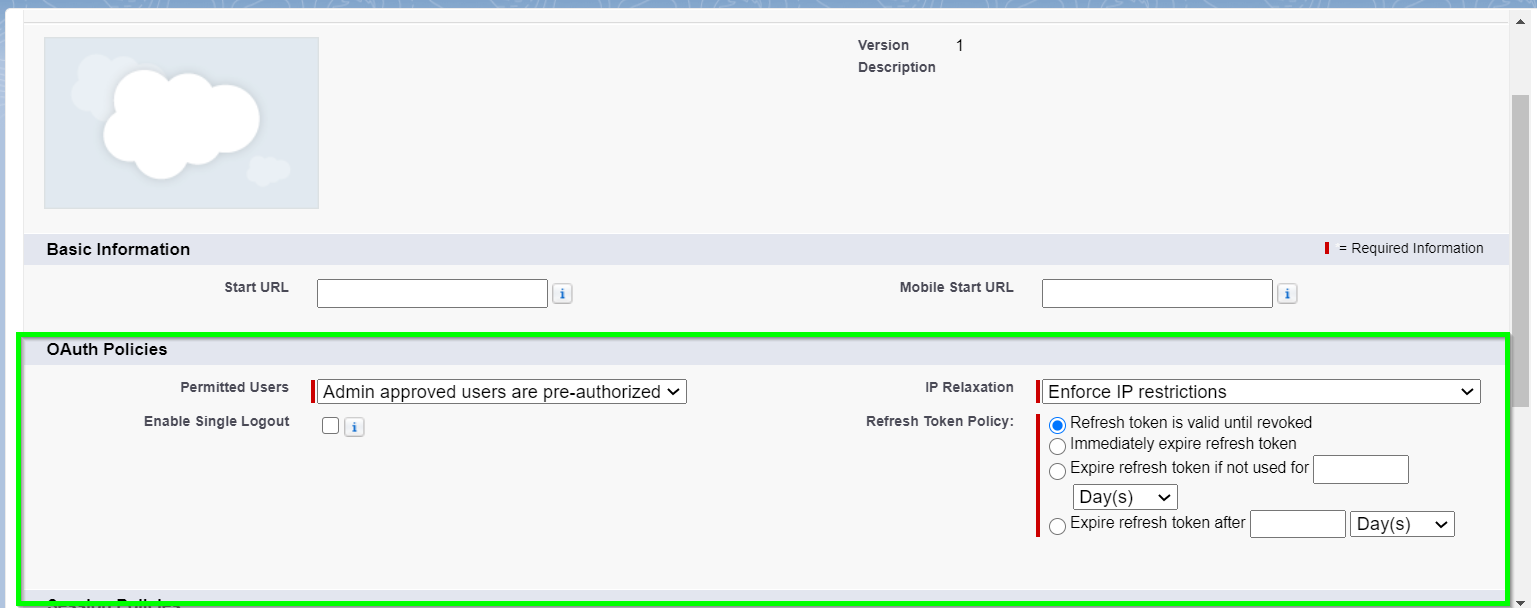
On the next page, click Edit Policies.

Scroll down to the OAuth Policies section. Set the Permitted Users field to Admin approved users are pre-authorized. Set the IP Relaxation field in accordance with your organization's policies. Keep the Refresh Token Policy set to Refresh token is valid until revoked. Then, click Save.
Next, scroll down to the Profiles section and click Manage Profiles.
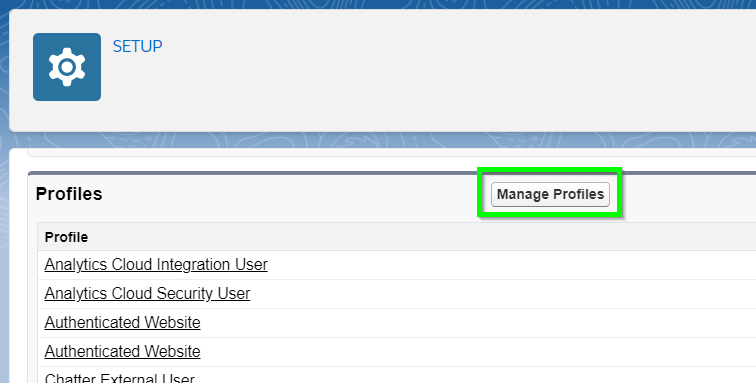
Add all user profiles that will generate documents, or be used as the "Run As" user. Click Save.
Step 4: Create A New Custom Setting Entry
From the setup menu, type "Custom Settings" into the Quick Find bar, then click Custom Settings in the dropdown menu. Find SDocsSettings and click Manage.
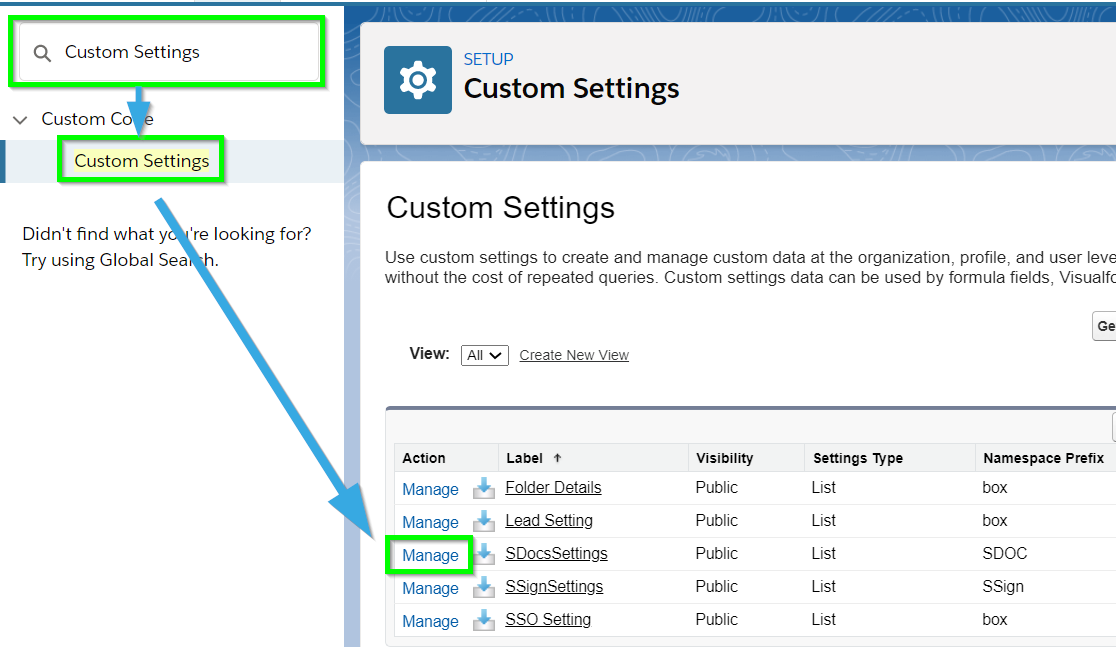
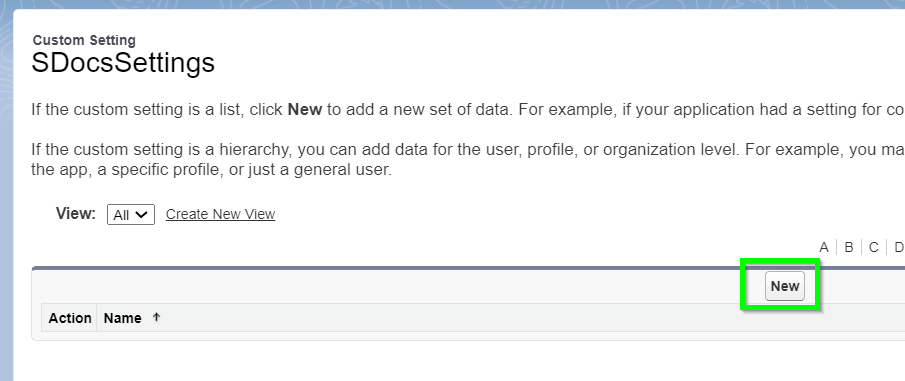
If you've created an S-DocsSettings entry in the past, you can click the Edit link next to its name to edit it now. Otherwise, click New to create a new SDocsSettings entry.
Fill in the following values:
Name: SDocsSettings
ConnectedAppCertificateName: SDocsCert
ConnectedAppConsumerKey: Paste the consumer key that you copied in step 3
ConnectedAppLoginURL:
[Production]: https://login.salesforce.com
[Sandbox]: https://test.salesforce.com
ConnectedAppTokenURL: Paste your Salesforce domain URL. If you're not sure how to find it, refer to Step 1
ConnectedAppUserName: If you are configuring S-Sign e-signatures, enter a username to be used as the S-Sign Internal User (we recommend using an administrator's user name). The S-Sign Internal User will be the user which all S-Sign operations will be conducted by through the secure S-Docs Connected App.
ConnectedAppAudienceURL:
[Production]: https://login.salesforce.com
[Sandbox]: https://test.salesforce.com
Your SDocsSettings entry should look similar to the following:
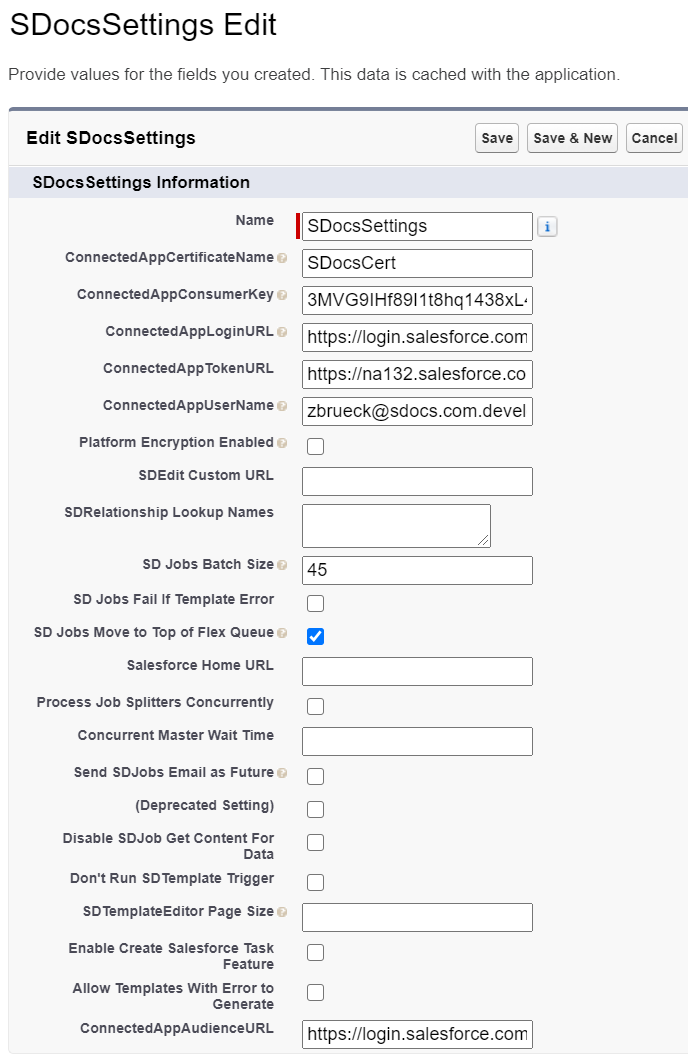
Click Save.
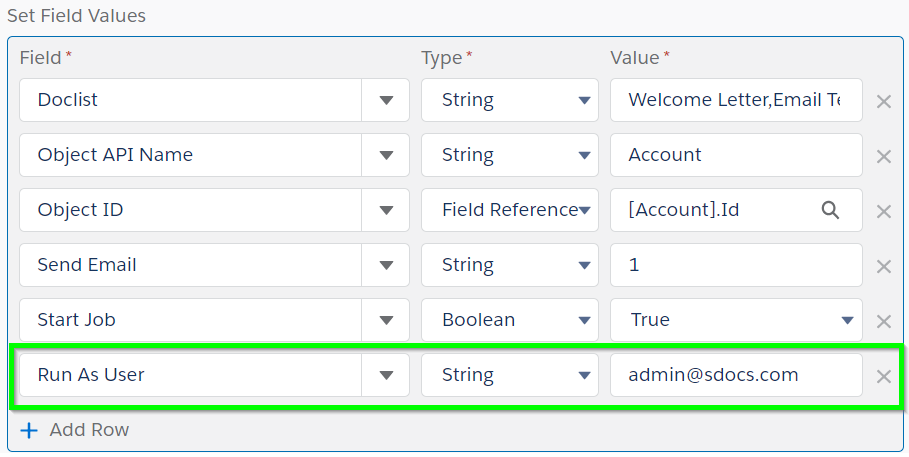
Step 5: Configure Your Salesforce Process, Apex Trigger, or Flow
The last step is to configure your Process, Apex trigger, or flow to populate the Run As User field on the S-Doc Job object . Please refer to the "Fields For Our Use Case" section in this article to learn more about S-Doc Job fields.
For example, if you were automating your document generation process with Process builder, you would need to add the Run As User field, set the Type to string, and enter the username of the user to be used as the running user. This is displayed in the following image:
For more information on automation and S-Docs jobs, please refer to our automation guides for Salesforce Lightning or Salesforce Classic.
Upon completion, you should be able to invoke the call using any username. To verify the process, you can go to:
Setup > Administrations Setup > Monitoring > Apex Jobs.
If you require additional error handling, this should be done within your own code base.
My Self-Signed Certificate is Expiring Soon!
Several months after setting this up, you may get an email from Salesforce informing you that your self-signed certificate expired. If that is the case, you can follow the steps below to renew your certificate. We recommend doing this after hours.
1. From the setup menu, type "Certificate" into the Quick Find bar and click Certificate and Key Management in the dropdown menu.
2. Click Delete for SDocsCert.
3. Click Create Self-Signed Certificate.
4. Set Label to SDocsCert.
5. Set Unique Name to SDocsCert.
6. Click Save.
7. Click Download Certificate.
The next steps are different in Salesforce Classic and Salesforce Lightning.
For Classic:
1. From the setup menu, type "Apps" into the Quick Find bar, then click Apps (under Build > Create).
2. Scroll down to the Connected Apps section, find "Sdocs Connected Apps," and click the Edit link next to it.
3. Scroll down to Use digital signatures.
4. Click Choose File and select the previously downloaded certificate.
5. Click Save.
6 It may take several minutes for the new certificate to take affect.
7. Confirm that everything is working (test SDJobs with Mass Merge).
For Lightning:
1. From the setup menu, type "App Manager" into the Quick Find bar, then click App Manager in the dropdown menu.
2. Find the "Sdocs Connected Apps" connected app. Click the dropdown arrow on the right, and click View.
9. Click Edit at the top of the page.
11. Scroll down to Use digital signatures.
12. Click Choose File and select the previously downloaded certificate.
13. Click Save.
14. It may take several minutes for the new certificate to take affect.
15. Confirm that everything is working (test SDJobs with Mass Merge).
Troubleshooting
If you performed this setup but your S-Docs Jobs are stuck at Error - Run As User Failed, or 10%, please try the following:
- Navigate to Setup > Custom Settings > SDocsSettings > Manage > SDocsSettings > Edit, and set ConnectedAppTokenUrl to the URL domain seen in your browser's URL bar when you're on the "home" page in Classic. Additionally, set the ConnectedAppLoginURL to one of the following:
- Production: https://login.salesforce.com
- Sandbox: https://test.salesforce.com
- Navigate to Setup > Connected Apps > SDocs Connected Apps > Profiles, and verify that the profiles of the following users are added to the app's permitted profiles list:
- The user who inserted the job
- The 'Run As User'
- Go to Setup > Remote Site Settings and verify that there are entries for the appropriate Salesforce production/sandbox URL and the customer’s home URL (Salesforce Classic). Additionally, verify that these entries are active.
- Make sure the user's profile has the Apex REST Services permission checked.